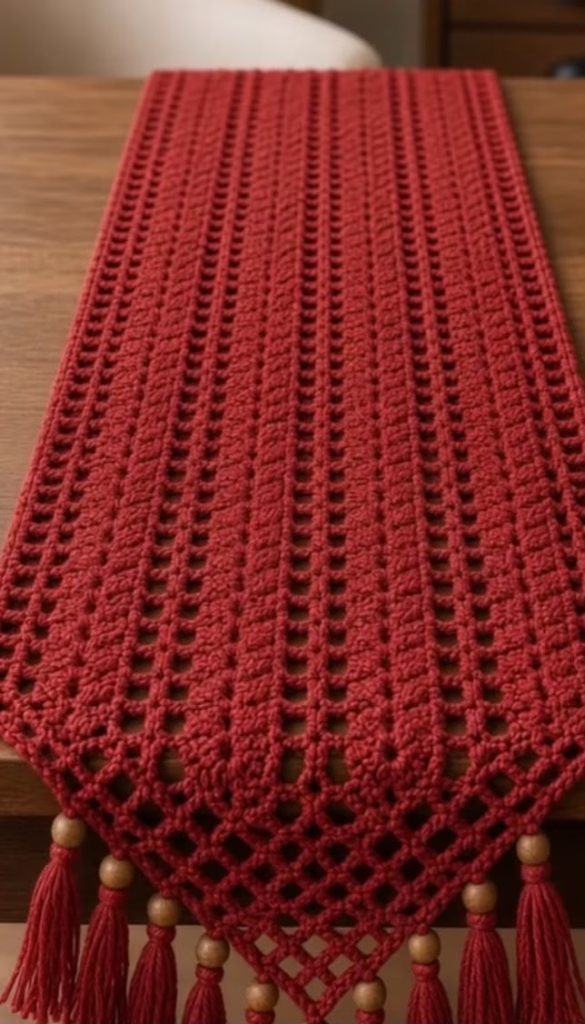
📖 B. INTRODUCTION This striking crochet table runner combines classic architectural lines with a beautifully draped fabric to create an unforgettable dining room centerpiece. Featuring a rich, deep red color palette, the design pairs long, solid vertical columns with open mesh chain spaces to create a geometric, eye-catching texture. The clean lines of the main rectangular body organically transition into a tapered, staggered triangular point at each end, giving the piece a polished, modern-rustic silhouette.
Whether you are dressing up a harvest table for a seasonal gathering, decorating your everyday living space, or searching for the perfect textured backdrop to shoot stunning flat-lays and vertical video content for your “Crochet Lovers” community, this versatile project delivers. The open-work filet crochet technique ensures the fabric works up quickly while remaining lightweight and elegant.
The true charm of this pattern lies in its finishing touches. The dramatically pointed ends are anchored by thick, luxurious yarn tassels, each accented with a natural large wooden bead. These rustic elements provide excellent weight and drape, ensuring the runner lays perfectly flat across your table. By swapping the deep crimson yarn for your favorite neutral, jewel tone, or brand color, you can easily personalize this runner to match any aesthetic.
🔍 C. MAIN PATTERN OVERVIEW This table runner is constructed in three seamless phases to create its distinct geometric silhouette. First, the main rectangular body is worked back-and-forth in long rows along the width of the runner. This section uses a repeated sequence of solid double-crochet blocks separated by chain spaces, establishing the long vertical stripes seen throughout the piece.
Once the main body reaches your desired length, the yarn is reattached at the short ends to create the triangular points. These points are formed using a simple, un-joined decrease technique where the blocks naturally step inward row by row, creating a stepped, lattice-like grid. Finally, handmade tassels are threaded with oversized wooden beads and securely tied to the steps and tips of the pointed ends, giving the runner its signature bohemian-rustic finish.
🎯 D. SKILL LEVEL
Skill Level: Easy / Confident Beginner
This pattern is accessible to beginners who are comfortable with basic stitch anatomy and maintaining even tension.
Techniques Involved:
- Chaining and skipping stitches to create open mesh.
- Working standard double crochets in rows.
- Slip stitching over existing stitches to create shaping and decreases.
- Basic measuring and symmetry checks.
- Crafting and attaching multi-strand tassels.
📏 E. FINISHED SIZE
Main Body Width: 13 inches (33 cm).
Total Length (Point to Point): 72 inches (183 cm), excluding tassels.
Tassel Length: Approximately 5 inches (12.5 cm) each.
Note: The width is easily customized by adding or subtracting foundation chains in multiples of 5. The length can be modified by working more or fewer rows in the main body before adding the pointed ends.
🧮 F. GAUGE Gauge: 3 solid blocks (9 dc) and 3 ch-2 spaces = 4 inches (10 cm) wide; 8 rows = 4 inches (10 cm) tall. While exact gauge is not strictly critical for a table runner, maintaining a consistent, even tension ensures the open mesh spaces remain crisp and rectangular rather than warped. If your runner is curling excessively, try sizing up your crochet hook.
🧶 G. REQUIRED YARN AMOUNTS Yarn Weight: Category 4 Worsted Weight or Category 3 DK Weight (Cotton is highly recommended for table linens due to its weight, heat resistance, and crisp stitch definition). Color: Deep Brick Red / Crimson.
- Main Body & Points: Approximately 750 yards (685 meters).
- Tassels: Approximately 100 yards (91 meters).
- Total Project Estimate: 850 yards (776 meters).
Tip: If you are altering the length or adding extra width, ensure you purchase an additional skein from the same dye lot.
🧰 H. MATERIALS
- Hook: 4.5 mm (US 7) crochet hook (or size needed to obtain a drape you prefer).
- Yarn: 5 skeins of a standard 100% mercerized or matte kitchen cotton (approx. 170 yds per skein).
- Beads: 11 to 15 large, round wooden beads with pre-drilled holes wide enough to accommodate several strands of yarn.
- Tools: Yarn/tapestry needle, sharp fabric scissors, measuring tape.
- Tassel Maker: A piece of heavy cardboard cut to 5 inches (12.5 cm) wide, or a commercial tassel maker.
🔤 I. ABBREVIATIONS – US TERMS
- ch: chain
- ch-sp(s): chain space(s)
- dc: double crochet
- rep: repeat
- sk: skip
- sl st: slip stitch
- st(s): stitch(es)
📝 J. NOTES BEFORE YOU BEGIN
- Turning Chains: The starting chain-3 at the beginning of a row always counts as your first double crochet (dc) stitch.
- Working into the Chain: For the foundation row, it is recommended to work into the back bump of the chain. This provides a cleaner edge when you attach the final tassels.
- Stitch Placement: When the pattern instructs you to “sk 2 ch” or work into a “ch-sp,” ensure you are working entirely around the chain space itself, not piercing the individual chain loops. This creates the clean, wide eyelets.
- Symmetry Check: The rectangular body should begin with a solid block of 3 dc and end with a solid block of 3 dc to keep the edges symmetrical.
🪡 K. COMPLETE PATTERN
🟥 Part 1: The Main Rectangular Body
This section establishes the vertical solid lines and the open mesh spaces.
Foundation: Ch 58. (To customize width, chain a multiple of 5, then add 3).
Row 1: Dc in the 4th ch from the hook. Dc in the next ch. (The skipped 3 chs count as the first dc. You now have a block of 3 dc). Ch 2, sk 2 ch, dc in the next 3 ch. Rep from * to the end of the foundation chain. Turn.
(Stitch Count: 12 solid blocks of 3-dc, separated by 11 ch-2 spaces).
Row 2: Ch 3 (counts as first dc). Dc in the next 2 sts. Ch 2, sk the ch-2 sp, dc in the next 3 dc. Rep from * across, ensuring the last dc is placed in the top of the turning chain from the previous row. Turn.
(Stitch Count: 12 solid blocks of 3-dc, separated by 11 ch-2 spaces).
Rows 3 to 120: Rep Row 2 until the rectangular body measures approximately 60 inches (152 cm) in length, or until you reach your desired table length minus 12 inches (to account for the two triangular points).
Fasten off and weave in the ends.
🔺 Part 2: Tapered Point (Make 2)
This section is worked directly onto the short edges of the completed main body. Instead of decreasing by skipping stitches, you will step inward by slip stitching, which creates the beautiful staggered lattice edges seen in the design.
Setup: Lay the rectangular body flat. You will be working into the tops of the stitches from the very last row you completed. Attach your yarn with a sl st into the first open ch-2 space on the right-hand side. (You will leave the first outer 3-dc block completely unworked).
Row 1 (Decrease Row): Ch 3 (counts as dc), make 2 dc in the exact same ch-sp. Ch 2, sk the next 3-dc block, make 3 dc in the next ch-sp. Rep from * across until you have worked into the very last ch-sp. Do not work into the final 3-dc block. Turn.
(Stitch Count: 11 solid blocks, 10 ch-2 spaces).
Row 2 (Decrease Row): Sl st loosely across the first 3 dc stitches and sl st directly into the first ch-2 space. Ch 3 (counts as dc), make 2 dc in the same ch-sp. Ch 2, sk the next 3-dc block, make 3 dc in the next ch-sp. Rep from * across, working your last 3-dc block into the final ch-2 space of the row. Turn.
(Stitch Count: 10 solid blocks, 9 ch-2 spaces).
Rows 3 to 10: Rep Row 2, decreasing your block count by exactly one block per row. You will create a clear diagonal “step” on both sides of the work.
Row 11 (Final Peak): Sl st across the first 3 dc stitches and sl st into the single remaining ch-2 space. Ch 3, 2 dc in the space. (1 block remains).
Fasten off securely.
Second Point: Rotate your entire runner 180 degrees to work along the foundation chain edge. Attach yarn to the first ch-2 space of the foundation row and repeat Rows 1 through 11 exactly.
🧶 Part 3: Tassels and Wooden Beads
The tassels anchor the runner and emphasize the beautiful points.
Making the Tassels (Make 11 to 15, depending on preference):
- Wrap your yarn approximately 40 times around a 5-inch piece of cardboard.
- Cut a 12-inch length of yarn and thread it under the wrapped yarn at the top of the cardboard. Tie a tight, secure double knot.
- Cut the yarn across the bottom edge of the cardboard to release the tassel.
- Cut a second 12-inch length of yarn. Wrap it tightly around the tassel about 1 inch down from the top knot to create the tassel “head.” Knot securely and bury the ends inside the tassel.
- Take the two long tails from the top knot. Thread both tails through a yarn needle, then push the needle through the center of a large wooden bead, sliding the bead down until it rests snugly against the top of the tassel.
🎨 L. STYLING / ASSEMBLY / STABILITY / FINAL SHAPING
Attaching the Tassels:
- ✅ Peak Attachment: Using the two top ties extending from the wooden bead, securely tie one tassel to the very tip of the triangular point on each end of the runner. Tie a firm double knot and weave the tails securely back down through the bead and into the tassel head to hide them.
- ✅ Step Attachment: Attach additional tassels to the outer edges of the diagonal points. The decreases in Part 2 naturally created “steps” along the edge. Tie a tassel to every other step along the diagonal edge to match the reference aesthetic.
- ✅ Blocking (Crucial for Filet Crochet): To achieve the crisp, flat, architectural look of the geometric grid, you must block the piece. Lay the runner face down on blocking mats or clean towels. Mist heavily with water until damp. Pin the corners, the side edges, and the triangular points down, ensuring the vertical solid columns run perfectly straight and the chain spaces are opened up evenly. Allow to air dry completely before unpinning.
💡 M. HELPFUL CROCHET TIPS
- 💡 Digital Planning: If you enjoy using digital design tools to plan your visual content or mood boards, try generating a mock-up of this runner in your specific brand colors before you start stitching. It helps visualize how the deep red or contrasting hues will pop on camera.
- 💡 Consistent Tension: When chaining 2 to skip the solid blocks, keep your chains slightly snug. Loose chains will cause the mesh eyelets to look sloppy rather than strictly geometric.
- 💡 Bead Sizing Check: Before purchasing your wooden beads, bring a scrap of your chosen yarn to the store. You need to ensure that two strands of the yarn can comfortably pass through the drilled hole of the bead without snapping your yarn needle.
- 💡 Tassel Trimming: Wait until all the tassels are attached to the runner to give them their final “haircut.” Let the runner hang off the edge of a table, smooth the tassels downward, and trim the bottoms straight across for a professional, uniform finish.
- 💡 Seamless Slip Stitches: When working the decrease steps on the triangular points, keep your slip stitches very loose. If you pull them tight, the edges of your diagonal steps will pucker and curl inward.
- 💡 Weaving Ends: Because filet crochet has so many open spaces, always weave your loose ends securely into the solid 3-dc blocks, changing directions at least three times so they do not pop out during washing.
🧼 N. CARE INSTRUCTIONS Because this pattern includes wooden bead hardware, spot cleaning or careful hand-washing is highly recommended. Fill a basin with cool water and a mild detergent. Gently press the runner into the water without wringing or scrubbing, keeping the wooden beads out of the water if possible (prolonged soaking can cause the wood to swell or the finish to bleed). Rinse with cool water, press flat inside a dry towel to remove excess moisture, and lay flat to dry. Do not machine wash or tumble dry.
❓ R. FAQ
❓ Can I make this table runner wider?
Yes. The stitch pattern requires a multiple of 5 chains, plus 3. To make it wider, simply add chains in groups of 5 to your foundation chain. Each group of 5 will add one more 3-dc block and one more ch-2 space to your width.
❓ What if my runner is curling at the long edges?
Curling in filet crochet usually means your foundation chain was too tight, or your tension changed as you worked. Ensure you use the same tension throughout. Heavy wet blocking (pinning it flat while damp) usually resolves 90% of curling issues in cotton yarn.
❓ Can I use acrylic yarn instead of cotton?
While you can use acrylic, cotton is strongly preferred for table linens. Cotton is heat-resistant (safe for hot plates), absorbs moisture, and has a heavy, matte drape that holds the geometric shape beautifully. Acrylic may melt under hot dishes and tends to have more stretch, which can warp the mesh design.
❓ The wooden beads keep slipping off my needle. How do I thread them?
If the eye of your tapestry needle is too thick to pass through the bead with the yarn, use a small piece of flexible wire or a dental floss threader. Fold the wire in half, hook the yarn inside the fold, and push the ends of the wire through the bead to pull the yarn cleanly through.
❓ Can I make the ends straight instead of pointed?
Absolutely. If you prefer a traditional rectangular runner, simply skip Part 2. Work the main body until it reaches your desired total length, fasten off, and attach the beaded tassels evenly across the flat short edges.