📖 B. INTRODUCTION
Create a little holiday magic with this adorable Santa Belly Crochet Pouch! This charming pattern transforms the visible design of a festive suit into a functional and decorative drawstring bag, perfect for presenting small gifts, candies, jewelry, or even as a unique tree ornament holder. Imagine the delight when a keepsake or a sweet treat is presented in this darling pouch!
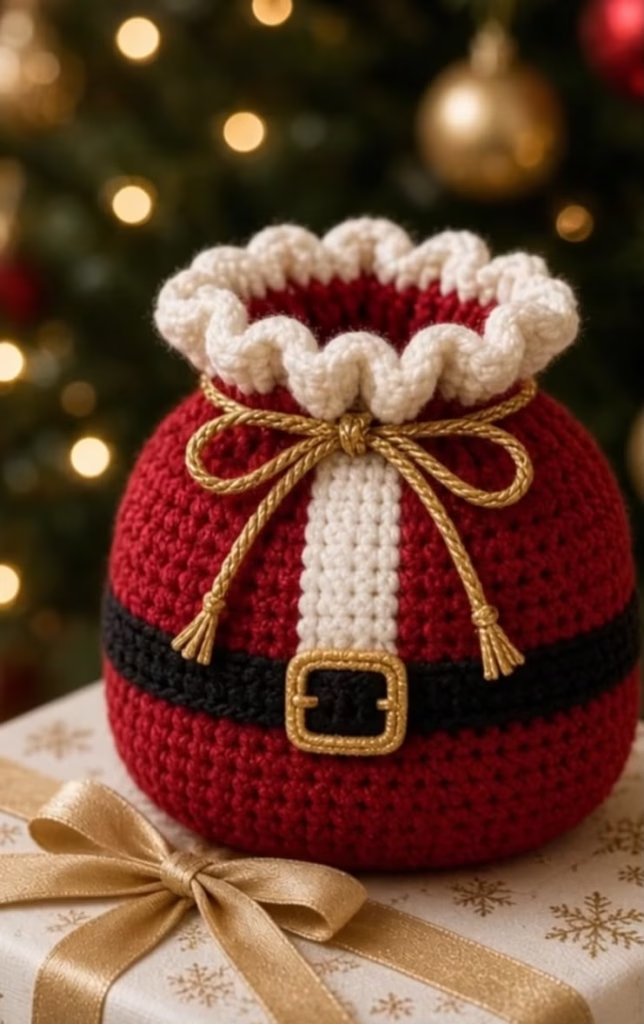
This is a wonderful project for crocheters of all skill levels, from advanced beginners eager to try new techniques to experienced makers looking for a quick and rewarding holiday make. The rounded red body, the smart black belt and gold buckle, and the dramatic white fluffy trim capture the spirit of Santa Claus perfectly, based on the inspiring reference design. Its small size makes it perfect for gifting, party favors, or as a decorative accent around your home. You can personalize this pouch with different drawstring colors, varying buckle sizes, or even different skin-tone-inspired belt colors for other beloved festive characters. Share the joy this Christmas by crocheting and gifting these little bags!
🔍 C. MAIN PATTERN OVERVIEW
The completed Santa Belly Crochet Pouch is a small, round bag featuring a decorative fluffy rim, an integrated belt, and a detachable vertical placket and gold buckle. It is constructed in multiple components that are assembled to capture the classic Santa silhouette.
- 🔴 Pouch Body: This is the main piece, worked in continuous rounds using worsted weight red and black yarn to form the rounded “belly.” It tapers slightly towards the top and includes eyelet rounds for the drawstring.
- ☁️ Fluffy Trim: This dramatic gathered cuff is worked in joined rounds of fluffy or textured white yarn (or worsted weight white yarn with dramatic ruffles, as detailed in our design choice) joined directly to the top of the body.
- 👔 Placket: A simple flat white rectangle made with single crochet to represent the button-down shirt front.
- 🖤 Belt: The belt is an integrated part of the body pattern, worked in black.
- 🔑 Buckle: A small rectangular gold-colored component that is crocheted flat and sewn over the intersection of the belt and placket.
- 🎀 Drawstring: A long gold cord, made either from a simple chain or a woven/knitted cord, finished with two decorative gold tassels.
This modular pattern allows you to complete pieces and assemble them neatly for a professional look.
🎯 D. SKILL LEVEL
Advanced Beginner to Intermediate.
This pattern is a fantastic next step for a beginner who can confidently make basic shapes and is ready for color changes and simple assembly. More advanced crafters will enjoy the quick, satisfying result and the clever construction. Specific skills required include:
- 🧵 Working in continuous rounds.
- 🧵 Working in joined rounds.
- 🧵 Making flat crocheted pieces (rows).
- 🧵 Using single crochet (sc), chains (ch), increases (inc), decreases (dec), and slip stitches (sl st).
- 🧵 Working in Back Loops Only (BLO) or Front Loops Only (FLO).
- 🧵 Performing clean color changes.
- 🧵 Sewing and simple assembly.
- 🧵 Making basic tassels.
📏 E. FINISHED SIZE
The completed Santa Belly Crochet Pouch measures approximately:
- 📏 Height (including fluffy trim): 6 inches (15 cm).
- 📏 Diameter (at widest point of the body): 4 inches (10 cm).
(Note: Finished size will vary slightly depending on yarn weight, hook size, and individual crochet tension. A tighter tension is recommended for amigurumi projects to prevent stuffing from showing.)
🧮 F. GAUGE
For this pouch pattern, tight, consistent stitches are generally more important than achieving an exact gauge. The pouch does not need to fit a specific item, but consistent tension is critical for shaping and matching pieces. Use a hook that gives you a dense, tight fabric with your chosen yarn. A common gauge to aim for with worsted weight yarn and a 3.5mm hook is:
20 sc x 22 rows = 4 inches (10 cm).
This is given as a sample, not a requirement. Adjust your hook size if necessary to achieve the desired stitch density.
🧶 G. REQUIRED YARN AMOUNTS
This project uses small amounts of various worsted weight yarns. The amounts are practical estimates. Variations in brand, ply, and tension can affect actual usage.
- 🧶 Red: approximately 100g / 200yds.
- 🧶 White: approximately 50g / 100yds. (A fluffy, textured yarn can enhance the trim but isn’t required.)
- 🧶 Black: approximately 20g / 40yds.
- 🧶 Gold (or yellow-gold): approximately 20g / 40yds.
Total estimated yarn usage for one pouch is approximately 190g / 380yds.
🧰 H. MATERIALS
Here is what you will need:
- 🧵 Yarn: Worsted Weight (Category 4) in Red, White, Black, and Gold. (Our sample used Red Heart Super Saver for the main body and a fluffy yarn like Bernat Pipsqueak or a dramatically ruffled worsted yarn for the trim).
- 🧵 Crochet Hook: 3.5mm (US E/4) hook, or size needed to obtain gauge and tight stitches.
- 🧵 Stuffing: Poly-fil or other fiberfill stuffing (only a small amount is used, to slightly shape the base for display).
- 🧵 Yarn Needle: A blunt-ended tapestry needle for sewing components and weaving ends.
- 🧵 Sewing Needle & Thread: Optional, for secure assembly of small parts or intricate detailing (though not strictly necessary for this pattern).
- 🧵 Scissors.
- 🧵 Stitch Markers.
- 🧵 Pins: Helpful for positioning parts before sewing.
- 🧵 Optional structural inserts: A circular piece of plastic or cardboard can be added to the inside base for added stability if you want the pouch to stand on its own for display.
🔤 I. ABBREVIATIONS – US TERMS
- ch: chain
- sc: single crochet
- sl st: slip stitch
- inc: increase (work 2 single crochets into the same stitch)
- dec: decrease (single crochet 2 stitches together)
- MR: magic ring / magic circle
- Rnd: round(s)
- Row: row(s)
- st(s): stitch(es)
- BLO: back loops only
- FLO: front loops only
- sk: skip
- FO: fasten off
- yo: yarn over
📝 J. NOTES BEFORE YOU BEGIN
- 🧵 Rounds: The pouch body is worked in continuous rounds. This creates a seamless look without a beginning-of-round line. Do not join at the end of rounds, simply work into the first stitch of the previous round. Use a stitch marker to track the start of each round and move it up after completing it.
- 🧵 Joining for Trim: The fluffy trim cuff is worked in joined rounds. Work a sl st into the first sc of the round at the end of each round to join, and chain the appropriate number (e.g., ch 1) to begin the next round.
- 🧵 Color Changes: In amigurumi, work color changes on the last yarn over (yo) of the final stitch in the old color. Bring up a loop in the old color, then yo with the new color and pull through both loops to complete the stitch. Carry the old color or carry it up on the inside for several stitches to secure it.
- 🧵 Stuffing: Use stuffing only minimally and optionally, primarily to give the base a rounded, stable shape for display. Since this is a practical pouch for gifts, you do not want to fill the entire bag. Use the opening function as intended.
- 🧵 Sewing Tails: When fastening off, leave long yarn tails for sewing parts together.
- 🧵 Tension: Maintain a tighter, consistent tension to create a sturdy fabric for the pouch.
- 🧵 Construction: The black belt is integrated into the body design by changing yarn colors for a few rounds, which simplifies assembly.
- 🧵 Placket & Buckle: These pieces are crocheted flat and sewn on top to give the classic Santa detail, which can be seen in the reference image. This also allows for personalization.
🪡 K. COMPLETE PATTERN
This pattern is organized modularly. Complete all components before assembly. The assembly order is crucial for the finished look, which you can see in our recommended order. Ensure all stitch counts are correct as you work.
🔴 Pouch Body
The body is worked in continuous rounds using worsted weight Red and Black yarn, starting from the base. Switch colors as indicated. The black belt is integrated into the rounds.
With Red yarn: Rnd 1: MR 6 sc. (6) Rnd 2: inc in each sc around. (12) Rnd 3: (sc 1, inc) x6. (18) Rnd 4: (sc 2, inc) x6. (24) Rnd 5: (sc 3, inc) x6. (30) Rnd 6: (sc 4, inc) x6. (36) Rnd 7: (sc 5, inc) x6. (42) Rnd 8: (sc 6, inc) x6. (48) Rnd 9: (sc 7, inc) x6. (54) Rnd 10: sc around. (54) Rnd 11-15: sc around. (54) Rnd 16: BLO sc around. (54) (This row creates a defining line for the base to sit on.) Rnd 17-19: sc around. (54) Rnd 20: (sc 8, inc) x6. (60) Rnd 21: (sc 9, inc) x6. (66) Rnd 22-26: sc around. (66) Rnd 27: (sc 10, inc) x6. (72) Rnd 28: sc around. (72) In the last sc of Rnd 28, change to Black yarn.
With Black yarn: Rnd 29: sc around. (72) Rnd 30: BLO sc around. (72) (The BLO round makes the belt lie flatter.) Rnd 31-33: sc around. (72) In the last sc of Rnd 33, change back to Red yarn.
With Red yarn: Rnd 34: sc around. (72) Rnd 35: (sc 10, dec) x6. (66) Rnd 36-39: sc around. (66) Rnd 40: (sc 9, dec) x6. (60) Rnd 41: sc around. (60) Rnd 42: (sc 8, dec) x6. (54) Rnd 43: sc around. (54) Rnd 44: (sc 7, dec) x6. (48) Rnd 45: sc around. (48) Rnd 46: Eyelet Round: (sc 1, ch 1, sk 1 st) x24. (24 sc, 24 ch-1 spaces) Rnd 47: sc in each sc and each ch-1 space around. (48) Rnd 48: sc around. (48) FO. Weave in all Red tails.
☁️ Fluffy Trim (Dramatic Ruffled Cuff)
This is our original design choice for regular worsted weight white yarn to create the ruffled fluffy look without special yarn, as you can see in the inspiring reference. We use joined rounds with dramatic increases.
With White yarn: Join white yarn with a slip stitch (sl st) in any stitch from Rnd 48 of the Pouch Body.
With White yarn: Rnd 1: Join yarn, ch 1 (counts as first sc), sc around. Join with sl st to first ch-1 sp. (48) Rnd 2: ch 1, inc in each sc around. Join with sl st. (96) Rnd 3: ch 1, inc in each sc around. Join with sl st. (192) (The drastic increases in Rnds 2 & 3 create the gathers) Rnd 4: ch 1, sc around. Join with sl st. (192) Rnd 5: ch 1, FLO sc around. Join with sl st. (192) FO. Weave in tails. This cuff will be dramatically gathered and fluffy.
👔 Placket
Crochet a flat white rectangle using worsted weight white yarn in rows to create the central vertical line.
With White yarn: Ch 11. Row 1: sc in 2nd ch from hook and in each ch across. (10) Row 2-35: ch 1, turn, sc in each sc across. (10) FO, leaving a long tail for sewing. This placket should be long enough to span from the bottom of the black belt to the eyelet rounds, ensuring it will cover the intersection.
🔑 Buckle
Crochet a small flat rectangle in gold.
With Gold yarn: Ch 13. Row 1: sc in 2nd ch from hook and in each ch across. (12) Row 2-6: ch 1, turn, sc in each sc across. (12) FO, leaving a long tail for sewing.
🎀 Drawstring
The drawstring can be a simple long chain or a more substantial cord. For amigurumi pouches, a long chain or braided cord is usually best to avoid adding bulk. This drawstring is purely decorative, as seen in the inspiring image.
With Gold yarn: Make a very long chain, approximately 20 inches (50 cm) long. Alternatively, you can make a braided cord with 3 strands of gold yarn or a Romanian point lace cord. Tie a knot at each end. Thread this cord through the eyelets (Rnd 46). Make sure to start and end your threading so the two ends hang neatly at the front center of the pouch.
💐 Tassels (Make 2)
Tassels add a decorative flourish. Make two small tassels.
With Gold yarn: 1.🎨 L. STYLING / ASSEMBLY / STABILITY / FINAL SHAPING
- Wrap yarn around a piece of cardboard or your fingers (about 3 inches wide) roughly 15-20 times.
- Carefully remove the loops and tie a length of yarn tightly around one end to create the tassel top.
- Tie another piece of yarn (approx 1 inch below the top tie) around the loops to create the neck.
- Cut the loops at the bottom and trim to make them even.
- Attach one tassel to each knot on the ends of the drawstring using the top tie, as you can see in our reference image. Secure tightly.
Styling & Assembly
Our pattern utilizes an original construction order designed for neatness and minimal sewing. The belt is integrated into the body (color work), simplifying the traditional assembly process. Follow these steps to correctly place and attach the remaining components.
1. Secure the Pouch and Trim: Ensure all yarn tails from the Pouch Body and Fluffy Trim are woven in securely. The dramatic gathered cuff should stand upright.
2. Attach the Placket: Position the White Placket vertically on the front center of the pouch. The placket should run from the bottom edge of the black belt up towards the drawstring eyelet round (Rnd 46), ensuring it covers the exact intersection. Use sewing pins to hold it in place. Using the long white sewing tail, stitch the placket down neatly, sewing all the way around the rectangle. Ensure your stitches are neat and barely visible. Referencing the original design is crucial for perfect placement here.
3. Attach the Buckle: Center the Gold Buckle rectangle horizontally across the black belt band. This buckle should completely cover the vertical placket and the belt intersection, capturing the classic suit look. Pin it into place. Using the long gold sewing tail, stitch the buckle down firmly. It is only necessary to sew the perimeter, as the placket visible inside the buckle is intended, as seen in the inspiring image.
4. Thread and Finish the Drawstring: Thread the Gold Drawstring with its attached Tassels through the eyelet round (Rnd 46) of the Red Body. Start at the front center, threading over and under the sc stitches and ch-1 spaces. Ensure the two tassel ends hang evenly and meet at the front center to form a neat bow. Refer to the reference images for the correct look.
Stability and Shaping
While this is a practical pouch, proper shaping makes it look professional.
- Stuffing the Base (Optional for Display): For a professional look when displaying, lightly stuff only the very bottom rounded base (Rnds 1-16) to help it hold the ‘belly’ shape. Avoid stuffing the upper body, which should remain flexible and easy to open.
- Shaping the Belly: Gently manipulate the sides of the pouch to enhance its rounded appearance.
- Flattening the Base: To help the pouch stand upright on a flat surface, gently press down on the BLO edge of Round 16 while it is slightly stuffed.
- Fluffy Trim: Ensure the voluminous white cuff is evenly gathered and stands nicely around the opening.
💡 M. HELPFUL CROCHET TIPS
- 💡 Clean Color Changes: For crisp lines between the red body and the black belt, ensure you make the color changes using the method described in the ‘Notes Before You Begin’ section (completing the last yarn-over of the final stitch in the new color). This avoids jagged transitions.
- 💡 Managing Yarn Tails: When working the color changes (Red to Black and back to Red), you can carry the non-working yarn color up on the inside of the pouch for a few stitches to secure it, then fasten off. Avoid leaving extremely long tails inside that might get snagged.
- 💡 Tight Tension: Maintain very tight, consistent tension throughout. This ensures the pouch holds its shape well and doesn’t stretch too much when opened.
- 💡 Ruffle Consistency: The dramatic ruffles of the trim are created by working many stitches (3 sc) into every single stitch. Maintain consistent tension here so the ruffles are even all the way around.
- 💡 Buckle Placement: Use pins to ensure the buckle is perfectly straight and centered before sewing. If it’s crooked, the whole pouch will look unbalanced. It should cover the intersection of the belt and placket.
- 💡 Thread Drawstring Carefully: Use a yarn needle to thread the drawstring through the eyelets. Be careful not to pull it so tight that you stretch the pouch body out of shape. It should thread smoothly.
- 💡 Secure Tassels Tightly: Ensure the tassels are very tightly secured to the drawstring ends. They are the most handled part of the decorative elements.
- 💡 Stuffing for Display: When stuffing the base (Rnds 1-16) for photos or display, use only a small amount. You don’t want to make the bag too heavy or unable to hold small items.
- 💡 BLO and FLO: Pay close attention to rounds that require working in BLO (Back Loops Only) or FLO (Front Loops Only). These special stitches create necessary ridges and flatter sections, crucial for the belt and trim to lay correctly, as seen in the inspiring reference images.
- 💡 Pouch Base Stability: For added stability if you want the pouch to stand as a decorative item, you can insert a circular piece of stiff cardboard or plastic into the inside base before lightly stuffing.
🧼 N. CARE INSTRUCTIONS
This Santa Belly Crochet Pouch is primarily a decorative and small storage item. Here are practical care instructions based on the worsted weight yarns used:
- 🧼 Hand Wash Only: Gentle hand washing in cool water is recommended. Avoid harsh machine washing, which can damage the delicate details and special textured yarn.
- 🧼 Spot Clean Recommended: For small stains, spot cleaning with a damp cloth and mild soap is best. This is especially true for the gold and white elements.
- 🧼 Shape and Air Dry: After washing, gently reshape the pouch (stuffing the base slightly if needed for drying) and air dry it flat on a towel. Do not tumble dry.
- 🧼 No Bleach/Harsh Chemicals: Never use bleach or harsh cleaning agents, as they can discolor the red and gold yarns.
- 🧼 Handle with Care: The gold drawstring and tassels are delicate. Avoid pulling on them aggressively.
❓ R. FAQ
1. Is this pattern suitable for absolute beginners? ❓ No, this is an intermediate pattern. An advanced beginner who has successfully made amigurumi or colorwork projects will find it achievable, as it requires color changes, sewing components, and different construction methods (rounds vs rows). If you are a brand-new beginner, try a few simpler projects first to build your skills.
2. Can I use a larger hook and thicker yarn for this pouch? ❓ Yes, you certainly can. Using bulkier yarn (like Category 5 or 6) and a corresponding larger hook (like 6.0mm or 8.0mm) will create a much larger sack. The technique remains the same, but the final dimensions will increase significantly. You may also need more yarn.
3. Do I have to stuff the pouch for it to hold its shape? ❓ No, you don’t have to stuff it, especially if you intend to use it practically to hold items. However, if you want it to maintain that classic rounded amigurumi shape for display on a shelf, lightly stuffing only the very base (as outlined in the ‘Stability’ section) will help it hold the silhouette.
4. How do I get the placket and buckle to align perfectly? ❓ Use pins! This is the most important tip. After completing the body (with the integrated belt) and the separate placket, pin the placket to the body and check its alignment carefully. The buckle should then cover the intersection, capturing the classic suit look. Don’t rely on guesswork; use pins to secure everything before sewing.
5. Can I use safety eyes on this pouch? ❓ This specific design represents Santa’s belly suit, not Santa’s face, so eyes are not appropriate for this concept, as shown in the reference image. The central elements are the belt and buckle.
6. I want a fluffier trim. Can I use a different yarn? ❓ Absolutely. In our pattern, we designed the dramatically gathered cuff with regular worsted weight white yarn. However, using a specialized fluffy yarn (like Bernat Pipsqueak, a boucle yarn, or even a soft faux-fur yarn) for the ☁️ Fluffy Trim component would enhance the textured, fluffy look seen in some reference materials. If you use a very thick fuzzy yarn, you might not need as many dramatic increase rounds.
7. Is the gold drawstring functional? ❓ The drawstring itself is functional in that it threads through the eyelets and can be pulled slightly, but the tassels are primarily decorative. To use the pouch to hold gifts, you should tie the drawstring neatly with the two tassel ends in front, allowing the pouch to open and close easily. The tassels should not interfere with the opening function.
8. Can I change the colors for a different festive character? ❓ Yes! You can use this basic pouch construction for other characters. For example, a black body and green belt for Elves, or an all-brown body for Rudolph. Simply swap the yarn colors for the 🔴 Pouch Body and use appropriate colors for the other components while maintaining the design principles.