📖 B. INTRODUCTION
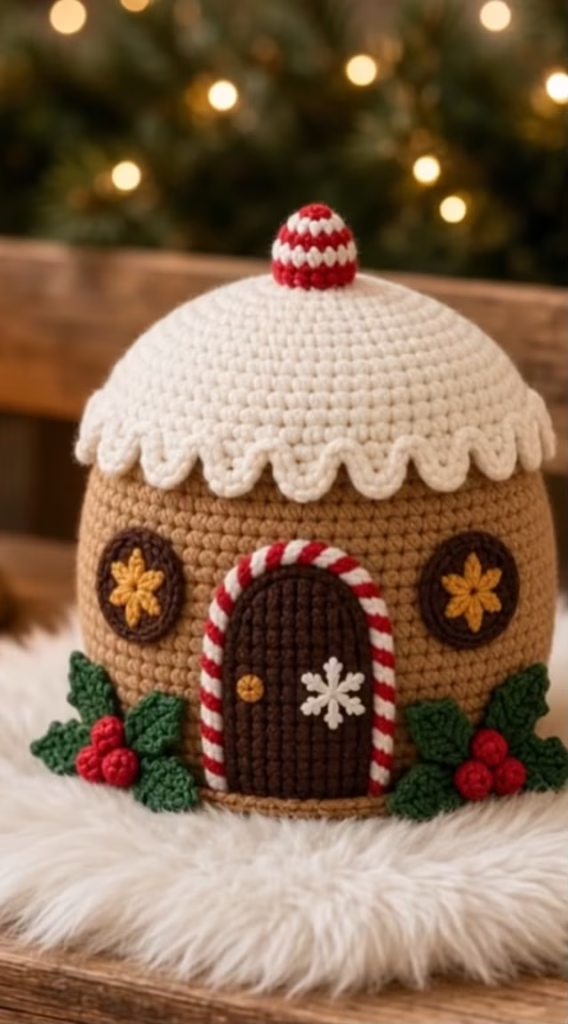
Bring the magic of holiday baking into your crochet space with this delightful Gingerbread House Crochet Trinket Box. Designed to be both a charming decorative piece and a functional storage container, this pattern creates a sturdy, self-standing box perfect for holding small candies, stitch markers, jewelry, or hidden gifts. The design features a rounded brown base mimicking baked gingerbread, topped with a white domed lid finished with a scalloped edge to resemble heavy, dripping snow. It captures the essence of classic holiday confections without the sticky icing mess.
Crocheting a structured box requires a balance of tight tension and clever shaping, making this project an engaging challenge for those looking to expand their amigurumi skills. The rich dark brown arched door is framed by a bold red and white candy cane striped trim, creating a welcoming focal point. Delicate embroidery brings the piece to life, with a crisp white snowflake adorning the door and warm golden snowflakes centered on the round side windows. Festive clusters of green holly leaves and bright red berries anchor the bottom corners of the entryway.
This trinket box is highly customizable. While the provided instructions recreate the classic gingerbread aesthetic, you can easily personalize your house by adding small crocheted candies, varying the embroidery colors, or attaching miniature buttons as “gumdrops.” A striped red and white knob sits at the peak of the snowy roof, providing an easy grip to open the box and reveal the treasures inside. Whether you are crafting a memorable holiday gift box or adding a whimsical touch to your mantelpiece, this pattern delivers a sturdy, heirloom-quality make.
🔍 C. MAIN PATTERN OVERVIEW
This project is constructed in several distinct modules that are sewn together at the end. Working modularly allows you to focus on the structural integrity of the box before adding the decorative flair.
- The Gingerbread Base: A flat-bottomed cylinder worked in continuous rounds using tight single crochet stitches to create a rigid, self-supporting wall.
- The Snowy Roof Lid: A separate domed piece that increases gradually to fit snugly over the base, finished with an overlapping scalloped border.
- The Peppermint Knob: A small, stuffed topper featuring alternating red and white stripes, attached to the very center of the roof.
- The Door and Windows: Dark brown applique pieces that are crocheted flat and sewn directly to the base wall.
- The Candy Cane Trim: A twisted, two-color cord that borders the arched door.
- Holly and Berries: Small decorative elements added near the base of the door to complete the festive look.
🎯 D. SKILL LEVEL
Intermediate
This pattern is suited for crocheters who are comfortable with standard amigurumi techniques but require a bit of patience for structured shaping and small detail work.
Specific techniques required include:
- Working in continuous rounds and joined rounds.
- Crocheting tightly to create a stiff, freestanding fabric.
- Working in the Back Loop Only (BLO) to create sharp structural angles.
- Basic embroidery (straight stitches and French knots or simple cross stitches).
- Creating small, fiddly appliques and sewing them cleanly to a curved surface.
📏 E. FINISHED SIZE
When made with worsted weight yarn and a 4.0mm hook, the finished trinket box measures approximately:
- Height: 6.5 inches (16.5 cm) from the bottom of the base to the top of the peppermint knob.
- Diameter: 5 inches (12.5 cm) across the base.
Note: The final size will vary depending on your yarn brand, hook size, and personal tension. Using a thicker yarn like bulky chenille will result in a much larger box, while sport weight cotton will yield a miniature version.
🧮 F. GAUGE
4 sc stitches x 4 rounds = 1 inch (2.5 cm)
For amigurumi and functional boxes, exact gauge is less critical than fabric density. Your stitches must be tight enough that the base can stand upright on its own without collapsing. If you can see light through your stitches, drop down half a hook size.
🧶 G. REQUIRED YARN AMOUNTS
All estimates are based on standard medium weight (Size 4 / Aran / Worsted) acrylic or cotton yarn. Cotton is highly recommended for this project as it holds a rigid shape better than soft acrylic.
- 🧵 Light Brown (Main Gingerbread): ~100 yards (90 meters)
- 🧵 White (Snowy Roof / Trim): ~80 yards (75 meters)
- 🧵 Dark Brown (Door / Windows): ~20 yards (18 meters)
- 🧵 Red (Peppermint Knob / Berries / Candy Cane Trim): ~15 yards (14 meters)
- 🧵 Green (Holly Leaves): ~10 yards (9 meters)
- 🧵 Golden Yellow (Embroidery Details): Small scrap length (approx. 2 yards)
🧰 H. MATERIALS
- Crochet Hook: 4.0mm (US G-6) or size needed to obtain a stiff fabric.
- Yarn: Worsted weight (Category 4) in the colors listed above.
- Stuffing: A very small amount of polyester fiberfill (for the peppermint roof knob only).
- Needles: A blunt tapestry needle for weaving in ends and a sharper embroidery needle for the snowflake details.
- Scissors: Sharp craft scissors.
- Stitch Markers: Essential for tracking continuous rounds.
- Pins: Sewing pins with large heads to temporarily place the appliques before sewing.
- Optional Structure: A 4.5-inch circle of rigid plastic canvas or thick cardboard to insert into the floor of the base for a perfectly flat bottom.
⚠️ Safety Note: If this box is intended for a small child, ensure all appliques are securely sewn and avoid using cardboard inserts that cannot be washed.
🔤 I. ABBREVIATIONS – US TERMS
- MR: Magic Ring
- ch: chain
- sc: single crochet
- hdc: half double crochet
- dc: double crochet
- inc: increase (2 sc in the same stitch)
- dec: invisible decrease (sc 2 together using front loops only)
- sl st: slip stitch
- BLO: back loop only
- FLO: front loop only
- st(s): stitch(es)
- FO: fasten off
- ( … ) xN: repeat the sequence in parentheses N times
- [ … ]: total stitch count at the end of the round/row
📝 J. NOTES BEFORE YOU BEGIN
- Round Mechanics: The gingerbread base is worked in continuous spiral rounds to avoid a visible seam. Do not slip stitch or chain 1 at the end of these rounds. Move your stitch marker up at the beginning of each new round.
- Roof Mechanics: The lid is also worked in continuous rounds until the final scalloped edge.
- Embroidery First: It is highly recommended to embroider the snowflakes onto the door and windows before sewing those pieces to the main base. This allows you to hide the messy embroidery knots on the backside of the appliques.
- Structure: When working the wall of the base (after the BLO round), pull your yarn firmly. A stiff tension is the secret to a box that holds its shape over time.
🪡 K. COMPLETE PATTERN
🏠 The Gingerbread Base
This piece forms the main storage compartment. Use Light Brown yarn.
R1: Create a MR, work 8 sc into the ring. [8]
R2: inc in each st around. [16]
R3: (1 sc, inc) x8. [24]
R4: (2 sc, inc) x8. [32]
R5: (3 sc, inc) x8. [40]
R6: (4 sc, inc) x8. [48]
R7: (5 sc, inc) x8. [56]
R8: (6 sc, inc) x8. [64]
R9: (7 sc, inc) x8. [72]
R10: (8 sc, inc) x8. [80]
Note: Your flat circle should measure roughly 4.5 to 5 inches across. If using a plastic canvas insert, trace this circle onto your canvas now and cut it out.
R11: Working in BLO, sc in each st around. [80]
This creates the sharp corner transitioning from the floor to the wall.
R12-R36 (25 rounds): Working in both loops normally, sc in each st around. [80]
Note: The walls should measure roughly 4.5 inches tall from the bottom ridge. Adjust by adding or removing rounds if you prefer a taller or shorter box.
R37: sl st in the next 3 sts to smooth out the jog of the continuous round. FO and weave in the ends seamlessly.
❄️ The Snowy Roof Lid
This piece forms the removable cover. Use White yarn.
R1: Create a MR, work 8 sc into the ring. [8]
R2: inc in each st around. [16]
R3: (1 sc, inc) x8. [24]
R4: sc in each st around. [24]
R5: (2 sc, inc) x8. [32]
R6: sc in each st around. [32]
R7: (3 sc, inc) x8. [40]
R8: sc in each st around. [40]
R9: (4 sc, inc) x8. [48]
R10: (5 sc, inc) x8. [56]
R11: sc in each st around. [56]
R12: (6 sc, inc) x8. [64]
R13: (7 sc, inc) x8. [72]
R14: sc in each st around. [72]
R15: (8 sc, inc) x8. [80]
R16: (9 sc, inc) x8. [88]
Note: This piece is intentionally wider than the base (88 sts vs 80 sts) so it can comfortably slide over the top edge of the box walls.
R17-R20 (4 rounds): sc in each st around. [88]
R21 (Scalloped Edge): Working in FLO, (skip 1 st, work 5 dc in the next st, skip 1 st, sl st in the next st) x22. [22 scallops complete the round]
FO, leaving a long tail if you wish to add extra security to the final slip stitches, or simply weave in the end invisibly on the underside.
🍬 Peppermint Roof Knob
This piece creates the handle for the lid. Use Red and White yarn.
R1: With Red, create a MR, work 6 sc into the ring. [6]
R2: Switch to White. inc in each st around. [12]
R3: Switch to Red. (1 sc, inc) x6. [18]
R4: Switch to White. sc in each st around. [18]
R5: Switch to Red. sc in each st around. [18]
R6: Switch to White. (1 sc, dec) x6. [12]
FO, leaving a long White tail for sewing. Stuff the knob firmly with a small pinch of fiberfill.
🚪 The Door
This piece is worked in rows, not rounds. Use Dark Brown yarn.
Row 1: ch 9. Starting in the 2nd ch from the hook, sc across. [8]
Row 2-R9 (8 rows): ch 1, turn. sc in each st across. [8]
Row 10 (Arch Shaping): ch 1, turn. 1 sc, 1 hdc, 4 dc, 1 hdc, 1 sc. [8]
Border: Do not fasten off. ch 1, turn the piece 90 degrees and sc evenly down the side of the door, work 3 sc in the bottom corner, sc across the bottom edge, work 3 sc in the next corner, and sc evenly up the final side.
FO, leaving a very long tail (approx. 18 inches) for sewing.
🪟 Windows (Make 2)
Use Dark Brown yarn.
R1: Create a MR, work 6 sc into the ring. [6]
R2: inc in each st around. [12]
R3: (1 sc, inc) x6. [18]
R4: sl st loosely around the perimeter to create a clean, finished edge. [18]
FO, leaving a long tail for sewing.
🍭 Candy Cane Door Trim
Use Red and White yarn. This creates a beautifully twisted, rigid cord that arches over the door.
Step 1: Cut three 30-inch lengths of Red yarn and three 30-inch lengths of White yarn.
Step 2: Knot the six strands together at one end.
Step 3: Separate the Red strands from the White strands. Twist the Red bundle tightly to the right. Separately, twist the White bundle tightly to the right.
Step 4: Bring the two twisted bundles together and allow them to twist around each other to the left. This counter-twisting locks the cord in place.
Step 5: Knot the bottom end at approximately 6.5 inches of length. Trim the fringes neatly.
🌿 Holly Leaves (Make 5)
Use Green yarn.
Row 1: ch 6.
Row 2: Starting in the 2nd ch from the hook, work the following down the chain: 1 sc, 1 hdc, 1 dc, 1 hdc, (1 sc, ch 2, sl st into 2nd ch from hook to form a picot point, 1 sc) all in the final chain stitch.
Row 3: Turn the piece to work up the unworked underside of the foundation chain. Work: 1 hdc, 1 dc, 1 hdc, 1 sc. sl st to the very first sc to join.
FO, leaving a long tail for sewing.
🍒 Holly Berries (Make 6)
Use Red yarn.
R1: Create a MR, work 4 sc into the ring. [4]
FO, leaving a long tail. Pull the magic ring completely tight, then use your tapestry needle to stitch the starting tail and ending tail together to force the 4 sc to ball up into a tiny sphere. Tie a firm double knot with the two tails on the back.
🎨 L. STYLING / ASSEMBLY / STABILITY / FINAL SHAPING
Correct placement of the appliques is what turns a plain box into a recognizable gingerbread house. Follow this sequence for the cleanest results.
1. Embroider the Appliques
- The Door Snowflake: Thread your embroidery needle with White yarn. Embroider a simple 6-point snowflake in the lower-center of the Dark Brown door.
- The Doorknob: Thread your needle with Golden Yellow yarn. Create a French knot (or a small cluster of straight stitches) halfway up the left side of the door.
- The Window Snowflakes: Using Golden Yellow yarn, embroider an 8-point snowflake centered on each Dark Brown window.
2. Attach the Main Facial Features
- Pin the Door: Place the door flat against the Light Brown base, ensuring the bottom of the door aligns perfectly with the BLO ridge at R11. Pin securely.
- Pin the Windows: Place one window on each side of the door, floating approximately 5 rounds up from the base floor. Ensure they are symmetrical.
- Sew: Using the long Dark Brown tails left on the pieces, whip stitch the door and windows to the base. Only sew through the top layer of the base fabric so stitches do not show on the inside of the box.
3. Attach the Candy Cane Trim
- Take your twisted red and white cord and drape it directly over the outer edge of the arched door.
- Using a needle threaded with a single strand of invisible thread or matching red yarn, carefully tack the cord down to the wall every quarter-inch. Hide the knotted ends of the cord slightly underneath the bottom corners of the door.
4. Arrange the Holly and Berries
- The greenery sits at the bottom corners of the base near the door.
- On the left side, arrange two green leaves pointing outward, and sew three red berries at their base.
- On the right side, arrange three green leaves fanning outward, and sew the remaining three red berries at the center.
- Sew the leaves down firmly so they do not curl, then securely tack the berry clusters over the inner leaf stems.
5. Finalize the Snowy Roof
- Center the peppermint knob exactly in the middle of the White roof lid (R1-R2). Sew securely using the remaining white tail, adding a tiny bit of extra stuffing just before closing the gap to ensure the knob stands proudly.
- Place the finished roof onto the base. Push it down gently until it naturally rests on the top edge of the walls.
✅ Finishing Checklist:
- ✅ Door is vertically straight and aligned with the bottom edge.
- ✅ Windows are level with each other.
- ✅ Snowflake embroidery is secured on the backside of the appliques.
- ✅ Candy cane trim hides the outer edges of the door applique.
- ✅ Berry clusters hide the raw ends of the candy cane trim.
- ✅ Base stands completely flat without wobbling.
- ✅ Lid slips on easily without stretching the scalloped border.
💡 M. HELPFUL CROCHET TIPS
- 💡 Yarn Under for Stiff Fabric: When making the base, consider using the “yarn under” single crochet technique (also known as the X-stitch) instead of the traditional “yarn over” (V-stitch). Yarn under naturally creates a tighter, stiffer fabric ideal for structural boxes.
- 💡 Preventing Wall Slump: If your finished base feels a bit soft, you can reinforce it by painting a layer of water-diluted PVA glue or fabric stiffener on the inside walls of the base. Let it dry completely before using.
- 💡 Perfect Flat Bottom: To ensure your box doesn’t wobble, insert a rigid plastic canvas circle into the bottom of the box. You can lightly glue this in place, or cut a slightly larger circle of felt and glue it over the plastic insert for a luxurious interior finish.
- 💡 Invisible Decreases: Always use invisible decreases (working only through the front loops) on the peppermint knob to prevent polyfill from showing through the color changes.
- 💡 Seamless Applique Edges: When slip-stitching around the edge of the windows, keep your tension quite loose. Tight slip stitches will cause the flat circles to curl into bowls.
- 💡 Embroidering Symmetrically: For the snowflakes, always stitch a simple cross (+) first, then add the diagonal lines (x) over the top. This ensures perfectly spaced points.
🧼 N. CARE INSTRUCTIONS
To maintain the stiff structure of this trinket box, do not machine wash. Machine washing will soften the yarn fibers, potentially causing the walls to collapse, and may agitate the delicate embroidery and twisted trim.
Instead, spot clean only using a damp cloth and mild soap. Gently dab any dirt or stains, taking care not to scrub the surface, which can cause the acrylic or cotton yarn to pill. Allow the piece to air dry completely in an upright position. If you used a cardboard insert instead of plastic canvas, ensure the bottom never gets saturated. Store the box in a dry area away from direct, harsh sunlight, which could fade the bright red and green accents over time.
Creating a handmade holiday heirloom like this Gingerbread House Crochet Trinket Box is a labor of love that pays off in smiles every season. The blend of clever amigurumi shaping and nostalgic holiday imagery makes this a perfect stash-buster project for gifting jewelry, holding small treats, or simply brightening up a winter windowsill. Don’t be afraid to make it your own by trying pastel icing colors, adding bead sprinkles, or scaling the yarn up to craft a jumbo cookie jar. Happy crocheting, and enjoy your sweet, zero-calorie creation!
❓ R. FAQ
❓ Can I make this with plush/chenille yarn?
Yes, but plush yarn is very soft and lacks structural integrity. If you use chunky chenille yarn, you will end up with a much larger, softer item. You will likely need to insert a sturdy plastic or cardboard lining into the base to help it stand up as a functional box.
❓ The lid is too tight and won’t fit over the base. How do I fix this?
This usually happens if your tension tightened up while crocheting the white roof. You can fix this by unraveling the lid back to Round 15, and adding one extra increase round (e.g., (10 sc, inc) x8 [96]) before completing the straight side walls and scallops.
❓ How do I stop my door from curving when I crochet it?
If your door is curling inward, your tension is too tight or you are missing stitches at the end of your rows. Count your stitches carefully to ensure you maintain exactly 8 stitches across. Blocking the piece with steam before sewing it to the base can also flatten it perfectly.
❓ Is this pattern safe for toddlers to play with?
While there are no hard plastic safety eyes used in this specific design, the box features several small sewn-on pieces (berries, candy cane cord). If making this for a very small child, embroider the berries directly onto the fabric rather than crocheting them, and stitch the candy cane trim down obsessively to prevent it from being pulled loose.
❓ Can I crochet the candy cane trim instead of twisting yarn?
Absolutely. If you prefer crocheting, you can make a 2-stitch I-cord, or simply chain 30 holding one strand of red and one strand of white together, which will naturally produce a striped, textured chain.
❓ Do I have to use continuous rounds for the base?
Continuous rounds are highly recommended because they eliminate the visible diagonal seam that joined rounds create. Since the base is one solid color (Light Brown), there is no color-jog to worry about, making a continuous spiral the cleanest structural option.