📖 B. INTRODUCTION
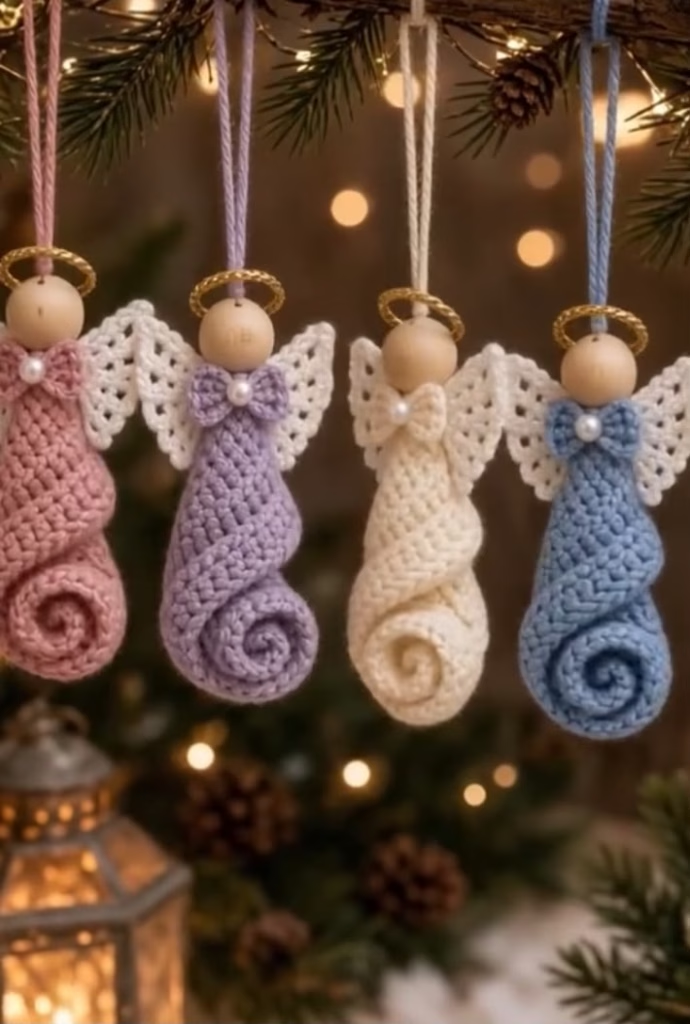
Welcome to the complete pattern for making these delightful Little Angel Spiral Ornaments! These handcrafted angels feature a unique spiraled gown design, openwork lace wings, a natural wooden bead head, and a halo crown. Whether you are dressing up your Christmas tree, creating memory keepsakes for loved ones, or preparing inventory for holiday craft fairs, these ornaments offer a quick, satisfying crochet experience.
The design combines traditional crochet stitches with minimalist craft accents. The body is crocheted in a flat piece that naturally coils into a dramatic bottom flourish before tapering upwards into an elegant, slender silhouette. Combined with delicate scalloped wings and a small bowed neck tie centered with a faux pearl bead, each piece carries an ethereal, rustic-chic charm.
Personalization options with this pattern are vast. While the featured collection highlights soft pastel hues—dusty rose pink, gentle lavender, warm ecru cream, and soft denim blue—you can craft these angels in vibrant holiday red, forest green, or shimmering metallic threads. You can also stain or paint the wooden heads, customize the halo materials, or swap the pearl center for tiny crystal gems.
This project is ideal for using up leftover yarn scraps and assembling in batches. Follow the step-by-step instructions below to create your own set of guardian angels.
🔍 C. MAIN PATTERN OVERVIEW
This ornament design is composed of six main components that assemble seamlessly into a lightweight hanging piece:
- 👗 The Spiral Gown Body: A custom-shaped piece worked in textured back-loop rows. The lower section uses graduated stitches and strategic increases to create a flat, curled swirl tail, while the upper section forms a structured conical body gown.
- 🪶 The Openwork Lacy Wings: A two-sided fan motif crocheted in crisp white yarn, featuring delicate scalloped picot edges that sit flush against the back of the angel.
- 🧠 Wooden Bead Head & Assembly: An unfinished natural wooden bead mounted on a central anchor cord that doubles as the top hanging loop.
- 👑 Golden Metallic Halo: A subtle golden braided crown loop hovering directly above the wooden head bead.
- 🎀 Miniature Neck Bow: A small crocheted rectangular bow in matching gown yarn, wrapped tightly at the center.
- 🔮 Faux Pearl Accent: A smooth pearl bead sewn or glued at the center of the neck bow for a refined finished detail.
🎯 D. SKILL LEVEL
- Level: Easy to Intermediate
- Explanation: This project is accessible to confident beginners familiar with basic stitches, basic shaping, and small assembly steps. Working in Back Loops Only (BLO) and shaping the spiral tail require careful stitch counting.
- 🎯 Required Techniques:
- ➰ Magic Ring (MR)
- 🧶 Single Crochet (sc), Half Double Crochet (hdc), and Double Crochet (dc)
- 📐 Working in Back Loops Only (BLO)
- 📈 Stitches with strategic increases (inc) and decreases (dec)
- 💫 Picot stitch for wing scalloping
- 🪡 Basic seam joining and bead threading
📏 E. FINISHED SIZE
- Height: Approximately 5.5 inches (14 cm) from the top of the halo to the bottom tip of the spiral tail.
- Wing Width: Approximately 4.5 inches (11.5 cm) at the widest point of the wing span.
- Depth: Approximately 1.25 inches (3.2 cm) at the thickest part of the gown coil.
📏 Note: Finished size may vary depending on yarn weight, hook size, and stitch tension. Using a heavier Worsted weight yarn with a larger hook will yield a larger ornament (~7 inches/18 cm).
🧮 F. GAUGE
- Gauge Standard: 22 sts and 22 rows = 4 inches (10 cm) in single crochet using a 3.0 mm hook.
- 💡 Tension Guidance: Precise gauge is not critical for this ornamental project. However, maintaining tight, consistent tension is recommended so that the gown maintains its defined swirl shape without sagging.
🧶 G. REQUIRED YARN AMOUNTS
The amounts listed below are sufficient to make one angel or a complete set of four angels as shown:
- 🧵 Gown Yarn (Sport / Light DK Weight #3):
- 🌸 Dusty Rose Pink: Approx. 35 yards (15g) per angel
- 🪻 Soft Lavender: Approx. 35 yards (15g) per angel
- 🍦 Ecru Cream: Approx. 35 yards (15g) per angel
- 🩵 Soft Denim Blue: Approx. 35 yards (15g) per angel
- 🕊️ Wing Yarn (Sport / Light DK Weight #3):
- ⚪ Bright White: Approx. 15 yards (6g) per angel
- 🎀 Bow Yarn:
- Uses remaining yarn scraps from the primary gown color (~4 yards / 2g per bow).
- 🧶 Total Set Requirement (4 Angels): Approx. 140 yards of gown yarn total (across 4 colors) + 60 yards of white yarn.
🧰 H. MATERIALS
- 🪡 Crochet Hook: Size 3.0 mm (US C-2 or D-3) or size needed to obtain tight stitches.
- 🪵 Wooden Beads: 4 unfinished, smooth round wooden beads (20 mm diameter with a minimum 4 mm drill hole).
- 🔮 Pearl Beads: 4 cream/white faux pearl beads (5 mm or 6 mm diameter).
- 👑 Halo Material: Approx. 20 inches (50 cm) of 2 mm gold braided metallic trim, gold lurex cord, or soft gold wire.
- 🪡 Tapestry Needle: Large eye yarn needle for seaming, threading through wooden beads, and weaving ends.
- ✂️ Scissors: Sharp craft/embroidery scissors.
- 📍 Pins: Fine quilting pins for positioning wings and bows prior to stitching.
- 🧴 Craft Glue: Clear fabric glue or low-temp hot glue gun (for securing halo cord ends and pearl centers).
🔤 I. ABBREVIATIONS – US TERMS
- ch: chain
- sl st: slip stitch
- sc: single crochet
- hdc: half double crochet
- dc: double crochet
- tr: treble (triple) crochet
- inc: increase (work 2 sts into the same st)
- dec: decrease (sc 2 sts together)
- BLO: back loop only
- FLO: front loop only
- st(s): stitch(es)
- MR: Magic Ring
- picot: ch 3, sl st into 1st ch
📝 J. NOTES BEFORE YOU BEGIN
- 🧵 Construction Direction: The gown is crocheted flat from the bottom spiral flourish up to the slender neck line, using back-loop ribbed stitches to provide flexibility and texture.
- 🌀 Spiral Tail Technique: The curling tail is created by placing multiple half-double crochet stitches into single chain bases. This rapid increase forces the work to naturally ruffle and coil into a tight spiral.
- 🪵 Wooden Bead Bead Anchor: Ensure your tapestry needle can pass twice through the wooden bead hole along with two strands of yarn. If the hole is tight, use a wire loop threader to pull yarn through smoothly.
- 💡 Color Matching: For best visual harmony, keep the neck bow identical in yarn weight and color to the primary gown body.
🪡 K. COMPLETE PATTERN
👗 Gown Body Component (Make 1 per Angel)
Use Primary Gown Color (Pink, Lavender, Cream, or Blue)
The gown is worked in a combination of a flat spiral disc base and a ribbed upper body cone.
  Row 1 (Coil Start):  [sl st x6] -> [sc x6] -> [hdc x10] -> [2 hdc x8] -> [3 hdc x7]  (59 sts)
  Row 2 (Expansion):   [3 hdc x15] -> [hdc x15] -> [sc x15] -> [sl st x14]              (74 sts)
  Row 3 (Tapering):    [sl st x14] -> [sc x15] -> [hdc x30] -> [hdc dec x7, hdc 1]     (67 sts)
🌀 Part 1: The Spiral Base Coil
- Foundation: Ch 38.
- Row 1: Starting in the 2nd ch from the hook:
- sl st in next 6 chs
- sc in next 6 chs
- hdc in next 10 chs
- 2 hdc in each of the next 8 chs
- 3 hdc in each of the remaining 7 chs. Ch 1, turn. (59 sts total)
- Row 2: Working in BLO across the entire row:
- 3 hdc in each of the first 15 sts (creates intense curl)
- hdc in next 15 sts
- sc in next 15 sts
- sl st in last 14 sts. Ch 1, turn. (74 sts total)
- Row 3: Working in BLO:
- sl st in first 14 sts
- sc in next 15 sts
- hdc in next 30 sts
- [hdc dec] across the remaining 15 sts (work 7 hdc dec, then 1 hdc in final st). (67 sts total)
Fasten off, leaving a long 18-inch (45 cm) tail for seaming and spiral anchoring.
       [Neck Top - 14 sl st]
              \  \
               \  \  <-- Upper Cone Section
                \  \
                 \  \
                  [======================================]
                 /                                        \
                /  <-- Broad Curved Section                \
               (                                            )
                \   🌀 Spiral Curl Flounce                 /
                 [========================================]
🪶 Lacy Wings Component (Make 1 Unit per Angel)
Use White Yarn
The wings are worked in two symmetrical openwork fan sections joined at a central anchor spine.
  Wing Center Ring: Ch 4, sl st to form ring

  Left Wing:
  - Row 1: Ch 3 (counts as dc), 5 dc into ring (6 dc). Turn.
  - Row 2: Ch 4, (dc, ch 1) in each st across (6 dc, 5 ch-1 spaces). Turn.
  - Row 3: (3 dc, picot, 3 dc) in each ch-1 space. (Scalloped edge)

  Right Wing:
  - Attach yarn to opposite side of central ring and repeat Left Wing steps.
🪶 Step-by-Step Wings Construction
- Center Ring: Ch 4, sl st into first ch to form a tiny ring.
- Left Wing Row 1: Ch 3 (counts as 1 dc), work 5 dc into the ring. Ch 3, turn. (6 dc)
- Left Wing Row 2: dc in first st, (ch 1, dc in next st) 5 times. Ch 1, turn. (6 dc, 5 ch-1 spaces)
- Left Wing Row 3 (Scalloped Edging): (sl st in first ch-1 space, ch 2, 2 dc in same sp, picot [ch 3, sl st in 1st ch], 2 dc in same sp) — repeat across all 5 ch-1 spaces. Fasten off White yarn.
- Right Wing: Rejoin White yarn with a sl st on the opposite side of the initial Center Ring.
- Right Wing Row 1: Ch 3 (counts as 1 dc), work 5 dc into ring. Ch 3, turn. (6 dc)
- Right Wing Row 2: dc in first st, (ch 1, dc in next st) 5 times. Ch 1, turn. (6 dc, 5 ch-1 spaces)
- Right Wing Row 3 (Scalloped Edging): (sl st in first ch-1 space, ch 2, 2 dc in same sp, picot, 2 dc in same sp) — repeat across all 5 ch-1 spaces.
Fasten off White yarn, leaving a 12-inch (30 cm) tail for attaching wings to the gown back.
🎀 Miniature Neck Bow Component (Make 1 per Angel)
Use Primary Gown Color Yarn
- Foundation: Ch 10.
- Row 1: Hdc in 3rd ch from hook and in each ch across. Ch 1, turn. (8 hdc)
- Row 2: Working in BLO, hdc in each st across. (8 hdc)
Fasten off yarn, leaving a 10-inch (25 cm) tail.
- Bow Shaping: Thread the tail into a tapestry needle. Wrap the yarn tightly around the horizontal center of the small rectangle 5-6 times to pinch it into a classic bow shape. Knot securely at the back.
- Pearl Attachment: Thread a faux pearl bead onto fine sewing thread or yarn strand and sew it directly onto the front wrapped center of the bow. (Alternatively, attach with a small drop of craft glue).
👑 Golden Halo Ring (Make 1 per Angel)
Use Gold Metallic Cord or Gold Braided Trim
- Cut a 5-inch (13 cm) piece of gold metallic cord.
- Form the cord into a circle measuring approximately 1.25 inches (3.2 cm) in diameter, overlapping the ends by 0.5 inches (1.3 cm).
- Secure the overlapped ends tightly using thread or a drop of clear craft glue to create a clean metallic ring. Set aside to dry.
🎨 L. STYLING / ASSEMBLY / STABILITY / FINAL SHAPING
🧵 Step-by-Step Assembly Guide
Step 1: Shaping the Spiral Gown Base
- Lay the crocheted gown strip flat on your work surface.
- Take the heavily curved end (containing the 3-hdc cluster groups) and coil it tightly inward like a snail shell or spiral wave to form the circular bottom base.
- Thread the long yarn tail into your tapestry needle. Working from the underside, take small, hidden stitches through the inner loops of the coiled layers to lock the spiral coil flatly in place.
- Curve the remaining straight, tapered upper section of the strip into a hollow tube/cone shape, bringing the back edges together.
- Whipstitch the back seam closed from the top of the spiral up to the narrow neck top. Knot securely inside the cone.
  [1. Coil Base]             [2. Seam Back Cone]       [3. Complete Gown]
     ( 🌀 )                      /  |  \                   /  |  \
   (  spiral  )                 /   |   \                 / 🌀|   \
  (___________)                (____|____)               (____|____)
Step 2: Mounting the Wooden Bead Head & Hanging Loop
- Cut a 14-inch (35 cm) piece of primary gown yarn.
- Fold the yarn strand in half to create a loop at one end.
- Insert the cut ends of the yarn into a tapestry needle and pass them from bottom to top up through the narrow neck opening of the gown.
- Slide the Golden Halo Ring onto the needle/yarn strands so it rests flat over the top neck opening.
- Pass the needle up through the central hole of the 20 mm Wooden Bead.
- Draw the yarn through until a 3-inch (7.5 cm) loop remains at the top above the head (this forms your hanging loop).
- Take the needle and pass it back down through the wooden bead, through the center of the halo, and into the interior of the gown.
- Pull gently until the wooden bead rests snugly against the halo and top neck ring. Knot the yarn ends securely inside the gown cone and trim excess.
Step 3: Attaching the Lacy Wings
- Position the prepared White Lacy Wings on the back seam of the angel, about 0.5 inches (1.3 cm) below the wooden bead neck line.
- Using the white yarn tail, stitch the center spine of the wings securely to the gown body.
- Ensure the wings flare outward symmetrically to the left and right. Weave in ends inside the gown.
Step 4: Attaching the Neck Bow & Pearl Accent
- Place the bow centered on the front neck line, directly below the wooden bead head.
- Pin in place to check alignment.
- Using the yarn tail from the bow, stitch the back of the bow securely onto the front of the gown.
- Weave in all remaining loose yarn tails inside the body.
                  ( 👑 Halo )
                 ( 🪵 Head )
                / [🎀 Bow] \
               /  /  |  \   \
      (🪶 Left Wing) | (🪶 Right Wing)
             /   /   |   \   \
            /   ( 🌀 Spiral ) \
           (___________________)
📋 Final Shaping Checklist
- ✅ Spiral Coil: Ensure the lower swirl lies flat and visible from the front view.
- ✅ Gown Alignment: Check that the back seam runs vertically down the center back.
- ✅ Head Stability: Verify the wooden bead is seated firmly atop the halo without wobbling.
- ✅ Halo Placement: Ensure the gold halo rests level like a crown behind/above the head.
- ✅ Wing Symmetry: Confirm both wing fans spread evenly at equal heights.
- ✅ Pearl & Bow: Ensure the faux pearl is centered directly beneath the chin area.
💡 M. HELPFUL CROCHET TIPS
- 💡 Tip 1 (Blocking Wings): Lightly spray the white crochet wings with fabric stiffener or diluted PVA glue water (1:1 ratio) and pin them flat on a blocking mat to dry before attaching. This prevents wing edges from curling.
- 💡 Tip 2 (Bead Hole Sizing): If the hole in your wooden bead is too small for a yarn needle, wrap a tiny piece of clear tape around the ends of your yarn strand to create a stiff needle-like end for easy threading.
- 💡 Tip 3 (Coil Control): Work your bottom gown increases with relaxed tension so the spiral lays flat rather than buckling into a cup shape.
- 💡 Tip 4 (Invisible Back Seams): When whipstitching the back seam of the upper gown cone, pick up only the inside loops of the edge stitches to keep the seam virtually invisible.
- 💡 Tip 5 (Securing Gold Cord): Metallic cord can fray easily. Dab a small drop of super glue or clear nail polish on the cut ends of the halo cord before shaping.
- 💡 Tip 6 (Weight & Hanging): These ornaments are light (~20 grams each). Hang them on sturdy branches near soft warm Christmas tree lights to highlight the texture of the stitches and yarn.
🧼 N. CARE INSTRUCTIONS
- 🧼 Spot Cleaning: Clean with a soft, dry cloth or soft-bristled brush to remove dust. Do not submerge in water, as moisture can damage or warp the unfinished wooden bead.
- ☀️ Storage: Store flat in a dry box surrounded by tissue paper. Avoid heavy stacking on top of the ornaments to preserve the shape of the spiral tail and halo ring.
- ⚠️ Child Safety Note: These items contain small wooden beads and faux pearls that may present a choking hazard. They are intended for decorative tree/home display only and are not toys for infants or young children.
❓ R. FAQ
❓ Can I crochet the angel head instead of using a wooden bead?
Yes! If you prefer a 100% yarn ornament, replace the wooden bead with a crocheted sphere:
- R1: MR 6 sc (6)
- R2: [inc] x6 (12)
- R3: [1 sc, inc] x6 (18)
- R4-R6: sc around (18)
- R7: [1 sc, dec] x6 (12) — stuff with fiberfill
- R8: [dec] x6 (6). Fasten off and mount as the head.
❓ What yarn weight works best for these ornaments?
Sport weight (Category 2) or Light DK (Category 3) cotton or acrylic blend yarn produces the cleanest stitch definition and ideal 5.5-inch size. Using Worsted Weight (#4) will result in a larger, heavier ornament.
❓ How do I keep the gold halo standing upright?
Securing the halo cord into a tight loop with a drop of glue and sandwiching its bottom edge between the top gown neck and the wooden bead holds it firmly in an upright position.
❓ Can I make these without glue?
Yes! The halo cord can be stitched closed with gold thread, and the neck bow and pearl can be hand-sewn using fine yarn or matching sewing thread.
❓ Why is my spiral gown curling too much?
If the spiral base curls excessively into a tight tube rather than a flat disc coil, your tension may be too tight. Try going up half a hook size (e.g., to 3.5 mm) for the first 3 rows of the gown pattern.
❓ Can these angels be used as gift toppers or place settings?
Absolutely! They make lovely embellishments on wrapped Christmas packages, gift bags, or holiday dinner napkin rings. You can also burn or write names/dates on the wooden head beads using a fine-tip pyrography tool or gel pen for personalized favors!