📖 B. INTRODUCTION
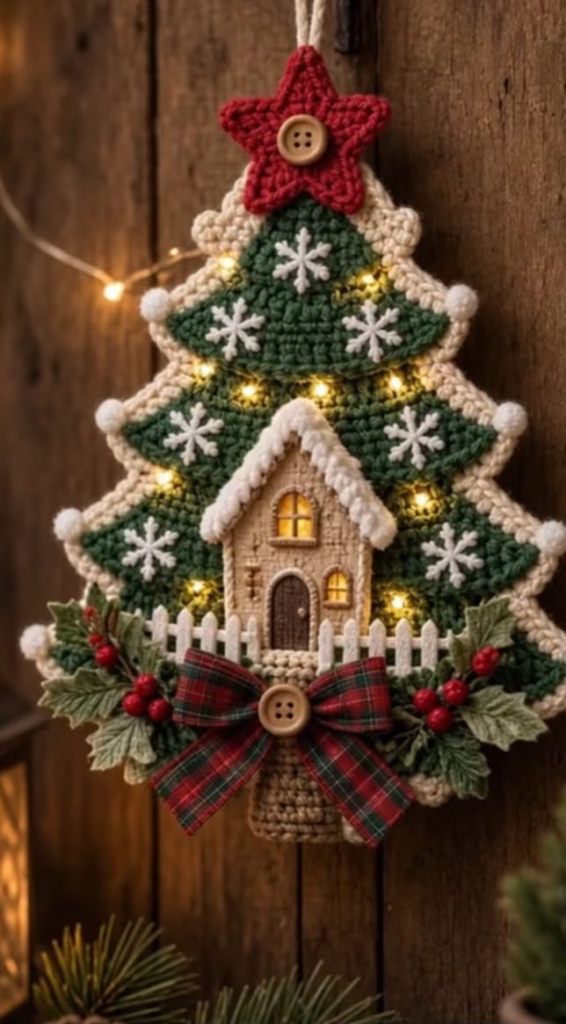
Bring cozy, rustic charm into your home for the holidays with this delightful Cottage Christmas Tree Wall Hanging. This beautiful piece features a rich green, tiered pine tree body edged in a chunky cream border. Nestled in the center of the tree is a miniature gingerbread-style cottage with a snowy roof, giving the piece a magical, storybook feel.
This project is highly textural and combines crochet with festive mixed-media embellishments. It is adorned with a bright red star topper, white embroidered snowflakes, and tiny white pom-poms on the branch tips. The base is beautifully grounded with crocheted green holly leaves, bright red berries, a classic plaid ribbon bow, and charming little white picket fences flanking the cottage.
Whether you are crafting a welcoming piece for your front door or a detailed heirloom to hang near your fireplace, this wall hanging is a joy to construct. The pattern is designed modularly, meaning you will crochet the flat tree panels, the cottage, and the botanical accents separately before assembling them into one cohesive masterpiece.
🔍 C. MAIN PATTERN OVERVIEW
This project is constructed using a layered, applique-style approach to create a sturdy, flat wall hanging:
- Tree Main Body (Front & Back Panels): Two flat triangular panels worked from the bottom up, featuring three distinct stepped tiers. They are joined together with a cream scalloped border.
- Tree Trunk: A simple rectangular piece worked in beige yarn at the base of the tree.
- Star Topper: A red, 5-pointed star applique finished with a wooden button center.
- Central Cottage: A structured applique featuring a beige house body, a textured cream roof, an arched brown door, and embroidered window details.
- Embellishments & Accents: The design incorporates embroidered white snowflakes on the green boughs. The base features crocheted holly leaves, red berry bead accents, a plaid fabric bow anchored by a button, and miniature picket fences.
🎯 D. SKILL LEVEL
Skill Level: Intermediate
This pattern requires a comfortable understanding of basic crochet mechanics and finishing techniques.
- Working flat panels in turned rows.
- Executing increases, decreases, and stepped rows to create the tree tiers.
- Working a continuous border through two thick layers of crochet.
- Basic surface embroidery (straight stitches for snowflakes and windows).
- Sewing and assembling multiple small applique pieces cleanly.
📏 E. FINISHED SIZE
- Height: Approximately 12.5 inches (32 cm) from the bottom of the trunk to the top tip of the star (excluding the hanging loop).
- Width: Approximately 9.5 inches (24 cm) at the widest point of the bottom tree tier.
Note: Your exact finished size will depend on your yarn weight, hook size, and personal tension. Using a stiffer, thicker yarn will yield a larger and more rigid wall hanging.
🧮 F. GAUGE
- Gauge: 16 sc x 18 rows = 4 inches (10 cm) using a 3.5 mm (E-4) hook and worsted weight yarn.
- Gauge Guidance: While gauge is not strictly critical for this decorative item, maintaining a tight, dense fabric is important. A firm tension ensures that the tree holds its distinct stepped shape and provides a solid foundation for sewing on the heavy appliques and buttons without sagging.
🧶 G. REQUIRED YARN AMOUNTS
All estimates are based on Medium/Worsted Weight (#4) yarn (acrylic or cotton blends work best for stiffness):
- 🧵 Forest Green (Main Tree): Approx. 120 yards (110 m)
- 🧵 Cream / Off-White (Trim, Roof & Snowflakes): Approx. 50 yards (46 m)
- 🧵 Beige / Sand (Cottage Body & Trunk): Approx. 25 yards (23 m)
- 🧵 Red (Star Topper): Approx. 15 yards (14 m)
- 🧵 Dark Brown (Door): Approx. 10 yards (9 m)
- 🧵 Olive / Sage Green (Holly Leaves): Approx. 15 yards (14 m)
- 🧵 Yellow / Gold (Window Lights): Small scrap for embroidery
🧰 H. MATERIALS
- 🪡 Crochet Hook: 3.5 mm (US E-4)
- 🧶 Yarn: Worsted weight (#4) in Forest Green, Cream, Beige, Red, Dark Brown, Olive Green, and Yellow.
- 🔘 Buttons: Two natural wood, 4-hole buttons (approx. 15–20 mm).
- 🎀 Ribbon: Tartan/plaid fabric ribbon (red and green), approx. 3/4″ wide and 12″ long.
- 🔴 Berries: 4–6 small red wooden beads, glass beads, or mini red pom-poms.
- ⚪ Mini Pom-Poms: 6 small white pom-poms (approx. 8–10 mm) for the tree branch tips.
- 🏡 Miniature Fence: Two small sections of miniature white picket fence (store-bought dollhouse/craft accessories, or can be crocheted).
- ✨ Optional Lighting: A short string of micro fairy lights.
- ✂️ Tools: Tapestry needle, embroidery needle, scissors, straight pins.
- 🧱 Structural Insert (Optional): A sheet of plastic canvas mesh to insert between the tree panels for maximum wall-hanging rigidity.
🔤 I. ABBREVIATIONS – US TERMS
- ch: chain
- sl st: slip stitch
- sc: single crochet
- hdc: half double crochet
- dc: double crochet
- tr: treble crochet
- inc: increase (2 sc in same stitch)
- dec / sc2tog: single crochet 2 together (decrease)
- st(s): stitch(es)
- MR: magic ring
- FO: fasten off
- RS / WS: right side / wrong side
📝 J. NOTES BEFORE YOU BEGIN
- Turning Chains: The ch 1 at the beginning of rows does NOT count as a stitch throughout the pattern.
- Panel Construction: The front and back tree panels are worked exactly the same way to ensure perfectly matching layers.
- Assembly Tail: Leave long yarn tails (8–12 inches) when fastening off your smaller appliques (star, house, door) to use for seamless sewing.
- Embroidery First: It is much easier to embroider the white snowflakes onto the front green panel before you crochet the front and back panels together.
🪡 K. COMPLETE PATTERN
🎄 Tree Panel (Make 2 – 1 Front, 1 Back)
Worked flat in turned rows from bottom to top using Forest Green yarn. The tree is built in three distinct tiers.
Bottom Tier
- Row 1: Ch 35, sc in 2nd ch from hook and in each ch across, turn. (34 sc)
- Row 2: Ch 1, sc in each st across, turn. (34 sc)
- Row 3: Ch 1, dec, sc in each st across until 2 sts remain, dec, turn. (32 sc)
- Row 4: Ch 1, sc in each st across, turn. (32 sc)
- Row 5: Ch 1, dec, sc in next 28 sts, dec, turn. (30 sc)
- Row 6: Ch 1, sc in each st across, turn. (30 sc)
- Row 7: Ch 1, dec, sc in next 26 sts, dec, turn. (28 sc)
- Row 8: Ch 1, sc in each st across, turn. (28 sc)
Middle Tier
- Row 9 (Stepping inward): Sl st loosely into the first 5 sts. Ch 1, sc in the same st as the last sl st. Sc in the next 19 sts. Leave the remaining 4 sts unworked. Turn. (20 sc)
- Row 10: Ch 1, sc in each of the 20 sts, turn. (20 sc)
- Row 11: Ch 1, dec, sc in next 16 sts, dec, turn. (18 sc)
- Row 12: Ch 1, sc in each st across, turn. (18 sc)
- Row 13: Ch 1, dec, sc in next 14 sts, dec, turn. (16 sc)
- Row 14: Ch 1, sc in each st across, turn. (16 sc)
Top Tier
- Row 15 (Stepping inward): Sl st loosely into the first 4 sts. Ch 1, sc in the same st as the last sl st. Sc in the next 9 sts. Leave the remaining 3 sts unworked. Turn. (10 sc)
- Row 16: Ch 1, sc in each of the 10 sts, turn. (10 sc)
- Row 17: Ch 1, dec, sc in next 6 sts, dec, turn. (8 sc)
- Row 18: Ch 1, dec, sc in next 4 sts, dec, turn. (6 sc)
- Row 19: Ch 1, dec, sc in next 2 sts, dec, turn. (4 sc)
- Row 20: Ch 1, (dec) twice, turn. (2 sc)
- Row 21: Ch 1, dec. (1 sc)
- FO and weave in ends. Repeat the exact same process for the second panel.
🪵 Tree Trunk
Worked in turned rows using Beige yarn.
- Row 1: Identify the center 10 stitches along the foundation chain (bottom edge) of Row 1 of your Tree Panel. Attach Beige yarn. Ch 1, sc in the same st and the next 9 sts, turn. (10 sc)
- Row 2–7: Ch 1, sc in each st across, turn. (10 sc)
- FO. Repeat on the Back Panel.
⭐️ Red Star Topper
Worked in joined rounds using Red yarn. It has 5 points.
- Rnd 1: MR, ch 1, 10 sc in ring. Join with sl st to 1st sc. (10 sc)
- Rnd 2: (Ch 4, sl st in 2nd ch from hook, sc in next ch, hdc in last ch, skip 1 st on the main ring, sl st in the next st on the ring). Repeat from * to * 4 more times to create 5 points.
- FO, leaving a long tail.
🏠 Gingerbread Cottage Applique
Cottage Main Body
Worked flat using Beige yarn.
- Row 1: Ch 13, sc in 2nd ch from hook and each ch across, turn. (12 sc)
- Row 2–11: Ch 1, sc in each st across, turn. (12 sc)
- Row 12 (Roof Pitch): Ch 1, dec, sc in next 8 sts, dec, turn. (10 sc)
- Row 13: Ch 1, dec, sc in next 6 sts, dec, turn. (8 sc)
- Row 14: Ch 1, dec, sc in next 4 sts, dec, turn. (6 sc)
- Row 15: Ch 1, dec, sc in next 2 sts, dec, turn. (4 sc)
- Row 16: Ch 1, (dec) twice, turn. (2 sc)
- Row 17: Ch 1, dec. (1 sc)
- FO and weave in the ends.
Cottage Roof Trim
Worked directly onto the cottage using Cream yarn.
- Attach Cream yarn at the bottom left edge of the roof pitch (Row 12).
- Work up the angled edge: (sc in row end, ch 2, sl st in same space) repeatedly to create a textured snow look.
- At the peak (Row 17), work (sc, ch 3, sl st, sc).
- Continue the (sc, ch 2, sl st) texture down the opposite angled edge.
- FO, leaving a long tail for sewing.
Arched Door
Worked flat using Dark Brown yarn.
- Row 1: Ch 5, sc in 2nd ch from hook and next 3 chs, turn. (4 sc)
- Row 2–5: Ch 1, sc in each st across, turn. (4 sc)
- Row 6 (Arch): Do not ch 1. Skip 1st st, work 4 dc into the next st, skip next st, sl st into the final st.
- FO, leaving a tail for sewing.
🌿 Holly Leaves (Make 4)
Worked in the round around a foundation chain using Olive Green yarn.
- Ch 8.
- Side 1: Sl st in 2nd ch from hook, sc in next, hdc in next, dc in next, (ch 2, sl st in 2nd ch from hook to make a picot point), dc in next, hdc in next, sc in last ch.
- Side 2: Rotate your work to crochet up the opposite side of the chain. Sc in first st, hdc in next, dc in next, picot point, dc in next, hdc in next, sc in next, sl st in top point.
- FO, leaving a tail for sewing.
🏡 Optional Crocheted Picket Fence (Make 2)
(Note: If you have purchased miniature craft fences, skip this step). Worked using Cream yarn.
- Ch 14.
- (Sl st in 2nd ch from hook, sc in next 2 chs, ch 4, sl st back down the 3 chs just made, sl st into the main foundation chain). Repeat across to create 4 small vertical posts connected by a bottom rail.
- FO, leaving a tail.
🎨 L. STYLING / ASSEMBLY / STABILITY / FINAL SHAPING
1. Snowflake & Window Embroidery
- Snowflakes: Thread a tapestry needle with Cream yarn. On the Front Green Panel, embroider 6-pointed starbursts randomly across the three tiers.
- Windows: On the Beige Cottage Body, use Dark Brown yarn to stitch small square frames on either side of where the door will go, and a slightly taller arched window near the roof peak. Use Yellow yarn to fill the panes with straight stitches so they look illuminated.
2. Cottage Assembly
- Sew the Dark Brown Arched Door to the bottom center of the Beige Cottage.
- Pin the completed Cottage to the lower-middle section of the Front Green Panel, aligning its base with the top of the tree trunk. Sew it down securely around the perimeter.
- If using mini picket fences, stitch or hot-glue them horizontally flanking the cottage base.
3. Joining the Panels & Border
- Place the Front and Back tree panels together, wrong sides facing inward.
- (Optional Stability Step: Trace the tree shape onto plastic canvas, cut it out slightly smaller than the tree, and sandwich it between the panels).
- Attach Cream yarn to the bottom right corner of the trunk.
- Working through both layers to join them, sc evenly up the side of the trunk, up the stepped tiers of the tree, around the top, and back down the other side.
- Scallop Details: To mimic the textured trim, work a (sc, ch 2, sl st in same st) into every other stitch along the green tree edges, and place 3 sc into the sharp outer corners of each tier.
- FO and weave in ends.
4. Attaching Accents
- Hanging Loop: Attach a loop of Cream yarn or thick twine securely to the top point of the back panel.
- Star Topper: Sew the Red Star to the front top peak of the tree. Sew one of the wooden buttons securely to the center of the star.
- Branch Tips: Using a needle and thread or a small dab of fabric glue, attach one mini white pom-pom to the outer points of each tree tier (6 pom-poms total).
- Base Decor: Arrange the 4 green Holly Leaves at the base of the tree trunk, overlapping them slightly. Sew them into place. Stitch the red beads/berries into the center of the holly clusters.
- Bow: Tie the plaid ribbon into a neat bow. Sew it firmly to the base of the tree trunk, overlapping the holly. Sew the second wooden button over the center knot of the bow.
- Lights (Optional): Gently weave a micro copper-wire string of warm white fairy lights through the green stitches of the tree, hiding the battery pack behind the piece.
💡 M. HELPFUL CROCHET TIPS
- 💡 Check Your Count: Always verify your stitch counts at the end of the stepped row decreases. Miscounting by just one stitch can make the tiers look lopsided.
- 💡 Crisp Embroidery: When stitching the snowflakes, split the plies of the worsted weight yarn, or use 6-strand embroidery floss for a cleaner, sharper starburst look.
- 💡 Flat Seaming: When joining the front and back panels, keep your tension even. If the border is worked too tightly, the edges of the tree will curl forward.
- 💡 Symmetry: Pin all of your appliques (star, house, bow) to the front panel using straight pins before sewing anything down permanently. Step back and check that everything is centered.
- 💡 No-Sew Options: Elements like the mini pom-poms, ribbon, and wooden fences can be attached using industrial fabric glue or hot glue if you want to save time on sewing.
- 💡 Concealing Light Wires: If adding string lights, run the thin wire directly between the front and back panels before completely sealing the cream border shut, poking the bulbs through the front stitches.
🧼 N. CARE INSTRUCTIONS
- Cleaning: Because this piece utilizes mixed media (wooden buttons, fabric ribbon, beads, and potentially plastic canvas/lights), spot clean only. Dab gently with a damp cloth and mild soap.
- Drying: Do not machine wash or tumble dry. Lay flat to air dry.
- Storage: Store flat in a shallow box lined with tissue paper at the end of the holiday season to prevent the appliques from getting crushed. Keep away from excessive moisture to protect the wooden elements.
❓ R. FAQ
❓ Can I make this tree as a plush amigurumi instead of a flat wall hanging?
Yes! Instead of using a rigid plastic canvas insert, you can lightly stuff the space between the front and back panels with polyester fiberfill before sewing the final side of the cream border shut.
❓ How do I resize this pattern to make it larger?
To double the size of the piece, hold two strands of worsted weight yarn together and use a larger 5.5 mm or 6.0 mm hook. You will need to scale up your buttons, ribbon width, and pom-poms to match the new proportions.
❓ Do I have to make the back panel?
No, you can technically make just the front panel if you want to use it as an applique for a blanket or sweater. However, for a wall hanging, the back panel hides the messy embroidery threads and provides necessary structural thickness.
❓ What can I use if I don’t have wooden buttons?
You can easily crochet a small flat circle (MR, 6 sc) in brown yarn to replace the button on the star, and a larger circle (MR, 12 dc) for the center of the bow.
❓ How do I keep the ribbon bow from fraying over time?
Trim the ends of your fabric ribbon at a 45-degree angle, and carefully seal the cut edges with a tiny dab of clear nail polish, fabric fray check liquid, or by passing a lighter flame quickly over the edge (if it is a synthetic ribbon).