Skill Level: Intermediate to Advanced
Terminology: US Crochet Terms
📖 B. INTRODUCTION
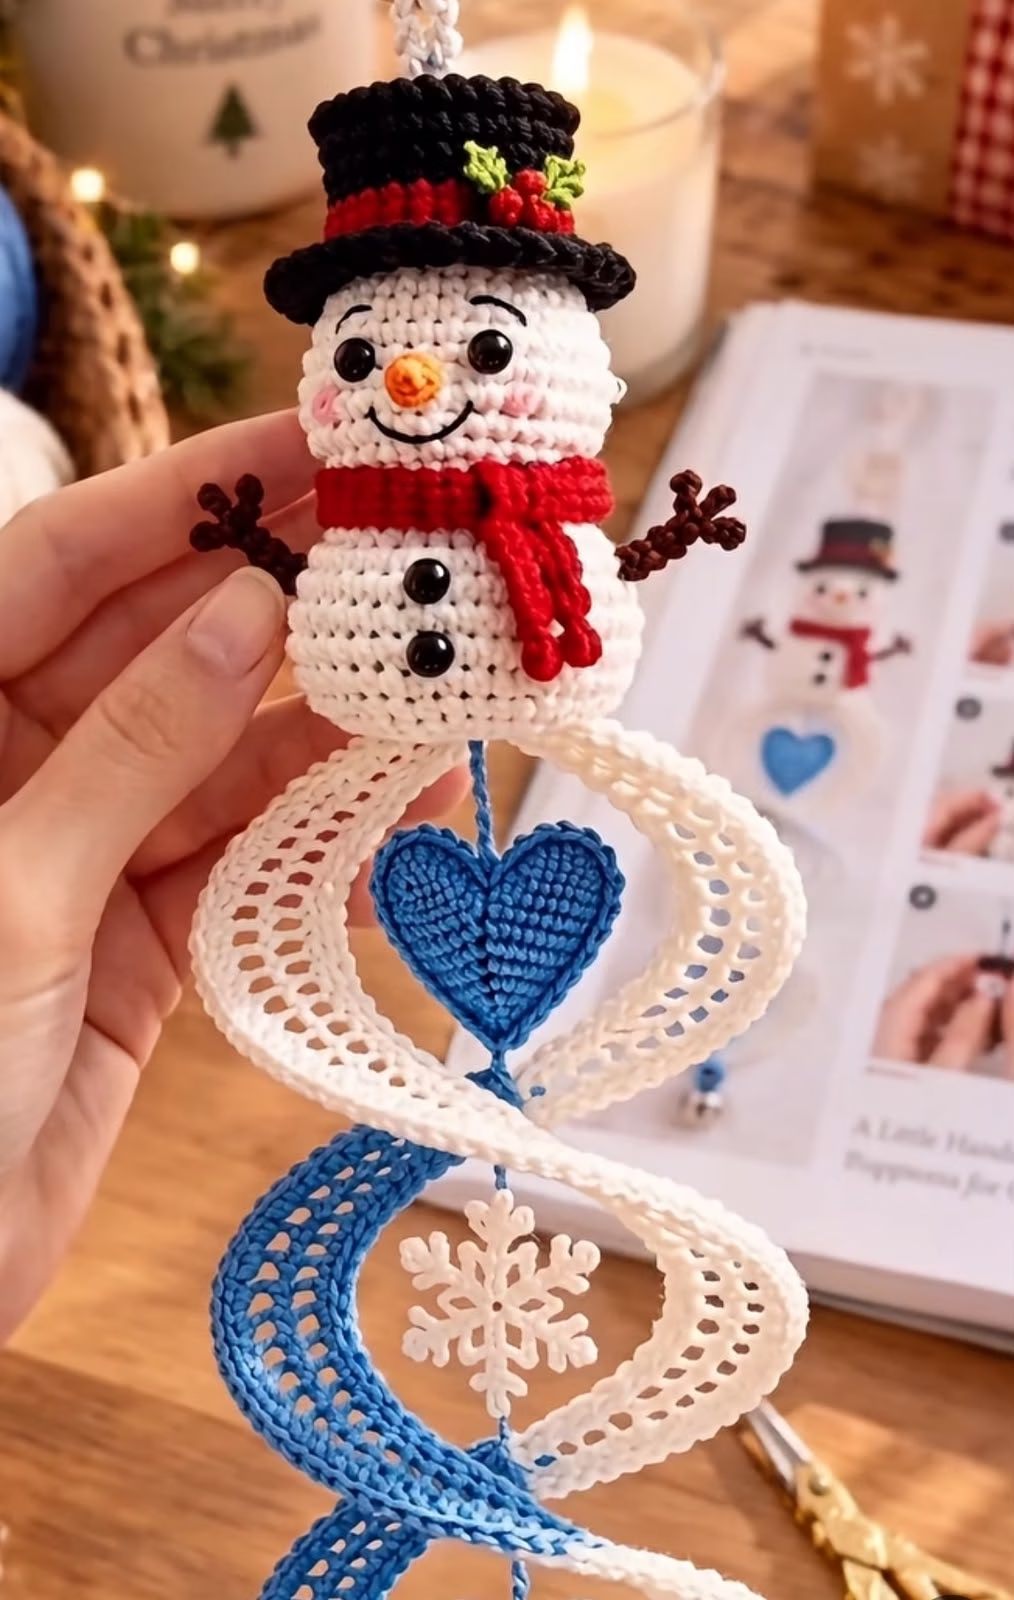
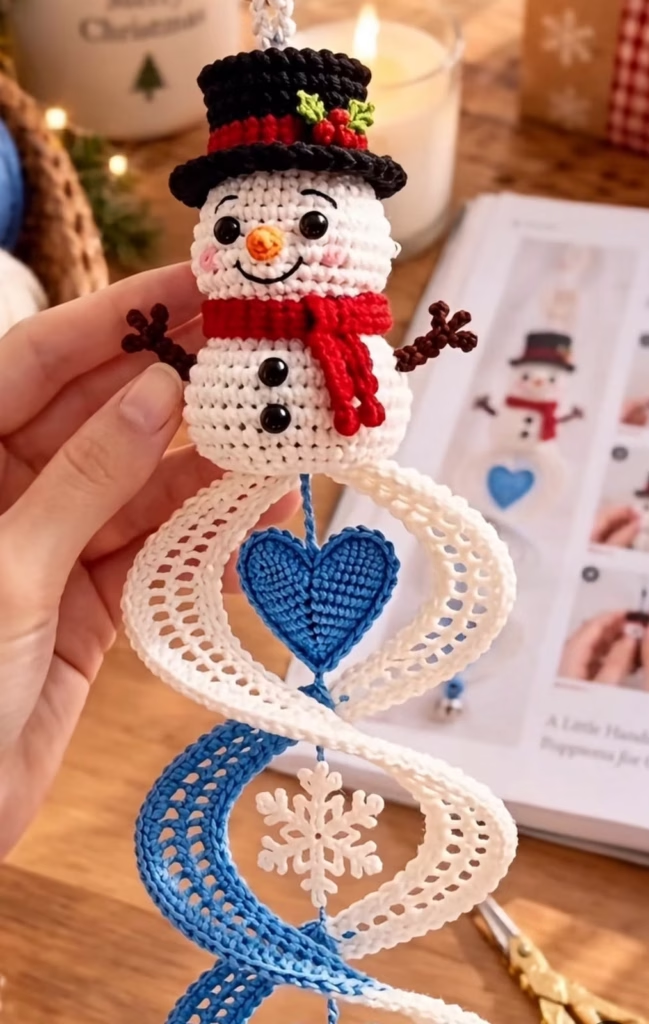
Add a touch of whimsy and festive cheer to your holiday decor with this adorable Crochet Snowman Amigurumi Wind Spinner. This unique project combines the charm of amigurumi with the flowing movement of a classic wind spinner, creating a cheerful decoration that spins and dances with the slightest breeze.
This pattern features a joyful snowman at the top, complete with a traditional black top hat, a cozy red scarf, and a carrot nose[cite: 1]. The main body of the decoration is a flowing, two-color (white and blue) spiral wind spinner that creates a beautiful visual effect when it turns[cite: 1]. It’s finished with a delightful blue heart and a dangling white snowflake motif, adding extra layers of festive detail[cite: 1].
Whether you hang it by a window, on a covered porch, or as a statement piece on your Christmas tree, this unique spinner is a wonderful keepsake or handmade gift. The project requires a mix of amigurumi assembly and intermediate wind spinner construction, making it an engaging build for crocheters looking for their next holiday challenge.
🔍 C. MAIN PATTERN OVERVIEW
This festive wind spinner is constructed in several distinct sections that are assembled into one final piece:
- Top: An amigurumi snowman figure (Head, Body, Top Hat, Scarf, Nose, and small twig-like Arms)[cite: 1].
- Middle (The Spinner): Two long, flat crochet strips (one White, one Blue) that are dramatically increased to create a flowing, wavy texture[cite: 1]. These are joined to form the main spiral structure.
- Bottom (The Dangles): A central hanging cord with a crocheted Blue Heart motif and a dangling White Snowflake motif[cite: 1].
🎯 D. SKILL LEVEL
Intermediate to Advanced
This project is best suited for crocheters with experience in:
- Amigurumi assembly and small-parts attaching[cite: 1].
- Intermediate amigurumi shaping.
- Understanding how a massive stitch increase creates the spiral wind spinner effect[cite: 1].
- Following multi-part assembly and mounting instructions.
📏 E. FINISHED SIZE
- 📏 Snowman: Approximately 4 inches (10 cm) tall.
- 📏 Total Length: Approximately 18-20 inches (45-50 cm) from the top hanging loop to the bottom of the dangling snowflake[cite: 1].
- Note: Final size will vary based on yarn choice, hook size, and individual tension.
🧮 F. GAUGE
- 🧵 For Amigurumi Parts (Snowman): Gauge is not critical, but stitches should be tight enough to prevent fiberfill stuffing from showing through. A smaller hook than suggested on the yarn label is recommended.
- 🧵 For Wind Spinner Sections: Tension should be even and relaxed to allow the spinner to flow and spin freely.
🧶 G. REQUIRED YARN AMOUNTS
- 🧶 Primary Colors (Worsted or Light Worsted Cotton/Acrylic Blend):
- White (for Snowman, parts of spinner, and snowflake): Approx. 100 yards[cite: 1].
- Blue (like a royal or cobalt, for spinner and heart): Approx. 60 yards[cite: 1].
- 🧶 Accent Colors (Small Amounts of Worsted Weight):
- Black (for Hat and buttons): Approx. 15 yards[cite: 1].
- Red (for Scarf and hatband): Approx. 10 yards[cite: 1].
- 🧶 Details (Tiny Amounts):
- Orange (for Carrot Nose)[cite: 1].
- Brown or dark gray (for tiny arms)[cite: 1].
- Bright Green (for Holly leaves)[cite: 1].
- Bright Red (for tiny Holly berries)[cite: 1].
🧰 H. MATERIALS
- 🪡 Crochet Hooks:
- 3.25 mm (D/3) for Amigurumi and detailed parts.
- 3.75 mm (F/5) for the main Wind Spinner sections.
- ☁️ Stuffing: Polyester fiberfill.
- 👀 Eyes: 8 mm black plastic safety eyes.
- Notions: Stitch markers, tapestry needle, sewing pins, scissors, measuring tape.
- Optional: Black embroidery thread for facial details and small black beads for the body buttons (if not crocheted)[cite: 1].
🔤 I. ABBREVIATIONS – US TERMS
- ch: chain
- sc: single crochet
- hdc: half double crochet
- dc: double crochet
- tr: treble crochet
- inc: increase (2 sc in one stitch)
- dec: invisible decrease (sc2tog using front loops only)
- BLO: back loop only
- FLO: front loop only
- MR: magic ring
- sl st: slip stitch
- st(s): stitch(es)
- rnd(s): round(s)
- () x #: repeat instructions within parentheses the number of times specified.
📝 J. NOTES BEFORE YOU BEGIN
- 📌 Tight Stitches for Amigurumi: Maintain tight tension when working the snowman parts to ensure the stuffing is contained. Use a stitch marker to track the beginning of each continuous round.
- 📌 Wind Spinner Construction: The key to the wind spinner effect is the massive increase in every single stitch. The two main strips are worked flat (not in rounds) and then joined. The twist happens naturally when the joined piece is suspended.
- 📌 Assemble Top to Bottom: For easier handling, complete and assemble the snowman figure first, then construct the spinner and attach it, and finally attach the dangles.
- 📌 Hanging: The finished spinner needs to be hung from a high point (like the ceiling or a hook near a window) to function correctly. The weight of the lower sections helps maintain the spiral twist.
🪡 K. COMPLETE PATTERN
🧠 SNOWMAN FIGURE
Head (White)
R1: 6 sc in MR. (6) R2: inc in each st around. (12) R3: (1 sc, inc) x 6. (18) R4: (2 sc, inc) x 6. (24) R5: (3 sc, inc) x 6. (30) R6-10: sc around (5 rounds). (30) R11: (3 sc, dec) x 6. (24) R12: (2 sc, dec) x 6. (18) Insert safety eyes between Rnds 7 and 8, about 5 stitches apart[cite: 1]. Sew a tiny carrot nose in orange yarn just below the eyes[cite: 1]. Add a small mouth and optional cheeks with black embroidery thread[cite: 1].Begin stuffing firmly. R13: (1 sc, dec) x 6. (12) R14: (dec) x 6. (6) Fasten off, leave a long tail to sew to the body. Finish stuffing before closing.
Body (White)
R1: 6 sc in MR. (6) R2: inc in each st around. (12) R3: (1 sc, inc) x 6. (18) R4: (2 sc, inc) x 6. (24) R5-9: sc around (5 rounds). (24) R10: (2 sc, dec) x 6. (18) R11-12: sc around (2 rounds). (18) R13: (1 sc, dec) x 6. (12) Fasten off, leave a long tail to sew the bottom end of the spinner.Add two small black “buttons” to the front (either crocheted black sc rings or small beads)[cite: 1].
Top Hat (Black)
R1: 6 sc in MR. (6) R2: inc in each st around. (12) R3: (1 sc, inc) x 6. (18) R4-6: sc around (3 rounds). (18) Change to Red yarn (or just complete one round for hatband)[cite: 1]. R7: sc around. (18) Change to Black yarn[cite: 1]. R8: In FLO, (1 sc, inc) x 9. (27) R9: sc around. (27) Fasten off, leave a long tail to sew onto the head.Add tiny holly detail to the hat (small green leaves, tiny red berry sc balls)[cite: 1].
Scarf (Red)
ch 30 (or length to wrap). R1: sc in 2nd ch from hook and across. (29) Fasten off, weave in ends.
🌀 THE WIND SPINNER BODY
Worked flat using the 3.75 mm hook for the flowing section[cite: 1].
Main Spinner Strip (Make 2: 1 White, 1 Blue)
Ch 120 (approximate length to drape as shown; adjust for more or less length)[cite: 1]. Row 1: dc in 3rd ch from hook and each ch across. (118) Row 2: ch 2 (counts as first dc), work 3 dc in each stitch across. This creates a massive increase, causing the strip to naturally ripple and twist. (354) Fasten off, leave a long tail for sewing the strips together.
Joining the Spinner Strips
Lay the White and Blue strips side-by-side with Right Sides facing the same direction[cite: 1]. Sew the two strips together along one long edge (the un-wavy edge, near Row 1) using an invisible mattress stitch. You now have a wide, very wavy, two-color piece[cite: 1].
💙 HANGING DANGLES
Heart Motif (Blue)
R1: In MR: ch 2, (3 tr, 4 dc, tr, 4 dc, 3 tr, ch 2, sl st) into the ring. R2: sl st in 1st st, (inc, inc) in next two sts, sc in next 4 sts, (dc, tr, dc) in next st (bottom point), sc in next 4 sts, (inc, inc) in next two sts, sl st in last st. Fasten off, weave in ends.
Snowflake Motif (White)
R1: 12 sc in MR. sl st to join. (12) R2: (ch 5, sl st in next 2 sts) x 6 times. sl st to join. (6 chain loops) R3: (2 sc in loop, ch 3, sl st in 1st ch to form picot, 2 sc in same loop, ch 2, sl st in next sl st, ch 2) x 6 times. Fasten off.
🎨 L. STYLING / ASSEMBLY / STABILITY / FINAL SHAPING
                          [ Hanging Loop ]
                                ||
                      /------------------------\
                     |   👒 SNOWMAN FIGURE       |
                     |   With Hat, Scarf, and    |
                     |   facial details[cite: 1]         |
                      \------------------------/
                                ||
                                ||
                    /----------------------------\
                   |  🌀 Joined WIND SPINNER Body |
                   |  Sewn into a MOBIUS shape    |
                   |  to create natural twists[cite: 1]    |
                    \----------------------------/
                             |          |
                             |      💙 Blue Heart
                             |      Hanging Central[cite: 1]
                             |
                      ❄️ Snowflake
                      Hanging Bottom[cite: 1]
1. Build the Snowman
- Sew the completed head onto the body firmly[cite: 1].
- Sew the Top Hat onto the head slightly back.
- Wrap the Scarf around the neck[cite: 1].
- Sew tiny carrot nose, add mouth/brow embroidery.
- Attach the small twig-like arms (brown yarn chains/loops) to the body side[cite: 1].
2. Mount the Spinner
- Lycra the joined white and blue wind spinner strips so they hang vertically.
- This is the critical step for the mobius or infinity look[cite: 1]. Grasp the two short ends of the joined spinner strip. Without twisting it, sew the two short ends together to form a large circle.
- Now, look at the shape. Grasp the “top” of the circle and let it hang. The internal weight of the massive stitch count causes the shape to naturally fall and spiral into a mobius loop[cite: 1]. Adjust the twists so they flow evenly.
3. Attach Components to Spinner
- Top (Snowman): Sew the bottom of the Snowman Body (R13) firmly to the exact top of your spiral mobius structure (where you want it to hang from). Add a hanging loop of yarn or ribbon to the very top.
- Central (Heart): Create a separate hanging cord (approx 8-10 inches) of white yarn. Attach the Blue Heart Motif to the center of this cord. The other end of this cord hangs down from the bottom of the snowman body, running through the central void of the spinner, to the heart[cite: 1].
- Bottom (Snowflake): Attach the remaining end of the heart’s hanging cord to the very bottom curve of the spiral wind spinner structure. Now, attach the Snowflake Motif so it dangles from the very bottom of the entire spinner shape[cite: 1].
4. Final Shaping Check
- Check the twists: The wind spinner should create a continuous flowing spiral from the snowman down[cite: 1]. Use sewing pins during final assembly to hold the twists in place while you secure the dangles.
- Ensure the weight is balanced so the snowman hangs straight and the spinner can spin freely.
💡 M. HELPFUL CROCHET TIPS
- 💡 Tight Tension: Small parts like the nose and arms can be difficult to sew if the tension is loose. Make your stitches tight.
- 💡 Spinner Yarn Flow: Choose a yarn for the wind spinner that has a slightly relaxed flow. Super tight cotton might create a stiff spiral, whereas a softer cotton-acrylic blend will drape and spin better.
- 💡 Pre-Twist: After sewing the spinner strips together, pre-twist the piece a few times before connecting the short ends to form the final circle. This helps encourage the natural spiral effect.
- 💡 Secure the Eyes: Always double-check that safety eyes are locked securely on the inside before you stuff the head.
- 💡 Hanging Cord Strength: Use a strong, non-stretchy yarn or thin ribbon for the main hanging cord. Any stretching will alter the drape of the spinner.
- 💡 Invisible Joining: The mattress stitch is your best friend for joining amigurumi pieces and sewing the wind spinner strips without visible seams.
🧼 N. CARE INSTRUCTIONS
- 🧼 Spot Clean Only: Use a damp cloth and mild soap to spot clean the snowman and delicate parts[cite: 1]. Do not submerge the amigurumi.
- 🧼 Air Dry: Lay the spinner flat on a towel or hang it near a gentle fan to air dry if it needs cleaning.
- 🧼 Store with Care: Store this ornament flat in a box, possibly layered with tissue paper, to keep the wind spinner sections from tangling between holiday seasons.
❓ R. FAQ
❓ How do I get my spinner to spin?
The spin comes from a high increase-per-stitch count. When the massive ruffled surface catches the air, it pushes the entire structure into a spin. For the best spinning effect, hang it in a location with consistent gentle airflow, like near an air vent or on a porch.
❓ What if my spinner doesn’t look twisted?
Make sure you followed the mounting instructions exactly. The spinner forms its own twist when the weight is applied from below. You can manually encourage the twist during assembly, but the ultimate look is created by gravity and tension[cite: 1].
❓ Can I use smaller eyes?
Yes, 6 mm eyes would also work and give a more subtle look. Adjust based on your personal preference.
❓ Do I need to stuff the snowman firmly?
Firm stuffing is crucial to give the snowman its shape and structural integrity, especially as it holds the weight of the spinner below[cite: 1].
❓ How do I attach the small twig-like arms?
These are not meant to be functional, just decorative. You can either make a tiny chain of brown yarn and sew it onto the body side, or just use brown embroidery thread to make a few long straight stitches that mimic a twig. The photo looks like simple chains and loops are attached[cite: 1].
❓ How do I connect the dangles to the spinner?
A strong central cord (or several small cords) runs through the center of the mobius spiral shape. The heart hangs from this cord. The snowflake hangs from the very bottom point of the spinner’s curve. It takes some careful sewing and pinning to ensure everything is attached to the central line correctly
