📖 B. INTRODUCTION
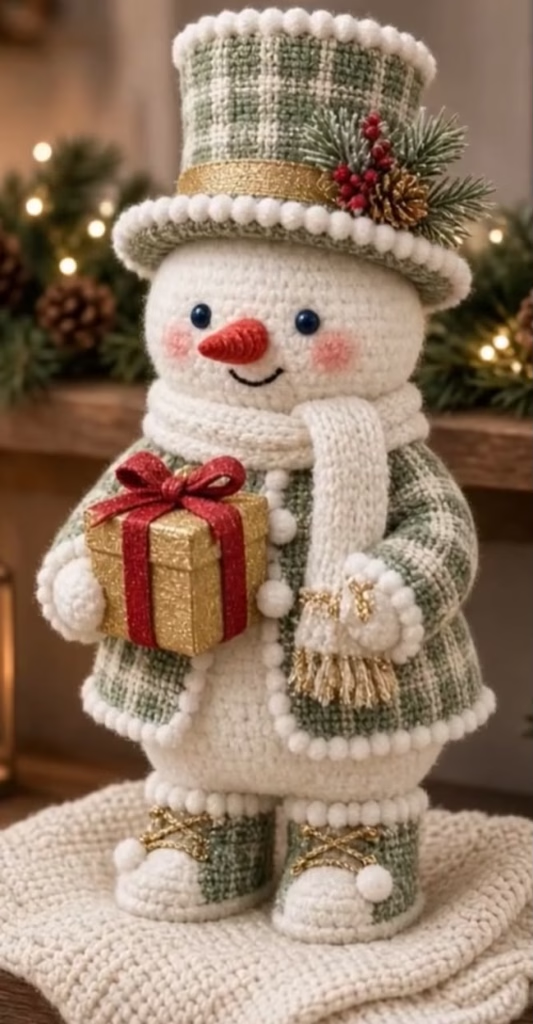
Bring the magic of a classic winter wonderland indoors with this heirloom-quality snowman amigurumi. This design captures the quintessential charm of the holiday season, featuring a smartly dressed snowman wrapped in a textured white scarf and matching plaid winter wear. Perfect as a prominent mantle centerpiece, a thoughtful handmade gift, or a cherished seasonal keepsake, this project offers a highly rewarding mix of structural amigurumi shaping and decorative detailing.
The true standout features of this design are the coordinated green and white plaid coat, the tall top hat with a bobble trim, and the charming matching boots laced with gold. By incorporating surface crochet techniques for the plaid grid and simple bobble stitches for the snowy trim, you can create a sophisticated, textured look without complicated colorwork.
This snowman is heavily customizable. While he holds a festive gold gift box tied with a red ribbon, you can easily swap this accessory for a miniature broom, a woodland creature, or a customized name tag to suit your recipient.
🔍 C. MAIN PATTERN OVERVIEW
This comprehensive pattern is constructed in modular sections to ensure stability and precise detailing. The head and body are crocheted as a solid white base, providing a sturdy foundation. The legs and boots are built with flat bases so the snowman can stand independently. The signature plaid clothing—including the open coat, top hat, and boots—is crocheted in a solid green base. The distinct plaid grid is applied afterward using a surface slip stitch technique, ensuring crisp, straight lines. Finally, the accessories—a cozy ribbed scarf, a carrot nose, and a tiny gold gift box—complete the festive silhouette.
🎯 D. SKILL LEVEL
Intermediate-to-Advanced
This project requires patience and a good understanding of 3D shaping. It is ideal for crocheters who have mastered basic amigurumi and are ready to tackle structural assembly and decorative overlays.
- Working in continuous rounds and joined rounds
- Invisible decreases and increasing
- Surface slip stitching (for the plaid effect)
- Bobble stitches (for the snowy trim)
- Working in the Back Loop Only (BLO) and Front Loop Only (FLO)
- Creating structural flat bases using cardboard or plastic inserts
📏 E. FINISHED SIZE
- Height: Approximately 12 inches (30.5 cm) from the bottom of the boots to the top of the hat.
- Width: Approximately 6.5 inches (16.5 cm) across the widest part of the body and arms.
- Note: Your final size will vary depending on your exact yarn weight, hook size, and personal tension. Stuffing density also plays a significant role in the final silhouette.
🧮 F. GAUGE
5 sts x 5 rows in single crochet = 1 inch (2.5 cm)
For amigurumi, exact gauge is less critical than creating a dense, tight fabric. Your stitches must be tight enough that the fiberfill stuffing does not show through the white body or the dark green coat. If your tension is loose, drop down a hook size.
🧶 G. REQUIRED YARN AMOUNTS
All estimates are based on a standard worsted weight (Medium 4) acrylic or cotton-blend yarn.
- White (Main Base & Trim): Approximately 150g (300 yards)
- Sage Green (Coat, Hat, Boots): Approximately 100g (200 yards)
- Gold/Mustard (Gift Box & Hat Band): 20g (40 yards)
- Orange (Carrot Nose): Scrap amount (under 5g)
- Red (Gift Box Bow): Scrap amount (under 5g)
🧰 H. MATERIALS
- Hooks: 2.5 mm (for the amigurumi body/tight stitches) and 3.0 mm (for the coat/clothing).
- Yarn: Worsted weight yarn in White, Sage Green, Gold, Orange, and Red.
- Eyes: One pair of 10mm black safety eyes.
- Stuffing: High-quality polyester fiberfill.
- Inserts: Thick cardboard or plastic template material (for flattening the boot soles and the top of the hat).
- Accents: Thin gold embroidery thread or cord (for the boot laces), pink blush or pastel chalk (for the cheeks), and a small cluster of faux pine sprigs, red berries, and a mini pinecone (for the hat decoration).
- Tools: Yarn needle, stitch markers, sewing pins, and sharp scissors.
- ⚠️ Safety Note: If gifting to a child under 3, embroider the eyes instead of using plastic safety eyes, and securely crochet or embroider the hat decorations instead of using faux floral picks.
🔤 I. ABBREVIATIONS – US TERMS
- MR: Magic Ring
- ch: chain
- st(s): stitch(es)
- sc: single crochet
- hdc: half double crochet
- inc: single crochet increase (2 sc in one st)
- dec: invisible single crochet decrease (sc 2 together using front loops)
- sl st: slip stitch
- BLO: back loop only
- FLO: front loop only
- BO: Bobble stitch (Yarn over, insert hook into st, yarn over, pull up a loop, yarn over, pull through 2 loops on hook. Repeat 3 more times in the same st. Yarn over and pull through all 5 loops on the hook. Push the bobble to the front).
- (…) xN: repeat the instructions in parentheses N times
- […]: total number of stitches at the end of the round/row
📝 J. NOTES BEFORE YOU BEGIN
- Continuous Rounds: Most components (head, body, arms) are worked in continuous spiral rounds. Do not join with a slip stitch or chain 1 at the end of a round unless explicitly stated.
- Joined Rounds: The coat and hat sections use joined rounds/rows to keep the seams and colorwork completely straight.
- Marker Use: Always place a stitch marker in the first stitch of the round and move it up as you progress.
- Stuffing: Stuff firmly as you go. The neck requires exceptionally dense stuffing to support the weight of the large top hat.
- Plaid Technique: The green and white plaid pattern is achieved by crocheting a solid green piece, then working surface slip stitches in white vertically and horizontally across the fabric.
🪡 K. COMPLETE PATTERN
🧠 Head and Body (Worked as one piece)
Yarn: White | Hook: 2.5 mm | Make 1
Head:
R1: MR 6 sc. [6]
R2: inc around. [12]
R3: (1 sc, inc) x6. [18]
R4: (2 sc, inc) x6. [24]
R5: (3 sc, inc) x6. [30]
R6: (4 sc, inc) x6. [36]
R7: (5 sc, inc) x6. [42]
R8: (6 sc, inc) x6. [48]
R9: (7 sc, inc) x6. [54]
R10: (8 sc, inc) x6. [60]
R11-22: sc around. [60] (12 rounds)
Insert safety eyes between R16 and R17, spacing them about 9 stitches apart.
R23: (8 sc, dec) x6. [54]
R24: (7 sc, dec) x6. [48]
R25: (6 sc, dec) x6. [42]
R26: (5 sc, dec) x6. [36]
R27: (4 sc, dec) x6. [30]
R28: (3 sc, dec) x6. [24]
Stuff the head firmly, shaping it into a smooth sphere.
Body:
R29: (3 sc, inc) x6. [30]
R30: (4 sc, inc) x6. [36]
R31: (5 sc, inc) x6. [42]
R32: (6 sc, inc) x6. [48]
R33: (7 sc, inc) x6. [54]
R34: (8 sc, inc) x6. [60]
R35: (9 sc, inc) x6. [66]
R36-48: sc around. [66] (13 rounds)
R49: (9 sc, dec) x6. [60]
R50: (8 sc, dec) x6. [54]
R51: (7 sc, dec) x6. [48]
R52: (6 sc, dec) x6. [42]
Stuff the body firmly, paying special attention to the neck joint.
R53: (5 sc, dec) x6. [36]
R54: (4 sc, dec) x6. [30]
R55: (3 sc, dec) x6. [24]
R56: (2 sc, dec) x6. [18]
R57: (1 sc, dec) x6. [12]
R58: dec around. [6]
Fasten off, weave the tail through the front loops of the remaining 6 stitches, and pull tight to close. Weave in the end.
🥕 Carrot Nose
Yarn: Orange | Hook: 2.5 mm | Make 1
R1: MR 4 sc. [4]
R2: (1 sc, inc) x2. [6]
R3: sc around. [6]
R4: (2 sc, inc) x2. [8]
R5: sc around. [8]
R6: (3 sc, inc) x2. [10]
Fasten off, leaving a long tail for sewing. Stuff lightly.
💪 Arms and Mittens
Yarn: White | Hook: 2.5 mm | Make 2
R1: MR 6 sc. [6]
R2: inc around. [12]
R3: (1 sc, inc) x6. [18]
R4-6: sc around. [18]
R7: BO in first st (creates the thumb), sc 17. [18]
R8: (4 sc, dec) x3. [15]
R9: (3 sc, dec) x3. [12]
Stuff the mitten hand firmly.
R10-22: sc around. [12] (13 rounds)
Stuff the rest of the arm lightly, leaving the top half nearly flat so it rests nicely against the body.
Press the top flat and crochet 6 sc across both layers to close. Fasten off, leaving a tail for sewing.
👢 Legs and Boots
Yarn: Sage Green and White | Hook: 2.5 mm | Make 2
Base of Boot (Green):
R1: Ch 7, start in 2nd ch from hook: 5 sc, 3 sc in last ch. Work down opposite side of ch: 4 sc, inc in last ch. [14]
R2: inc, 4 sc, 3 inc, 4 sc, 2 inc. [20]
R3: 1 sc, inc, 4 sc, (1 sc, inc) x3, 4 sc, (1 sc, inc) x2. [26]
R4: 2 sc, inc, 4 sc, (2 sc, inc) x3, 4 sc, (2 sc, inc) x2. [32]
Trace this oval onto cardboard/plastic and cut it out to insert later.
R5: (BLO) sc around. [32]
R6-8: sc around. [32]
Insert the cardboard sole.
R9: 8 sc, 8 dec, 8 sc. [24]
R10: 8 sc, 4 dec, 8 sc. [20]
R11: 8 sc, 2 dec, 8 sc. [18]
R12-14: sc around. [18]
Change to White for the boot trim.
R15 (White Bobble Trim): (FLO) (2 sc, BO) x6. [18]
Fasten off the White yarn. Join White yarn to the unworked Back Loops of R14 for the leg.
R16 (Leg): (BLO of R14) sc around. [18]
R17-20: sc around. [18]
Fasten off, leaving a long tail for sewing. Stuff the boot and leg firmly.
🧵 Plaid & Lace Details: Using white yarn, surface slip stitch a grid on the green boot section. Thread gold cord/thread through the front of R11-14 in an ‘X’ pattern to create boot laces.
👗 Plaid Winter Coat
Yarn: Sage Green and White | Hook: 3.0 mm | Make 1
Note: The coat is worked flat in rows from the top down.
Row 1: (Green) Ch 25, start in 2nd ch: 24 sc, ch 1, turn. [24]
Row 2: (2 sc, inc) x8, ch 1, turn. [32]
Row 3: (3 sc, inc) x8, ch 1, turn. [40]
Row 4 (Armholes): 6 sc, ch 8, skip 8 sts, 12 sc, ch 8, skip 8 sts, 6 sc, ch 1, turn. [24 sc + 16 ch]
Row 5: sc across, including the chains. [40]
Row 6: (4 sc, inc) x8, ch 1, turn. [48]
Row 7-18: sc across, ch 1, turn. [48] (12 rows)
Do not fasten off Green. Turn to work down the side edge.
Edging (Green): sc evenly down the left edge, across the bottom, and up the right edge. Fasten off Green.
🧵 Applying the Plaid:
Using White yarn and your hook, surface slip stitch vertical lines every 4 stitches across the coat. Then, surface slip stitch horizontal lines every 4 rows.
Bobble Trim (White):
Join White yarn to the bottom left corner of the coat.
Work up the left edge, around the collar, down the right edge, and across the bottom: (2 sc, BO in next st) evenly around the entire coat. Fasten off and weave in ends.
🎓 Top Hat
Yarn: Sage Green, Gold, and White | Hook: 2.5 mm | Make 1
Top of Hat (Green):
R1: MR 6 sc. [6]
R2: inc around. [12]
R3: (1 sc, inc) x6. [18]
R4: (2 sc, inc) x6. [24]
R5: (3 sc, inc) x6. [30]
R6: (4 sc, inc) x6. [36]
R7: (5 sc, inc) x6. [42]
R8: (6 sc, inc) x6. [48]
Trace this circle onto cardboard and cut it out.
R9: (BLO) sc around. [48]
R10-22: sc around. [48] (13 rounds)
Change to Gold for the hat band.
R23-25 (Gold): sc around. [48]
Change back to Green.
R26 (Green): (FLO) (7 sc, inc) x6. [54]
R27: (8 sc, inc) x6. [60]
R28: (9 sc, inc) x6. [66]
R29: (10 sc, inc) x6. [72]
Change to White for the brim trim.
R30 (White Bobble Trim): (2 sc, BO) around. Fasten off and weave in ends.
🧵 Plaid Detail: Apply the white surface slip stitch grid to the tall green section of the hat, matching the 4×4 spacing of the coat.
🧣 Winter Scarf
Yarn: White | Hook: 3.0 mm | Make 1
Worked flat in rows to create a ribbed knit-look texture.
Row 1: Ch 65, hdc in 3rd ch from hook and each ch across. [63]
Row 2-4: Ch 2, turn. (BLO) hdc across. [63]
Fasten off and weave in ends. Optional: Attach short fringe tassels to each end using gold and white yarn.
🎁 Gift Box Accessory
Yarn: Gold/Mustard and Red | Hook: 2.5 mm | Make 1
Box (Gold):
R1: Ch 11, start in 2nd ch: 10 sc, ch 1, turn. [10]
R2-10: sc across, ch 1, turn. [10]
R11: (BLO) sc around the entire square (approx 40 sts) to create the base edge.
R12-18: sc around.
Insert a small cardboard cube or stiff stuffing. Cut a flat square for the lid, sc around it, and sew it to the top of the box.
Ribbon (Red):
Ch 60. Wrap it tightly around the box in a cross shape and tie a neat bow on top. Fasten off or sew the bow in place to prevent unravelling.
🎨 L. STYLING / ASSEMBLY / STABILITY / FINAL SHAPING
Correct assembly is essential to achieve the balanced, professional look of the reference image. Follow this order:
- Face Assembly: Sew the carrot nose directly between the eyes. Using a single strand of black embroidery floss, stitch a small, curved smile starting just under the right side of the nose. Lightly apply pink blush or soft pastel chalk to the cheeks directly beneath and slightly outside the eyes.
- Attaching Legs: Pin the legs to the bottom of the body (around R48-R54). Ensure the boots are facing completely forward. Check the balance by standing the snowman up on a flat surface before sewing. Securely stitch around the entire leg joint.
- Dressing the Snowman: Put the plaid coat on the snowman before attaching the arms.
- Attaching Arms: Pin the flattened tops of the arms to the sides of the body (around R28), pinning them right through the armholes of the coat. Sew them firmly to the white body beneath.
- Positioning the Scarf: Wrap the ribbed scarf twice around the neck and tie it securely in the front, letting the fringed ends hang down over the coat.
- Attaching the Hat: Insert the cardboard circle into the top of the hat. Stuff the hat lightly so it maintains its rigid cylinder shape. Pin the hat at a slight angle on top of the snowman’s head and sew it down using the unworked back loops of R26.
- Hat Decor: Glue or stitch the faux pine sprigs, red berries, and mini pinecone securely to the left side of the hat band.
- Adding the Prop: Tack the snowman’s mittens to the sides of the gold gift box using white thread so he appears to be holding it tightly.
✅ Final Checklist:
- ✅ Face is centered with blush applied evenly.
- ✅ Coat sits evenly on the shoulders and remains open at the front.
- ✅ Plaid lines align cleanly on both the hat and coat.
- ✅ Snowman stands independently without tilting.
- ✅ Scarf covers the neckline seam.
- ✅ Accessories (gift box and hat flora) are secure.
💡 M. HELPFUL CROCHET TIPS
- 💡 Clean Bobbles: When working the bobble stitches (BO) in white, push them firmly toward the “right side” (the outside) of the fabric before moving to the next single crochet. This makes the snowy trim pop.
- 💡 Plaid Precision: Use a thinner yarn or split your worsted weight yarn in half for the surface slip stitches. A bulky slip stitch will make the plaid look messy; a thinner line looks sharp and professional.
- 💡 Neck Support: If your snowman’s head is flopping back from the weight of the hat, insert a wooden dowel or a rolled-up piece of plastic canvas through the center of the body into the head before finishing the body decreases.
- 💡 Invisible Decreases: Always use invisible decreases (working through the front loops only) on the white face and body to prevent stuffing from showing through.
- 💡 Symmetrical Eyes: Before attaching safety eyes permanently, use pins to test placement. The placement of the eyes in relation to the carrot nose dictates the entire personality of the doll.
- 💡 Tucking Ends: When working the surface slip stitch grid, pull the starting and ending tails through to the inside (wrong side) of the coat and tie them in secure square knots to save time weaving in dozens of ends.
🧼 N. CARE INSTRUCTIONS
Because this snowman incorporates structural cardboard inserts, faux floral decorations, and intricate surface details, it is spot clean only.
- Use a damp cloth with mild soap to gently dab any dirt off the white yarn.
- Do not submerge the amigurumi in water, as the cardboard soles and hat top will warp and disintegrate.
- Store in a dry, dark place (like a sealed plastic tote or display case) during the off-season to prevent dust accumulation and protect the yarn colors from fading in direct sunlight.
❓ R. FAQ
❓ Can I use blanket yarn or plush yarn for this pattern?
Yes, you can! Using a super bulky chenille or velvet yarn will make a massive, huggable snowman. However, you will need to scale up your hook size (e.g., 5.0mm or 6.0mm) and use significantly larger safety eyes. Keep in mind that surface slip stitching for the plaid may get lost in plush yarn, so a solid green coat might work better for that texture.
❓ The surface slip stitches are making my coat curl. How do I fix this?
This is a common tension issue. When applying surface slip stitches, your tension must be perfectly relaxed. If you pull the white yarn too tight, it will scrunch the green fabric underneath. Try using a hook one size larger (e.g., 3.5mm) just for the surface stitching.
❓ Is this safe for babies and toddlers?
As written, no. The safety eyes, faux berries, pine sprigs, and mini pinecone pose choking hazards. To make it baby-safe, embroider the eyes with black yarn, skip the floral hat decorations, and embroider the boot laces rather than using rigid gold cord.
❓ How do I prevent the hat from slouching?
The cardboard insert at the flat top of the hat is crucial. Additionally, ensure you are stuffing the cylinder of the hat before you completely sew it onto the head. The stuffing holds the walls of the hat upright.
❓ Can I make the coat removable?
The coat is technically crocheted as a separate piece, but in this pattern, the arms are sewn over the coat to secure it in place and prevent the arm joints from looking overly bulky. If you want a removable coat, you will need to sew the arms directly to the white body first, then crochet the coat with slightly wider armholes to slip over them.