📖 B. INTRODUCTION
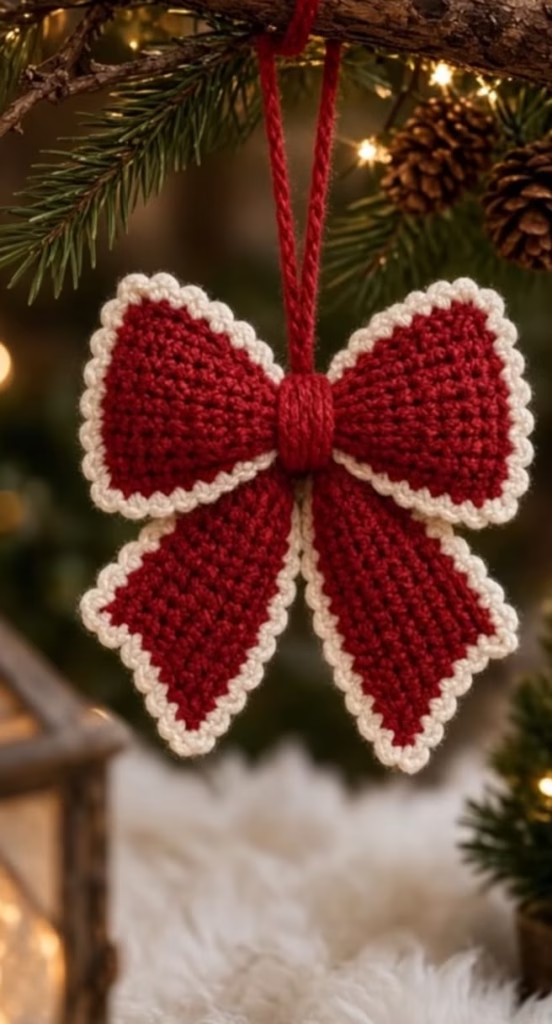
Add a touch of timeless, handmade elegance to your holiday decorating with this classic crochet Christmas bow ornament. Inspired by vintage holiday aesthetics, this beautiful project features a rich, deep red base framed by a striking cream-colored textured border. Whether you are looking to create heirloom ornaments for your family tree, elevate your gift wrapping with a handmade touch, or construct a stunning focal point for a winter wreath, this versatile bow delivers exceptional visual impact with surprisingly simple techniques.
The design relies on structured, geometric shaping to achieve its crisp silhouette. Instead of relying on a single floppy strip of fabric tied in a knot, this bow is constructed in carefully shaped geometric panels. The distinct upper loops curve elegantly, while the two lower tails taper to sharp, clean points. A textured contrasting border highlights the shaping, giving the ornament a polished, professional finish that mimics traditional blanket-stitched felt or frosted piping.
Best of all, this project is a wonderful stash-buster. It requires very little yarn, works up quickly in an evening, and is endlessly customizable. While the classic crimson and cream palette offers a nostalgic, rustic charm, you can easily adapt the colors to match your specific holiday theme.
🔍 C. MAIN PATTERN OVERVIEW
This crochet bow is designed for stability and perfect symmetry. To achieve the sharp look seen in the finished design, the pattern is broken down into modular components that are crocheted flat and assembled at the end.
First, you will create the Upper Bow, which is crocheted as a single continuous piece that starts narrow, widens to form the first loop, tapers perfectly at the center, widens for the second loop, and tapers again at the end.
Next, you will crochet two identical Tails working from the bottom point upwards, allowing for a sharp, crisp chevron tip.
A simple Center Wrap is created to cinch everything together seamlessly.
Finally, the signature Cream Border is applied individually to the bow and tails before assembly, creating that gorgeous, frosting-like outline that makes the red pop. A simple red hanging loop is added to the back for easy display on your tree branches.
🎯 D. SKILL LEVEL
Beginner-Friendly / Easy
This pattern uses foundational crochet stitches and basic shaping. It is an excellent project for beginners who want to practice increasing, decreasing, and working a neat border around shaped edges.
- Working flat in rows
- Single crochet increases (inc) and invisible or standard decreases (dec)
- Crocheting an even border around raw row edges
- Basic seaming and cinching techniques
📏 E. FINISHED SIZE
- Width: Approximately 5.5 inches (14 cm) across the widest part of the upper loops.
- Height: Approximately 6 inches (15 cm) from the top of the loops to the bottom points of the tails.
- Note: The final dimensions will vary slightly based on your yarn weight and tension. Using a thicker yarn will naturally yield a larger bow suitable for a wreath or tree topper.
🧮 F. GAUGE
18 sc x 20 rows = 4 inches (10 cm)
While exact gauge is not strictly critical for this ornament, tension is very important. Your stitches need to be tight and dense so the bow maintains its rigid, structured shape without flopping over. If your fabric feels loose or drapey, drop down a hook size.
🧶 G. REQUIRED YARN AMOUNTS
This project is perfect for leftover scrap yarn. Estimates are based on standard Medium 4 (Worsted/Aran) weight yarn. A stiff cotton or a sturdy acrylic works best for holding shape.
- Main Color (Deep Red): Approximately 30g (60 yards).
- Contrast Color (Cream/White): Approximately 10g (20 yards).
🧰 H. MATERIALS
- Hook: 3.5 mm (E) or 4.0 mm (G) crochet hook (use a smaller hook than the yarn label suggests to ensure a stiff fabric).
- Yarn: Worsted weight yarn in Deep Red and Cream.
- Needle: Tapestry/yarn needle for seaming and weaving in ends.
- Scissors: Sharp craft scissors.
- Optional but Recommended: Commercial fabric stiffener spray or a homemade cornstarch/water mixture to block the bow and make it rock-solid for hanging.
🔤 I. ABBREVIATIONS – US TERMS
- ch: chain
- st(s): stitch(es)
- sc: single crochet
- inc: single crochet increase (work 2 sc in the same stitch)
- dec: single crochet decrease (sc 2 together)
- sl st: slip stitch
- RS: Right Side
- WS: Wrong Side
- (…) xN: repeat the instructions within the parentheses N times
- […]: total number of stitches at the end of the row
📝 J. NOTES BEFORE YOU BEGIN
- Turning Chains: The turning chain (ch 1) at the beginning of a row does not count as a stitch.
- Right Side vs. Wrong Side: Because the pieces are worked flat in rows, they are reversible until you add the border. Decide which side looks neatest and designate it as the Right Side (RS) before applying the cream edging.
- Decreases: When working flat, standard decreases (insert hook, pull up loop, insert into next st, pull up loop, yarn over, pull through all 3) generally look perfectly fine. If you prefer, you can use invisible decreases.
- Border Placement: When crocheting the border down the sides of the rows, aim to place one single crochet at the end of each row.
🪡 K. COMPLETE PATTERN
🎀 1. Upper Bow
Yarn: Deep Red | Hook: 3.5 mm | Make 1
This piece is worked in one continuous strip from left to right, creating both upper loops.
Row 1: Ch 3, sc in 2nd ch from hook and in the next ch. Ch 1, turn. [2]
Row 2: inc in both sts. Ch 1, turn. [4]
Row 3: inc, 2 sc, inc. Ch 1, turn. [6]
Row 4: inc, 4 sc, inc. Ch 1, turn. [8]
Row 5: inc, 6 sc, inc. Ch 1, turn. [10]
Row 6-12: sc in each st across. Ch 1, turn. [10] (7 rows)
Row 13: dec, 6 sc, dec. Ch 1, turn. [8]
Row 14: dec, 4 sc, dec. Ch 1, turn. [6]
Row 15: dec, 2 sc, dec. Ch 1, turn. [4]
Row 16 (Center): dec, dec. Ch 1, turn. [2]
You have reached the center cinch point. Now we mirror the shaping for the second loop.
Row 17: inc in both sts. Ch 1, turn. [4]
Row 18: inc, 2 sc, inc. Ch 1, turn. [6]
Row 19: inc, 4 sc, inc. Ch 1, turn. [8]
Row 20: inc, 6 sc, inc. Ch 1, turn. [10]
Row 21-27: sc in each st across. Ch 1, turn. [10] (7 rows)
Row 28: dec, 6 sc, dec. Ch 1, turn. [8]
Row 29: dec, 4 sc, dec. Ch 1, turn. [6]
Row 30: dec, 2 sc, dec. Ch 1, turn. [4]
Row 31: dec, dec. [2]
Fasten off the red yarn and weave in the ends.
✂️ 2. Bottom Tails
Yarn: Deep Red | Hook: 3.5 mm | Make 2
These are worked from the sharp bottom point upwards toward the center knot.
Row 1: Ch 2, place 3 sc in the 2nd ch from the hook. Ch 1, turn. [3]
Row 2: inc, 1 sc, inc. Ch 1, turn. [5]
Row 3: sc in each st across. Ch 1, turn. [5]
Row 4: inc, 3 sc, inc. Ch 1, turn. [7]
Row 5: sc in each st across. Ch 1, turn. [7]
Row 6: inc, 5 sc, inc. Ch 1, turn. [9]
Row 7: sc in each st across. Ch 1, turn. [9]
Row 8: inc, 7 sc, inc. Ch 1, turn. [11]
Row 9-12: sc in each st across. Ch 1, turn. [11] (4 rows)
Row 13: dec, 7 sc, dec. Ch 1, turn. [9]
Row 14: dec, 5 sc, dec. Ch 1, turn. [7]
Row 15: dec, 3 sc, dec. Ch 1, turn. [5]
Row 16: dec, 1 sc, dec. [3]
Fasten off the red yarn and weave in the ends. Repeat to make a second identical tail.
✨ 3. Contrasting Cream Border
Yarn: Cream/White | Hook: 3.5 mm
Applying the border before assembly ensures clean lines.
Bordering the Upper Bow:
Attach the Cream yarn to any stitch on the edge of the Upper Bow piece.
Ch 1. Work 1 sc evenly around the entire perimeter of the bow.
Border Note: To get the slightly textured, scalloped look seen in the image, keep your tension firm. Place exactly 1 sc in the side of each row. When you reach the curved outer edges (Rows 6-12 and Rows 21-27), the fabric should lay flat. When you reach the tight inner corners at the center (Row 16), slip stitch instead of single crochet to keep the center pinched tight.
Join with a sl st to the first sc. Fasten off and weave in ends.
Bordering the Tails:
Attach the Cream yarn to the top edge (Row 16) of a tail piece.
Ch 1. Work 1 sc evenly down the side of the tail.
When you reach the bottom point (Row 1), work (1 sc, ch 1, 1 sc) all into the same tip stitch to create a sharp, distinct point.
Work 1 sc evenly up the other side. Do not border the flat top edge (Row 16) as it will be hidden inside the center knot. Fasten off and weave in ends. Repeat for the second tail.
🧶 4. Center Wrap
Yarn: Deep Red | Hook: 3.5 mm | Make 1
This creates the tidy band that cinches the bow together.
Row 1: Ch 13, sc in the 2nd ch from the hook and each ch across. Ch 1, turn. [12]
Row 2-3: sc in each st across. Ch 1, turn. [12]
Fasten off, leaving a very long tail (about 12 inches) for sewing the entire ornament together.
🎨 L. STYLING / ASSEMBLY / STABILITY / FINAL SHAPING
Assembly is where this project truly comes to life. Follow these steps to achieve perfect symmetry and structural stability.
- Prepare the Tails: Take your two tail pieces and overlap the flat top edges (Row 16) slightly so they splay outward at a pleasing angle, resembling an upside-down ‘V’. Using a scrap of red yarn, stitch these top edges together securely so they act as a single piece.
- Cinch the Upper Bow: Take your long Upper Bow piece. Thread a yarn needle with a 10-inch piece of red yarn. Wrap this yarn around the narrow center (Row 16) a few times and pull tightly to gather and cinch the center. Tie a firm double knot at the back.
- Join Bow to Tails: Place the cinched center of the Upper Bow directly over the joined tops of the tails. Sew them together securely.
- Attach the Center Wrap: Take the red Center Wrap strip. Wrap it tightly around the cinched center of the bow, covering all your joining stitches and the raw top edges of the tails. Whipstitch the two short ends of the wrap together firmly at the back of the bow.
- Add the Hanging Loop: Cut a 10-inch length of Deep Red yarn. Thread it through the back of the Center Wrap, tie the ends in a secure knot to form a loop, and hide the knot inside the wrap.
- Stiffening (Highly Recommended): To ensure your bow hangs perfectly flat and the tails remain sharp, block the finished bow. Lay it flat on a blocking mat or folded towel. Pin the outer loops and the sharp points of the tails securely. Spray generously with commercial fabric stiffener. Let it dry completely for 24 hours.
✅ Final Checklist:
- ✅ Both upper loops are perfectly symmetrical.
- ✅ The cream border faces the same direction on all pieces (RS facing out).
- ✅ The tail points are sharp and angle evenly outward.
- ✅ The center wrap is tight enough to create natural folds in the upper bow.
- ✅ The ornament feels stiff and holds its own shape when hung by the loop.
💡 M. HELPFUL CROCHET TIPS
- 💡 Crisp Corners: Always remember to place (sc, ch 1, sc) at the very bottom tip of the tails when adding your border. This prevents the point from rounding off and curling inward.
- 💡 Yarn Choice Matters: Avoid soft, draping yarns like silk or bamboo for this project. Sturdy, somewhat “scratchy” kitchen cottons or standard acrylics provide the rigidity needed for ornaments.
- 💡 Hiding the Magic: Make sure all your seaming, knotting, and weaving is done strictly on the WS (Wrong Side) of the bow so the front remains pristine.
- 💡 Border Alternatives: If you want an even bumpier, more pronounced edging, try substituting the single crochet border with a Crab Stitch (Reverse Single Crochet) border.
- 💡 Scale It Up: Want to make a giant version for your front door? Hold two strands of worsted yarn together and use a 5.5mm or 6.0mm hook, following the exact same pattern.
- 💡 DIY Stiffener: If you don’t have commercial fabric stiffener, mix equal parts white PVA craft glue and water, paint it lightly onto the back of the bow, and let it dry.
🧼 N. CARE INSTRUCTIONS
- Storage: Store the bow flat in a rigid box during the off-season. Do not crush it under heavier ornaments, as this will permanently crease the stiffened fabric.
- Cleaning: Spot clean only with a slightly damp cloth. Do not machine wash or soak the ornament, as this will wash out the fabric stiffener and cause it to lose its shape completely.
- Refreshing: If the bow becomes floppy after a few years of use, simply lay it flat, re-pin the edges, and apply a fresh coat of fabric stiffening spray.
❓ R. FAQ
❓ My border looks wavy and won’t lay flat. What did I do wrong?
A wavy border means you are putting too many stitches along the raw edge. You only need one single crochet per row edge. If it still waves, try dropping down half a hook size just for the cream border.
❓ Can I make this as one continuous piece without sewing?
While you can crochet a standard bow as a long rectangle and tie it, it will not yield the sharp, tailored, geometric shape of this specific design. Crocheting the tails and upper loops separately is what creates the distinct, crisp silhouette.
❓ How can I make the bow double-sided?
This pattern produces a bow that has a definite “front” and “back” (due to the center wrap seam and hanging loop). To make it double-sided for hanging in a window, crochet two complete bows and slip stitch them together back-to-back around the final cream border, stuffing lightly before closing.
❓ Is it possible to use velvet or chenille yarn?
Yes, but the aesthetic will change drastically. Velvet yarn creates a chunky, soft, floppy bow. You will lose the crisp stitch definition of the contrasting border, and you will absolutely need to sew a wire into the border to get it to hold the butterfly shape.