📖 B. INTRODUCTION
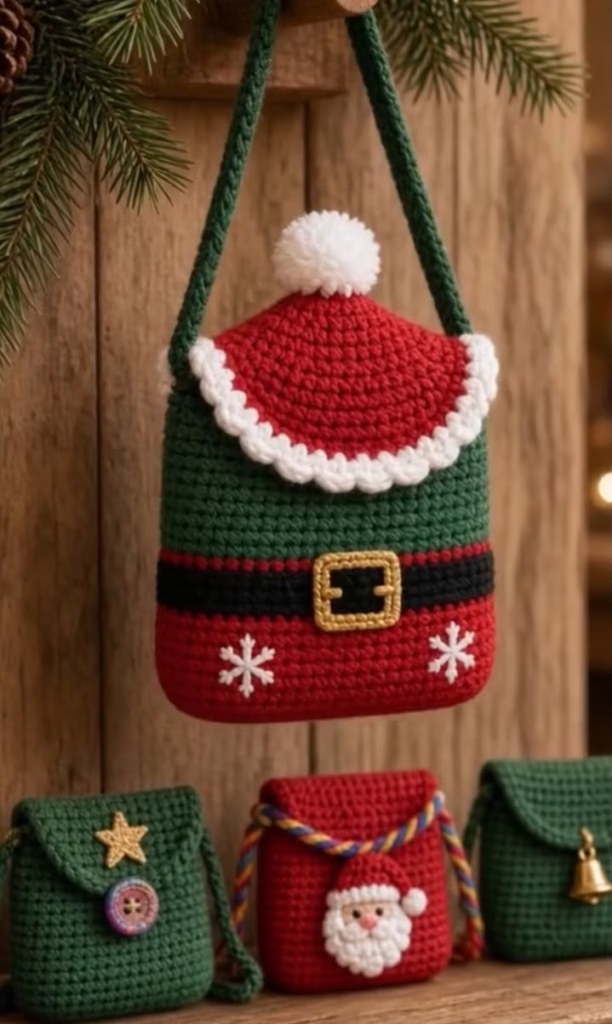
The holiday season calls for accessories that are both functional and full of cheer, and this Festive Santa Hat Crochet Phone Pouch is the perfect quick make. Designed to securely hold your smartphone while keeping your hands free for gift shopping and hot cocoa, this crossbody bag is a joyful addition to any winter wardrobe. The pouch features a bright red bottom half and a rich green top half. It is instantly recognizable thanks to a bold black belt wrapping around the middle, secured by a bright gold square buckle.
Adding to the winter magic, the front red section is decorated with two delicate white embroidered snowflakes. The crowning detail is the unique closure: a flap shaped exactly like a classic red Santa hat. This flap tapers down the front of the pouch and is finished with a textured white scalloped edge and a fluffy white pom-pom at the very tip. The entire pouch is suspended by a long, sturdy green strap attached securely to the sides.
Whether you are crocheting this as a thoughtful stocking stuffer, a teacher gift, or a personal accessory for your next holiday party, this design is incredibly customizable. You can easily adjust the strap length to wear it over the shoulder or across the body, or even switch up the color palette to create an elf-themed variation.
🔍 C. MAIN PATTERN OVERVIEW
This pouch is constructed using a seamless, modular approach to minimize sewing and ensure a sturdy finish. You will begin at the bottom of the pouch, working in joined rounds to create a flat, oval base that smoothly transitions into the walls of the bag. The body of the pouch is worked entirely in the round from the bottom up, utilizing crisp color changes to create the red suit, the black belt, and the green upper section.
Once the main pouch body is completed, the yarn is re-attached at the back edge to crochet the Santa hat flap. The flap is worked back-and-forth in rows, utilizing strategic decreases to create a smooth, tapered point. After the flap is shaped, a contrasting white scalloped border is added along its edge, and a miniature white pom-pom is attached to the tip. The long crossbody strap is crocheted as a separate, sturdy piece and securely sewn to the interior sides of the pouch. Finally, simple embroidery techniques are used to apply the gold belt buckle and the snowflake motifs to the front panel.
🎯 D. SKILL LEVEL
Easy / Advanced Beginner
This pattern is accessible to crocheters who have mastered the basic stitches and are ready to tackle simple color changes and basic shaping.
Techniques Used:
- Working into a starting chain to create an oval base
- Working in joined continuous rounds and flat rows
- Single crochet and half double crochet stitches
- Simple decreases (sc2tog)
- Clean color changes at the end of a round
- Basic surface embroidery (running stitch / backstitch)
📏 E. FINISHED SIZE
When made with the recommended worsted weight yarn and hook, the finished pouch dimensions are:
- Width: 4.5 inches (11.5 cm) across the base.
- Height: 7.5 inches (19 cm) from the bottom edge to the top opening (excluding the flap).
- Strap Length: 45 inches (114 cm), which sits comfortably as a standard crossbody strap.
Note: The final size of your pouch can be easily modified. Using a bulkier yarn or a larger hook will yield a larger bag, while a lighter yarn will create a snugger fit for smaller devices. Ensure you check your phone’s dimensions against your starting chain to guarantee a perfect fit.
🧮 F. GAUGE
16 sc and 18 rows = 4 x 4 inches (10 x 10 cm)
While strict gauge is not absolutely critical for this accessory, maintaining a tight, consistent tension is highly recommended. A tighter stitch ensures that the pouch fabric is dense enough to protect your phone and prevents the bag from stretching out of shape when weighted. If your stitches are too loose, consider dropping down half a hook size.
🧶 G. REQUIRED YARN AMOUNTS
This project uses Category 4 (Worsted / Aran) weight yarn. Cotton or a cotton-blend is highly recommended for bags as it prevents excessive stretching and provides excellent stitch definition.
- 🔴 Main Color A (Red): Approximately 50 yards (for the bottom of the bag and the hat flap).
- 🟢 Main Color B (Green): Approximately 60 yards (for the top of the bag and the strap).
- ⚫ Accent Color C (Black): Approximately 15 yards (for the belt).
- ⚪ Accent Color D (White): Approximately 20 yards (for the flap trim, snowflakes, and pom-pom).
- 🟡 Embroidery Color E (Gold/Yellow): Approximately 5 yards (for the belt buckle).
🧰 H. MATERIALS
- Crochet Hook: 4.0 mm (US G/6)
- Yarn: Worsted weight yarn in Red, Green, Black, White, and Gold (see amounts above).
- Tapestry/Yarn Needle: For weaving in ends and embroidery.
- Scissors: Sharp craft scissors.
- Stitch Markers: Useful for marking the first stitch of your rounds.
- Small Pom-Pom Maker: (Optional) 1.5-inch size for creating the white hat tip.
- Magnetic Snap Closure: (Optional) 14mm size for securing the flap closed.
🔤 I. ABBREVIATIONS – US TERMS
- ch – chain
- sc – single crochet
- hdc – half double crochet
- sl st – slip stitch
- inc – increase (2 sc in the same stitch)
- dec – decrease (single crochet 2 stitches together)
- blo – back loop only
- st(s) – stitch(es)
- rep – repeat
- RS – right side
- WS – wrong side
📝 J. NOTES BEFORE YOU BEGIN
- Joined Rounds: The body of the pouch is worked in joined rounds to ensure the colored stripes remain perfectly level. At the end of every round, slip stitch into the first single crochet of that round, then chain 1 to step up. The chain 1 does not count as a stitch.
- Color Changes: To achieve crisp stripes, make your color changes in the very last step of the slip stitch that joins the round. Drop the old color, pull the new color through the loop on your hook, chain 1, and begin the next round.
- Strap Adjustments: Crossbody straps inevitably stretch over time due to the weight of a phone. The pattern includes a slip stitch reinforcement row to minimize this, but you may still want to crochet the strap about 1 to 2 inches shorter than your absolute ideal length to account for future stretching.
🪡 K. COMPLETE PATTERN
👜 Pouch Base & Body
The base starts by working on both sides of a foundation chain to create a seamless oval.
With Red yarn (Color A):
Foundation: Ch 19.
R1: sc in 2nd ch from hook, sc in next 16 chs. Work 3 sc in the last ch. Turn your work 180 degrees to work along the opposite, unworked side of the foundation chain. sc in next 16 chs, work 2 sc in the very first ch (the same ch as your first st). Join with a sl st to the first sc. (38 sts)
R2: ch 1. inc in first st, 16 sc, inc in next 3 sts, 16 sc, inc in last 2 sts. Join with a sl st. (44 sts)
R3: ch 1. Working in blo for this round only, sc in each st around. Join with a sl st. (44 sts)
Note: Working in the back loops creates a distinct ridge that allows the bag to sit flat.
R4 – R12 (9 rounds): ch 1. sc in each st around. Join with a sl st. (44 sts)
At the end of R12, change to Black yarn (Color C).
⬛ The Belt
With Black yarn (Color C):
R13 – R15 (3 rounds): ch 1. sc in each st around. Join with a sl st. (44 sts)
At the end of R15, change to Green yarn (Color B). You can fasten off the Black and Red yarn and weave in those ends.
🟩 Upper Body
With Green yarn (Color B):
R16 – R28 (13 rounds): ch 1. sc in each st around. Join with a sl st. (44 sts)
Fasten off the Green yarn and weave in the end.
🎅 The Santa Hat Flap
The flap is worked back-and-forth in rows across the back edge of the pouch opening.
Lay the pouch flat so the starting chain of the base is perfectly horizontal. Identify the 22 stitches that make up the back half of the pouch opening. Mark the first and 22nd stitch of the back panel.
Join Red yarn (Color A) with a sl st to the first marked stitch on the right side of the back panel.
Row 1 (RS): ch 1, sc in the next 22 sts across the back. Turn. (22 sts)
Row 2 (WS): ch 1, dec, 18 sc, dec. Turn. (20 sts)
Row 3: ch 1, sc in each st across. Turn. (20 sts)
Row 4: ch 1, dec, 16 sc, dec. Turn. (18 sts)
Row 5: ch 1, sc in each st across. Turn. (18 sts)
Row 6: ch 1, dec, 14 sc, dec. Turn. (16 sts)
Row 7: ch 1, sc in each st across. Turn. (16 sts)
Row 8: ch 1, dec, 12 sc, dec. Turn. (14 sts)
Row 9: ch 1, sc in each st across. Turn. (14 sts)
Row 10: ch 1, dec, 10 sc, dec. Turn. (12 sts)
Row 11: ch 1, sc in each st across. Turn. (12 sts)
Row 12: ch 1, dec, 8 sc, dec. Turn. (10 sts)
Row 13: ch 1, sc in each st across. Turn. (10 sts)
Row 14: ch 1, dec, 6 sc, dec. Turn. (8 sts)
Row 15: ch 1, sc in each st across. Turn. (8 sts)
Row 16: ch 1, dec, 4 sc, dec. Turn. (6 sts)
Row 17: ch 1, sc in each st across. Turn. (6 sts)
Row 18: ch 1, dec, 2 sc, dec. Turn. (4 sts)
Row 19: ch 1, 2 dec. Turn. (2 sts)
Row 20: ch 1, dec. (1 st)
Fasten off Red yarn and weave in the end.
❄️ Flap Border (Scalloped Trim)
This trim is added to the raw edges of the red flap to give it a finished, textured look.
With White yarn (Color D):
Join yarn with a sl st where the right base of the red flap meets the green body.
Border Row: Work evenly up the diagonal side of the flap, placing approximately 1 sc in the end of each row. When you reach the tip (Row 20), work 3 sc into the very point. Continue working evenly down the left diagonal side of the flap to the base. Turn your work.
Scallop Row: ch 1. sc in next st, skip 1 st, 3 hdc in next st, skip 1 st. Repeat from * to * all the way around the edge of the flap. End with a sl st in the final stitch.
Fasten off White yarn and weave in the ends.
🎗️ Crossbody Strap
With Green yarn (Color B):
Leave a 10-inch tail for sewing.
Row 1: ch 150 (or chain until the strap reaches your desired length).
Row 2: sc in the 2nd ch from the hook and in each ch across. Turn.
Row 3: ch 1, sl st loosely in each st across. (This slip stitch row reinforces the strap and prevents it from stretching out under the weight of the phone).
Fasten off, leaving another 10-inch tail for sewing.
🎨 L. STYLING / ASSEMBLY / STABILITY / FINAL SHAPING
✨ Embroidery Details
- The Buckle: Thread a tapestry needle with Gold/Yellow yarn. On the front of the pouch, locate the center of the black belt stripe. Using a surface slip stitch or a simple backstitch, embroider a hollow square that spans the height of the black belt and slightly overlaps the red and green sections on the top and bottom. Tie off on the inside of the pouch.
- The Snowflakes: Thread a needle with White yarn. On the front red section, below the belt, embroider two small snowflakes (one on the left, one on the right). To make a simple snowflake, stitch a small “plus sign” (+), then stitch a small “X” over the top of it. Secure the knots firmly on the interior.
☁️ Attaching the Pom-Pom
Using White yarn and a pom-pom maker (or your fingers), create a small, dense 1.5-inch pom-pom. Leave two long tying tails. Use your tapestry needle to thread these tails through the tip of the Santa hat flap (right above the white scalloped border). Tie them securely in a double knot on the underside of the flap and trim the excess.
🪡 Strap Assembly
Pin the ends of the green strap to the inside top edges of the green pouch body, ensuring the strap is not twisted. The ends should overlap the inside of the pouch by about 1 inch for stability. Using the long green tails left on the strap, sew the strap ends securely to the inside walls of the pouch using a sturdy whipstitch or square stitch.
🔒 Optional Closure
If you wish to add a closure, sew the two halves of a magnetic snap to the pouch: place one half on the underside of the red flap (hidden behind the pom-pom area) and the corresponding half on the center front of the green body.
✅ Final Shaping Checklist
- ✅ Symmetry Check: Ensure the gold buckle is perfectly centered between the two white snowflakes.
- ✅ Strap Alignment: Verify the strap is sewn to the exact opposite sides of the pouch so it hangs evenly.
- ✅ Flap Check: Fold the flap down and gently block or press it flat with your hands to train it to stay closed.
- ✅ Thread Check: Turn the bag inside out and ensure all embroidery knots are securely tied and snipped short so they don’t catch on your phone.
💡 M. HELPFUL CROCHET TIPS
- 💡 Joggling Stripes: When changing colors from red to black to green in continuous or joined rounds, you may notice a slight “step” or jog where the round begins. To minimize this, always ensure your initial chain 1 of a new color is pulled very tight.
- 💡 Embroidery Tension: When stitching the gold buckle and white snowflakes, keep your tension loose enough that the bag fabric doesn’t pucker, but tight enough that the yarn won’t snag on keys or buttons.
- 💡 Protecting Your Screen: Since this pouch is unlined, the back of your embroidery will be exposed on the inside. Be absolutely sure to weave in all scratchy yarn tails completely so they do not rub against your phone screen.
- 💡 Custom Sizing: If you have an oversized phone with a bulky case, simply add 2 to 4 extra foundation chains at the very beginning of the pattern to increase the overall width of the bag.
- 💡 Strap Comfort: If you prefer a wider, more cushioned strap, substitute the final slip stitch row of the strap with a row of half double crochet (hdc) stitches instead.
- 💡 Fluffy Pom-Poms: For the best-looking pom-pom, tie the center string as tightly as physically possible, then spend a few extra minutes trimming it down with sharp scissors until it forms a perfectly dense, uniform sphere.
🧼 N. CARE INSTRUCTIONS
To keep your holiday pouch looking vibrant, hand wash it gently in cold water with a mild detergent. Do not wring or twist the fabric, as this can warp the shape of the bag and distort the embroidered details. Gently press the water out using a dry towel, reshape the pouch with your hands, and lay it flat to dry. If you used an acrylic yarn, keep it away from high heat (like radiators or hot irons) to prevent the fibers from melting. If the white pom-pom becomes flattened over time, carefully fluff it up using a clean pet slicker brush or a fine-tooth comb.
❓ R. FAQ
❓ Can I adjust this pattern for a tablet or e-reader?
Yes! You will need to increase the starting chain length to match the width of your device and add additional rounds in the green section to achieve the necessary height. You will also need to adjust the stitch count for the flap to ensure it spans the new width of the back panel.
❓ My strap is stretching out too much. How can I fix this?
Crochet straps are prone to stretching. The slip stitch row included in the pattern significantly reduces this. For a completely stretch-proof strap, you can sew a strip of grosgrain ribbon or fabric to the underside of the finished strap.
❓ Do I have to use cotton yarn?
No, acrylic works wonderfully and offers very bright, festive colors. However, cotton is recommended because it is durable, creates less “fuzz” over time, and naturally resists stretching better than acrylic.
❓ Should I line the inside of the pouch?
Lining is optional but highly recommended if you plan to carry small items like lip balm or coins that might slip through the stitches. A simple cotton fabric rectangle folded and sewn into a pouch shape can be easily hand-stitched to the inside edge of the green section.
❓ Why is my flap curling at the edges?
Curling often happens when working flat rows of single crochet. Adding the white scalloped border usually adds enough weight and structure to flatten it out. If it still curls, you can lightly steam block the flap (if using cotton) to relax the stitches.