📖 B. INTRODUCTION
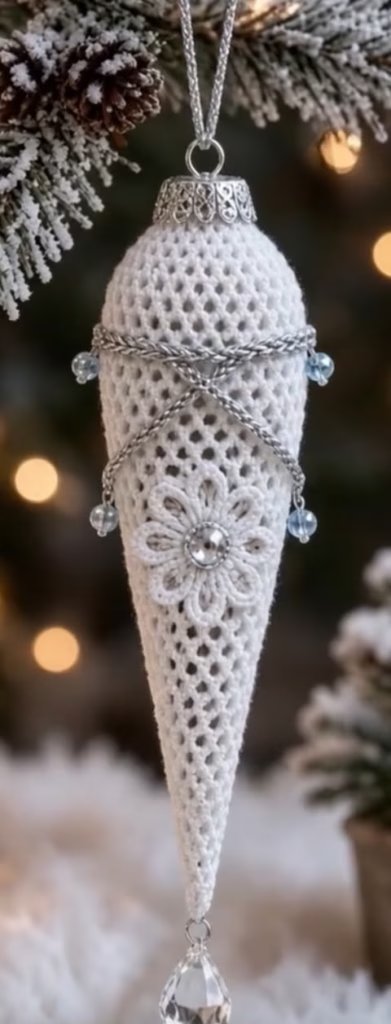
This elegant crochet icicle features a delicate, form-fitting white mesh body that tapers to a fine point. Designed to emulate the frosty beauty of winter, it is decorated with crossed metallic silver cording and dangling pale blue round beads. A central crocheted applique flower, complete with a sparkling rhinestone center, adds a vintage, heirloom quality to the piece. The very bottom tip is finished with a stunning, light-catching teardrop crystal.
Creating this ornament is a highly rewarding project that transforms basic crochet netting into a structured, professional-looking decoration. It makes an unforgettable handmade gift, a gorgeous addition to a winter-themed tree, or a profitable item for holiday craft fairs. Because it utilizes a structured cone base, the finished piece remains rigid and perfectly shaped year after year.
This design is particularly striking when photographed. If you are crafting content or filming a reveal video for a social page like Crochet Corner, the hanging crystal and metallic silver accents catch studio ring lights beautifully, making it a perfect centerpiece for a relaxing ASMR showcase. You can easily personalize the look by swapping the silver cord for gold, or replacing the pale blue beads with deep ruby or emerald accents to match different seasonal themes.
🔍 C. MAIN PATTERN OVERVIEW
This pattern is constructed in several simple, modular steps to ensure a flawless final silhouette. You will first crochet a flat circular base that perfectly fits under a standard silver ornament cap. From that base, you will work a continuous diamond mesh pattern top-down, slipping it over a rigid styrofoam cone and working gradual decreases until you reach the tip.
Once the primary cone is completed, you will crochet a delicate 8-petal central flower. The final steps involve the assembly and styling: wrapping the silver cord, securing the pale blue beads and bottom teardrop crystal, and applying the top hanging cap.
🎯 D. SKILL LEVEL
Intermediate
While the stitches themselves are foundational, working tight netting over a rigid 3D form requires consistent tension and patience.
Techniques Involved:
- Working in a magic ring
- Continuous rounds
- Chain-space netting (diamond mesh)
- Crocheting over a pre-made form
- Basic sewing and multimedia assembly (beads, wire/cord, rhinestones)
📏 E. FINISHED SIZE
- Height: Approximately 6.5 inches (16.5 cm) from the top of the silver cap to the bottom of the teardrop crystal.
- Width: 2 inches (5 cm) across the widest part of the top base.
- Note: The finished size is strictly dependent on the size of the styrofoam cone insert used. You can scale this pattern up or down by choosing a larger or smaller cone and adjusting the starting round stitch counts.
🧮 F. GAUGE
- Gauge: 8 sc stitches and 8 rows = 1 inch (2.5 cm) worked tightly in single crochet.
- Note: Traditional gauge is less critical here than achieving a tight, stretchy mesh. The mesh should need to be stretched slightly to fit snugly over the styrofoam form so that it hugs the cone without sagging.
🧶 G. REQUIRED YARN AMOUNTS
- Main Color (White): Size 10 crochet thread – approximately 40-50 yards.
- Note: Because thread yardage is highly generous per ball, a single standard 300-yard ball of Size 10 cotton thread will yield dozens of these ornaments.
🧰 H. MATERIALS
- Yarn: Size 10 Mercerized Cotton Crochet Thread in Bright White.
- Hook: 1.50 mm steel crochet hook.
- Structure: 1 solid styrofoam cone (approx. 5 inches / 12.5 cm tall, 2 inches / 5 cm wide at the base).
- Top Cap: 1 silver metal or plastic ornament cap with a hanging loop.
- Cording: 12 inches of 2mm silver braided metallic craft cord.
- Beads: 4 pale blue round glass or acrylic beads (approx. 6mm diameter).
- Bottom Crystal: 1 large clear faceted teardrop crystal (approx. 1 inch / 2.5 cm long) with top drilled hole or jump ring.
- Center Gem: 1 flat-backed clear rhinestone (approx. 8mm diameter).
- Tools: Tapestry needle, fine beading needle, invisible nylon thread, craft glue (or hot glue), scissors, and sewing pins.
🔤 I. ABBREVIATIONS – US TERMS
- MR – Magic Ring
- ch – chain
- ch-sp – chain space
- sc – single crochet
- dc – double crochet
- sl st – slip stitch
- inc – increase (2 sc in the same stitch)
- dec – decrease (for mesh: explained in pattern)
- st(s) – stitch(es)
- rep – repeat
📝 J. NOTES BEFORE YOU BEGIN
- Design Inspiration: The styling, textures, and colorways for this pattern are based directly on the visual elements of the reference image (WhatsApp Image 2026-09-29 at 03.22.17).
- Working in the Round: The flat top base is worked in continuous spiral rounds. Use a stitch marker to keep track of the first stitch of each round.
- Mesh Construction: The mesh is worked top-down. Once the top flat section is complete, insert the styrofoam cone and work the mesh around the cone, using it as a physical guide to ensure a perfect, skin-tight fit.
- Mesh Decreases: To decrease in netting, you simply skip a chain space or single crochet two adjacent chain spaces together without chaining between them. The pattern below provides specific decrease rounds to taper the icicle perfectly.
🪡 K. COMPLETE PATTERN
❄️ Top Base & Mesh Cone
Purpose: This creates the solid flat top that sits beneath the ornament cap, and the white diamond mesh body that covers the cone. Yarn: White Size 10 Cotton Thread.
Solid Top Base:
R1: MR, 6 sc. (6)
R2: inc in each st around. (12)
R3: (1 sc, inc) x 6. (18)
R4: (2 sc, inc) x 6. (24)
R5: (3 sc, inc) x 6. (30)
R6: (4 sc, inc) x 6. (36)
R7-R8: sc in each st around. (36)
Note: Check the fit against the flat top of your styrofoam cone. It should exactly cover the top circular face. If it is too small, add another increase round.
Mesh Overlay (Begin working over the foam cone):
R9: *sc in next st, ch 3, sk 1 st; rep from * around. (18 ch-sps)
R10-R14 (5 rounds): *sc in next ch-sp, ch 3; rep from * around. (18 ch-sps)
Note: Slide the crocheted piece onto the styrofoam cone now. Keep the cone inside the work for the remainder of the pattern.
R15 (Dec): *sc in next ch-sp, sc in the following ch-sp (decrease made), (ch 3, sc in next ch-sp) x 7; rep from * around. (16 ch-sps)
R16-R20 (5 rounds): *sc in next ch-sp, ch 3; rep from * around. (16 ch-sps)
R21 (Dec): *sc in next ch-sp, sc in the following ch-sp, (ch 3, sc in next ch-sp) x 6; rep from * around. (14 ch-sps)
R22-R26 (5 rounds): *sc in next ch-sp, ch 3; rep from * around. (14 ch-sps)
R27 (Dec): *sc in next ch-sp, sc in the following ch-sp, (ch 3, sc in next ch-sp) x 5; rep from * around. (12 ch-sps)
R28-R32 (5 rounds): *sc in next ch-sp, ch 3; rep from * around. (12 ch-sps)
R33 (Dec): *sc in next ch-sp, sc in the following ch-sp, (ch 3, sc in next ch-sp) x 4; rep from * around. (10 ch-sps)
R34-R38 (5 rounds): *sc in next ch-sp, ch 3; rep from * around. (10 ch-sps)
R39 (Dec): *sc in next ch-sp, sc in the following ch-sp, (ch 3, sc in next ch-sp) x 3; rep from * around. (8 ch-sps)
R40-R42 (3 rounds): *sc in next ch-sp, ch 3; rep from * around. (8 ch-sps)
R43 (Dec): *sc in next ch-sp, sc in the following ch-sp, (ch 3, sc in next ch-sp) x 2; rep from * around. (6 ch-sps)
R44-R45 (2 rounds): *sc in next ch-sp, ch 3; rep from * around. (6 ch-sps)
R46: sc continuously in each ch-sp around until the hole at the bottom tip closes tightly around the point of the cone.
Fasten off, leaving an 8-inch tail.
🌸 Central Flower Applique
Purpose: The vintage white 8-petal flower that sits squarely on the front of the ornament. Yarn: White Size 10 Cotton Thread.
R1: MR, 8 sc. Join with a sl st to the first sc. (8)
R2: *(sl st, ch 3, 2 dc, ch 3, sl st) all in the same st. Rep from * in each of the remaining 7 sts. (8 petals total)
Fasten off, leaving a 10-inch tail for sewing.
🎨 L. STYLING / ASSEMBLY / STABILITY / FINAL SHAPING
The visual magic of this ornament is in the precise placement of the metallic elements and accessories over the white mesh base. Follow these assembly steps sequentially:
1. Attach the Teardrop Crystal Thread the bottom tail from the mesh cone onto a needle. Pass it through the top jump ring or drilled hole of the teardrop crystal. Sew it securely to the very tip of the crocheted cone, ensuring the crystal dangles straight down. Weave in the end.
2. Wrap the Silver Cord Take the 12-inch silver braided cord and wrap it horizontally around the upper third of the cone. Cross the ends over each other in the front to create a large “X” shape. Pin the cord in place with sewing pins. Using invisible nylon thread and a fine needle, tack the silver cord down securely wherever it touches the white mesh, ensuring the “X” shape stays crisp.
3. Attach the Blue Beads At the four draped ends of the crossed silver cord, use invisible thread or jewelry wire to sew one pale blue round bead to each point. Let them dangle slightly so they catch the light.
4. Mount the Flower and Rhinestone Position the 8-petal white flower directly over the bottom center of the silver cord “X”. Using the long white tail left on the flower, sew the applique securely to the mesh cone. Apply a small dot of craft glue to the center of the flower and firmly press the clear flat-backed rhinestone into place.
5. Secure the Top Cap Apply a ring of craft glue to the flat top of the crocheted base. Firmly press the silver ornament cap down onto the top, ensuring it covers the solid crocheted circles perfectly. Allow the glue to set completely.
✅ Final Finishing Checklist
- ✅ Teardrop crystal is perfectly centered at the bottom tip.
- ✅ Silver cord lays flat against the mesh and is tacked down.
- ✅ All four pale blue beads hang at identical lengths.
- ✅ Central flower sits symmetrically on the front face.
- ✅ Top cap is glued flush with no visible raw styrofoam.
💡 M. HELPFUL CROCHET TIPS
- 💡 Form Fitting: If your mesh feels too loose against the styrofoam cone at any point, simply sneak in an extra decrease (skipping a chain space) on that round to tighten the “skin” before continuing.
- 💡 Lighting and Photography: If you are using this piece for a video or a photo shoot, suspend the ornament using clear fishing line instead of a standard hook to make it look like a floating, magical icicle.
- 💡 Pinning the Cord: Do not attempt to tack the silver cord without pinning it first. The geometry of the “X” shape is critical to the vintage look, and pins allow you to step back and check the symmetry before sewing.
- 💡 Bead Security: Glass beads can be heavy. Pass your invisible nylon thread through the beads at least three times to ensure they won’t snap off during storage.
- 💡 Top Cap Stability: If the silver ornament cap feels wobbly on top of the foam, use a toothpick to push a small hole into the top center of the styrofoam, squeeze a drop of glue inside, and insert the metal prongs of the cap directly into the foam.
- 💡 Starch Alternative: If you do not wish to use a styrofoam cone, you can stuff the mesh firmly with fiberfill, but you must spray the finished piece heavily with fabric stiffener to maintain the crisp, straight icicle lines.
🧼 N. CARE INSTRUCTIONS
Because this ornament utilizes mixed media (metal caps, glass beads, styrofoam, and rhinestones), it should never be machine washed or submerged in water. To clean, gently dust with a clean, dry, soft-bristled makeup brush. If the white thread becomes stained, use a damp cotton swab with a tiny amount of mild detergent to spot-clean the affected stitch. Store wrapped in acid-free tissue paper inside a hard-sided box to prevent the styrofoam cone from being crushed or the crystal from scratching.
❓ R. FAQ
❓ Can I use standard worsted weight yarn instead of crochet thread?
Yes, but the entire scale will change. A worsted weight yarn will result in a massive cone, requiring a custom-cut piece of foam and much larger decorative elements. For the delicate, jewelry-like appearance shown, Size 10 thread is highly recommended.
❓ Where can I find the styrofoam cones?
Solid foam cones are available in the floral or basic craft aisles of most major craft stores. Look for the smooth, high-density foam rather than the porous, flaky variety.
❓ What if I can’t find a silver cord that looks right?
You can substitute the craft cord by crocheting a thin chain using metallic silver embroidery floss. It will give you the same shiny, crossed-line effect.
❓ Is there a safe way to attach the rhinestone without it falling off?
For long-term hold, use a specialized jewelry glue (like E6000 or Gem-Tac) rather than hot glue. Hot glue can peel away from the smooth plastic back of the rhinestone when exposed to cold winter storage temperatures.
❓ My mesh seems to slant sideways as I work down the cone. What am I doing wrong?
This is a natural effect of crocheting in a continuous spiral. It won’t be overly noticeable once the decorations are applied, but to minimize the slant, ensure you are pulling your single crochets straight up into the center of the chain spaces below them.