📖 B. INTRODUCTION
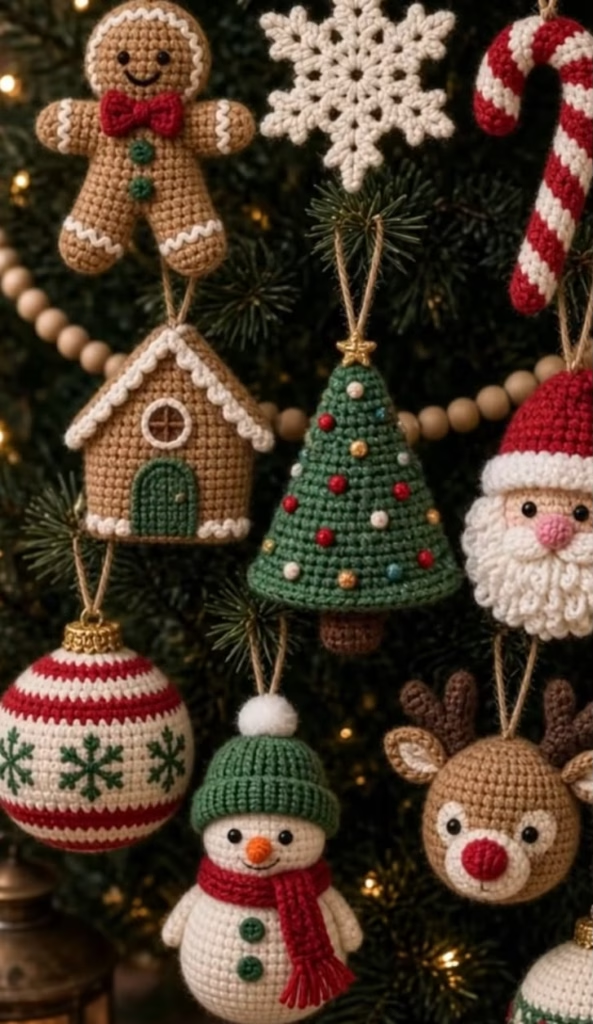
Get ready to deck the halls with one of the most iconic symbols of the holiday season! This classic amigurumi Christmas tree ornament is a joyful, quick-to-work project that instantly brings handmade charm to any winter display. Inspired by the beautiful green tree seen in WhatsApp Image 2026-09-22 at 02.20.59.jpeg, this design captures the essence of a traditional evergreen with a modern, minimalist amigurumi twist. Whether you are batch-crafting for local holiday markets, trimming your own family tree, or looking for a highly photogenic make to share with the Crochet Lovers community, this delightful little pine is guaranteed to be a crowd-pleaser.
Crocheting your own ornaments creates lasting heirloom keepsakes that won’t shatter if they tumble from the branches. This particular design features a classic green conical shape, a sturdy little brown trunk, and a rustic twine loop for easy hanging. The true magic of this pattern lies in its versatility. While the reference image features delicate, brightly colored bobble decorations and a tiny gold star, you can easily personalize the “ornaments” on your tree using your favorite beads, French knots, or sequins to match your specific holiday color palette.
Grab your favorite green yarn, settle in with a warm cup of cocoa, and let’s crochet some festive magic!
🔍 C. MAIN PATTERN OVERVIEW
This pattern is worked in two primary pieces that are joined during the finishing process.
- The Tree Body: The main section is a conical tree worked in continuous rounds from the top tip down to the base, using standard green amigurumi yarn. It features a flat, distinct bottom edge created by working in the back loops only before decreasing to close the base.
- The Trunk: A small, cylindrical brown trunk is crocheted separately and sewn securely to the flat bottom of the tree.
- The Details: The tree is topped with a small gold star applique. Colorful decorations are added to the green branches, featuring tiny dots of red, white, gold, and light blue. The entire piece is suspended from a simple loop of natural twine attached to the top.
🎯 D. SKILL LEVEL
Easy / Advanced Beginner
This project requires basic amigurumi knowledge, including working in the round, simple increases, and basic decreases. The embroidery and assembly are straightforward, making it an excellent weekend project.
Techniques Involved:
- Magic Ring (MR)
- Single crochet (sc)
- Working in continuous rounds
- Invisible decreases (dec)
- Working in Back Loops Only (BLO)
- Basic hand-sewing and simple embroidery
📏 E. FINISHED SIZE
When using worsted weight (Category 4) yarn and a 3.5mm (E) hook, the finished tree ornament will measure approximately 4 inches (10 cm) tall from the flat base of the trunk to the tip of the tree, and roughly 2.75 inches (7 cm) wide at the base.
Note: Your final size will vary depending on your yarn choice, hook size, and personal tension. Using a bulkier yarn like velvet or chenille will result in a much larger plush tree, while a sport-weight cotton will yield a tiny, delicate ornament.
🧮 F. GAUGE
Gauge: 5 sc stitches x 5 rounds = 1 inch x 1 inch (2.5 cm x 2.5 cm).
For amigurumi, exact gauge is not strictly critical. The most important factor is ensuring your stitches are tight and dense enough so that the white fiberfill stuffing does not show through the fabric. If you can see gaps between your stitches, size down your hook by 0.5mm.
🧶 G. REQUIRED YARN AMOUNTS
This stash-busting project requires very little yarn, making it perfect for using up leftovers from larger holiday projects!
- Main Color (Green): Approximately 25-30 yards (23-27 meters) of worsted weight acrylic or cotton yarn.
- Contrast Color 1 (Brown): Approximately 5 yards (4.5 meters) of worsted weight yarn for the trunk.
- Embroidery Colors: Small scrap lengths (about 12 inches / 30 cm each) of worsted or sport weight yarn in Red, White, Gold/Yellow, and Light Blue for the baubles.
🧰 H. MATERIALS
- 🧶 Worsted weight (Category 4) yarn in Green and Brown.
- 🧶 Scrap yarn in Red, White, Gold, and Light Blue.
- 🪄 3.5mm (US E/4) crochet hook.
- ☁️ High-quality polyester fiberfill stuffing.
- 🧵 Tapestry needle / yarn needle for sewing and embroidery.
- ✂️ Sharp scissors.
- 📍 Stitch markers.
- ⭐ One small gold star button, sequin, or applique (approx. 10mm) for the top.
- 🎗️ A 6-inch (15 cm) length of natural jute twine for the hanging loop.
🔤 I. ABBREVIATIONS – US TERMS
- MR: Magic Ring (or Magic Circle)
- ch: chain
- st(s): stitch(es)
- sc: single crochet
- inc: single crochet increase (work 2 sc in the same stitch)
- dec: invisible single crochet decrease (use front loops only of the next 2 stitches)
- BLO: back loop only
- sl st: slip stitch
- FO: fasten off
- ( ) x…: repeat the instructions inside the parentheses the specified number of times
- [ ]: indicates the total number of stitches you should have at the end of the round
📝 J. NOTES BEFORE YOU BEGIN
- Continuous Rounds: This pattern is worked in continuous spiral rounds. Do not join with a slip stitch or chain 1 at the end of a round unless explicitly instructed to do so.
- Stitch Markers: Always place a stitch marker in the first stitch of every new round to keep track of your progress.
- Invisible Decrease: For the neatest finish, always use the invisible decrease method for the
decstitches. Insert your hook into the front loop of the first stitch, then immediately into the front loop of the second stitch, yarn over, and complete the single crochet. - Stuffing: Stuff the tree firmly to maintain its crisp, conical shape, but be careful not to overstuff to the point where the stitches stretch and expose the white fiberfill.
🪡 K. COMPLETE PATTERN
🌲 Main Tree Cone
The main body of the tree is worked from the top tip downward in Green yarn.
Yarn Color: Green
Make: 1
R1: Create a MR, work 4 sc into the ring. [4]
R2: (1 sc, inc) x2. [6]
R3: (2 sc, inc) x2. [8]
R4: (3 sc, inc) x2. [10]
R5: (4 sc, inc) x2. [12]
R6: (3 sc, inc) x3. [15]
R7: 15 sc around. [15]
R8: (4 sc, inc) x3. [18]
R9: 18 sc around. [18]
R10: (5 sc, inc) x3. [21]
R11: 21 sc around. [21]
R12: (6 sc, inc) x3. [24]
R13: 24 sc around. [24]
R14: (7 sc, inc) x3. [27]
R15: 27 sc around. [27]
R16: (8 sc, inc) x3. [30]
R17: 30 sc around. [30]
R18: (9 sc, inc) x3. [33]
R19: 33 sc around. [33]
R20: (10 sc, inc) x3. [36]
R21: 36 sc around. [36]
R22: (11 sc, inc) x3. [39]
R23: 39 sc around. [39]
R24: (12 sc, inc) x3. [42]
R25: 42 sc around. [42]
⚠️ Note: In the next round, we will create the sharp bottom edge of the tree by working in the back loops only (BLO).
R26 (Base Edge): Working in BLO, (5 sc, dec) x6. [36]
Start adding fiberfill stuffing now. Continue to stuff firmly as you close the base, ensuring the tip is gently pushed out and the bottom is flat.
R27: (4 sc, dec) x6. [30]
R28: (3 sc, dec) x6. [24]
R29: (2 sc, dec) x6. [18]
R30: (1 sc, dec) x6. [12]
Add the final bits of stuffing here, making sure the bottom surface remains perfectly flat.
R31: dec x6. [6]
FO: Cut the yarn leaving a 6-inch tail. Thread the tail onto your tapestry needle, weave it through the front loops of the remaining 6 stitches, and pull tight to close the hole perfectly. Hide the remaining tail inside the body of the tree.
🪵 The Trunk
The trunk is a small cylinder worked in Brown yarn and later sewn to the flat base of the green cone.
Yarn Color: Brown
Make: 1
R1: Create a MR, work 6 sc into the ring. [6]
R2: inc in each st around. [12]
R3: Working in BLO, 12 sc around. [12]
R4: 12 sc around. [12]
R5: 12 sc around. [12]
FO: Sl st into the next stitch to finish the edge evenly. Cut the yarn, leaving a long 12-inch tail for sewing. Optional: Place a tiny pinch of stuffing inside the trunk before attaching it.
🎨 L. STYLING / ASSEMBLY / STABILITY / FINAL SHAPING
Creating a beautiful silhouette requires precise assembly! Follow these steps in order to ensure your tree ornament looks professionally finished.
1. Attaching the Trunk
- Thread the long brown tail from the trunk onto your tapestry needle.
- Center the open top of the trunk over the closed bottom base of the green tree cone (around Rounds 30-31 of the tree base).
- Whip stitch the trunk securely to the base, passing the needle through both loops of the trunk’s final round and catching the corresponding stitches on the flat bottom of the tree.
- Once secured, tie a hidden knot and weave the excess brown yarn deep into the green tree body to hide it.
2. Embroidering the Ornaments
The tree in the reference image features delicate, evenly spaced dots in red, white, gold, and light blue.
- Thread a tapestry needle with a scrap of your first color (e.g., Red).
- Insert the needle through the back of the tree and bring it out at your desired location on the front branches.
- Create a “French Knot” or simply make two tiny horizontal stitches over a single green stitch to create a colorful bauble.
- Re-insert the needle and pop it out a few rounds away to create the next bauble of the same color.
- Repeat this process with the White, Gold, and Light Blue yarn until the tree looks beautifully decorated.
3. Adding the Star Top
- Take your small gold star applique, bead, or button.
- Using a thin sewing needle and matching thread (or a dot of hot glue if you are not giving this to a small child), attach the gold star directly to the top point (Rounds 1-2) of the green cone.
4. Creating the Hanging Loop
- Cut a 6-inch length of natural rustic twine.
- Thread the twine onto a large-eye tapestry needle.
- Pass the needle horizontally through the very top tip of the green cone (just behind the gold star).
- Remove the needle and tie the two ends of the twine together in a tight, secure overhand knot at the top to form a loop.
✅ Final Shaping Checklist
- ✅ The tree stands upright or hangs perfectly straight without tilting.
- ✅ The bottom edge (created by the BLO round) is distinct and flat.
- ✅ The colorful embroidered baubles are relatively evenly distributed around the visible sides.
- ✅ The twine loop is secure enough to support the ornament’s weight.
💡 M. HELPFUL CROCHET TIPS
- 💡 Preventing a Crooked Tip: When working rounds 1-5, tension can sometimes cause the tip of the cone to bend slightly. Use the back of your crochet hook to gently press inside the cone and straighten it out before adding any stuffing.
- 💡 Flawless Embroidery: When embroidering the colored baubles, do not pull your yarn too tightly. Leave the French knots or small stitches slightly loose so they maintain a raised, 3D “bauble” appearance.
- 💡 Standing Decor: If you prefer to display this as a standing shelf decoration rather than an ornament, place a flat cardboard or plastic disc inside the base before working the final decrease rounds (R27-R31) to ensure the bottom remains perfectly rigid and flat.
- 💡 Invisible Finish: Always use the needle-join (invisible fasten off) method on the trunk to prevent an unsightly jagged step where the rounds end.
- 💡 Stuffing Density: Ensure the middle of the cone is stuffed quite firmly. If it is too soft, the tension of the hanging twine might cause the tree to stretch and deform over the years.
- 💡 Twine Alternatives: If you don’t have natural jute twine, a metallic gold embroidery thread, a thin satin ribbon, or a simple chain made from the green main yarn works perfectly for the hanging loop.
🧼 N. CARE INSTRUCTIONS
Because this ornament contains fiberfill and potentially glued/sewn appliques, do not machine wash.
- Dusting: Before packing away after the holidays, gently roll a lint roller over the surface to remove dust or stray pet hair.
- Spot Cleaning: If the ornament becomes stained, lightly dab the affected area with a damp cloth and a drop of mild detergent. Do not soak the tree, as the interior stuffing can retain moisture and develop mildew.
- Storage: Store in a dry box, preferably wrapped in tissue paper to prevent the twine or gold star from snagging on other ornaments.
❓ R. FAQ
❓ Can I use blanket yarn to make this?
Yes! Using a super bulky (Category 6) plush yarn will turn this small ornament into a large, squishy plushie. Just remember to size up your hook (usually a 5.0mm to 6.5mm) and note that you will need significantly more yardage.
❓ My tree looks more like a dome than a sharp cone. What did I do wrong?
This usually happens if the initial increase rounds are worked too loosely, or if the piece is overstuffed at the top. Ensure you are pulling your magic ring completely closed and maintaining tight tension for the first 8 rounds.
❓ Is this pattern safe for babies?
If you are gifting this to a home with infants, omit the gold star button/applique and the twine loop. Instead, embroider a yellow star at the top with yarn, and crochet a hanging loop using a chain of standard yarn to prevent any choking or strangulation hazards.
❓ How do I prevent the white stuffing from showing through the green yarn?
Always use a hook size smaller than the yarn label recommends (e.g., a 3.5mm hook for worsted weight yarn). If stuffing is still visible, try the “yarn under” single crochet technique, which creates a tighter, “X” shaped stitch that is excellent for amigurumi.
❓ Can I add arms or a face to the tree?
Absolutely! To give your tree character, you can add 6mm safety eyes between rounds 13 and 14, embroider a little smile, and crochet tiny tubular arms to attach to the sides.