📖 B. INTRODUCTION
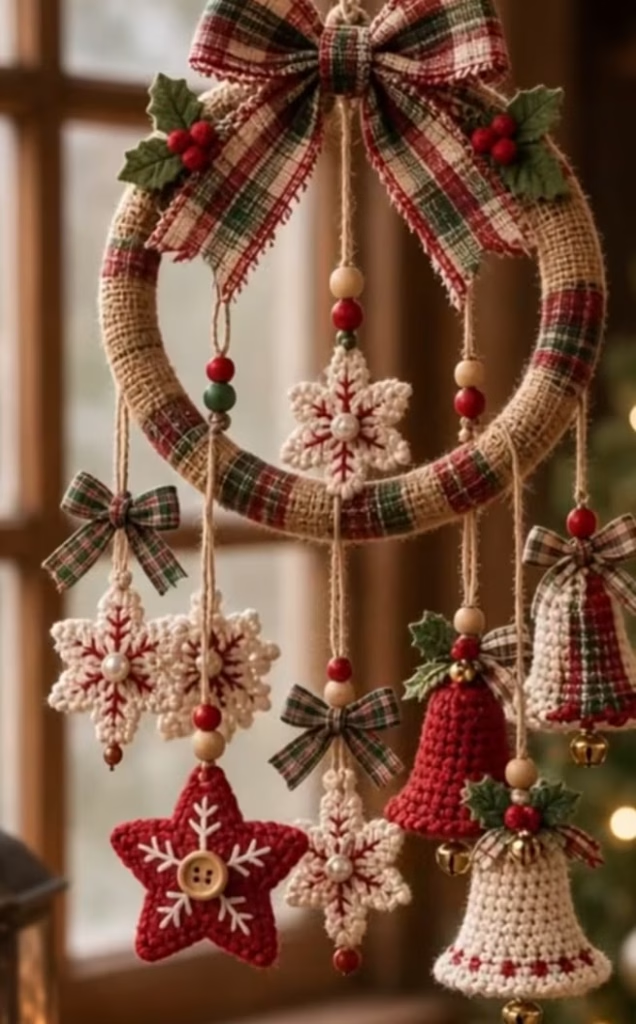
Capture the warmth and nostalgia of a rustic country Christmas with this handcrafted Plaid Christmas Ornament Mobile. Combining textured crochet motifs, cozy tartan accents, natural wooden elements, and festive greenery, this statement hanging piece brings timeless holiday charm to any room in your home. Designed as an heirloom-quality decorative wreath mobile, it features a ring suspension system loaded with delicate crocheted snowflakes, a embroidered plush star, traditional Christmas bells with jingle accents, and festive holly details.
Whether suspended in a cozy window frame, hung above a holiday mantle, or positioned as a focal piece in a nursery or living space, this mobile offers a harmonious blend of traditional craftsmanship and modern rustic aesthetic. The subtle interplay between rich crimson yarn, warm natural jute textures, soft ivory highlights, and classic tartan plaid ribbons provides a rich visual depth that looks striking from every angle.
This comprehensive pattern guide takes you through each individual element step-by-step. You will craft delicate star-shaped motifs, structured bell shapes, a stuffed focal star, and leafy accents before bringing everything together with custom bead stringing and balanced assembly. Feel free to customize your mobile by tweaking yarn shades, altering hanging lengths, or adding extra bells and pearls to suit your personal holiday styling.
🔍 C. MAIN PATTERN OVERVIEW
The finished mobile is constructed around a sturdy 10-inch (25 cm) circular frame wrapped in textured natural jute yarn and accented with buffalo plaid fabric trim. Suspended from this central hoop are six unique hanging strands featuring four distinct types of crocheted ornaments, decorative wooden beads, mini plaid bows, and small brass jingle bells.
- The Suspended Wreath Ring: A rigid base completely enveloped in a rustic, textured jute-style wrap, crowned with a large multi-loop plaid bow, holly leaves, and vibrant red berries.
- The Cream Snowflakes (4 Pieces): Intricate, six-pointed lace motifs embroidered with red chevron details and finished with pearl bead centers.
- The Plush Embroidered Star (1 Piece): A stuffed, five-pointed crimson star embellished with embroidered cream snowflake branches and a vintage-style wooden center button.
- The Festive Bells (3 Pieces): Flared, bell-shaped ornaments (crafted in solid red and ivory options) adorned with mini plaid bows, holly leaf caps, and functional jingle bells suspended from their centers.
- Assembly Elements: Natural jute hanging cords strung with turned wooden beads, red and forest green accent beads, and classic plaid ribbon bow ties.
🎯 D. SKILL LEVEL
Skill Level: Intermediate
While the individual motifs utilize foundational stitches, this project requires intermediate skills due to assembling small multi-component pieces, maintaining consistent tension with stiff yarn textures, executing precise embroidery on small crocheted surfaces, and balancing a complex multi-strand hanging structure.
Techniques Required:
- Working in continuous rounds (spiral) and joined rounds
- Magic Ring (MR), chain (ch), single crochet (sc), half double crochet (hdc), and double crochet (dc)
- Picot stitches for decorative snowflake points
- Working in Front Loops Only (FLO) and Back Loops Only (BLO)
- Basic surface embroidery (French knots, straight stitch/fly stitch)
- Seamless joining, light stuffing application, and structured assembly
📏 E. FINISHED SIZE
- Hoop Diameter: 10 inches (25 cm)
- Overall Mobile Length: Approx. 22–24 inches (56–61 cm) from top hanging loop to lowest hanging bell
- Snowflake Diameter: 3.5 inches (9 cm)
- Stuffed Star Diameter: 4.25 inches (11 cm) point-to-point
- Bell Height: 2.5 inches (6.5 cm) excluding hanging loop and jingle bell
- Holly Leaf Length: 1.75 inches (4.5 cm)
Note: Finished size may vary depending on hook size, yarn brand, tension tightness, and how firmly components are stuffed.
🧮 F. GAUGE
- With 2.75 mm hook in Sc (DK Cotton/Yarn): 24 sts x 26 rows = 4 inches (10 cm)
- With 3.5 mm hook in Jute/Burlap Yarn: 16 sts x 18 rows = 4 inches (10 cm)
Gauge is not strictly critical for this ornamental project, but maintaining firm, even tension is essential for amigurumi elements (star and bells) so stuffing does not show through the stitches.
🧶 G. REQUIRED YARN AMOUNTS
All yarn weights refer to Lightweight / DK (Category 3) combed cotton or cotton-blend yarn unless noted otherwise.
- 🧵 Natural Jute / Burlap Yarn (Category 4 Medium): Approx. 65 yards / 60 meters (for wrapping or crocheting over the ring hoop).
- 🧶 Ivory / Cream Yarn: Approx. 110 yards / 100 meters (for 3 cream snowflakes, 2 cream bells, and embroidery accents).
- 🧶 Crimson Red Yarn: Approx. 95 yards / 87 meters (for 1 red star, 1 red bell, 1 red snowflake, and berry accents).
- 🧶 Forest Green Yarn: Approx. 25 yards / 23 meters (for holly leaves).
- 🧵 Embroidery Floss: Small skein of Dark Crimson and Ivory for surface detailing.
🧰 H. MATERIALS
- 🪡 Crochet Hooks: Size 2.75 mm (US C/2 or D/3) for ornaments; Size 3.5 mm (US E/4) for jute ring cover.
- ⭕ Ring Frame: 10-inch (25 cm) metal, wooden, or wire wreath ring.
- 🎀 Plaid Ribbon: 1.5-inch (3.8 cm) wide wired tartan/plaid ribbon (approx. 2 yards) for main top bow and mini cord bows.
- 🪵 Wooden Beads: 12 mm natural unfinished wooden beads (approx. 8–10 pieces).
- 🔴 Colored Accent Beads: 8 mm painted red and green wooden or acrylic beads (approx. 12–16 pieces).
- ⚪ Pearl Beads: 8 mm flat-back or sew-on pearl beads (4 pieces for snowflake centers).
- 🔘 Wooden Button: 15–18 mm vintage 4-hole wooden button (1 piece for central star).
- 🔔 Jingle Bells: 12 mm gold or bronze mini jingle bells (3 pieces for bell clappers).
- ☁️ Stuffing: Premium polyester fiberfill stuffing.
- ✂️ Tools: Tapestry/yarn needle, sharp sewing needle, clear craft glue or hot glue gun, stitch markers, scissors, tape measure.
⚠️ SAFETY NOTE: This item is intended purely as a seasonal home decoration. It contains small beads, buttons, and jingle bells. Hang securely out of reach of infants, young children, and pets.
🔤 I. ABBREVIATIONS – US TERMS
- MR – Magic Ring
- ch – Chain
- sl st – Slip stitch
- sc – Single crochet
- hdc – Half double crochet
- dc – Double crochet
- inc – Increase (2 single crochet in the same stitch)
- dec – Decrease (single crochet 2 stitches together)
- sc3tog – Single crochet 3 stitches together (decrease over 3 sts)
- BLO – Back loop only
- FLO – Front loop only
- st(s) – Stitch(es)
- rnd(s) – Round(s)
- picot – Chain 3, sl st in 1st ch (or base st as specified)
- [ ] – Repeat instructions inside brackets as directed
- ( ) – Total stitch count at the end of the round/row
📝 J. NOTES BEFORE YOU BEGIN
- 📌 Working Style: Amigurumi 3D pieces (bells, star, berries) are worked in continuous spiral rounds without joining. Do not join rounds unless explicitly instructed. Use a stitch marker to track the start of each round.
- 📌 Flat Motifs: The snowflakes are worked in joined concentric rounds. Slip stitch joins at the end of rounds do not count as a stitch unless noted.
- 📌 Tension Control: Maintain a snug tension for 3D elements so stuffing remains hidden. Flat motifs require light steam blocking to lie perfectly flat before assembly.
- 📌 Color Changes: Change yarn colors in the final yarn-over of the previous stitch.
- 📌 Tails: Leave generous 8–10 inch (20–25 cm) yarn tails on all finished motifs for sewing and attaching hanging cords.
🪡 K. COMPLETE PATTERN
⭕ 1. Frame Ring Base Cover
The 10-inch ring forms the structural suspension base for the entire mobile.
- Material: Jute Yarn (Medium / Weight 4)
- Hook Size: 3.5 mm
Option A: Direct Spiral Crochet Wrap (Recommended for clean texture)
- Step 1: Make a slip knot on your hook. Hold your hook above the metal/wooden 10-inch ring.
- R1: Work single crochet stitches directly OVER the ring frame until the metal/wood is completely covered and no gaps show. For a 10-inch ring, this typically takes between 140 to 160 sc stitches. Push stitches closely together as you work.
- Step 2: Join with a sl st to the first sc. Fasten off and weave in ends securely.
Option B: Ribbon & Cord Wrap Alternative
- Secure end of Jute yarn or burlap ribbon to the ring with a dab of hot glue. Wrap tightly around the circumference of the ring, overlapping slightly by 1/8 inch until fully covered. Glue tail end to secure.
❄️ 2. Cream Snowflake Motifs (Make 3 in Cream, 1 in Red)
These openwork 6-pointed star motifs dangle at varying lengths on the mobile.
- Color: Cream (3 pieces) and Crimson Red (1 piece)
- Hook Size: 2.75 mm
- Quantity: 4 Motifs total
- Rnd 1: MR, ch 1, 12 sc into ring. Sl st to 1st sc to join. (12)
- Rnd 2: [ch 4 (counts as 1 dc + ch 1), dc in next st, ch 1] 11 times. Sl st to 3rd ch of initial ch-4. (12 dc, 12 ch-1 spaces)
- Rnd 3: Sl st into first ch-1 space. Ch 1, 2 sc in same space. 2 sc in each ch-1 space around. Sl st to 1st sc. (24)
- Rnd 4 (Point Round): [sc in next st, ch 5, sl st in 3rd ch from hook (picot made), ch 2, skip 1 st, sc in next st, ch 3, skip 1 st] 6 times. Sl st to first sc.
- Rnd 5 (Outer Point Detailing): Sl st into the first ch-5 picot loop. Work into loop: (2 sc, ch 3 picot, 2 sc). Ch 2, sc in next ch-3 space, ch 2. [Work (2 sc, ch 3 picot, 2 sc) in next ch-5 loop, ch 2, sc in next ch-3 space, ch 2] 5 times. Join with sl st to first sc.
- Fasten off and weave in ends.
Snowflake Embroidery Details:
- 🧵 Using Crimson Red yarn (for cream snowflakes) or Cream yarn (for red snowflake) and a tapestry needle, embroider straight V-shaped embroidery stitches branching along each of the 6 spoke lines radiating from the center ring to the outer points.
- ⚪ Sew an 8 mm pearl bead (or wooden bead) firmly into the center magic ring of each snowflake.
- 💨 Blocking: Lightly spray with water or stiffening spray and pin out to 6 sharp points on a blocking mat. Allow to dry completely.
       ❄️ SNOWFLAKE DIAGRAM SKETCH
            \   |   /
             \  |  /
           --- (⚪) ---   (Center Pearl)
             /  |  \
            /   |   \
⭐ 3. Plush Embroidered Red Star
A padded 5-pointed rustic central ornament with embroidered details.
- Color: Crimson Red
- Hook Size: 2.75 mm
- Quantity: Make 2 identical star panels (Front & Back), then join together.
Center Pentagon Base (Make 2):
- Rnd 1: MR, ch 1, 5 sc into ring. (5)
- Rnd 2: inc in each st around. (10)
- Rnd 3: [1 sc, inc] x5. (15)
- Rnd 4: [2 sc, inc] x5. (20)
- Rnd 5: [3 sc, inc] x5. (25)
- Do not fasten off second piece. Keep working to form 5 individual star points on each panel.
Star Points (Worked in short rows over 5 sts each):
- Point Row 1: sc in next 5 sts of pentagon edge, ch 1, turn. (5)
- Point Row 2: dec, 1 sc, dec, ch 1, turn. (3)
- Point Row 3: sc across 3 sts, ch 1, turn. (3)
- Point Row 4: sc3tog, ch 1. (1)
- Fasten off. Reattach yarn with sl st in next open stitch of Rnd 5 pentagon edge and repeat Rows 1–4 to create the remaining 4 points.
Front Panel Embroidery:
- 🧵 On the front star panel, use Cream yarn to embroider feather/snowflake branches radiating from the center toward each of the 5 points using straight stitch.
- 🔘 Sew a 15 mm 4-hole vintage wooden button directly over the central magic ring point.
Star Assembly:
- Place Front and Back panels together with wrong sides facing in.
- Join Crimson Red yarn at any inner corner gap.
- Work single crochet stitches through both layers evenly around the outer border (3 sc up each point side, 3 sc in point tip, 3 sc down point side).
- ☁️ Stuff the star body and points moderately with polyester fiberfill right before closing the last two points.
- Sl st to join, fasten off, and weave in end.
🔔 4. Christmas Bells (Make 3 total)
Traditional flared bell ornaments capped with holly leaves.
- Color Variations:
- Bell A (1 Piece): Crimson Red body with Cream border trim.
- Bell B & C (2 Pieces): Cream body with Crimson Red border trim.
- Hook Size: 2.75 mm
- Rnd 1: MR, ch 1, 6 sc into ring. (6)
- Rnd 2: inc in each st around. (12)
- Rnd 3: [1 sc, inc] x6. (18)
- Rnd 4–9: sc in each st around. (18) (6 rounds total)
- Rnd 10: [2 sc, inc] x6. (24)
- Rnd 11: [3 sc, inc] x6. (30)
- Rnd 12: sc in each st around. (30)
- Rnd 13 (Contrast Flare Rim): Switch to contrasting color yarn. Working in FLO: [sc in next st, ch 2, sc in same st, skip 1 st] 15 times around. (30 flared rim loops)
- Fasten off and weave in tail.
Inner Clapper & Jingle Bell:
- Attach a 12 mm gold jingle bell to an 8-inch strand of jute cord.
- Thread both ends up through the top center magic ring of the bell so the jingle bell hangs just at or slightly below the flared rim level. Tie a secure knot inside top of bell.
🍃 5. Holly Leaves & Berry Clusters
Decorative accents for the frame top and individual bell tops.
- Color: Forest Green (Leaves) & Crimson Red (Berries)
- Hook Size: 2.75 mm
- Quantity: Make 8 Leaves and 9 Berries total.
Holly Leaf (Make 8):
- Ch 8.
- Rnd 1: Working down starting chain: sc in 2nd ch from hook, hdc in next, (dc, ch 2 picot, dc) in next ch, hdc in next ch, sc in next ch, 3 sc in last ch.
- Rotate piece to work down opposite side of chain: sc in next, hdc in next, (dc, ch 2 picot, dc) in next, hdc in next, sc in next.
- Sl st to first sc to join. Fasten off, leaving a 6-inch tail for sewing.
Holly Berries (Make 9):
- Rnd 1: MR, ch 1, 5 sc into ring. (5)
- Rnd 2: sc in each st around. (5)
- Fasten off, weave tail through FLO of all 5 sts, pull tight to create a rounded ball shape, and knot securely.
🎨 L. STYLING / ASSEMBLY / STABILITY / FINAL SHAPING
🪡 Recommended Assembly Order
- Prepare Ring Frame: Ensure the 10-inch hoop is fully wrapped and smooth.
- Top Main Bow Accent:
- Form a large multi-loop bow using 1.5-inch plaid ribbon (approx. 6–7 inches wide with 6-inch dangling tails).
- Secure the center of the bow tightly with wire or jute cord.
- Attach bow firmly to the top center of the wrapped frame ring.
- Sew 3 Holly Leaves and 3 Red Berries at the knot center of the bow.
- Construct Hanging Cords:
- Cut 6 strands of natural jute cord in varying lengths (ranging from 12 inches to 20 inches).
- Thread beads onto cords using a yarn needle according to layout below.
- Attach Motifs to Cords:
- Secure ornaments firmly to bottom ends of each string using double knots hidden inside stitches or behind beads.
- Bind Cords to Mobile Frame:
- Space strands symmetrically along the lower semicircle of the 10-inch ring frame.
📐 Hanging Strand Layout Guide
                         [ TOP PLAID BOW ]
                             ( HOOP )
       +----------+----------+----------+----------+----------+
       |          |          |          |          |          |
    Strand 1   Strand 2   Strand 3   Strand 4   Strand 5   Strand 6
     (10")      (14")      (18")      (16")      (12")      (9")
       |          |          |          |          |          |
    [Bead]     [Bead]     [Bead]     [Bead]     [Bead]     [Bead]
       |          |          |          |          |          |
   Snowflake  Snowflake   Red Star  Snowflake  Red Bell   Cream Bell
       |          |          |          |
   Cream Bell  [Bead]    Snowflake   [Bead]
                  |                     |
              Cream Bell            Cream Bell
Detailed Strand Composition:
- Strand 1 (Far Left – 10″ drop): Jute cord ➔ Wood Bead ➔ Red Accent Bead ➔ Cream Snowflake Motif ➔ Mini Plaid Ribbon Bow.
- Strand 2 (Inner Left – 15″ drop): Jute cord ➔ Wood Bead ➔ Green Accent Bead ➔ Cream Snowflake Motif ➔ Wood Bead ➔ Red Bell (with Holly Leaf cap).
- Strand 3 (Center Drop – 18″ drop – Longest): Jute cord ➔ Wood Bead ➔ Red Bead ➔ Cream Snowflake ➔ Wood Bead ➔ Plush Embroidered Red Star.
- Strand 4 (Inner Right – 16″ drop): Jute cord ➔ Wood Bead ➔ Red Bead ➔ Mini Plaid Ribbon Bow ➔ Cream Snowflake ➔ Cream Bell (with Holly cap).
- Strand 5 (Outer Right – 12″ drop): Jute cord ➔ Wood Bead ➔ Green Bead ➔ Cream Bell.
- Strand 6 (Far Right – 9″ drop): Jute cord ➔ Wood Bead ➔ Red Snowflake Motif.
⚖️ Balance & Structural Stability
- Weight Distribution: Ensure the central Plush Red Star hangs precisely from the center point of the bottom arc to act as a visual anchor.
- Knot Security: Apply a tiny droplet of clear craft glue or fabric glue to every knot tied on jute cords behind beads to prevent slippage over time.
- Level Check: Hang the central ring from an overhead hook or door handle during strand attachment to continuously verify that the ring stays perfectly level.
✅ Final Shaping Checklist
- [ ] Ring Cover: Smooth, tight jute texture with no exposed frame wire.
- [ ] Top Accent Bow: Fluffed loops, neatly dovetailed ribbon ends, centered holly leaves.
- [ ] Snowflakes: Pinned and steam-blocked flat; pearl centers securely sewn.
- [ ] Red Star: Evenly stuffed, crisp points, wooden button centered.
- [ ] Bells: Flared rims turned slightly outward; internal jingle bells centered.
- [ ] Hanging Balance: Mobile hangs completely level without tilting to one side.
- [ ] Finishing: All yarn tails neatly woven in and cord knots sealed with glue.
💡 M. HELPFUL CROCHET TIPS
- 💡 Stiffening Snowflakes: For extra crispness that prevents curling in humid environments, paint the backs of your crocheted snowflakes with a 1:1 mixture of PVA white craft glue and water before blocking.
- 💡 Bead Threading Trick: Dip the end of your jute cord in clear nail polish or craft glue and twist it into a sharp point. Allow to dry for 2 minutes—it will slide through small wooden bead holes like a stiff needle!
- 💡 Clean Color Changes: Always perform the final yarn-over of the stitch before a color transition using the new color to keep your color borders sharp.
- 💡 Maintaining Bell Shape: When stuffing is not used inside open bells, brush the interior wall lightly with fabric stiffener spray so they retain their firm bell silhouette permanently.
- 💡 Plaid Bow Precision: Use wired edge ribbon for the top bow so you can sculpt and fluff the loops into a full 3D shape that won’t sag over time.
- 💡 No-Slippage Strand Mounting: When tying hanging cords onto the ring frame, make a hitch knot (larks head knot) over the ring cover, then anchor it with a hidden stitch through the jute wrap.
- 💡 Symmetry Alignment: Use locking stitch markers placed at equal degree intervals around your hoop frame before attaching your ornament cords to guarantee perfect spacing.
🧼 N. CARE INSTRUCTIONS
- 🧼 Dusting: Clean softly with a dry micro-fiber feather duster or use a hairdryer on the “cool/low” setting to blow away dust accumulated during seasonal display.
- 🧼 Spot Cleaning: If necessary, spot-clean cotton ornaments using a damp white cloth and mild detergent. Do not submerge the complete assembly in water as wood beads, metal rings, and ribbon stiffeners may degrade.
- 🧼 Off-Season Storage: Store flat in a breathable cardboard box lined with acid-free tissue paper. Wrap snowflakes flat between sheets of cardstock to prevent creasing points. Avoid storing in damp basements or hot attics.
❓ R. FAQ
❓ Q: Can I substitute acrylic yarn for cotton in this pattern?
A: Yes! While DK cotton provides the crispest stitch definition for snowflakes, light worsted or DK acrylic yarn works wonderfully. If using acrylic, steam block your snowflakes lightly with an iron held 2 inches away (do not touch the iron directly to acrylic fibers or they will melt).
❓ Q: How can I adjust this pattern if I only have a 8-inch or 12-inch ring?
A: For an 8-inch ring, reduce your hanging strands to 4 or 5 total and eliminate 1-2 snowflakes to prevent crowding. For a 12-inch ring, add 2 additional hanging strands and craft extra holly leaves to maintain a full appearance.
❓ Q: Can these individual ornaments be made separately for a Christmas tree?
A: Absolutely! Each component in this mobile (the Embroidered Star, Bell, and Snowflake) makes a standalone Christmas tree ornament. Simply attach an 8-inch loop of jute cord or ribbon to the top of any individual motif.
❓ Q: My mobile is tilting slightly to one side. How do I fix it?
A: Mobile imbalance happens when weight is distributed unevenly. Adjust the position of the top suspension loop slightly toward the heavier side, or adjust bead counts on individual strands until the hoop rests completely level.
❓ Q: Where do I find wooden beads with holes large enough for jute cord?
A: Look for wooden craft beads with a minimum 3 mm to 4 mm inner hole diameter. Craft stores usually carry these in the jewelry or macramé section.
❓ Q: Can I make this mobile without hot glue?
A: Yes! Glue is optional for added durability, but all elements can be secured using traditional hand-sewing techniques with strong yarn tails and tapestry needles.
May this handmade Plaid Christmas Ornament Mobile bring warmth, rustic beauty, and joyful holiday spirit to your home for many festive seasons to come! Happy crocheting! 🎄✨