📖 B. INTRODUCTION
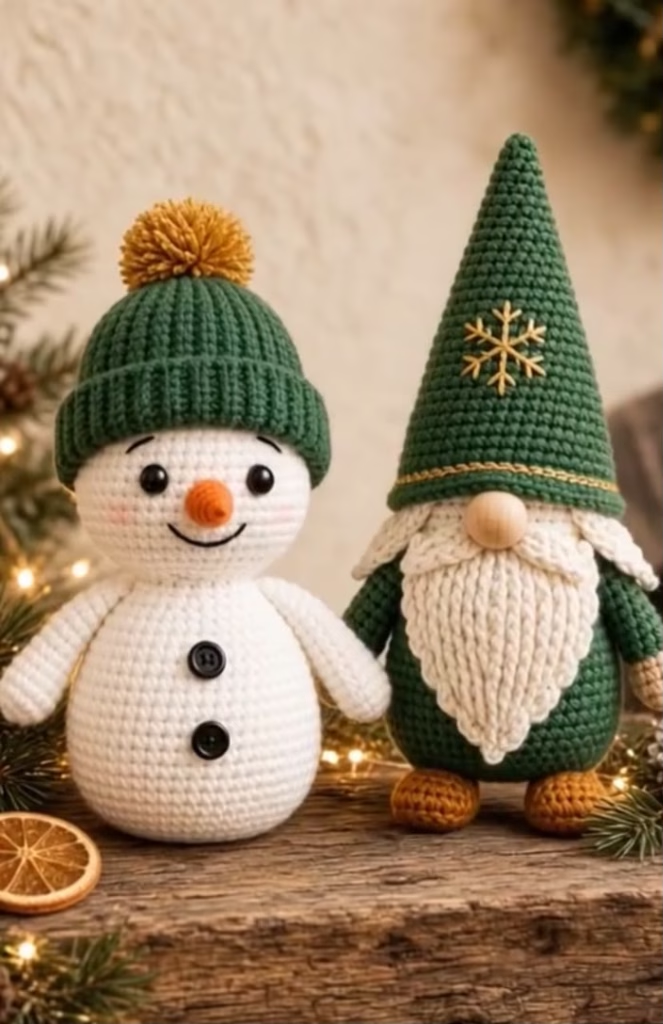
Welcome, crochet lovers, to a wonderfully cozy winter project! This free amigurumi pattern features a cheerful snowman and his woodland gnome companion, making them a perfect handmade feature for your seasonal decor or your crafting community. Whether you are creating these as heartfelt gifts, charming mantle displays, or a festive table centerpiece, this duo is guaranteed to spread warmth and joy.
The snowman boasts a traditional white silhouette with a snug green ribbed beanie, a fluffy mustard pom-pom, a crocheted orange carrot nose, and classic black buttons stitched down his belly. Beside him stands a delightful gnome, dressed in rich forest green with a tall, snowflake-embroidered hat, mustard-colored shoes, and a beautifully textured white beard. Both figures are highly customizable—swap out the forest green and mustard for your favorite holiday hues, or experiment with different bead sizes to give the gnome a unique personality.
🔍 C. MAIN PATTERN OVERVIEW
This comprehensive pattern includes full instructions for both the Snowman and the Gnome figures.
- The Snowman: Crocheted from the bottom up, the body and head are worked in one seamless, continuous piece. The tube-like arms and carrot nose are crocheted separately and sewn on. The cozy winter hat is created by crocheting a flat ribbed rectangle, seaming it into a tube, cinching the top, and finishing it with a yarn pom-pom.
- The Gnome: The body and head are also worked as one continuous conical shape starting from a flat base. The thick, snowy beard is crocheted flat using alternating textured stitches, accented by a separate mustache piece. The signature tall hat is crocheted in the round to form a crisp cone, topped off with simple gold snowflake embroidery.
🎯 D. SKILL LEVEL
Intermediate
While the primary shaping uses standard single crochet stitches, the inclusion of ribbed hat construction, textured stitch combinations for the beard, and surface embroidery elevates this to an intermediate-level project.
- Working in continuous rounds and flat rows
- Invisible decreases for smooth, gap-free shaping
- Back loop only (BLO) ribbing
- Basic surface embroidery for the snowflake and facial expressions
📏 ## 📏 E. FINISHED SIZE
- Snowman: Approximately 8 inches (20 cm) tall from the rounded base to the tip of the pom-pom.
- Gnome: Approximately 9.5 inches (24 cm) tall from the bottom of the flat base to the folded tip of the hat.Note: Your final size will vary depending on your specific yarn weight, hook size, and stuffing density.
🧮 ## 🧮 F. GAUGE
5 rounds of single crochet = 2 inches (5 cm) in diameter.
Gauge is not strictly critical for this amigurumi project. However, ensure your stitches are tight enough so that the white fiberfill stuffing does not show through the fabric. If you can see gaps between your stitches, drop down half a hook size.
🧶 ## 🧶 G. REQUIRED YARN AMOUNTS
Estimates are based on medium/worsted weight (Category 4) yarn:
- White (Snowman Body, Gnome Beard): 120 yards (110 m)
- Forest Green (Hats, Gnome Body): 100 yards (90 m)
- Mustard Yellow (Pom-pom, Gnome Shoes): 30 yards (27 m)
- Orange (Snowman Nose): 5 yards (4 m)
- Gold/Yellow (Snowflake & Hat Trim): 5 yards (4 m)
- Black (Facial details): Scrap amounts
🧰 ## 🧰 H. MATERIALS
- Yarn: Medium (worsted) weight acrylic or cotton blend in White, Forest Green, Mustard Yellow, Gold, and Orange.
- Hook: 3.5 mm (E/4) crochet hook (or size needed for a tight fabric).
- Eyes: 10 mm black safety eyes (1 pair for the snowman).
- Nose (Gnome): 1 large round wooden bead (approx. 20 mm) or beige yarn to crochet a small sphere.
- Buttons: 2 small black buttons (approx. 12 mm) for the snowman’s belly.
- Stuffing: High-quality polyester fiberfill.
- Tools: Tapestry needle, stitch markers, sewing pins, scissors.
- Makeup (Optional): Real pink blush or soft pink pastel chalk for the snowman’s cheeks.
⚠️ Safety Note: If making these items for children under 3 years old, do not use plastic safety eyes, wooden beads, or real buttons. Embroider the eyes, nose, and belly buttons tightly with yarn instead to prevent choking hazards.
🔤 ## 🔤 I. ABBREVIATIONS – US TERMS
- MR: Magic ring
- ch: Chain
- st(s): Stitch(es)
- sl st: Slip stitch
- sc: Single crochet
- hdc: Half double crochet
- dc: Double crochet
- inc: Single crochet increase (2 sc in one st)
- dec: Invisible single crochet decrease (sc 2 together using front loops only)
- BLO: Back loop only
- FO: Fasten off
- ( ) x N: Repeat the instructions in parentheses N times
📝 ## 📝 J. NOTES BEFORE YOU BEGIN
- Continuous Rounds: Most amigurumi parts (bodies, heads, arms, and the tall hat) are worked in continuous spirals. Do not join with a slip stitch or chain 1 at the end of a round unless the pattern explicitly instructs you to do so.
- Stitch Markers: Place a stitch marker in the very first stitch of every round to easily keep track of your count.
- Stuffing Protocol: Stuff the pieces firmly as you go. Pay special attention to the neck area of the snowman; pack this area densely to prevent the head from flopping or wobbling.
- Sewing Tails: When finishing a component that needs to be attached to another part, leave a long yarn tail (about 12 inches) before fastening off.
🪡 ## 🪡 K. COMPLETE PATTERN
⛄ SNOWMAN BODY & HEAD
This piece is worked from the bottom up in one continuous piece.
Yarn: White
R1: MR 6. (6)
R2: inc x6. (12)
R3: (1 sc, inc) x6. (18)
R4: (2 sc, inc) x6. (24)
R5: (3 sc, inc) x6. (30)
R6: (4 sc, inc) x6. (36)
R7: (5 sc, inc) x6. (42)
R8: (6 sc, inc) x6. (48)
R9: (7 sc, inc) x6. (54)
R10-22: 13 rounds of 54 sc. (54)
R23: (7 sc, dec) x6. (48)
R24: (6 sc, dec) x6. (42)
R25: (5 sc, dec) x6. (36)
R26: (4 sc, dec) x6. (30)
Start stuffing the body firmly and continue as you close the neck.
R27: (3 sc, dec) x6. (24)
R28: (2 sc, dec) x6. (18) — This completes the neck section.
Begin the head:
R29: (2 sc, inc) x6. (24)
R30: (3 sc, inc) x6. (30)
R31: (4 sc, inc) x6. (36)
R32: (5 sc, inc) x6. (42)
R33: (6 sc, inc) x6. (48)
R34-43: 10 rounds of 48 sc. (48)
If using safety eyes, insert them between R38 and R39, about 7 stitches apart. Ensure they are centered with the front of the body.
R44: (6 sc, dec) x6. (42)
R45: (5 sc, dec) x6. (36)
R46: (4 sc, dec) x6. (30)
R47: (3 sc, dec) x6. (24)
R48: (2 sc, dec) x6. (18)
Stuff the head and neck extremely firmly to support the weight of the hat.
R49: (1 sc, dec) x6. (12)
R50: dec x6. (6)
FO, leaving a tail. Weave the tail through the front loops of the remaining 6 stitches and pull tight to close. Hide the end inside the head.
💪 SNOWMAN ARMS (Make 2)
Yarn: White
R1: MR 6. (6)
R2: inc x6. (12)
R3-14: 12 rounds of 12 sc. (12)
Stuff only the bottom half of the arm lightly. Leave the top flat.
Pinch the top opening flat and crochet 5 sc through both layers to close. FO, leaving a long tail for sewing.
🥕 SNOWMAN NOSE
Yarn: Orange
R1: MR 4. (4)
R2: (1 sc, inc) x2. (6)
R3: 6 sc. (6)
R4: (2 sc, inc) x2. (8)
R5: 8 sc. (8)
FO, leaving a tail for sewing. Do not stuff.
🧶 SNOWMAN BEANIE HAT This hat is worked in flat rows to create a stretchy ribbed band, then seamed. Yarn: Forest Green Row 1: Ch 21. Starting in the 2nd ch from hook, sc 20. Ch 1, turn. (20) Row 2-42: Working in BLO, sc 20. Ch 1, turn. (20) Check the fit around your snowman’s head. Add or remove rows if necessary. Fold the rectangle in half so the short ends meet. Sl st the edges together to form a tube. FO, leaving a very long tail (about 20 inches). Using your tapestry needle, weave the long tail in and out of the row ends along one open side of the tube. Pull the yarn tightly to cinch the top of the hat closed. Secure with a knot. Leave the remaining tail to sew the pom-pom. Pom-pom: Wrap Mustard Yellow yarn around three fingers 40 times. Tie tightly in the middle, cut the loops, and trim into a neat, dense sphere. Attach securely to the cinched top of the hat.
🌲 GNOME BODY & HEAD
Worked bottom-up in continuous rounds.
Yarn: Forest Green
R1: MR 6. (6)
R2: inc x6. (12)
R3: (1 sc, inc) x6. (18)
R4: (2 sc, inc) x6. (24)
R5: (3 sc, inc) x6. (30)
R6: (4 sc, inc) x6. (36)
R7: (5 sc, inc) x6. (42)
R8: (6 sc, inc) x6. (48)
R9: (7 sc, inc) x6. (54)
R10: Working in BLO, 54 sc. (54) — This creates the flat bottom edge.
R11-18: 8 rounds of 54 sc. (54)
R19: (7 sc, dec) x6. (48)
R20-23: 4 rounds of 48 sc. (48)
R24: (6 sc, dec) x6. (42)
R25-28: 4 rounds of 42 sc. (42)
R29: (5 sc, dec) x6. (36)
Start stuffing the base firmly.
R30-33: 4 rounds of 36 sc. (36)
R34: (4 sc, dec) x6. (30)
R35-37: 3 rounds of 30 sc. (30)
R38: (3 sc, dec) x6. (24)
R39-41: 3 rounds of 24 sc. (24)
R42: (2 sc, dec) x6. (18)
R43: (1 sc, dec) x6. (12)
Finish stuffing.
R44: dec x6. (6)
FO, weave through the remaining 6 front loops, and pull tight to close.
🧔 GNOME BEARD Worked flat in rows to create a textured triangle. Yarn: White Row 1: Ch 2, 3 sc in the 2nd ch from hook. Ch 1, turn. (3) Row 2: inc, 1 sc, inc. Ch 1, turn. (5) Row 3: inc, 1 dc, 1 sc, 1 dc, inc. Ch 1, turn. (7) Row 4: inc, (1 sc, 1 dc) x2, 1 sc, inc. Ch 1, turn. (9) Row 5: inc, (1 dc, 1 sc) x3, 1 dc, inc. Ch 1, turn. (11) Row 6: inc, (1 sc, 1 dc) x4, 1 sc, inc. Ch 1, turn. (13) Row 7: inc, (1 dc, 1 sc) x5, 1 dc, inc. Ch 1, turn. (15) Row 8: inc, (1 sc, 1 dc) x6, 1 sc, inc. Ch 1, turn. (17) Row 9: inc, (1 dc, 1 sc) x7, 1 dc, inc. Ch 1, turn. (19) Row 10: inc, (1 sc, 1 dc) x8, 1 sc, inc. (21) FO, leaving a long tail for sewing.
🧔 GNOME MUSTACHE (Make 2)
Yarn: White
Row 1: Ch 8. Starting in the 2nd ch from hook, work: sl st, sc, hdc, dc, hdc, sc, sl st. (7)
FO, leaving a tail for sewing.
🎓 GNOME TALL HAT Worked in continuous rounds. Yarn: Forest Green R1: MR 4. (4) R2: (1 sc, inc) x2. (6) R3: 6 sc. (6) R4: (1 sc, inc) x3. (9) R5: 9 sc. (9) R6: (2 sc, inc) x3. (12) R7: 12 sc. (12) R8: (3 sc, inc) x3. (15) R9: 15 sc. (15) R10: (4 sc, inc) x3. (18) R11: 18 sc. (18) R12: (5 sc, inc) x3. (21) R13: 21 sc. (21) R14: (6 sc, inc) x3. (24) R15: 24 sc. (24) R16: (7 sc, inc) x3. (27) R17: 27 sc. (27) R18: (8 sc, inc) x3. (30) R19: 30 sc. (30) R20: (9 sc, inc) x3. (33) R21: 33 sc. (33) R22: (10 sc, inc) x3. (36) R23: 36 sc. (36) R24: (11 sc, inc) x3. (39) R25: 39 sc. (39) R26: (12 sc, inc) x3. (42) R27-31: 5 rounds of 42 sc. (42) R32 (Brim Trim): Change to Gold/Yellow yarn. Sl st loosely in each st around. (42) FO, leaving a long tail if you plan to sew the hat to the body, or weave in ends if you want it removable.
👞 GNOME SHOES (Make 2) Yarn: Mustard Yellow R1: Ch 6. Starting in the 2nd ch from hook, sc 4. Work 3 sc in the last ch. Working down the opposite side of the chain: sc 3, inc in the last st. (12) R2: inc, sc 3, inc x3, sc 3, inc x2. (18) R3: Working in BLO, 18 sc. (18) R4-5: 2 rounds of 18 sc. (18) R6: sc 5, dec x4, sc 5. (14) FO, leaving a long tail for sewing. Stuff the shoes firmly.
🎨 🎨 L. STYLING / ASSEMBLY / STABILITY / FINAL SHAPING
Recommended Assembly Sequence:
- Snowman Face: Sew the orange carrot nose directly between the eyes. Using black thread, embroider a curved smile just below the nose, and add two small, tilted eyebrows above the eyes.
- Snowman Accessories: Sew the two black buttons vertically onto the belly. Fold up the bottom brim of the green ribbed hat and place it securely on the head. You can sew it down with a few hidden stitches so it stays in place. Add a dab of pink blush to the cheeks!
- Snowman Arms: Sew the flat tops of the arms symmetrically to the sides of the body, right where the neck begins to widen into the body.
- Gnome Beard & Face: Pin the top straight edge of the beard to Round 27 of the green gnome body. Sew it securely. Sew the wooden bead (or crocheted nose) right at the top center of the beard. Sew the two mustache pieces directly under the nose, angling them slightly downward.
- Gnome Hat Details: Thread a tapestry needle with Gold/Yellow yarn. Embroider a simple, 6-point snowflake on the front center of the green hat using straight stitches.
- Gnome Hat Placement: Pull the hat down snugly over the gnome’s body so the brim rests just above the wooden nose, partially hiding the top of the beard.
- Gnome Shoes: Pin the stuffed mustard shoes to the bottom front edge of the gnome body, slightly angled outward. Sew them securely through the flat base to ensure the gnome remains balanced and stands upright.
Stability Check:
✅ Gently press the bottom of both figures against a hard table.
✅ Check that the gnome’s shoes are completely flush with the table for standing support.
✅ Verify that the snowman’s head doesn’t tilt backward; massage the stuffing in the neck to straighten the posture if needed.
💡 💡 M. HELPFUL CROCHET TIPS
- 💡 Stuffing the Neck: To prevent the snowman from developing a “bobblehead,” insert a small, rolled-up cylinder of felt or a thickly folded pipe cleaner directly into the center of the neck while stuffing.
- 💡 Crisp Embroidery: When stitching the smile and snowflake, split the yarn strands or use embroidery floss to get cleaner, sharper lines instead of thick, chunky yarn strokes.
- 💡 Invisible Decreases: Always use invisible decreases (stitching through the front loops only) on the bodies to prevent small holes where the white stuffing might peek through.
- 💡 Fluffy Pom-Poms: After tying your mustard pom-pom, hold it over a trash can and aggressively trim it into a tight sphere. Then, use a fine-toothed comb or a pet slicker brush to gently brush out the yarn fibers for a commercial-quality fuzzy finish.
- 💡 Flat Bases: When working Round 10 (the BLO round) on the Gnome, pull your stitches slightly tighter than usual to create a sharp, distinct edge for the base.
- 💡 Symmetrical Arms: Use sewing pins to secure both snowman arms before sewing either of them. Look at the snowman from the top-down to ensure they are perfectly directly across from each other.
🧼 🧼 N. CARE INSTRUCTIONS
Because this pattern utilizes fiberfill, safety eyes, and structural stitching, spot cleaning is highly recommended. Use a damp cloth with a tiny amount of gentle detergent to dab away stains. Avoid machine washing, as the agitation can permanently felt the yarn, warp the amigurumi stuffing, and damage the wooden nose on the gnome. Store in a dry place wrapped in tissue paper during the off-season to prevent dust accumulation on the textured beard and pom-pom.
❓ ## ❓ R. FAQ
❓ Can I use chenille or blanket yarn to make these?
Yes! Swapping to a bulky or super bulky chenille yarn will make incredibly soft, large plushies. Just remember to size up your hook (usually to a 5.0mm or 6.0mm) and use larger safety eyes (16mm or 18mm) to match the new proportions.
❓ My gnome keeps falling backward. How do I fix this?
If your gnome is back-heavy, make sure the front of the body is stuffed deeply. Additionally, ensure the mustard shoes are sewn slightly forward to act as a counterweight. If you haven’t closed the base yet, you can add a small bag of poly-pellets or a heavy flat washer to the bottom for weight.
❓ How do I get the ribbed hat to look so neat?
The secret to neat ribbing is maintaining consistent tension at the ends of your rows. Always chain 1 tightly before turning, and make sure you aren’t accidentally skipping the very last stitch of the row, which can cause the edges to slant.
❓ Is it safe to use real buttons?
Real buttons and wooden beads add a wonderful rustic charm, but they are strictly for display or gentle handling. If the amigurumi will be given to a young child or a pet, you must replace the buttons and bead nose with embroidered details for safety.
❓ How do I make the snowman’s blush?
You can use a small brush and real cosmetic blush, or shave a little bit of pink chalk pastel into a powder and apply it with a cotton swab. A little goes a long way, so start lightly and build up the color!