📖 B. INTRODUCTION
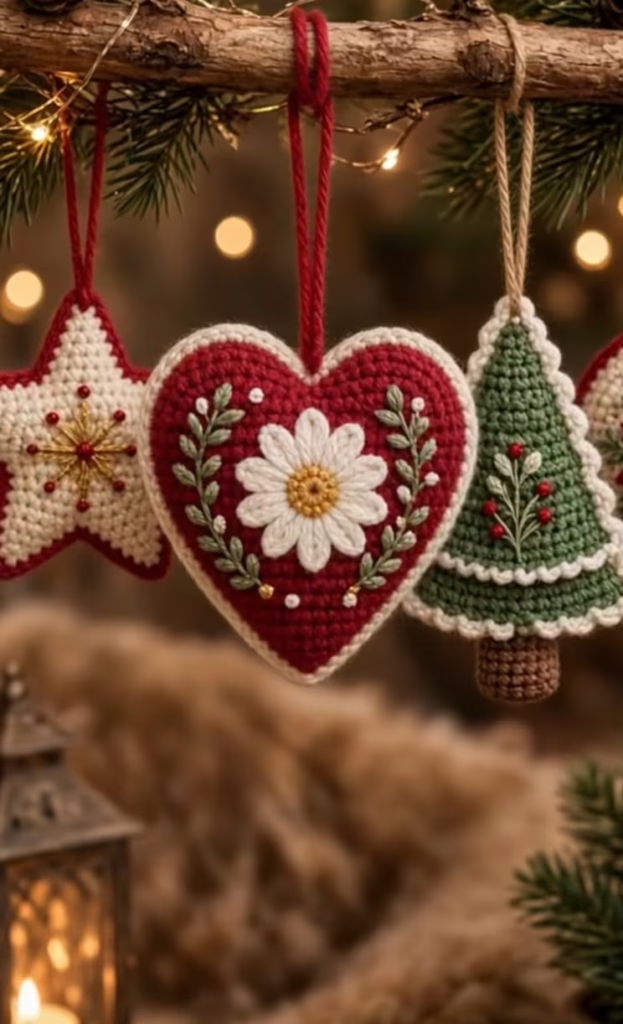
Bring the magic of the holiday season to your home with this original crochet Christmas ornament pattern collection. Inspired by classic festive aesthetics, this set features three beloved holiday shapes: a radiant star, a cozy heart, and a rustic evergreen tree. These ornaments are crafted using a flat-stuffed, two-panel construction method that gives them a plush, dimensional look while keeping them lightweight enough to hang gracefully on any branch.
Whether you are looking to trim your own tree, craft heirloom-quality gifts for loved ones, or add a handmade touch to your holiday wrapping, these ornaments are the perfect project. The visual charm of these pieces comes from their beautiful contrasting edges and delicate surface embroidery. The red heart is adorned with a prominent white daisy applique and elegant green vine embroidery. The white star pops with a bright red border and a gleaming gold starburst center. Finally, the green tree is perfectly framed by a scalloped snow-white edge and decorated with tiny red embroidered berries.
These ornaments offer endless personalization possibilities. You can easily swap the yarn colors to match your specific holiday aesthetic, whether that is a traditional red and green theme, a modern winter wonderland palette, or a vibrant retro vibe. Grab your hook, your favorite worsted weight yarn, and a cup of hot cocoa—it is time to crochet some holiday magic!
🔍 C. MAIN PATTERN OVERVIEW
This pattern collection includes instructions for three distinct ornaments. Each ornament is constructed by crocheting a separate Front Panel and Back Panel in flat rows or continuous rounds.
Before joining, the Front Panel of each shape receives all of its decorative elements. This includes sewing on the intricate daisy applique for the heart, embroidering the gold metallic bursts on the star, and adding the delicate green vines and red berry french knots to the tree.
Once decorated, the two panels are held wrong-sides together and joined using a single crochet border in a contrasting color. A small amount of fiberfill stuffing is added during this joining process to give the ornaments a beautiful, pillowy 3D effect without turning them into spherical balls. Finally, simple hanging loops—made from red yarn or rustic twine—are attached to the top peaks.
🎯 D. SKILL LEVEL
Intermediate While the basic crochet stitches are beginner-friendly, this project requires a comfortable understanding of panel joining, tension control, and hand embroidery.
Techniques Involved:
- Crocheting in both flat rows and continuous spiral rounds.
- Increasing and decreasing to shape flat motifs.
- Surface embroidery (lazy daisy stitch, straight stitch, and french knots).
- Crocheting two separate pieces together around the edges.
- Working small, detailed appliques.
📏 E. FINISHED SIZE
When made with worsted weight (Medium 4) yarn and a 3.0 mm hook, the finished ornaments measure approximately:
- Heart: 4.5 inches (11.5 cm) wide by 4 inches (10 cm) tall.
- Star: 4.5 inches (11.5 cm) across all points.
- Tree: 5 inches (12.5 cm) tall (including the trunk) by 4 inches (10 cm) wide at the base.
Note: Your finished size may vary depending on your individual yarn weight, hook size, and tension. Heavier yarn like chenille or blanket yarn will result in significantly larger, pillow-sized ornaments.
🧮 F. GAUGE
Gauge: 5 sc stitches and 5 rows = 1 inch (2.5 cm). For amigurumi and stuffed flat panels, gauge is not strictly critical as long as your stitches are tight and consistent. You must use a hook size smaller than the yarn label recommends to ensure the fabric is dense enough that the fiberfill stuffing does not show through the stitches.
🧶 G. REQUIRED YARN AMOUNTS
This project is an excellent stash-buster. All estimates below are based on standard worsted weight (Medium 4) acrylic or cotton yarn.
- Cherry Red: Approx. 30 yards (Main heart body, star edging, and embroidery details).
- Snow White: Approx. 30 yards (Main star body, heart/tree edging, and daisy petals).
- Evergreen: Approx. 25 yards (Main tree body and leaf embroidery).
- Warm Brown: Approx. 5 yards (Tree trunk).
- Mustard Yellow: Approx. 2 yards (Daisy center).
- Gold Metallic Thread/Yarn: A small scrap for starburst embroidery.
🧰 H. MATERIALS
- Crochet Hook: 3.0 mm (or size needed to achieve a tight fabric).
- Yarn: Worsted weight (Medium 4) in Red, White, Green, Brown, and Yellow.
- Embroidery Thread: Gold metallic thread or embroidery floss.
- Hanging Material: Small length of rustic jute twine (for the tree).
- Stuffing: High-quality polyester fiberfill.
- Tools: Tapestry/yarn needle, sharp scissors, stitch markers, and sewing pins.
- ⚠️ Safety Note: If adding plastic beads or bells instead of embroidered french knots, ensure they are securely sewn if the ornaments will be handled by young children or pets.
🔤 I. ABBREVIATIONS – US TERMS
- MR – Magic Ring
- ch – chain
- st(s) – stitch(es)
- sl st – slip stitch
- sc – single crochet
- hdc – half double crochet
- dc – double crochet
- inc – single crochet increase (2 sc in one stitch)
- dec – single crochet decrease (invisible decrease preferred: sc2tog)
- sc3tog – single crochet 3 together (decrease across 3 stitches)
- FO – fasten off
- RS / WS – Right Side / Wrong Side
📝 J. NOTES BEFORE YOU BEGIN
- Turning Chains: Unless otherwise stated, the ch 1 at the end of a row does not count as a stitch.
- Panel Identification: The side facing you as you crochet your flat rows is the Right Side (RS). Place a stitch marker on the RS so you easily know which side should face outward during assembly.
- Joining Technique: When joining the front and back panels, always work with the Front Panel facing you. This ensures the clean, “V” shaped top of the single crochet border frames the front of the ornament.
- Stuffing Strategy: Flat amigurumi requires less stuffing than you might think. Overstuffing will cause the flat panels to bulge into a spherical shape, distorting the star and heart silhouettes. Stuff lightly and focus on pushing the fiberfill gently into the corners and points.
🪡 K. COMPLETE PATTERN
❤️ THE HEART ORNAMENT
The heart is worked from the bottom point upwards in flat rows. Once the main body is wide enough, the two top rounded “humps” are worked separately.
💖 Heart Panels (Make 2: 1 Front, 1 Back)Yarn: Cherry RedRow 1: Ch 2, make 3 sc in the 2nd ch from the hook. Ch 1, turn. (3) Row 2: inc, sc 1, inc. Ch 1, turn. (5) Row 3: sc 5. Ch 1, turn. (5) Row 4: inc, sc 3, inc. Ch 1, turn. (7) Row 5: sc 7. Ch 1, turn. (7) Row 6: inc, sc 5, inc. Ch 1, turn. (9) Row 7: sc 9. Ch 1, turn. (9) Row 8: inc, sc 7, inc. Ch 1, turn. (11) Row 9: sc 11. Ch 1, turn. (11) Row 10: inc, sc 9, inc. Ch 1, turn. (13) Rows 11-13: sc 13. Ch 1, turn. (13 for 3 rows)
First Top Curve (Right Side)Row 14: sc 6, leaving the remaining stitches unworked. Ch 1, turn. (6) Row 15: dec, sc 2, dec. Ch 1, turn. (4) Row 16: dec, dec. (2) FO, leaving a short tail to weave in.
Second Top Curve (Left Side) Skip the center stitch of Row 13. Attach Red yarn in the next stitch (the 8th stitch of Row 13).Row 14: sc 6 across to the edge. Ch 1, turn. (6) Row 15: dec, sc 2, dec. Ch 1, turn. (4) Row 16: dec, dec. (2) FO, leaving a short tail to weave in.
🌼 Daisy Applique Yarn: Mustard Yellow and Snow White R1: With Yellow, make a MR. 6 sc into the MR. sl st to the first sc to join. (6) FO Yellow. R2: Join White yarn into any stitch. [ch 4, working back down the chain: sl st in 2nd ch from hook, sc in next 2 chains. sl st back into the same base stitch on the yellow center. sl st into the next stitch] Repeat from * to * 6 times to create 6 even petals. FO, leaving a long white tail for sewing.
⭐️ THE STAR ORNAMENT
The star is worked from the center outward in continuous rounds, followed by individual points worked in short rows.
🌟 Star Panels (Make 2: 1 Front, 1 Back)Yarn: Snow WhiteR1: Make a MR. 10 sc into the MR. (10) R2: 10 inc. (20) R3: (sc 3, inc) x 5. (25)
Star Points (Make 5) The points are worked over 5 stitches each. Do not fasten off after R3.Point 1, Row 1: sc 5. Ch 1, turn. (5) Point 1, Row 2: dec, sc 1, dec. Ch 1, turn. (3) Point 1, Row 3: sc 3. Ch 1, turn. (3) Point 1, Row 4: sc3tog. (1) FO.
Points 2, 3, 4, and 5: Join White yarn in the very next unworked stitch on R3 of the main body.Row 1: sc 5. Ch 1, turn. (5) Row 2: dec, sc 1, dec. Ch 1, turn. (3) Row 3: sc 3. Ch 1, turn. (3) Row 4: sc3tog. (1) FO. Repeat until all 5 points are completed.
🌲 THE TREE ORNAMENT
The tree is a classic triangle worked from the top point down to the base in flat rows.
🌿 Tree Panels (Make 2: 1 Front, 1 Back)Yarn: EvergreenRow 1: Ch 2, make 2 sc in the 2nd ch from the hook. Ch 1, turn. (2) Row 2: inc, inc. Ch 1, turn. (4) Row 3: sc 4. Ch 1, turn. (4) Row 4: inc, sc 2, inc. Ch 1, turn. (6) Row 5: sc 6. Ch 1, turn. (6) Row 6: inc, sc 4, inc. Ch 1, turn. (8) Row 7: sc 8. Ch 1, turn. (8) Row 8: inc, sc 6, inc. Ch 1, turn. (10) Row 9: sc 10. Ch 1, turn. (10) Row 10: inc, sc 8, inc. Ch 1, turn. (12) Row 11: sc 12. Ch 1, turn. (12) Row 12: inc, sc 10, inc. Ch 1, turn. (14) Row 13: sc 14. Ch 1, turn. (14) Row 14: inc, sc 12, inc. Ch 1, turn. (16) Row 15: sc 16. Ch 1, turn. (16) Row 16: inc, sc 14, inc. Ch 1, turn. (18) FO, leaving a tail to weave in.
🪵 Tree Trunk (Make 1)Yarn: Warm Brown The trunk is made separately and will be sandwiched between the panels later.Row 1: Ch 7. sc in the 2nd ch from the hook and each ch across. Ch 1, turn. (6) Rows 2-5: sc 6. Ch 1, turn. (6 for 4 rows) FO, leaving a long tail for securing.
🎨 L. STYLING / ASSEMBLY / STABILITY / FINAL SHAPING
The magic of these ornaments happens in the embroidery and the joining process. Take your time with these steps.
🧵 Step 1: Surface Embroidery (Front Panels Only)
Complete all embroidery on the RS of your designated Front Panels before sewing the front and back together. This hides all messy knots inside the ornament.
Heart Decor:
- Sew the Daisy Applique to the exact center of the red Front Panel.
- Using a tapestry needle and Evergreen yarn, embroider a curved vine mirroring the outer edge of the heart on the left and right sides of the daisy. Use the lazy daisy stitch for the leaves.
- Add tiny french knots using White and Gold yarn near the tips of the green leaves.
Star Decor:
- Using Gold metallic thread, embroider a snowflake/starburst starting from the MR of the white Front Panel, radiating out toward the five points.
- Using Cherry Red yarn, embroider one neat french knot at the center of the gold starburst, and one french knot at the tip of each gold line.
Tree Decor:
- Using Evergreen yarn (or a slightly lighter green for contrast), embroider 3-4 vertical branch lines ascending the center of the tree Front Panel. Use the lazy daisy stitch for small pine needles.
- Using Cherry Red yarn, scatter 4-6 small french knots around the branches to mimic winter berries.
🪡 Step 2: Panel Joining & Stuffing
Joining the Heart:
- Hold the decorated Front Panel and plain Back Panel together, WS facing inward.
- Join Snow White yarn at the bottom point of the heart.
- Sc evenly through both panels around the entire perimeter. Place 3 sc in the bottom point to keep it sharp.
- When you have about 1.5 inches left open, gently push a small amount of fiberfill inside.
- Continue to sc closed. Sl st to the first sc and FO. Hide the tail inside.
- Attach a loop of Cherry Red yarn to the top center dip for hanging.
Joining the Star:
- Hold the front and back star panels together, WS facing inward.
- Join Cherry Red yarn at any inner corner (the “valley” between two points).
- Sc evenly through both panels up the side of the point. At the very tip, (sc, ch 1, sc) in the same stitch to keep the point sharp. Sc down the other side.
- Sl st in the valleys between points.
- Pause to stuff lightly before closing the final point. Sl st to join, FO.
- Attach a loop of Cherry Red yarn to the top point.
Joining the Tree:
- Position the Warm Brown trunk between the two green tree panels at the bottom center. Pin it in place so about half of it sticks out.
- Hold the tree panels together, WS facing inward. Join Snow White yarn at the bottom right corner.
- Sc evenly up the right side of the tree through both panels. At the top point, (sc, ch 1, sc). Sc evenly down the left side.
- The Scalloped Snow Bottom: When you reach the bottom edge, work across the base. To create the snowy scallop effect: (sc in next st, 2 hdc in next st, sc in next st) repeatedly across the bottom edge. When you pass over the trunk section, ensure your hook goes through the front green panel, the brown trunk, and the back green panel to secure it all together.
- Remember to pause and stuff the tree lightly before completely sealing the bottom edge!
- FO White, weave in ends. Attach a loop of natural jute twine to the top point for a rustic touch.
✅ Final Shaping Checklist
- ✅ Symmetry: Gently press the ornaments flat between your palms to distribute the stuffing evenly and prevent bulging.
- ✅ Points: Tug gently on the star points, the tree top, and the heart bottom to sharpen their silhouettes.
- ✅ Appliques: Ensure the daisy petals sit flat; if they curl, carefully tack them down with an invisible stitch.
💡 M. HELPFUL CROCHET TIPS
- 💡 Clean Embroidery: Always use sharp embroidery needles rather than blunt tapestry needles when doing french knots; they pierce the crochet fabric cleanly rather than snagging the yarn plies.
- 💡 Consistent Edging: When working the contrasting sc border around raw row ends (like on the heart and tree), place one sc at the end of each row. Spacing them out evenly prevents the edge from ruffling or puckering.
- 💡 Invisible Finish: Use the invisible fasten-off technique when completing your contrasting borders for a seamless edge that looks professional from all angles.
- 💡 Stuffing Tool: Use the blunt back end of your crochet hook to push small tufts of stuffing deep into the narrow star points before closing them up.
- 💡 Color Control: When changing colors for the borders, start your slip knot on the hook before inserting it into the panels for a tighter, cleaner first stitch.
- 💡 Flat Appearance: If your ornament keeps spinning on the tree branch, use a slightly stiffer yarn for the hanging loop or spray the back panel lightly with fabric stiffener.
🧼 N. CARE INSTRUCTIONS
Handmade amigurumi ornaments are delicate keepsakes.
- Cleaning: Spot clean only using a damp cloth and mild soap. Do not machine wash, as the agitation will cause the surface embroidery to fray and the stuffing to clump.
- Storage: Store flat in a sturdy box lined with acid-free tissue paper during the off-season. Avoid tossing them into heavy bins where the 3D appliques and points could be permanently crushed.
These beautiful, heirloom-quality ornaments are sure to become a beloved part of your family’s holiday traditions. Because they are soft and unbreakable, they make wonderful, safe additions to the lower branches of your tree where little hands (or paws!) might reach. Have fun mixing and matching the embroidery colors to create a whole customized set for your next holiday market or family gift exchange. Happy crocheting!
❓ R. FAQ
❓ Can I use blanket yarn or chenille yarn for this pattern? Yes! Using a super bulky or blanket yarn with a corresponding larger hook (like a 6.0 mm or 7.0 mm) will work perfectly. However, the finished result will be much larger—likely the size of a decorative throw pillow rather than a tree ornament.
❓ My flat panels are curving and won’t lay flat. What did I do wrong? Curling panels usually indicate that your tension is incredibly tight, or you are missing stitches at the ends of your rows. Count your stitches carefully at the end of every row to ensure you haven’t accidentally skipped an increase or decrease.
❓ How do I prevent the fiberfill from showing through the stitches? Make sure you are using a crochet hook that is at least 1-2 sizes smaller than what is recommended on your yarn label. This creates a dense, tight fabric. Additionally, use small pinches of stuffing rather than one giant clump to prevent stretching the stitches from the inside out.
❓ Can I glue the applique on instead of sewing it? While sewing provides the most durable, heirloom-quality finish, you can use a high-quality permanent fabric glue to attach the daisy to the heart if you prefer. Allow it to cure completely for 24 hours before handling.
❓ Do I have to make the back panels, or can I just use a single layer? If you want to use these as flat appliques for a sweater or a stocking, a single layer works beautifully! However, for hanging ornaments, the two-panel stuffed construction is highly recommended to give them structure, prevent curling, and hide the messy backs of the surface embroidery.