📖 B. INTRODUCTION
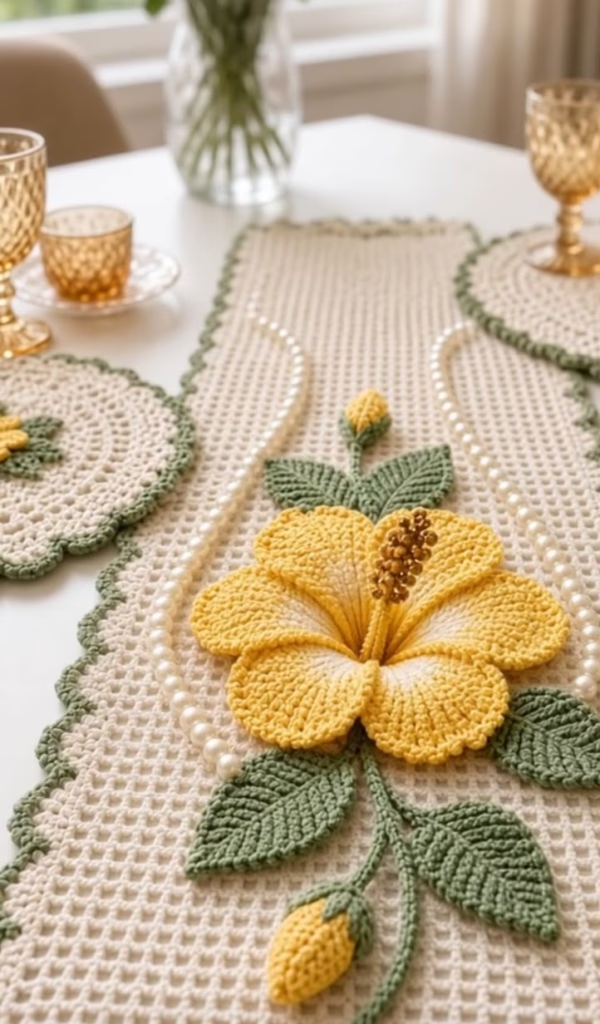
Transform your dining room into a warm, tropical sanctuary with this breathtaking Crochet Hibiscus Table Runner. Showcasing a beautifully structured cream-colored open-mesh base, this runner provides the perfect neutral canvas for the vibrant, lifelike botanical appliques that rest on top. Whether you are hosting a summer garden party, looking to refresh your seasonal home decor, or crafting an heirloom-quality housewarming gift, this project perfectly balances elegance and striking visual impact.
The true star of this design is the central 3D yellow hibiscus flower, featuring a delicate white-to-yellow color gradient and a prominent, textured stamen. The floral focal point is framed by large, richly veined green leaves, trailing vines, and closed yellow flower buds. The entire piece is tied together with a classic sage green scalloped border that mirrors the botanical theme. As a versatile home accent, the layout of the floral appliques can be customized to suit any table length, and the modular design allows you to easily create matching circular coasters for a complete dining set.
🔍 C. MAIN PATTERN OVERVIEW
This pattern is constructed modularly, meaning you will crochet the background textiles and the floral decorations separately before bringing them together in the final assembly.
- The Base Runner: Worked in rows using a classic filet crochet technique (double crochets separated by chain spaces) to create a clean, square-grid texture. It is finished with a simple scalloped edge in a contrasting green.
- The 3D Hibiscus: The large central flower is made of five individual, overlapping petals that begin with a white center and transition to bright yellow to create a realistic gradient effect. A separate textured stamen is crocheted and sewn into the center.
- Botanical Accents: Deep green leaves are crocheted using back-loop techniques to mimic the heavy natural veining seen in the reference. Trailing green vines and closed yellow buds enclosed in green sepals complete the floral spray.
- Bonus Coasters: The pattern includes instructions for a matching circular coaster featuring a solid round base, the same scalloped border, and a miniature flat floral applique.
🎯 D. SKILL LEVEL
Intermediate
This pattern uses fundamental crochet stitches but requires precision and patience during the assembly phase.
- Working flat in rows (filet mesh grid).
- Working in the round (flower petals, buds, and coasters).
- Color changing to create the gradient petal effect.
- Working in the Back Loop Only (BLO) to create ribbed leaf textures.
- Pinning and sewing 3D appliqued pieces securely to a mesh background.
📏 E. FINISHED SIZE
- Table Runner (Without vines extending past edges): 14 inches wide by 48 inches long (35 cm x 122 cm).
- Coaster: 6 inches (15 cm) in diameter.
- Central Hibiscus Flower: Approximately 7 inches (18 cm) in diameter when fully fanned out.
Note: The overall length of the runner can easily be adjusted by chaining more or fewer starting stitches (must be a multiple of 2 + 1) and crocheting more rows until your desired length is reached.
🧮 F. GAUGE
- Runner Base: 10 filet squares (10 dc + 10 ch-1 spaces) and 9 rows = 4 x 4 inches (10 x 10 cm).
- Gauge is not strictly critical for this project, but maintaining consistent tension ensures your runner lays perfectly flat and your flower petals hold their 3D shape.
🧶 G. REQUIRED YARN AMOUNTS
This pattern is designed for Category 3 (DK weight) or Category 4 (Worsted weight) 100% mercerized cotton yarn. Cotton is highly recommended as it provides crisp stitch definition, lays flat, and is easily washable for table settings.
- Color A (Cream/Ecru): Approx. 450 yards (410 m) for the main runner and two coasters.
- Color B (Sage/Leaf Green): Approx. 200 yards (183 m) for the border, leaves, vines, and sepals.
- Color C (Bright Yellow): Approx. 120 yards (110 m) for the hibiscus petals, buds, and coaster flowers.
- Color D (Soft White): Approx. 40 yards (36 m) for the inner petal gradient.
- Color E (Golden Brown): Approx. 10 yards (9 m) for the stamen texture.
🧰 H. MATERIALS
- Crochet Hook: 3.5 mm (US E-4) or size needed to obtain a firm but draping fabric.
- Yarn Needle: A blunt tapestry needle for weaving in ends and sewing appliques.
- Pins: Rust-proof sewing pins (essential for laying out the floral spray before sewing).
- Scissors: Sharp craft scissors.
- Optional: Liquid fabric starch or a water/PVA glue mixture if you wish to permanently stiffen the 3D flower petals.
🔤 I. ABBREVIATIONS – US TERMS
- ch: chain
- st(s): stitch(es)
- sl st: slip stitch
- sc: single crochet
- hdc: half double crochet
- dc: double crochet
- tr: treble (triple) crochet
- inc: increase (2 stitches in the same stitch)
- dec: decrease (crochet 2 stitches together)
- BLO: back loop only
- FLO: front loop only
- MR: magic ring
- sp: space
- sk: skip
📝 J. NOTES BEFORE YOU BEGIN
- Turning Chains: For the filet runner base, the turning chain (ch 4) counts as the first double crochet and the first chain-1 space of the new row.
- Continuous vs. Joined Rounds: The flower buds and coaster bases are worked in joined rounds. Always slip stitch to the first stitch of the round and chain up to begin the next round.
- Color Changes: To achieve a seamless color change on the flower petals, work the final yarn-over of the last white stitch using the new yellow yarn.
- Sewing Tails: Leave incredibly long yarn tails (15-20 inches) when fastening off the leaves, petals, and vines. You will use these tails to sew the components to the table runner base.
🪡 K. COMPLETE PATTERN
🔲 Table Runner Base
The base is a simple, repeating open grid pattern. Yarn: Color A (Cream)
Row 1: Ch 77. Dc in the 5th ch from the hook (the skipped chains count as 1 dc and 1 ch-1 sp). Ch 1, sk 1 ch, dc in the next ch. Repeat from * to the end of the foundation chain. Turn. (37 dc, 36 ch-1 spaces).
Row 2: Ch 4 (counts as 1 dc and ch-1 sp). Sk the first ch-1 sp, dc in the next dc, ch 1, sk the next ch-1 sp. Repeat from * across, placing the final dc in the 3rd chain of the turning chain from the previous row. Turn.
Rows 3 – 108: Repeat Row 2 until the runner measures approximately 48 inches (or your desired length). Do not fasten off.
〰️ Scalloped Border
A soft, scalloped green edging frames the entire runner. Yarn: Color B (Sage Green)
Round 1 (Base Round): Fasten off Color A and join Color B in the top right corner. Ch 1. Sc evenly around the entire perimeter of the runner. Work 3 sc in each of the four corners to help them lay flat. Sl st to the first sc to join.
Round 2 (Scallops): Ch 1, sc in the first st. Sk 2 sts, 5 dc in the next st, sk 2 sts, sc in the next st. Repeat from * entirely around the runner. Adjust skipped stitches at the corners if necessary to ensure a scallop sits nicely on each point. Sl st to the first sc and fasten off. Weave in ends.
🌺 Hibiscus Petals (Make 5)
The flower is made of five distinct, slightly ruffled petals starting with white centers fading to yellow. Yarn: Color D (White) and Color C (Yellow)
Row 1: Using Color D, ch 12.
Row 2: Sc in 2nd ch from hook, hdc in next ch, dc in next 7 chs, hdc in next ch, 5 dc in the last ch (this forms the rounded top of the petal). Working down the opposite side of the foundation chain: hdc in next ch, dc in next 7 chs, hdc in next ch, sc in last ch. Turn.
Row 3: Ch 1. Sc in first st, hdc in next st, dc in next 7 sts, (2 dc in next st) x 5 around the top curve, dc in next 7 sts, hdc in next st, sc in last st. Change to Color C (Yellow) on the final pull-through. Turn.
Row 4: Using Color C, ch 2 (counts as hdc). 2 hdc in next st, dc in next 7 sts, (2 dc in next st) x 10 around the top curve, dc in next 7 sts, 2 hdc in next st, hdc in last st. Turn.
Row 5: Ch 2. Working in the FLO for a subtle ridge: dc in next st, 2 dc in next st. Repeat from * around the entire outer edge of the petal to create a wavy, ruffled edge. Fasten off, leaving a long yellow tail for sewing.
🌱 Hibiscus Stamen
The prominent central stamen features a textured brown top on a yellow stalk. Yarn: Color C (Yellow) and Color E (Brown)
Step 1: Using Color C, ch 18. Sl st in the 2nd ch from the hook and in each of the next 16 chs to create a sturdy cord. Fasten off.
Step 2: Join Color E at the top tip of the yellow cord. (Ch 3, sl st into the same sp) x 4 to create a cluster of textured brown loops mimicking pollen. Fasten off and weave in tiny ends.
🌿 Large Leaves (Make 4 to 6)
These leaves use back-loop stitches to create realistic, heavy veining. Yarn: Color B (Sage Green)
Row 1: Ch 18. Sc in 2nd ch from hook, hdc in next ch, dc in next 2 chs, tr in next 8 chs, dc in next 2 chs, hdc in next ch, 3 sc in the last ch. Rotate to work down the other side of the chain: hdc in next ch, dc in next 2 chs, tr in next 8 chs, dc in next 2 chs, hdc in next ch, sc in last ch. Turn.
Row 2 (Veining): Ch 1. Working strictly in the BLO: sc in first 2 sts, hdc in next 2 sts, dc in next 10 sts, (sc, ch 2, sc) in the center point st, dc in next 10 sts, hdc in next 2 sts, sc in last 2 sts. Fasten off, leaving a long tail.
🌷 Flower Buds (Make 2)
Tight yellow buds peeking out from green bases sit at the ends of the floral spray. Yarn: Color C (Yellow) and Color B (Sage Green)
Yellow Bud:
R1: With Color C, MR 4 sc. (4)
R2: (1 sc, inc) x 2. (6)
R3: (2 sc, inc) x 2. (8)
R4: (3 sc, inc) x 2. (10)
R5-6: Sc in each st around. (10)
R7: Dec x 5. (5). Fasten off. (Do not stuff; pinch flat).
Green Sepal/Base: R1: With Color B, MR 5 sc. (5) R2: Inc in each st around. (10) R3-4: Sc in each st around. (10) R5 (Leaves): Ch 4, sl st in 2nd ch from hook, sc in next ch, hdc in next ch, sk 1 st on the base, sl st into next st. Repeat from * 4 times to create 5 leafy points. Fasten off, leaving a tail. Assembly: Insert the base of the yellow bud into the green sepal cup. Sew the sepal points slightly up the sides of the yellow bud to secure it.
〰️ Green Vines
Trailing vines connect the floral elements across the cream mesh. Yarn: Color B (Sage Green)
You will need roughly 3 to 4 cords of varying lengths.
Vine 1 (Long): Ch 45. Sl st in the 2nd ch from the hook and each ch across. Fasten off.
Vine 2 & 3 (Medium): Ch 30. Sl st in 2nd ch and each ch across. Fasten off.
☕ Bonus: Matching Coasters
Create beautiful circular coasters to complete the table setting. Yarn: Color A (Cream), Color B (Green), Color C (Yellow)
Base (Color A):
R1: MR 12 dc. Sl st to join. (12)
R2: Ch 2 (counts as dc). dc in same st. 2 dc in each st around. (24)
R3: Ch 2. 2 dc in next st, 1 dc in next st. Repeat around. (36)
R4: Ch 2. 2 dc in next st, dc in next 2 sts. Repeat around. (48)
R5: Ch 2. 2 dc in next st, dc in next 3 sts. Repeat around. (60). Fasten off Color A.
Border (Color B): Join Color B. Ch 1. Sk 2 sts, 5 dc in next st, sk 2 sts, sc in next st. Repeat around to create the scalloped edge. Fasten off.
Mini Flower (Color C): MR. Ch 3, 2 dc in ring, ch 3, sl st in ring. Repeat 4 more times for 5 petals. Fasten off and sew to the side of the coaster base.
🎨 L. STYLING / ASSEMBLY / STABILITY / FINAL SHAPING
The magic of this pattern lies in the assembly. The floral components must be thoughtfully arranged and sewn flat enough to function on a table, while retaining their 3D pop.
- Block the Runner First: Before sewing anything, wet-block the cream filet runner. Pin it perfectly square on a blocking mat and let it dry. This prevents the mesh from puckering when you attach the heavy appliques.
- Petal Assembly: Take your 5 hibiscus petals. Overlap them slightly in a circle so the white bases meet in the center and the yellow ruffles fan outward. Using the white yarn, sew the bases together securely into a single flower shape.
- Attach the Stamen: Thread the tail of the yellow stamen through the exact center of the white petal base. Secure it firmly at the back so the textured brown tip stands upright.
- Layout the Spray: Lay your blocked runner flat on a table. Place the finished 3D hibiscus perfectly in the center. Arrange the green vines sweeping outward toward the top and bottom edges. Tuck the large green leaves under the edges of the flower. Place the yellow buds at the outer tips of the vines.
- Pin and Sew: Once you are happy with the layout, pin everything aggressively. Using a tapestry needle and matching yarn tails, whip-stitch the leaves, vines, and buds flat to the filet mesh.
- Securing the Flower: Sew the center of the hibiscus firmly to the runner. To keep the 3D effect, only tack down the middle section of each yellow petal, leaving the ruffled outer edges unattached so they lift slightly off the table.
- Table Styling Note: In the reference imagery, the runner is styled with a gorgeous, swooping string of white pearls laid loosely across the mesh alongside the flowers. You can replicate this elegant look by draping a faux pearl necklace or loose craft pearls on the table during dinner parties!
✅ Finishing Checklist:
- ✅ Runner lays perfectly flat without buckling.
- ✅ Flower petals overlap in a consistent, clockwise direction.
- ✅ Stamen stands up cleanly from the center of the bloom.
- ✅ All vines and leaves are tacked down securely enough that tablewares won’t snag them.
- ✅ Scallop border corners are distinct and not curling inward.
💡 M. HELPFUL CROCHET TIPS
- 💡 Hide the Stitches: When sewing the appliques to the open filet mesh, try to align your sewing stitches with the solid double crochets of the base rather than stretching yarn across the open chain spaces.
- 💡 Starching Petals: If your hibiscus petals are flopping too much, brush the underside of the yellow edges with a light coat of liquid fabric starch and let them dry over a curved surface (like a rolled towel).
- 💡 Consistent Sizing: Count your chain spaces on the filet runner every few rows. It is very easy to accidentally skip a chain space or add an extra one, which will cause your runner’s edges to wave.
- 💡 Seamless Gradients: When transitioning from the white center to the yellow petal edge, crochet over the white yarn tail for a few stitches to secure it without needing a knot.
- 💡 Leaf Symmetry: Make sure you crochet half your leaves with the “right” side facing up, and optionally flip the others when sewing them down to create natural, mirrored variation.
- 💡 Heat Protection: Remember that cotton yarn transfers heat. If placing a very hot dish on the runner, use a proper trivet over the mesh.
🧼 N. CARE INSTRUCTIONS
Because this table runner will likely be exposed to food and drinks, proper care is essential to maintain its vibrant colors and crisp shape.
- Washing: Hand wash gently in cool water using a mild detergent. Do not vigorously scrub the 3D flower petals, as this will cause the yarn to fuzz and lose stitch definition.
- Drying: Never put this piece in the dryer. Gently squeeze out excess water with a clean towel. Lay it perfectly flat on a dry towel or blocking mat, manually reshaping the scalloped border and fluffing the 3D petals while damp.
- Ironing: If the filet mesh wrinkles, you can steam it or iron it on a low cotton setting, but do not iron the 3D flowers or leaves directly, as it will crush their beautiful texture.
❓ R. FAQ
❓ Can I make this table runner longer or wider?
Absolutely. To make it wider, increase your starting foundation chain by any multiple of 2. To make it longer, simply continue repeating Row 2 of the base pattern until it fits your table before adding the scalloped border.
❓ Can I use acrylic yarn instead of cotton?
While you can use acrylic, it is highly discouraged for table runners. Acrylic yarn does not block well, tends to pill, and can actually melt if a hot plate or serving dish is placed on it. Mercerized cotton is crisp, heat-resistant, and provides the best drape.
❓ The edges of my filet mesh are curling. What did I do wrong?
Curling edges in filet crochet usually mean your tension is too tight on the turning chains, or you need to block the piece. Wet blocking almost always solves minor curling. If it persists, try going up half a hook size.
❓ Do I have to sew the vines, or can I surface slip stitch them directly onto the base?
You can absolutely surface slip-stitch the vines directly onto the mesh if you are comfortable with that technique! Crocheting them as separate cords and sewing them on simply gives you more freedom to arrange and adjust the layout before making it permanent.
❓ Is this pattern suitable for outdoor patio tables?
Yes, but be mindful of the sun. Deeply pigmented cotton yarns (like the bright yellow and green) can fade if left in direct sunlight for weeks at a time. It’s best to bring the runner indoors when not actively entertaining.