📖 B. INTRODUCTION
Welcome to a truly magical holiday make! If you are looking to elevate your handmade Christmas decor, this Elegant Navy Poinsettia Crystal Spiral is the perfect project. Blending delicate crochet work with jewelry-making techniques, this ornament creates a sophisticated, heirloom-quality decoration that catches the light beautifully on any tree or window display.
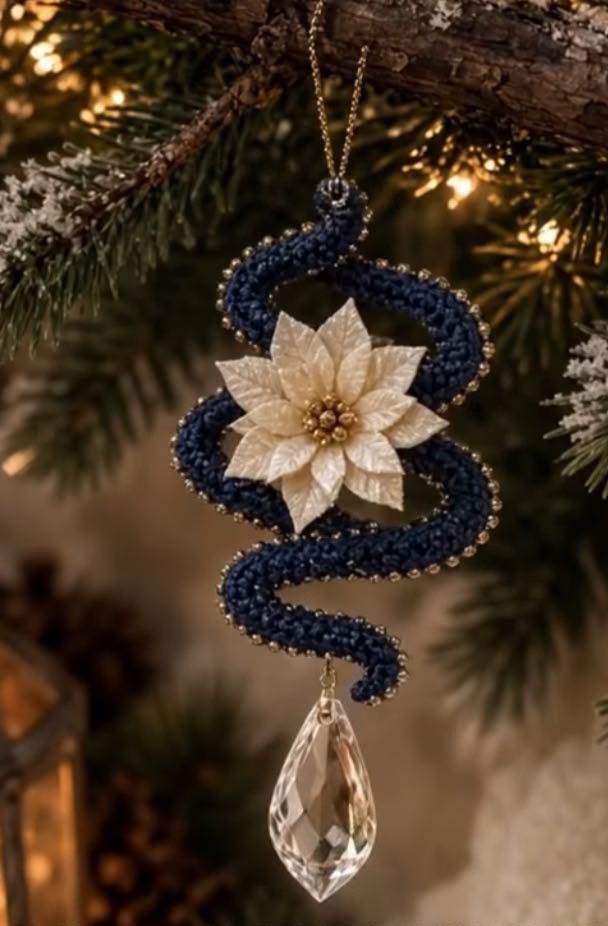
This design features a dramatic, wire-reinforced “S” spiral crocheted in deep, rich navy blue yarn. The edges of the spiral are adorned with a delicate halo of gold seed beads, mimicking the starry twinkle of holiday lights. At the very center of the curve rests a pristine, multi-layered cream poinsettia blossom, heavily textured and finished with a cluster of gold beads at its heart.
To give the ornament its breathtaking weight and vertical pull, a brilliant, clear teardrop crystal is suspended from the bottom tail. Crocheting this piece is immensely rewarding. The modular construction means you can take your time crafting the individual elements—the sturdy band, the delicate flower—before bringing them all together in a joyous assembly process.
Whether you are making this as a treasured gift for a loved one, a standout piece for an ornament exchange, or a sophisticated addition to your own holiday aesthetic, this pattern offers a wonderful opportunity to practice bead crochet, wire shaping, and mixed-media finishing. Let’s create a little winter magic!
🔍 C. MAIN PATTERN OVERVIEW
This intricate ornament is broken down into three highly manageable construction modules, ensuring your final piece looks exactly like a high-end boutique decoration.
- The Beaded Spiral Body: The core of the ornament is a dense, flattened crochet band made in navy blue. It is worked in simple rows to create a ribbon. The magic happens in the edging round, where we simultaneously crochet over a thin craft wire (for shape memory) and introduce pre-strung gold seed beads along the perimeter.
- The Winter Poinsettia: Designed to sit snugly in the center curve of the spiral, this cream-colored flower is constructed in layered rounds to create staggered, pointed petals. The center is embellished with hand-sewn gold beads to match the edging.
- The Hardware Final Touches: The piece is finished by attaching a heavy, light-catching teardrop crystal to the bottom using jewelry findings, and a simple gold metallic hanging cord to the top.
🎯 D. SKILL LEVEL
Intermediate to Advanced
While the actual crochet stitches used (Single Crochet, Half Double Crochet, Double Crochet) are beginner-friendly, the mixed-media techniques push this pattern into the intermediate realm.
Techniques Involved:
- Crocheting with thread or fingering-weight yarn.
- Pre-stringing and crocheting with seed beads (Bead Crochet).
- Working stitches over craft wire.
- Working in Front Loops Only (FLO) and Back Loops Only (BLO) for floral layers.
- Basic jewelry assembly (opening and closing jump rings).
📏 E. FINISHED SIZE
When made with the recommended size 3 crochet thread (or fingering weight yarn) and a 2.0mm hook, the finished ornament measurements are:
- Total Height: Approximately 6.5 inches (16.5 cm) from the top of the navy spiral to the bottom tip of the crystal.
- Width: Approximately 3 inches (7.5 cm) across the widest point of the shaped S-curve.
- Flower Diameter: Approximately 2.5 inches (6.3 cm) across.
Note: Changing yarn weight or crystal size will significantly alter the final dimensions. Using worsted weight yarn is not recommended as it will make the ornament too bulky to hold the elegant shape.
🧮 F. GAUGE
Gauge: 7 sc and 7 rows = 1 inch (2.5 cm) unblocked.
For this specific amigurumi-style decor piece, exact gauge matching is less critical than stitch tension. Your stitches for the navy band must be tight enough to create a stiff ribbon and completely hide the wire that will be encased in the final round. If you find your fabric is floppy or has visible gaps, drop your hook size down by 0.25mm or 0.50mm.
🧶 G. REQUIRED YARN AMOUNTS
This project uses very little yarn, making it an excellent stash-buster for those leftover skeins of premium thread or sock yarn. Estimates are based on Size 3 Crochet Thread or Fingering Weight (Category 1) yarn.
- Main Color (MC) – Deep Navy Blue: Approximately 20-25 yards.
- Contrast Color (CC) – Cream/Soft White: Approximately 15 yards for the poinsettia.
- Note: Metallic gold embroidery floss or fine gold yarn (approx. 5 yards) is needed for the hanging loop.
🧰 H. MATERIALS
Gather the following tools and supplies before starting to ensure a smooth crafting experience:
- Hook: 2.0mm (US Steel Hook 4 or B-1 equivalent) or size needed to obtain a dense fabric.
- Yarn: Size 3 mercerized cotton thread or fingering weight yarn in Navy and Cream.
- Beads: Size 6/0 or 8/0 glass seed beads in Metallic Gold (approx. 70-80 beads for the edge, plus 10-15 for the flower center).
- Crystal: 1 large clear acrylic or glass teardrop chandelier crystal pendant (approx. 1.5 to 2 inches long) with a top hanging hole.
- Wire: 24-gauge or 22-gauge gold craft wire or floral wire (approx. 18 inches).
- Hardware: 1 small gold jump ring (6mm or 8mm) to attach the crystal.
- Tools:
- Tapestry needle (eye must be small enough to pass through your seed beads if sewing them on).
- Small jewelry pliers (for the jump ring and wire ends).
- Wire cutters.
- Small sharp scissors.
- ⚠️ Safety Note: This item contains small beads, glass crystals, and wire. It is designed as a decorative object, not a toy. Keep out of reach of small children and pets.
🔤 I. ABBREVIATIONS – US TERMS
- ch = chain
- sc = single crochet
- hdc = half double crochet
- dc = double crochet
- sl st = slip stitch
- st(s) = stitch(es)
- inc = increase (2 sc in the same stitch)
- MR = magic ring
- BLO = back loop only
- FLO = front loop only
- FO = fasten off
- ( ) = stitch count at the end of the round/row
- [ ] x… = repeat the instructions in the brackets the specified number of times
📝 J. NOTES BEFORE YOU BEGIN
- Stringing Beads: For the navy spiral, you MUST string your gold beads onto your navy yarn before you make your slip knot to start the project. String about 80 beads just to be safe. You will push them down the yarn strand as you work Rows 1-3, only bringing them up when instructed in the Edge Round.
- Working Over Wire: In the final edge round of the spiral, you will lay the craft wire flat along the top edge of your stitches. Insert your hook into the stitch, ensuring the wire is trapped under your hook and working yarn, and complete the slip stitch.
- Continuous vs. Joined: The flower base is worked in a continuous spiral—do not join with a slip stitch at the end of the round unless instructed. Use a stitch marker to keep your place.
🪡 K. COMPLETE PATTERN
🌀 The Beaded Navy Spiral Body
Purpose: Creates the structural, wire-supported S-curve. Yarn: Navy Blue (MC) Prep: String 80 gold seed beads onto your MC yarn. Push them down the tail so they are out of the way.
Row 1: Leaving a 6-inch starting tail, ch 71. Sc in the 2nd ch from the hook and in each ch across. (70 sts)
Row 2: Ch 1, turn. Sc in each st across. (70 sts)
Row 3: Ch 1, turn. Sc in each st across. (70 sts)
Do not fasten off.
Edge Round (Inserting Wire & Beads):
🧵 Note: You will now work around the entire perimeter of the rectangle you just made. Cut a piece of wire about 18 inches long. Using pliers, bend the first 1/4 inch of the wire into a tiny, tight loop—this prevents the sharp end from poking through your yarn.
Step 1 (Short edge): Ch 1, rotate your work 90 degrees to work across the short end. Lay the looped end of your wire along the edge. Working over the wire, place 3 sl sts evenly across the short edge.
Step 2 (Long edge with beads): Rotate to work down the long starting chain edge. You will continue to crochet over the wire.
- [Sl st in the next st. Slide one bead up your yarn so it sits flush against your hook. Sl st in the next st, locking the bead on the outside edge.]
- Repeat this pattern [1 un-beaded sl st, 1 beaded sl st] all the way down the 70 stitches of the long edge.Step 3 (Short edge): Rotate to work across the next short edge. Place 3 sl sts evenly across, still working over the wire.Step 4 (Final long edge with beads): Rotate to work across the top of Row 3.
- Repeat the bead pattern [1 un-beaded sl st, 1 beaded sl st] across all 70 stitches, working over the wire.Step 5 (Closing): Sl st to the very first ch-1 of the edge round.⚠️ Wire Finish: Trim the excess wire, leaving 1/4 inch. Bend this tip into a tiny loop with your pliers and tuck it gently inside the crochet fabric.FO, leaving a long tail for final tacking if needed. Weave in ends.
🌸 The Layered Cream Poinsettia
Purpose: Creates the dimensional floral centerpiece. Yarn: Cream/Soft White (CC) Note: This flower is worked from the center outward, utilizing front and back loops to create overlapping layers.
Round 1: Make a MR. 6 sc into the ring. (6 sts)
Round 2: Inc in each st around. (12 sts)
Layer 1 (Top Small Petals):
Work this entire layer in the FLO of Round 2.
- Petal 1-6:[Sl st into the next FLO st. Ch 6. Working down the chain: sc in 2nd ch from hook, hdc in next ch, dc in next ch, hdc in next ch, sc in last ch. Skip the next FLO st on the base.]
- Repeat from * to * 5 more times. You will have 6 small petals.
Layer 2 (Bottom Large Petals):
Push the small petals forward. Work this entire layer in the unworked BLO of Round 2.
- Petal 1-6:[Sl st into the first BLO st (this should be directly behind a skipped stitch from the previous layer, ensuring the petals stagger). Ch 8. Working down the chain: sc in 2nd ch from hook, hdc in next ch, dc in next 3 chs, hdc in next ch, sc in last ch. Skip the next BLO st on the base.]
- Repeat from * to * 5 more times. You will have 6 large petals sitting behind the small ones.FO, leaving an 8-inch tail for sewing.
🎨 L. STYLING / ASSEMBLY / STABILITY / FINAL SHAPING
Assembly is where this project truly comes to life. Follow these steps in order to ensure structural stability and perfect symmetry.
1. Shaping the Spiral Take your wired navy band and gently bend it into a fluid “S” shape. The wire allows you to manipulate it perfectly. Make the top curve slightly tighter than the bottom curve, leaving a straight diagonal section in the exact middle for the flower to rest on.
2. Embellishing the Poinsettia Center Thread your tapestry needle with gold thread or a thin strand of split yarn. Sew a tight cluster of 10-15 gold seed beads directly into the center magic ring of the cream poinsettia. Make them dense and slightly piled up for a luxurious 3D effect.
3. Attaching the Flower Position the finished poinsettia directly in the center of the navy S-curve. Using the cream yarn tail, sew the base of the flower securely to the navy band. Tack down the back of two of the larger petals to the navy band—this prevents the flower from drooping forward when hung.
4. Hanging the Crystal Open your gold jump ring using jewelry pliers. Hook it through the top hole of your teardrop crystal. Find the exact center stitch at the bottom tip of your navy spiral. Hook the jump ring through this stitch and squeeze it completely closed. The weight of the crystal will pull the ornament taut, keeping the S-curve looking crisp.
5. Adding the Hanging Loop Cut a 10-inch length of gold metallic cord or embroidery floss. Thread it through the top-most center stitch of the navy spiral. Tie the ends in a secure overhand knot to create a hanging loop.
✅ Final Finishing Checklist
- ✅ Symmetry Check: Hold the ornament by the top string. Does it hang straight, or does it tilt? If it tilts, bend the wire slightly to adjust the center of gravity until it hangs vertically.
- ✅ Petal Check: Gently pinch the tips of the poinsettia petals to sharpen their points.
- ✅ Bead Check: Ensure the beaded edge of the spiral is facing forward on both the top and bottom curves.
- ✅ Wire Check: Feel the top and bottom tips of the band to ensure no sharp wire edges are exposed.
💡 M. HELPFUL CROCHET TIPS
- 💡 Flawless Petal Points: When working down the petal chains, crochet into the “back bump” of the chain instead of the front V. This leaves a clean braided edge around the entire petal, making it look much sharper and professional.
- 💡 Stiffening (Optional): If your thread is soft, you can paint the back of the poinsettia petals with a 50/50 mixture of PVA glue (school glue) and water. Let it dry completely flat before attaching it to the spiral. This freezes the petals in a perfect star shape.
- 💡 Alternative Flower: If you prefer the mixed-media look, you can substitute the crocheted poinsettia with a high-quality miniature faux velvet or paper poinsettia from a craft store. Simply hot glue or wire it to the center of the navy band!
- 💡 Managing Wire: When crocheting over the wire, keep your tension slightly looser on the hook loop, but pull the working yarn tight after completing the stitch. This prevents the stitches from bunching up and exposing the metal beneath.
- 💡 Bead Sliding: When pulling a bead up for the slip stitch edge, make sure the bead sits on the outside of the work, facing you, before you pull the final loop through.
- 💡 Crystal Weight: Make sure your crystal isn’t too heavy. A standard acrylic chandelier drop (about 10-15 grams) is perfect. Heavy solid glass may warp the crochet stitches over time.
🧼 N. CARE INSTRUCTIONS
Because this ornament contains craft wire, glass/acrylic elements, and delicate thread, it requires gentle care:
- Storage: Store flat in a hard-sided box between layers of acid-free tissue paper. Do not pack heavy items on top of it, as the wire will crush and the shape will distort.
- Cleaning: Do not machine wash or soak. Dust lightly with a soft, dry makeup brush. If a spot clean is necessary, dab gently with a slightly damp cotton swab.
- Tarnish: If you use real metal seed beads rather than glass, keep the ornament away from high humidity to prevent the gold finish from tarnishing in storage.
❓ R. FAQ
❓ Can I use worsted-weight yarn for this pattern?
It is not recommended. Worsted weight yarn will make the spiral thick, bulky, and difficult to shape elegantly with standard wire. The delicate, jewelry-like appearance relies on the fine texture of thread or fingering weight yarn.
❓ What if I can’t find craft wire?
You can substitute floral wire, though it is slightly stiffer. Alternatively, you can use a heavily starched stiffening method (like sugar water or fabric stiffener) on the band and pin it into an ‘S’ shape on a blocking board until rock solid, though it won’t be as durable as a wired piece.
❓ Can I sew the beads on afterward instead of stringing them?
Yes! If you find bead-crochet frustrating, you can crochet the entire edge round without beads, then go back with a sewing needle and gold thread, hand-sewing a bead to every other stitch. This takes longer but yields a very similar result.
❓ How do I stop the flower from flopping forward?
The crystal at the bottom provides downward tension, but the flower itself needs to be anchored. Ensure you tack down the back of the left and right petals directly to the navy band during assembly.
❓ Is it possible to make the spiral longer?
Absolutely. If you want a longer, multi-curved spiral, increase your starting chain in increments of 20 (e.g., ch 91 or 111). You will need a longer piece of wire and more beads to accommodate the extended length.