📖 B. INTRODUCTION
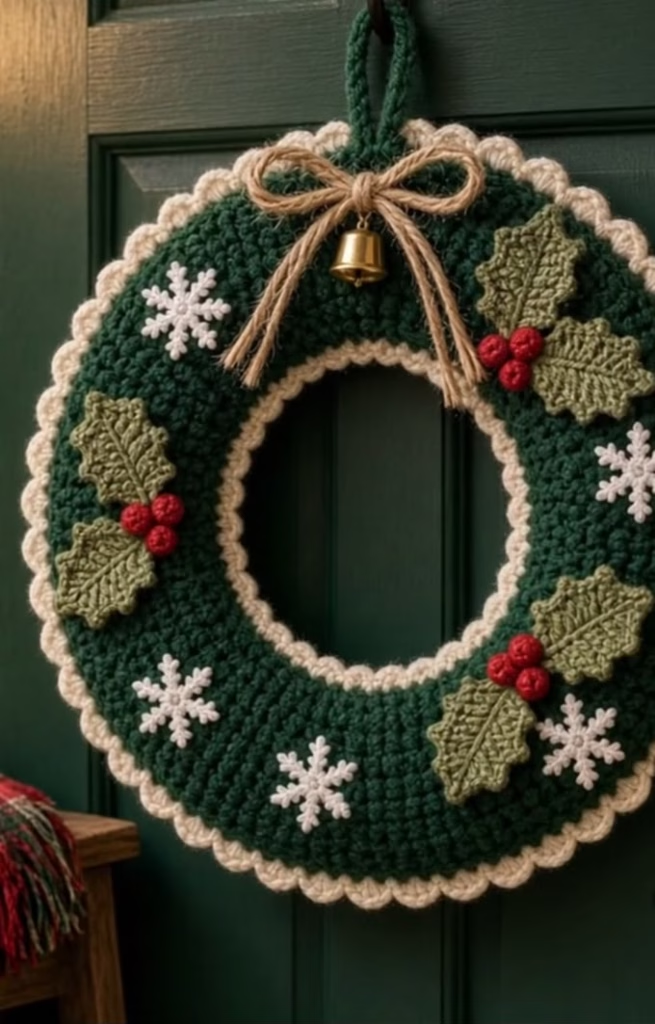
Bring the timeless charm of the holiday season to your front door with this beautifully textured, flat-profile evergreen wreath. Designed to lay flush against a wall or door, this project combines a rich forest green base with high-contrast cream scalloped borders for a polished, vintage-inspired finish. The traditional aesthetic is elevated by dimensional appliques, including three distinct clusters of sage green holly leaves, bright cherry red berries, and crisp white snowflakes. A rustic jute twine bow and a functional gold bell at the top center complete the festive look.
Whether you are decorating your own home for the holidays, crafting a memorable handmade gift, or filming a festive tutorial to share with a community of crochet lovers online, this design yields a highly photogenic and professional result. Because the wreath is built around a sturdy inner ring, it maintains a crisp, perfect circle without sagging or warping over time. The modular nature of the appliques also means you can easily customize the final arrangement to suit your personal style.
🔍 C. MAIN PATTERN OVERVIEW
This wreath is constructed using a “sandwich” method to achieve a flat, sturdy profile. You will crochet two identical flat circular panels (an annulus shape) in dark green. These panels are then placed back-to-back with a rigid, flat craft ring hidden inside. The panels are joined by crocheting through both pieces simultaneously along the inner and outer circumferences, finishing with a decorative cream-colored scalloped shell stitch. Finally, the individual appliques—holly leaves, berry bobbles, and delicate snowflakes—are crocheted separately and securely sewn or glued to the front panel.
🎯 D. SKILL LEVEL
Intermediate
This pattern uses foundational stitches but requires precision when increasing to ensure the circular panels lay completely flat.
- Working in joined rounds
- Creating even mathematical increases
- Crocheting around a rigid structural form
- Creating picot stitches for textured leaf edges
- Small, detailed amigurumi-style work (berries)
📏 E. FINISHED SIZE
- Outer Diameter: Approximately 12 inches (30.5 cm) edge-to-edge.
- Inner Ring Diameter: Approximately 5.5 inches (14 cm).
- Thickness: 0.75 inches (2 cm).
- Note: The final size is dependent on the size of the hidden craft ring you use as your base. This pattern is written for a standard 12-inch flat floral ring. If your tension is tight or you use a different yarn weight, you may need to add or remove an increase round from the base panels.
🧮 F. GAUGE
14 hdc and 10 rounds = 4 x 4 inches (10 x 10 cm) using a 5.0mm (H) hook.
Gauge is moderately important. Your finished crochet panels must be slightly larger than your structural craft ring so the edges can comfortably touch and be joined without stretching the stitches so tight that the underlying form shows through.
🧶 G. REQUIRED YARN AMOUNTS
All yardages are approximate and based on standard Medium (Worsted/Aran) Weight #4 acrylic or cotton-blend yarn.
- Main Wreath (Forest Green): 180 yards
- Borders (Cream/Off-White): 45 yards
- Holly Leaves (Sage/Muted Green): 35 yards
- Berries (Cherry Red): 15 yards
- Snowflakes (Crisp White): 15 yards
🧰 H. MATERIALS
- 🧶 Hooks: 5.0mm (H) for the wreath base; 3.5mm (E) or 4.0mm (G) for the appliques
- 🧶 Yarn: Medium Weight #4 in five colors (see above)
- ⭕ Structural Core: One 12-inch (30.5 cm) flat floral ring (MDF, extruded foam, or heavy-duty layered cardboard cut to size)
- 🎀 Twine: 1 yard of rustic jute twine for the bow
- 🔔 Bell: One 1-inch (2.5 cm) gold craft bell
- 🪡 Notions: Tapestry needle, scissors, stitch markers, sewing pins
- 💧 Optional: Hot glue gun (if you prefer gluing appliques over sewing)
🔤 I. ABBREVIATIONS – US TERMS
- MR: Magic Ring
- ch: chain
- sl st: slip stitch
- sc: single crochet
- hdc: half double crochet
- dc: double crochet
- tr: treble crochet
- inc: increase (place 2 stitches in the same space)
- dec: decrease (invisible decrease preferred for berries)
- st(s): stitch(es)
- picot: chain 2, slip stitch into the 2nd chain from the hook
- ( … ) x N: repeat the sequence inside the parentheses N times
📝 J. NOTES BEFORE YOU BEGIN
- Joined Rounds: The front and back wreath panels are worked in joined rounds to maintain a perfectly horizontal alignment. Always chain 1 at the beginning of a round. The starting chain-1 does not count as a stitch. Always place your first stitch of the new round in the exact same base space as the slip stitch join.
- Applique Construction: The berries and snowflakes are worked in continuous rounds. Use a stitch marker to track your first stitch.
- Ring Sizing: If your underlying craft ring is slightly wider than the pattern, simply continue the increase logic (adding 6 stitches per round) until the panel covers the ring.
- Tail Management: Leave long sewing tails (about 12 inches) on all holly leaves and snowflakes if you intend to sew them on. If you plan to hot glue them, weave in all ends immediately.
🪡 K. COMPLETE PATTERN
🌲 Wreath Base Panels (Make 2)
Yarn: Forest Green
Hook: 5.0mm (H)
Purpose: Creates the front and back flat covers for the hidden ring.
Foundation: Ch 48. Being careful not to twist the chain, sl st into the first ch to form a large ring.
Round 1: Ch 1, work 48 hdc into the ring. Sl st to first hdc to join. (48)
Round 2: Ch 1, (7 hdc, inc) x 6. Sl st to join. (54)
Round 3: Ch 1, (8 hdc, inc) x 6. Sl st to join. (60)
Round 4: Ch 1, (9 hdc, inc) x 6. Sl st to join. (66)
Round 5: Ch 1, (10 hdc, inc) x 6. Sl st to join. (72)
Round 6: Ch 1, (11 hdc, inc) x 6. Sl st to join. (78)
Round 7: Ch 1, (12 hdc, inc) x 6. Sl st to join. (84)
Round 8: Ch 1, (13 hdc, inc) x 6. Sl st to join. (90)
Round 9: Ch 1, (14 hdc, inc) x 6. Sl st to join. (96)
Round 10: Ch 1, (15 hdc, inc) x 6. Sl st to join. (102)
Round 11: Ch 1, (16 hdc, inc) x 6. Sl st to join. (108)
Round 12: Ch 1, (17 hdc, inc) x 6. Sl st to join. (114)
Fasten off the first panel and weave in ends. For the second panel, do NOT fasten off.
🧵 Joining the Panels and Inner Edging
Yarn: Forest Green and Cream
Hook: 5.0mm (H)
- Inner Join: Place the two green panels back-to-back. Join Forest Green yarn through any matching stitch on the inner Foundation chain of both panels. Work 48 sc evenly around the inner ring, inserting your hook through both panels to seam them together. Sl st to join. Fasten off green.
- Inner Cream Scallops: Join Cream yarn to any inner sc. Round 1 (Edging): (Sc in next st, skip 1 st, 5 dc in next st, skip 1 st) x 12. Sl st into the first sc. Fasten off and weave in ends. You should have 12 cream scallops around the inner ring.
🪢 Inserting the Frame and Outer Edging
- Slip your rigid craft ring between the two green panels. It should fit snugly.
- Outer Join: Pick up the working loop of Forest Green yarn left on the second panel. Ch 1. Working through both the front and back panels to trap the craft ring inside, sc evenly around the entire outer edge. Note: To make the scallop math work, you need 116 stitches. Place 2 extra sc increases anywhere during this round. (116) Sl st to join. Fasten off green.
- Outer Cream Scallops: Join Cream yarn to any outer sc. Round 1 (Edging): (Sc in next st, skip 1 st, 5 dc in next st, skip 1 st) x 29. Sl st into the first sc. Fasten off and weave in ends. You should have 29 cream scallops around the outer edge.
🌿 Holly Leaves (Make 6)
Yarn: Sage Green Hook: 4.0mm (G) Purpose: Creates textured, pointed leaves. Grouped in pairs.
Foundation: Ch 12.
Round 1: Sc in 2nd ch from hook, hdc, dc, 2 tr in next ch, tr, 2 tr in next ch, dc, hdc, sc, 3 sc in last ch. Turn to work down the opposite side of the foundation chain. Sc, hdc, dc, 2 tr in next ch, tr, 2 tr in next ch, dc, hdc, sc. Sl st to the first sc to join.
Round 2 (Points): (Sl st in next 2 sts, [sc, picot, sc] in next st) x 3, sl st around the tip of the leaf, ([sc, picot, sc] in next st, sl st in next 2 sts) x 3. Sl st to join.
Fasten off, leaving a 12-inch tail.
🍒 Red Berries (Make 9)
Yarn: Cherry Red Hook: 3.5mm (E) Purpose: Small 3D spheres. Grouped in threes.
Round 1: MR, 5 sc. (5)
Round 2: 5 inc. (10)
Round 3: 10 sc. (10)
Round 4: 5 dec. (5)
Fasten off, leaving an 8-inch tail. Tuck the starting tail inside the berry for slight stuffing. Cinch the remaining 5 stitches closed.
❄️ Snowflakes (Make 4)
Yarn: Crisp White Hook: 3.5mm (E) Purpose: Crisp 6-pointed appliques.
Round 1: MR. (Sc into ring, ch 4, sl st into 3rd ch from hook [picot made], ch 1) x 6. Sl st into the first sc to join. Pull MR tightly to close the center hole completely.
Fasten off, leaving a 10-inch tail.
🔗 Hanging Loop
Yarn: Forest Green
Hook: 5.0mm (H)
Row 1: Ch 35.
Row 2: Sc in 2nd ch from hook and in each ch across. (34)
Fasten off, leaving tails on both ends for attachment.
🎨 L. STYLING / ASSEMBLY / STABILITY / FINAL SHAPING
Correct placement is vital for achieving the balanced, festive look of the original design. Use sewing pins to secure all components before committing to sewing or gluing.
- Top Orientation: Identify the top center of your wreath.
- Holly & Berry Placement: The design features three distinct clusters, each containing two overlapping holly leaves and three red berries.
- Pin the first cluster on the middle-right side (approximately the 4 o’clock position).
- Pin the second cluster on the bottom-right side (approximately the 5:30 position).
- Pin the third cluster on the upper-right side (approximately the 2 o’clock position).
- Styling Note: Angle the leaves dynamically outward and nestle the three berries tightly at the base where the two leaves meet.
- Snowflake Placement: Distribute the four white snowflakes in the negative space on the left and bottom-left side of the wreath (approximately 7, 8, 9, and 10 o’clock positions). Ensure they sit squarely in the center of the green band.
- Attaching the Hardware:
- Fold the green Hanging Loop in half. Sew the ends securely to the top center of the wreath’s back panel, ensuring the loop extends straight up.
- Tie the jute twine into a classic, even bow with roughly 4-inch tails.
- Thread a thin strand of twine or green yarn through the gold bell and tie it directly beneath the center knot of the twine bow.
- Sew or glue the bow/bell assembly to the top center of the wreath (12 o’clock position), hiding the base of the hanging loop.
- Final Silhouette Check: ✅ Lay the wreath flat. Ensure no inner craft ring is visible, all scallops lie flat without curling, and the hanging loop supports the weight evenly without pulling the top border out of shape.
💡 M. HELPFUL CROCHET TIPS
- 💡 Block the Appliques: Before attaching, lightly steam-block the holly leaves and snowflakes. This sharpens the picot points and prevents the leaves from curling inward.
- 💡 Invisible Seaming: When sewing the appliques to the wreath base, only catch the front green panel with your needle. Do not sew all the way through to the back panel, as this will leave messy stitches on the reverse side.
- 💡 Twine Fraying: To prevent the ends of your jute twine bow from fraying over time, dab a tiny drop of clear craft glue or clear nail polish on the very tips.
- 💡 Tension Control: When working the final joining rounds over the craft ring, keep your tension slightly loose. If your single crochets are too tight, they will pull the cream scalloped borders inward.
- 💡 Berry Shaping: Since the berries are so small, you do not need traditional polyfill. Using the yarn starting tail as internal stuffing gives them just enough firmness without the risk of white stuffing poking through the red stitches.
- 💡 Securing the Hanger: The hanging loop supports the entire weight of the project. Stitch over the attachment point multiple times in a square-and-cross (X) pattern for maximum durability.
🧼 N. CARE INSTRUCTIONS
Because this wreath contains a rigid internal frame (especially if cardboard or MDF is used) and a metal bell, do not machine wash or submerge this project in water.
To remove dust, use a lint roller or lightly dab with a piece of masking tape. If the yarn becomes soiled, gently spot-clean the affected area with a damp cloth and mild detergent. Allow it to air dry completely while laying perfectly flat to prevent the internal frame from warping. Store flat in a shallow box during the off-season so the dimensional berries and bow do not get crushed.
❓ R. FAQ
❓ Can I use a foam wreath form instead of a flat craft ring?
Yes, but the pattern will look slightly different. A foam tube wreath will create a rounded, donut-like profile rather than the flat profile shown in the reference. If you use a round foam form, you will need to add more increase rounds to the green panels so they are wide enough to stretch over the thicker foam.
❓ How do I make the white snowflakes stand out more?
If your white yarn is blending into the green base, use a slightly thicker yarn for the snowflakes, or double up your #4 yarn and use a larger hook. Pinning them tightly and sewing down every single point also maximizes their visual impact.
❓ Is it better to sew or hot glue the appliques?
Sewing is always more durable and is highly recommended if the wreath will be hung on a door that opens and closes frequently. However, hot glue is perfectly acceptable for holiday decor and will save you considerable time during assembly.
❓ Can I hang this wreath outdoors?
This wreath is best suited for indoor use or on a front door protected by a deep porch or storm door. Prolonged exposure to rain will ruin the inner cardboard/MDF ring and cause the yarn to mildew, while direct, harsh sunlight may fade the dark green yarn over time.
❓ What if my wreath panels are rippling like a potato chip?
Rippling occurs when you have too many stitches for the circumference. If your panels are not laying perfectly flat by round 8 or 9, omit the increase stitches for one entire round (just hdc in each stitch around), and then resume the increase sequence on the following round.