📖 B. INTRODUCTION
Transform ordinary wine bottles into spectacular holiday centerpieces with these textured, tailored crochet bottle covers. Designed to fit snugly over a standard 750ml bottle, these covers serve as the ultimate reusable wrapping for holiday hostess gifts, teacher appreciation presents, or festive table displays. The tactile stitches and dimensional appliques elevate the design far beyond a basic bottle sleeve.
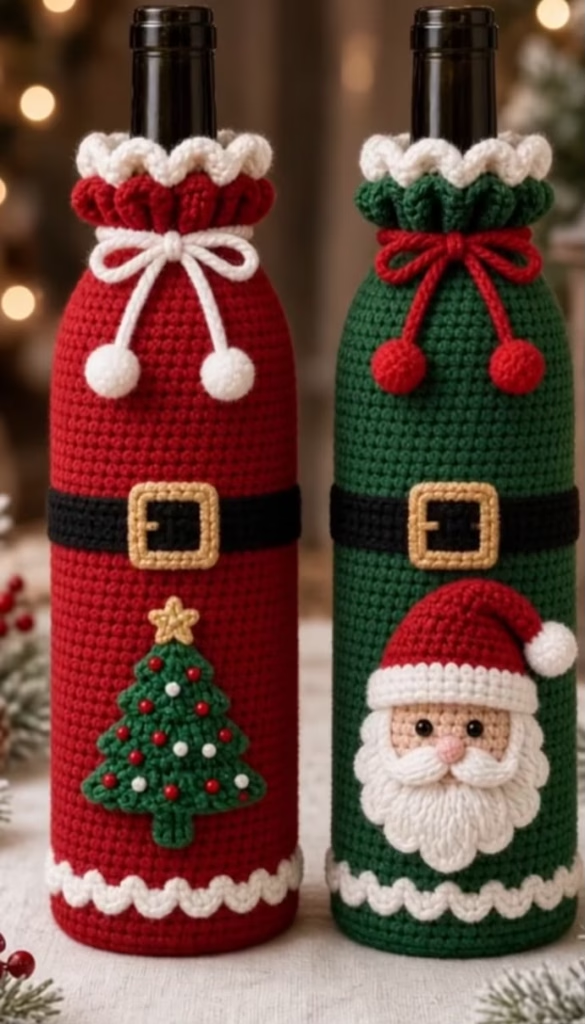
This pattern includes instructions for two distinct holiday designs. The first variation features a rich red body adorned with a decorated Christmas tree applique. The second variation uses a forest green background showcasing a cheerful, dimensional Santa Claus face. Both designs are unified by a striking black center belt, golden buckles, and charming ruffled necks tied with custom drawstrings.
Whether you are crocheting a matching set for your own dining table or crafting personalized gifts for loved ones, these covers offer endless charm. The modular nature of the pattern allows you to mix and match colors, appliques, and trims to create your own bespoke holiday collection.
🔍 C. MAIN PATTERN OVERVIEW This pattern is constructed in distinct, manageable sections. You will begin by crocheting the main cylindrical body from the base up to the neck, seamlessly incorporating a black belt block in the center. The neck features a flared ruffle, creating a gathered look when cinched.
After completing the main body, you will add structural details including a white scalloped trim along the top rim and the bottom edge. Finally, you will crochet the drawstrings with round pom-pom ends, the golden belt buckle, and your choice of applique: a layered Christmas tree with embroidered ornaments, or a Santa face complete with a textured beard and hat.
🎯 D. SKILL LEVEL
Intermediate
This pattern requires comfort with working in continuous rounds, color changes, front loop/back loop exclusively, and assembling multiple small applique parts.
- Techniques used: Magic ring, invisible color changes, crocheting in the back loop only (BLO) and front loop only (FLO), basic increasing and decreasing, and flat shaping for appliques.
📏 E. FINISHED SIZE
- Height: Approximately 11.5 inches (29 cm) from base to top ruffle.
- Diameter: 3.25 inches (8.25 cm) at the base, fitting a standard 750ml wine bottle.
- ⚠️ Note: The stretch of your yarn and your personal tension will affect the final fit. Cotton blends tend to stretch less than pure acrylics.
🧮 F. GAUGE
16 sc stitches and 18 rows = 4 x 4 inches (10 x 10 cm) using a 4.0mm hook.
Gauge is moderately important to ensure the sleeve slides over the bottle easily without sagging.
🧶 G. REQUIRED YARN AMOUNTS
Medium weight (Category 4 / Worsted) yarn. Cotton or a cotton-acrylic blend is recommended for stitch definition and durability.
- Red (Main Color 1): ~120 yards
- Green (Main Color 2): ~120 yards
- White (Trim & Santa): ~50 yards
- Black (Belt): ~15 yards
- Gold/Yellow (Buckle & Star): ~10 yards
- Peach/Flesh (Santa Face): ~5 yards
- Small amounts of poly-fill stuffing for the drawstring pom-poms.
🧰 H. MATERIALS
- 🧶 4.0mm (G) crochet hook (for main body and appliques)
- 🧶 3.5mm (E) crochet hook (for drawstrings and smaller details)
- ✂️ Scissors
- 🪡 Tapestry needle (with a blunt tip for weaving ends and sewing appliques)
- 📍 Stitch markers
- ☁️ Small handful of poly-fill stuffing
- ✅ A standard 750ml wine bottle (empty or full) to test the fit as you work
🔤 I. ABBREVIATIONS – US TERMS
- MR – Magic Ring
- ch – chain
- sc – single crochet
- hdc – half double crochet
- dc – double crochet
- tr – treble crochet
- sl st – slip stitch
- inc – single crochet increase (2 sc in one stitch)
- dec – single crochet invisible decrease (sc 2 together using front loops)
- BLO – back loop only
- FLO – front loop only
- st(s) – stitch(es)
- ( … ) xN – repeat the instructions between parentheses N times
- [ … ] – total stitch count at the end of the round/row
📝 J. NOTES BEFORE YOU BEGIN
- 🧵 The main bottle cover is worked in continuous spiral rounds. Do not join with a slip stitch or turn at the end of the round unless explicitly instructed. Use a stitch marker to mark the first stitch of every round.
- 🧵 Appliques (Tree, Santa Hat) are worked in flat rows. You will chain 1 and turn at the end of each row.
- 🧵 Color changes in the continuous rounds (such as for the black belt) should be done using the invisible color change method: complete the final pull-through of the last stitch of the old color with the new color.
- 🧵 Leave long yarn tails (about 12 inches) when fastening off applique pieces to use for sewing them onto the main bottle body later.
🪡 K. COMPLETE PATTERN
🍾 1. MAIN BOTTLE BODY
Make 1 in Red for the Tree Cover, or 1 in Green for the Santa Cover.
Hook: 4.0mm
Yarn: Main Color (Red or Green)
R1: MR, 6 sc into ring. [6]
R2: inc in each st around. [12]
R3: (1 sc, inc) x6. [18]
R4: (2 sc, inc) x6. [24]
R5: (3 sc, inc) x6. [30]
R6: (4 sc, inc) x6. [36]
R7: (5 sc, inc) x6. [42]
Base diameter should now be approx. 3.25 inches. If it is too small, add one more increase round.
R8: Working in BLO, sc in each st around. [42]
(Keep the unworked front loops of R8 visible; we will attach the bottom trim here later).
R9-30: sc in each st around. [42]
(You are building the lower half of the bottle. Change to Black yarn in the last step of R30).
⬛ 2. THE BELT
R31-35: In Black, sc in each st around. [42]
(Change back to your Main Color in the last step of R35. Fasten off Black).
🍾 3. UPPER BOTTLE & NECK
R36-50: In Main Color, sc in each st around. [42]
R51: (5 sc, dec) x6. [36]
R52-56: sc in each st around. [36]
(This section shapes the neck of the cover. We will now create the flared ruffle).
🎀 4. THE NECK RUFFLE
R57: Working in FLO, 2 dc in each st around. [72]
(Keep the unworked back loops of R57 free for the top trim).
R58: 1 dc in each st around. [72]
R59: 1 sc in each st around. [72]
Fasten off Main Color, weave in end.
❄️ 5. TOP & BOTTOM SCALLOPED TRIMS The image features thick white zig-zag/scalloped edges at the top and bottom of the covers.
Top Trim:
Hold the bottle right-side up. Join White yarn to the unworked Back Loops of R57 (behind the ruffle).
R1: sc in each st around the back loops of R57. [36]
R2: (Skip 1 st, 5 dc in next st, Skip 1 st, sl st in next st) x9. [9 scallops]
Fasten off, weave in ends.
Bottom Trim:
Turn the bottle upside down. Join White yarn to the unworked Front Loops of R8 at the base.
R1: (Skip 1 st, 5 dc in next st, Skip 1 st, sl st in next st) x10.
(Note: 42 sts divided by 4 requires a slight adjustment. Work the pattern 10 times, and on the final scallop, skip 1 st, 5 dc, skip 0 sts, sl st into first st to close nicely).
Fasten off, weave in ends.
🪢 6. DRAWSTRING TIE WITH POM-POMS Make 1 in White for the Red cover, or 1 in Red for the Green cover. Hook: 3.5mm
The Cord:
With chosen color, ch 70. Fasten off, leaving a short tail for sewing.
Thread this chain in and out of the stitches of R52 on the bottle neck.
The Pom-Poms (Make 2):
R1: MR, 6 sc into ring. [6]
R2: inc in each st around. [12]
R3-4: sc in each st around. [12]
R5: dec x6. [6]
Stuff very lightly.
Fasten off, leaving a tail. Sew one pom-pom securely to each end of the chained drawstring cord.
🟨 7. GOLDEN BELT BUCKLE
Make 1 per cover.
Hook: 3.5mm
Yarn: Gold/Yellow
Row 1: Ch 20. Join with a sl st to the first ch to form a ring (careful not to twist).
R1: Ch 1, 4 sc, 3 sc in next ch (corner), 4 sc, 3 sc in next ch, 4 sc, 3 sc in next ch, 4 sc, 3 sc in last ch. Join with sl st.
Fasten off, leaving a long tail for sewing.
🎄 8. CHRISTMAS TREE APPLIQUE (For Red Cover)
Hook: 3.5mm
Yarn: Green
Worked flat in rows.
Row 1: Ch 2, 1 sc in 2nd ch from hook. ch 1, turn. [1]
Row 2: inc. ch 1, turn. [2]
Row 3: inc, 1 sc. ch 1, turn. [3]
Row 4: inc, sc 1, inc. ch 1, turn. [5]
Row 5: sc in each st across. ch 1, turn. [5]
Row 6: inc, sc 3, inc. ch 1, turn. [7]
Row 7: sc in each st across. ch 1, turn. [7]
Row 8: inc, sc 5, inc. ch 1, turn. [9]
Row 9: sc in each st across. ch 1, turn. [9]
Row 10: inc, sc 7, inc. ch 1, turn. [11]
Row 11: sc in each st across. [11]
Tree Trunk: sl st across first 4 sts. ch 1, sc in next 3 sts. ch 1, turn. sc in next 3 sts.
Fasten off, leaving a long tail for sewing.
Tree Decorations:
- Use Red and White yarn to embroider small french knots across the tree body to mimic the ornaments shown.
- Star: With Gold yarn, MR, (ch 2, sl st in 2nd ch from hook, sl st into MR) x5. Fasten off and sew to the top of the tree.
🎅 9. SANTA FACE APPLIQUE (For Green Cover)
Hook: 3.5mm
Face Base:
Yarn: Peach/Flesh
R1: MR, 6 sc into ring. [6]
R2: inc in each st around. [12]
R3: (1 sc, inc) x6. [18]
R4: (2 sc, inc) x6. [24]
Fasten off, leave a tail.
Santa Beard (White):
Join White yarn to the side of R4 of the face base. We will work around the bottom half of the circle.
Row 1: Working in FLO of the bottom 12 stitches: (sc, ch 2, dc, ch 2, sc) all in the same stitch. Skip 1 st. Repeat this cluster 5 more times across the bottom edge.
Fasten off.
Santa Mustache (White): Ch 10. Row 1: sl st in 2nd ch from hook, sc, hdc, dc, sl st in next st (center), dc, hdc, sc, sl st. Fasten off. Sew across the center of the face, right above the beard. Add a small pink french knot for the nose directly above the center of the mustache. Use black embroidery thread for two small eyes.
Santa Hat (Red):
Row 1: Ch 13. sc in 2nd ch from hook and across. ch 1, turn. [12]
Row 2: dec, sc 8, dec. ch 1, turn. [10]
Row 3: sc across. ch 1, turn. [10]
Row 4: dec, sc 6, dec. ch 1, turn. [8]
Row 5: sc across. ch 1, turn. [8]
Row 6: dec, sc 4, dec. ch 1, turn. [6]
Row 7: sc across. ch 1, turn. [6]
Row 8: dec, sc 2, dec. ch 1, turn. [4]
Row 9: dec x2. ch 1, turn. [2]
Row 10: dec. [1]
Fasten off.
Hat Brim & Pom-Pom (White): Join White to the bottom edge of the hat. sc across the bottom edge (12 sts). Fasten off. For the hat pom-pom, use a small amount of white yarn to make a 6-sc magic ring, close it into a tiny ball, and sew it to the bent tip of the hat.
🎨 L. STYLING / ASSEMBLY / STABILITY / FINAL SHAPING
Assembly Sequence:
- The Buckle: Center the golden buckle over the black belt section on the front of your bottle cover. Pin it in place and sew around the inner and outer edges using the gold yarn tail.
- The Applique:
- For the Red Cover: Center the Christmas tree below the belt. Pin securely. Sew around the perimeter.
- For the Green Cover: Sew the Santa hat slightly overlapping the top of the Santa face. Center the entire Santa head assembly below the belt. Sew firmly in place, leaving the dimensional beard clusters unsewn at the tips for a 3D effect.
- The Drawstring: Ensure the cord is woven evenly through R52. Place the cover over an actual wine bottle. Pull the cords firmly to cinch the neck right below the ruffle, and tie a neat bow in the front.
✅ Finishing Checklist:
- ✅ Ensure the bottom scallops lay flat against the table.
- ✅ Check that the applique is vertically aligned with the center of the buckle.
- ✅ Verify that the drawstrings are tied tightly enough to flare the top ruffle nicely.
- ✅ Weave all loose ends into the inside of the bottle cover.
💡 M. HELPFUL CROCHET TIPS
- 💡 Invisible Finish: When completing the final rounds of the bottom and top scallops, use an invisible join instead of a slip stitch for a seamless, professional edge.
- 💡 Belt Transitions: To keep the black belt lines perfectly straight without a “jog” at the start of the round, use the slip-stitch-and-chain-1 method just for the color change rounds, or work a series of slip stitches over the transition point.
- 💡 Sewing Appliques: Pin the appliques while the cover is on a bottle. Sewing them while the cover is flat may result in puckering when stretched over the glass.
- 💡 Drawstring Placement: Threading the cord through a round of single crochet can be tight; you can gently stretch the spaces with your tapestry needle before pulling the yarn through.
- 💡 Beard Texture: If you prefer a fluffier Santa beard, you can brush out the white acrylic yarn clusters with a wire pet brush before sewing the face to the bottle.
- 💡 Bottom Trim: Ensure you are working the bottom trim into the front loops of R8 facing downward, so the scallops flare away from the bottle rather than curling underneath it.
🧼 N. CARE INSTRUCTIONS
- Washing: Hand wash gently in cold water using a mild detergent. Do not machine wash, as the agitation can damage the dimensional appliques and pom-poms.
- Drying: Press gently between two thick towels to remove excess water. Lay flat to dry. Do not wring or twist.
- Storage: Store flat in a dry place after the holidays. If the covers become wrinkled, slide them over a bottle and use a garment steamer lightly from a distance to reshape the stitches.
❓ R. FAQ
❓ Can I use acrylic yarn instead of cotton?
Yes. Acrylic yarn offers beautiful vibrant colors, but it stretches more than cotton. If using 100% acrylic, check your gauge carefully and consider dropping down half a hook size for the main body so it doesn’t slide off the bottle.
❓ How do I adjust the size for a wider champagne bottle?
To fit a wider bottle, add one more increase round to the base (R8: (6 sc, inc) x6 = 48 sts). Maintain this 48-stitch count up the body, and adjust your stitch placement evenly for the decreases at the neck.
❓ Why is my top ruffle floppy instead of standing up?
The ruffle relies on the tightness of the drawstring to flare out. Ensure you are tying the cord tightly around the narrowest part of the bottle neck. Working the ruffle stitches tightly also adds structural integrity.
❓ Can I make this as a solid bag with a closed top?
These are designed as open-top sleeves that leave the cork/foil exposed. To make it a closed gift bag, you would need to extend the body well past the neck and omit the neck decreases, adding a standard drawstring closure at the very top.
❓ Are the appliques glued or sewn?
Always sew the appliques for a durable, heirloom-quality finish. Hot glue can seep through crochet stitches, leaving hard, visible bumps, and may fail if the cover needs to be washed.