📖 B. INTRODUCTION
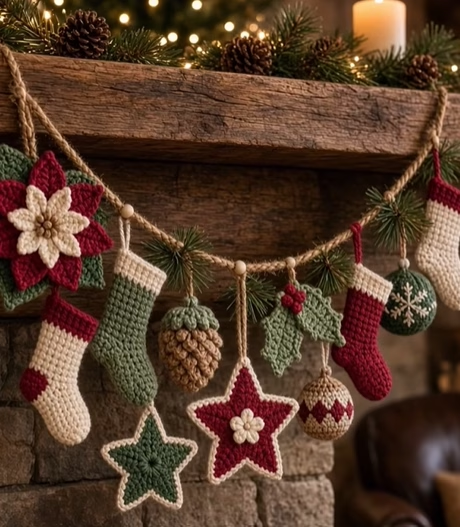
Transform your home into a rustic holiday sanctuary with this handcrafted Vintage Heirloom Christmas Garland! Suspended from a thick natural jute rope, this festive bunting features a charming assortment of classic winter motifs: mini rustic stockings, crisp framed five-point stars, a layered poinsettia flower, textured pinecones, holly leaves with berries, and embroidered glass-style baubles.
Draped across a fireplace mantel, woven along a staircase banister, or hung above a festive doorway, this garland brings rich texture and nostalgic warmth to your seasonal decor. Each individual motif is crocheted in traditional holiday shades—deep cranberry red, forest green, warm cream, and earthy camel brown—accented by wooden beads and fresh pine sprigs tucked into the cord.
This pattern is designed as a modular holiday project. You can mix and match your favorite motifs, crochet a shorter bunting for a window frame, or repeat individual pieces to create a lavish, full-length mantelpiece display. Individual motifs also make fantastic gift tags, Christmas tree ornaments, or wine bottle decorations!
🔍 C. MAIN PATTERN OVERVIEW
The garland consists of seven distinct crocheted components suspended along a heavy rustic jute cord:
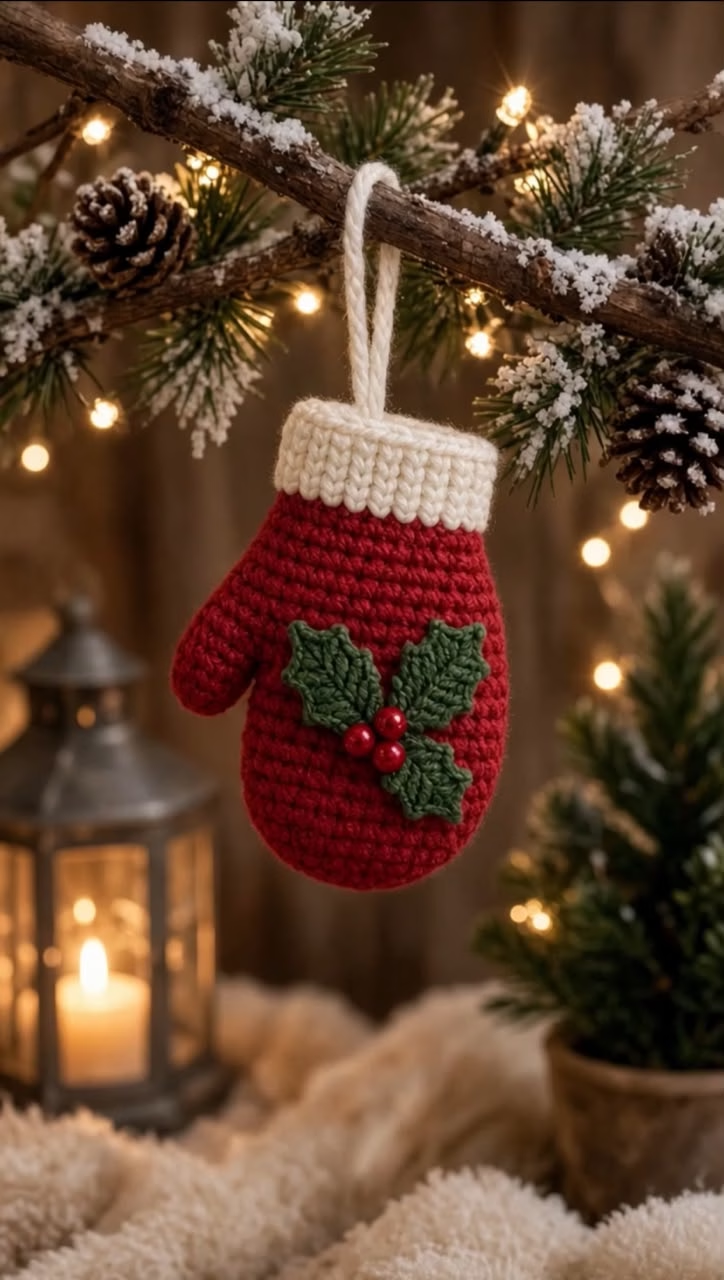
- 🧦 Mini Stockings: Three two-tone stockings with folded cuffs and contrasting heel/toe details.
- ⭐ Framed 5-Point Stars: Two solid stars bordered with crisp contrasting single crochet edging, one finished with a miniature center flower.
- 🌸 Layered Poinsettia: A grand statement motif with green leaf backing, rich red petals, and a raised cream flower center.
- 🌲 Textured Pinecone: A 3D dimensional piece worked in popcorn stitches with a green top cap.
- 🍃 Holly & Berry Bunch: Twin serrated green holly leaves topped with three cluster berries.
- 🔮 Embroidered Baubles: Two stuffed ornament spheres—one forest green with an embroidered snowflake, and one cream with a red geometric band.
- 🪢 Jute Cord Assembly: Heavy natural jute cord threaded with accent wooden beads and faux pine sprigs.
🎯 D. SKILL LEVEL
Skill Level: Intermediate
This pattern uses a variety of stitch techniques worked both flat and in the round, making it engaging and fast-paced.
Techniques Involved:
- 🧶 Magic Ring (MR), chains, single crochet (sc), half double crochet (hdc), double crochet (dc), and treble crochet (tr)
- 🧶 Working in continuous and joined rounds
- 🧶 Working in Back Loops Only (BLO) and Front Loops Only (FLO)
- 🧶 Popcorn / Bobble stitches for 3D texture
- 🧶 Basic short-row shaping for stocking heels
- 🧶 Simple surface embroidery for baubles
📏 E. FINISHED SIZE
- 📏 Total Garland Rope Length: Approx. 6.5 feet (2.0 meters) (customizable).
- 📏 Mini Stockings: 4.5 inches (11.5 cm) tall x 2.5 inches (6.5 cm) wide at foot.
- 📏 5-Point Stars: 4.25 inches (11 cm) tip to tip.
- 📏 Layered Poinsettia: 5.5 inches (14 cm) in diameter.
- 📏 Textured Pinecone: 3.5 inches (9 cm) tall x 2 inches (5 cm) wide.
- 📏 Holly Leaf Pair: 4 inches (10 cm) wide across both leaves.
- 📏 Ornament Baubles: 2.5 inches (6.5 cm) diameter spheres.
🧮 F. GAUGE
- 🧮 Gauge: 18 sc x 20 rows = 4 inches x 4 inches (10 cm x 10 cm) using a 3.5 mm hook.
- 💡 Tension Note: Gauge is not strictly critical for this decorative garland, but tight, even stitches ensure that stuffed components (baubles, pinecone) retain their shape without polyfill showing through.
🧶 G. REQUIRED YARN AMOUNTS
Medium Worsted Weight (#4) or Heavy DK Yarn in four primary shades:
- 🧶 Cranberry Red: Approx. 85 yards (78 meters)
- 🧶 Forest Green: Approx. 85 yards (78 meters)
- 🧶 Cream / Off-White: Approx. 90 yards (82 meters)
- 🧶 Camel / Warm Brown: Approx. 30 yards (27 meters)
- 📌 Total Yarn Requirement: Approx. 290 yards (265 meters) total.
🧰 H. MATERIALS
- 🪡 Crochet Hook: US size E/4 (3.5 mm) or F/5 (3.75 mm).
- 🧶 Yarn: Worsted/DK weight acrylic or wool blend yarn in Red, Green, Cream, and Camel.
- 🪢 Garland Cord: 7 feet (2.1 meters) of 3-ply heavy natural jute rope or twine.
- 🪵 Wooden Beads: 12 to 14 unfinished natural wooden beads (14 mm to 16 mm diameter with large holes).
- ☁️️ Stuffing: Polyester fiberfill (for baubles and pinecone).
- 🌲 Greenery Picks: Faux pine needle sprigs or small pinecone accents.
- 🪡 Tapestry Needle & Scissors: For embroidery and weaving in ends.
🔤 I. ABBREVIATIONS – US TERMS
- ch = chain
- st(s) = stitch(es)
- sl st = slip stitch
- sc = single crochet
- hdc = half double crochet
- dc = double crochet
- tr = treble crochet
- inc = increase (2 sts in same st)
- dec = decrease (sc2tog)
- MR = Magic Ring
- BLO = back loop only
- FLO = front loop only
- popcorn = 4 double crochet popcorn stitch
- picot = ch 2, sl st in 1st ch
📝 J. NOTES BEFORE YOU BEGIN
- 📝 Color Variations: You will make 3 stockings (1 Red/Cream, 1 Green/Cream, 1 Cream/Red) and 2 stars (1 Green with Cream edge, 1 Red with Cream edge).
- 📝 Continuous vs. Joined: Stuffed spheres and the pinecone body are worked in continuous spirals (do not join). Flat star points and flower petals are joined at the end of each round.
- 📝 Hanging Loops: Every motif features a top chain loop (approx. 12–15 chains) made in matching yarn or jute cord so it can slide smoothly onto the main garland rope.
🪡 K. COMPLETE PATTERN
🧦 Component 1: Mini Christmas Stocking
Quantity: Make 3 (1 Cream body with Red details, 1 Green body with Cream details, 1 Red body with Cream details)
Hook: 3.5 mm
🦵 Leg (Worked in continuous rounds)
- R1: With Main Color, ch 13. Sl st into 1st ch to form a ring (be careful not to twist). Ch 1, sc in each of the 12 chs around. (12 sts)
- R2–R7: Sc in each st around. (12 sts for 6 rounds)
🦶 Heel Turn (Worked flat on 6 stitches)
- Row 1: Switch to Accent Color. Sc in next 6 sts. Turn, leaving remaining 6 sts unworked. (6 sts)
- Row 2–Row 3: Ch 1, sc in each of the 6 sts across. Turn. (6 sts)
- Heel Seam: Fold Heel flap in half (right sides together). Sl st the 3 sts of Row 3 together to form the heel cup. Fasten off Accent Color.
👟 Foot (Worked in rounds)
- R1: Reattach Main Color at the inner corner of the heel. Work 6 sc evenly across the top unworked instep stitches and 6 sc along the side/top edges of the heel cup. (12 sts)
- R2–R4: Sc in each st around. (12 sts)
- R5 (Toe Dec): Switch to Accent Color. (sc 1, dec) x 4. (8 sts)
- R6: (dec) x 4. (4 sts)
- ✂️ Fasten off, weave tail through remaining 4 sts and pull tight to close toe.
❄️ Foldover Cuff & Hanging Loop
- Cuff: Join Accent Color at the top opening of the leg. Ch 1, working in BLO, hdc in each st around. (12 sts) Work 2 additional rounds of hdc. Fasten off and fold cuff down.
- Hanging Loop: Join Main Color at top back corner of stocking. Ch 14, sl st into same st. Fasten off and weave in ends.
⭐ Component 2: 5-Point Framed Stars
Quantity: Make 2 (1 Forest Green, 1 Cranberry Red)
Hook: 3.5 mm
🌟 Star Center & Points
- R1: With Main Color (Red or Green), MR, ch 1, 10 sc into ring. Join with sl st to 1st sc. (10 sts)
- R2: Ch 1, inc in each st around. Join with sl st. (20 sts)
- R3 (Star Points):
- Point 1: Ch 6. Sl st in 2nd ch from hook, sc in next ch, hdc in next ch, dc in next 2 chs. Skip 3 sts on R2 ring, sl st into 4th st on ring.
- Points 2–5: Rep Step 1 four more times. Join with sl st to base of 1st point. (5 star points made)
- ✂️ Fasten off Main Color.
🤍 Contrast Border
- R4: Attach Cream yarn at any valley between two star points.
- Working up the side of the point: sc in next 4 ch-loops.
- At the tip: (sc 1, ch 1, sc 1) into the top loop.
- Working down the opposite side: sc in next 4 ch-loops.
- Sl st into the valley stitch between points.
- Repeat for all 5 points. Join with sl st to 1st st.
- Hanging Loop: Ch 15 at tip of top point, sl st in same tip. Fasten off and weave in ends.
🌼 Center Mini Flower (For Red Star only)
- With Cream yarn: MR, (ch 2, sl st into ring) x 5 to create 5 tiny petals. Pull ring tight and sew to center of Red Star.
🌸 Component 3: Layered Poinsettia Motif
Quantity: Make 1
Hook: 3.5 mm
🍃 Base Leaf Layer (Forest Green)
- R1: With Green yarn, MR, ch 1, 12 sc into ring. Join with sl st. (12 sts)
- R2 (Green Background Leaves):
- (Ch 8. Sl st in 2nd ch from hook, sc in next, hdc in next, dc in next 2, tr in next 2. Skip 1 st on ring, sl st in next st on ring) x 6. (6 green leaves made)
- ✂️ Fasten off Green.
🌺 Large Red Petal Layer
- R3: Attach Cranberry Red yarn to FLO of R1 green ring stitches.
- (Ch 7. Sl st in 2nd ch from hook, sc in next, hdc in next, dc in next 2, tr in last ch. Skip 1 st on ring, sl st in next st) x 6. (6 large red petals)
- ✂️ Fasten off Red.
🌼 Center Cream Flower
- R1: With Cream yarn, MR, 5 sc into ring. Join. (5 sts)
- R2:(Ch 4, sl st in 2nd ch, sc in next, hdc in next, sl st in next center st) x 5. (5 small cream petals)
- ✂️ Sew Cream mini flower into center of Poinsettia. Attach a 15-ch Cream hanging loop behind top petal.
🌲 Component 4: Textured Pinecone
Quantity: Make 1
Hook: 3.5 mm
Special Stitch:Popcorn Stitch = Work 4 dc into same st, drop loop from hook, insert hook in top of 1st dc, re-engage dropped loop, pull through.
🪵 Pinecone Body (Camel Brown)
- R1: With Camel Brown yarn, MR, 6 sc into ring. (6 sts)
- R2: (sc 1, popcorn 1) x 3. (6 sts)
- R3: (inc with 2 sc, inc with 2 popcorn) around. (12 sts)
- R4–R5: Alternating (sc 1, popcorn 1) around. (12 sts)
- R6: (dec) x 6. Stuff body lightly with fiberfill. (6 sts)
- ✂️ Fasten off Brown.
🌿 Green Top Cap
- R7: Attach Forest Green yarn to remaining 6 sts. Ch 1, sc in each st around. (6 sts)
- R8: (dec) x 3. (3 sts)
- Hanging Loop: Ch 15, sl st into top of cap. Fasten off and weave in ends.
🍃 Component 5: Holly Leaves & Red Berries
Quantity: Make 1 Set (2 Green Leaves, 3 Red Berries)
Hook: 3.5 mm
🍃 Holly Leaf (Make 2 in Forest Green)
- Foundation: Ch 10.
- R1: Sl st in 2nd ch from hook, sc in next, hdc in next, (dc 1, picot 1) in next, hdc in next, sc in next, (dc 1, picot 1) in next, sc in next, sl st in last ch.
- Opposite Side: Rotate to work down opposite side of foundation chain: sl st in 1st ch, sc, (dc 1, picot 1), hdc, sc, (dc 1, picot 1), hdc, sc, sl st.
- ✂️ Fasten off leaving 6-inch tail. Sew two leaves together at bases.
🔴 Red Berries (Make 3 in Cranberry Red)
- R1: MR, 5 sc in ring. Join with sl st, pull ring tight.
- ✂️ Fasten off leaving long tail. Cinch into a tight ball. Sew 3 berries to the junction of the 2 holly leaves. Add a 15-ch hanging loop behind berries.
🔮 Component 6: Embroidered Christmas Baubles
Quantity: Make 2 (1 Green with White Snowflake, 1 Cream with Red Geometric Band)
Hook: 3.5 mm
🟢 Bauble 1: Green Snowflake Sphere
- R1: With Forest Green yarn, MR, 6 sc. (6 sts)
- R2: inc x 6. (12 sts)
- R3: (sc 1, inc) x 6. (18 sts)
- R4–R7: sc in each st around. (18 sts for 4 rounds)
- R8: (sc 1, dec) x 6. Stuff firmly with fiberfill. (12 sts)
- R9: (dec) x 6. Fasten off and weave closed. (6 sts)
- ❄️ Embroider Snowflake: Using Cream yarn and tapestry needle, stitch a 6-spoke star on the front face, adding small V-ticks at the end of each spoke.
⚪ Bauble 2: Cream Geometric Sphere
- Work same sphere instructions as Bauble 1 using Cream yarn.
- 🔴 Embroider Chevron Band: Using Red yarn, stitch a zig-zag/diamond geometric pattern around the middle circumference (R4–R6).
- Hanging Loops: Attach 15-ch loops to top of both baubles.
🪢 Component 7: Garland Mounting & Cord Stringing
Materials: Jute cord, 12 Wooden beads, Faux pine sprigs
- 📏 Cut a 7-foot length of 3-ply natural jute cord. Tie a 2-inch loop at both far ends for hanging.
- 🪵 Thread 2 wooden beads onto the cord at each end as stoppers.
- 🪡 Arrange motifs in the following sequence from left to right:
- Layered Poinsettia
- Red/Cream Stocking
- Green Star
- Green/Cream Stocking
- Textured Pinecone
- Red Star with Center Flower
- Holly Leaves & Berries
- Cream/Red Stocking
- Embroidered Green Bauble
- Embroidered Cream Bauble
- 🪵 Separate each motif with 1 wooden bead strung on the jute cord.
🎨 L. STYLING / ASSEMBLY / STABILITY / FINAL SHAPING
🌲 Spacing & Greenery Placement
- Spacing: Position motifs approximately 4 to 5 inches apart along the jute cord to prevent tangling.
- Greenery Accents: Tuck small faux pine sprigs behind the jute knots adjacent to the wooden beads for an authentic botanical look.
- Weight Distribution: Place heavier items (Poinsettia and Baubles) toward the outer edges or exact center to create a natural, graceful drape.
✅ Final Finishing Checklist
- ✅ Block stars and poinsettia petals with steam to ensure they lie flat.
- ✅ Check that all stocking cuffs are folded neatly down.
- ✅ Verify embroidery stitches on baubles are tight and centered.
- ✅ Ensure wooden beads are secure and won’t slide freely.
💡 M. HELPFUL CROCHET TIPS
- 💡 Block Flat Motifs: Lightly steam-block the stars and poinsettia leaves prior to assembly so they hold crisp geometric shapes and don’t curl.
- 💡 Stiffening Stars: For extra structure, dip stars in a 50/50 mix of PVA craft glue and water, squeeze out excess, and pin flat on a blocking board until dry.
- 💡 Clean Color Changes on Stockings: When changing colors for stocking heels and cuffs, complete the final yarn-over of the previous stitch with the new color to eliminate color bleeding.
- 💡 Threading Wooden Beads: Wrap a small piece of clear tape around the end of your jute rope to turn it into a stiff “needle” for threading wooden beads easily.
- 💡 Preventing Polyfill Showing: When crocheting stuffed items like the pinecone and baubles, drop down half a hook size if your stitches are loose.
- 💡 Custom Lengths: Duplicate the mini stockings or stars to extend the garland for larger mantels or double-tiered displays.
🧼 N. CARE INSTRUCTIONS
- 🧼 Storage: Wrap the garland around a piece of heavy cardboard when storing after the holidays to prevent the jute cord from knotting.
- 🧼 Cleaning: Spot clean individual motifs with a damp cloth and mild detergent. Do not submerge stuffed components or jute cord in water.
- 🧼 Restyling: Fluff up the poinsettia petals and stocking cuffs with your fingers when hanging the garland fresh out of seasonal storage.
❓ R. FAQ
❓ Can I use cotton yarn instead of acrylic yarn?
Yes! Cotton yarn gives fantastic stitch definition, especially for the star points and leaf picots. Just keep in mind that cotton motifs may be slightly heavier.
❓ How long does it take to complete the entire garland?
Each small motif takes about 20–30 minutes, while the Poinsettia takes around 45 minutes. The entire garland can easily be completed over a weekend.
❓ What if the holes in my wooden beads are too small for jute cord?
Use a large tapestry needle threaded with a loop of embroidery floss as a threader to pull the thick jute cord through tight bead openings.
❓ Can I adjust the length of the garland cord?
Absolutely. Simply cut a longer or shorter length of jute rope and add or subtract wooden beads and repeated stocking or star motifs as desired.
❓ Is this garland safe to hang directly above a working fireplace?
If you have a live flame fireplace, ensure the garland is hung well above the fire box or clearance zone on the mantelpiece, away from direct heat and sparks.