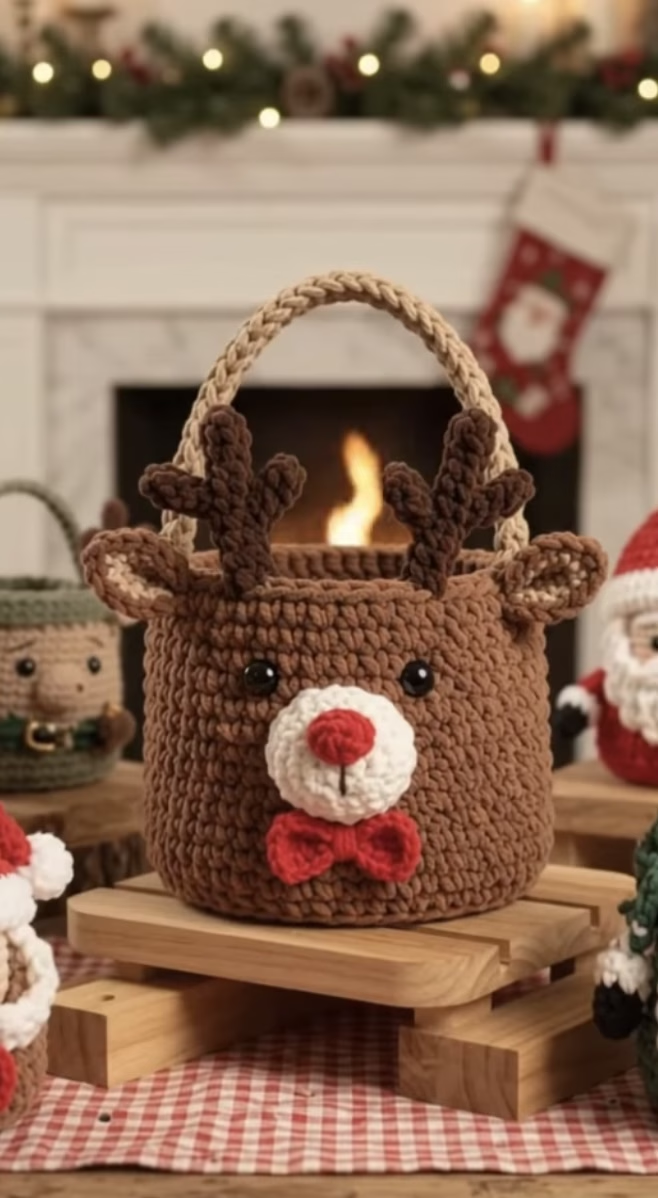
If you’re looking for a whimsical and heartwarming addition to your holiday decor, this chunky crochet reindeer basket is sure to become a favorite. Featuring a rounded, plush brown body with soft reindeer ears, bold antlers, a bright red nose, a white snout, endearing safety eyes, and a delightful red bow tie, this festive basket radiates personality and seasonal charm. The thick, braided handle makes it functional as both a decorative storage piece and a unique gift container. Cozy enough for a Christmas living room or a child’s bedroom, this basket brings a touch of handmade magic to any space.
This reindeer basket showcases a classic cylindrical shape in warm brown tones, accented by a creamy white snout and vibrant pops of red for the nose and bow. Textural details shine through with plush, easy-to-hold yarn that creates a modern, inviting look. Whether filled with treats, craft supplies, or tiny presents, this adorable reindeer is both cute and practical, offering the ideal combination of form and function for the winter season.
Crafting this project offers joyful challenges for crochet lovers, from making sturdy antlers and neatly attached facial features to shaping strong handles that keep their form. Not only does this add festive flair to your home, but it also provides a creative way to show off your crochet skills and celebrate the holidays with a handmade touch.
Project Overview
The reindeer basket is constructed in multiple parts. The main basket body is crocheted in seamless rounds for strength and shape. The base is started in a magic ring, increased outward for stability, then worked evenly in the round to create the cylinder. All the decorative features—ears, antlers, snout, nose, bow tie—are crocheted separately and sewn on. The handle is made as a thick, braided cord and attached securely to the basket’s sides. This modular construction allows for clean color changes and strong attachment points for the antlers, ears, and handle.
Skill Level
Intermediate. While the main basket body uses basic stitches and is straightforward to assemble, the pattern involves shaping, changing colors, creating three-dimensional antlers, and securely attaching multiple appliqué elements. Beginners comfortable with in-the-round construction, increases, and amigurumi techniques may enjoy the challenge, but some previous crochet experience is highly recommended.
Materials
- Yarn (approximate requirements):
- Super bulky weight (size 6) or chunky t-shirt yarn for sturdy structure
- Brown – 150-175g (main body, antlers, ears)
- Cream/white – 20g (snout, inside of ears)
- Red – 15g (nose, bow tie)
- Small scrap of black for embroidery, if desired
- Hook: 8mm (L-11) crochet hook for basket and body parts
- Tapestry needle for sewing pieces and weaving in ends
- Stitch markers for rounds and placement
- Scissors
- 2 safety eyes (14-16mm) or black buttons
- Stuffing fiber (small amount for snout and nose)
- Hot glue (optional) for extra security on small parts
Finished Size
- Basket height (without handle): approx. 18 cm / 7 inches
- Diameter: approx. 18 cm / 7 inches
- Handle drop: approx. 12-14 cm / 5-5.5 inches
To adjust the size, use a thinner or thicker yarn, and change the number of increase rounds for a smaller or larger base.
Gauge
Gauge is not critical but for a firm basket structure:
8 sc x 8 rounds = 10 x 10 cm (4 x 4 inches) in super bulky yarn with 8mm hook.
Small gauge differences will alter basket size; denser stitches help the basket stand up better.
Stitches and Abbreviations
- ch – chain
- sl st – slip stitch
- sc – single crochet
- inc – increase (2 sc in same st)
- dec – decrease (sc2tog)
- MR – magic ring
- FLO – front loop only
- BLO – back loop only
Important Pattern Notes
- The basket body is worked in joined rounds; join each round with a sl st unless noted.
- Ch 1 at the beginning of a round does not count as a stitch unless specified.
- Use a stitch marker for the first st of each round to keep track.
- For sturdy color changes, pull new color through in the last yarn-over of the previous stitch.
- Stuff antlers, snout, and nose lightly as you go; do not overstuff.
- Safety eyes are added after body is finished but before sewing on snout; count rounds for placement.
Detailed Crochet Pattern
Part 1: Basket Base & Body
With brown yarn:
- Round 1: MR, 6 sc in ring. Pull tight. (6)
- Round 2: 2 sc in each st around. (12)
- Round 3: *sc in next st, inc in next st*, repeat around. (18)
- Round 4: *sc in next 2 sts, inc in next st*, repeat around. (24)
- Round 5: *sc in next 3 sts, inc in next st*, repeat around. (30)
- Round 6: *sc in next 4 sts, inc in next st*, repeat around. (36)
- Round 7: *sc in next 5 sts, inc in next st*, repeat around. (42)
- Round 8: *sc in next 6 sts, inc in next st*, repeat around. (48)
- Round 9: *sc in next 7 sts, inc in next st*, repeat around. (54)
(For a wider or narrower basket, add or subtract increase rounds.)
- Round 10: In BLO, sc in each st around. (54)
(This creates an upright edge for the sides.) - Rounds 11-27: Sc in each st around. (54 per round)
(Continue in rounds until basket reaches about 18 cm/7 inches tall. Add/subtract rounds to adjust height.)
Fasten off and weave in ends.
Part 2: Ears (Make 2)
Outer ear (brown):
- Round 1: MR, 6 sc. (6)
- Round 2: *sc, inc* x3. (9)
- Round 3: *sc in next 2 sts, inc* x3. (12)
- Round 4: sc in each st around. (12)
Fasten off, leaving long tail for sewing.
Inner ear (cream/white):
- Repeat Rounds 1-2 above. (6, 9)
Fasten off, leaving tail. Sew inner ear to center of outer ear. Pinch base of ear and sew a few stitches to gather, creating a slight fold. Flatten and curve as desired.
Part 3: Antlers (Make 2)
With dark brown:
Each antler is crocheted as three small tubes (branches) joined as you go. Use smaller hook if needed for firmness. Lightly stuff as you go.
Small branch (make 2 for each antler):
- Round 1: MR, 4 sc. (4)
- Rounds 2-4: Sc in each st around. (4 per round)
Fasten off one branch. Do not fasten off second branch; continue to join to make the main shaft:
- Round 5: Attach yarn to first branch, sc around (4 sts on branch 1), then sc around (4 sts on branch 2). (8)
- Rounds 6-11: Sc in each st around. (8 per round)
(For a larger antler, add extra rows before or after joining. Shape as you go.)
Optional: Add a third mini-branch for extra detail by making a third piece as in Rounds 1-4, then sewing it on to side of antler shaft.
Fasten off, leave a tail for sewing. Make two antlers.
Part 4: Snout and Nose
Snout (white/cream):
- Round 1: MR, 6 sc. (6)
- Round 2: 2 sc in each st around. (12)
- Round 3: *sc in next st, inc* x6. (18)
- Round 4: *sc in next 2 sts, inc* x6. (24)
- Round 5: sc in each st around. (24)
Fasten off, stuff gently, leave long tail for sewing. Flatten snout slightly into an oval before sewing onto basket front, centered about 5-6 rounds up from the base.
Nose (red):
- Round 1: MR, 6 sc. (6)
- Round 2: 2 sc in each st around. (12)
- Round 3: sc in each st around. (12)
Fasten off, stuff lightly, sew to center of white snout piece.
Part 5: Eyes
- Attach safety eyes (14-16mm) or sew black buttons onto basket front, evenly spaced about 3-4 stitches above the snout and 6 stitches apart. Place before sewing on the snout for easiest access.
Part 6: Bow Tie (Red)
- Ch 10, sl st to first ch to form ring.
- Round 1: Ch 1 (does not count), sc in each ch around. (10)
- Rounds 2-4: Sc in each st around. (10 per round)
Fasten off, flatten into a rectangle. Pinch center tightly and wrap several times with red yarn to form bow tie. Sew just under the snout.
Part 7: Handle
- With brown or cream, chain 36 (or desired length for handle).
Row 1: Sc in 2nd ch from hook and each ch across (35). Fasten off. - Make 2 more strips (total 3). Hold strips together and braid tightly. Secure ends, sew firmly to inside edge of basket, opposite sides. Reinforce with extra sewing for strength.
Assembly and Finishing
- Lightly stuff and sew antlers on top outer rim, equally spaced, curving slightly outward.
- Sew ears beside antlers, tacking down base and shaping for a realistic fold.
- Sew snout with nose centered on basket front, about 5-6 rounds from base.
- Sew bow tie under snout.
- Secure handle ends with extra stitches and weave in securely on basket interior.
- Weave in all threads and check that all parts are firmly secured.
- Optionally block basket by shaping with your hands and gently steaming or stuffing with towels to set shape.
Customization Ideas
- Switch out main colors for a whimsical deer (light tan, cream, gray, or pastel shades).
- Add embroidered mouth, eyebrows, or rosy cheeks with embroidery floss for extra personality.
- Use worsted-weight yarn and smaller hook for a mini basket or mug rug.
- Enlarge the base for a toy storage bin.
- Add a fabric liner to make it suitable for storing yarn, candy, or craft supplies.
- Adapt to a wall hanging by skipping the handle and attaching a dowel through the rim.
Troubleshooting Tips
- Bowl Curling Inward/Outward: Adjust hook size; a larger hook makes looser, more flexible fabric.
- Uneven Edges: Check stitch counts at end of rounds; use markers for accuracy.
- Basket Too Flimsy: Use firmer yarn or hold 2 strands together; avoid over-stuffing features.
- Loose Color Changes: Always join new color on final stitch yarn-over of previous row and pull snugly.
- Motif Too Large/Small: Alter yarn weight or hook size as needed and adjust increase rounds.
- Tension Issues: Practice even single crochet tension; keep stitches tight but not stiff, especially in the basket body.
Care Instructions
- Hand wash basket gently in cold water with mild detergent.
- Shape and lay flat to dry.
- Do not wring or machine dry.
- Spot clean antlers, ears, and bow tie as needed.
Final Notes
Measure as you go and double-check stitch counts for each section to ensure proper shape and symmetry. A consistent tension helps maintain sturdy sides and crisp facial features. Use the sample image as a visual guide for placement, facial proportions, and finishing detail. Above all, enjoy bringing this festive reindeer character to life for your own home or as a heartfelt gift!