Introduction
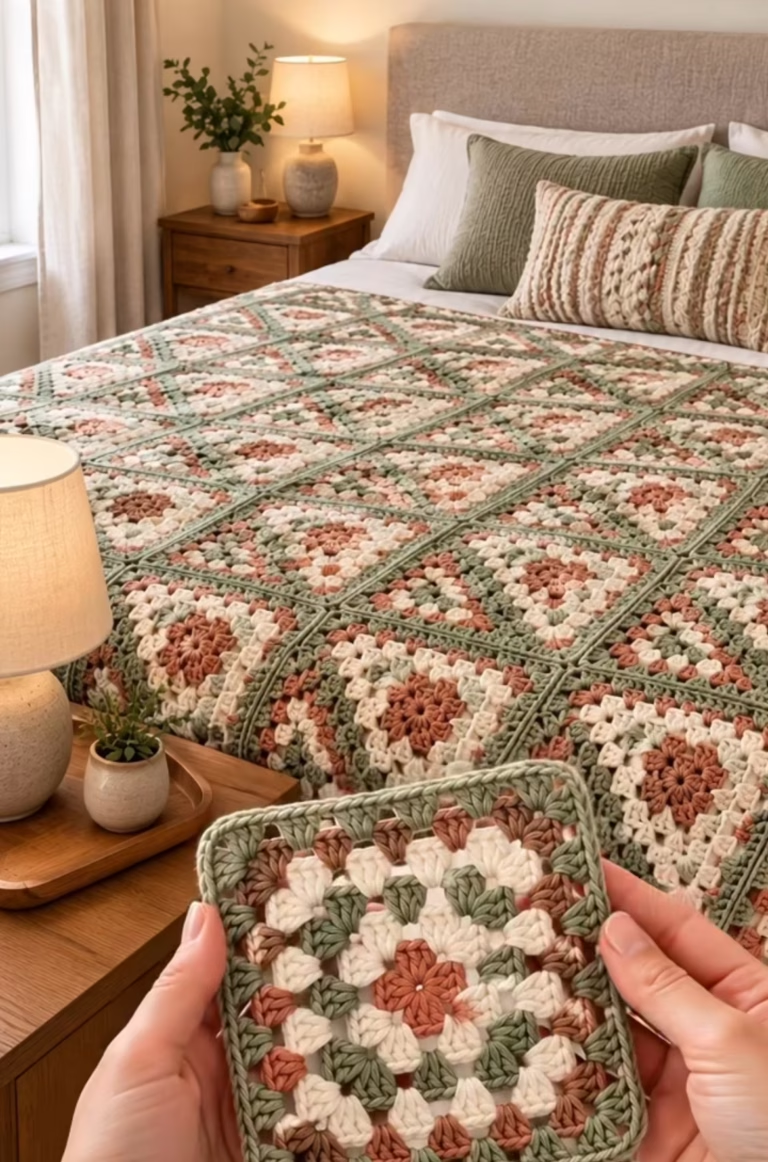
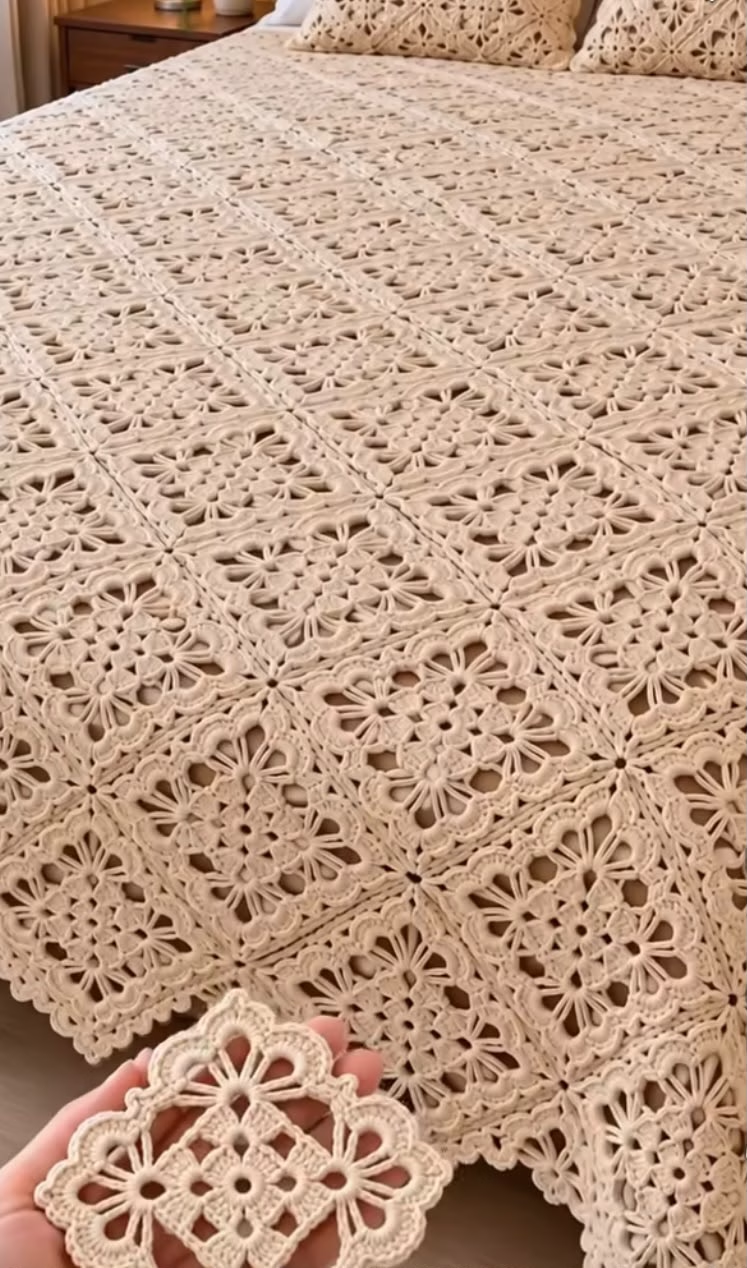
If you’re dreaming of a show-stopping heirloom piece for your home, this elegant lacy crochet motif bedspread is a perfect project. The blanket is composed entirely of beautiful, vintage-inspired square motifs with a delicate floral design at the center and intricate arches along the edges. The piece features a single, neutral cream color, highlighting the intricate stitches and openwork, and exudes a timeless, romantic feel. With its light, airy drape and visually captivating detail, this bedspread can serve as a focal point on any bed or be adapted for other uses like a throw, pillow cover, or striking wall hanging.
The appeal of this project lies not only in its final beauty but also in its construction. Each motif is worked separately—making it portable and manageable, even for large projects. Joining the squares together as you go results in a seamless, unified look. The project is both a relaxing repetitive process and a satisfying challenge as you watch the blanket grow, motif by motif. It’s a rewarding project for anyone who loves combining traditional crochet with modern home style.
Project Overview
This bedspread is constructed from join-as-you-go square motifs. Each motif is crocheted from the center outward in rounds, starting with a magic ring and building up with openwork stitches, puff petals, and textural details. Motifs are joined on the final round to adjacent motifs, creating a seamless grid. Once assembled, you can optionally add a simple border to the outer edge for a finished look.
Skill Level
Intermediate. You should be comfortable with working in the round, reading crochet instructions, maintaining consistent stitch tension, and joining motifs. Some experience with puff stitches (or cluster stitches) and working with fine yarns is helpful because the motif combines openwork, arches, and thicker textural petals. A patient crocheter with good attention to detail will be delighted by the results.
Materials
- Yarn: Fingering weight (1 yarn) mercerized cotton is ideal for this lacy look. Suggested: 100% cotton or bamboo blend for a drapey, soft hand. Approximate total yardage for a queen bedspread (60 motifs by 80 motifs = 4800 motifs, about 10×10 cm/4×4 inches each): 3000–3500 grams/10,500–12,000 yards.
- Color: 1 solid, natural shade (ecru, ivory, beige, or cream)
- Crochet hook: US size C/2.75mm or size needed for gauge
- Tapestry needle (for weaving ends and joining, if not using join-as-you-go method)
- Sharp scissors
- Stitch markers (optional, helpful for marking corners)
- Blocking mats and pins (for shaping motifs after finishing)
Finished Size
Each motif measures approximately 10 cm (4 inches) square when blocked. For a standard queen-sized bedspread (60 x 80 motifs), the finished dimensions are approximately 240 x 320 cm (96 x 128 inches). For other sizes, multiply the number of motifs to reach your desired measurements. For throws, use fewer motifs or scale up for a king bed.
To adjust the size: Simply make more or fewer motifs; you can also join motifs in rectangles or squares for custom-fitting blankets, throws, or decorative pieces.
Gauge
Each blocked motif should measure approximately 10 cm x 10 cm (4 x 4 inches). If your motifs are smaller or larger, adjust your hook size until you achieve close to this measurement. Small differences in gauge will slightly affect the total finished size.
Stitches and Abbreviations
- ch – chain
- sl st – slip stitch
- sc – single crochet
- hdc – half double crochet
- dc – double crochet
- tr – treble crochet
- MR – magic ring
- picot – ch 3, sl st to top of previous st
- cl – cluster (as defined in pattern)
- sp – space
- rep – repeat
Important Pattern Notes
- Chains do NOT count as stitches unless otherwise stated.
- Motifs are worked in joined rounds. Use a slip stitch to join each round, then ch 1 and begin next round.
- Motifs are joined on the final round by slip stitching corners and sides to adjacent motifs. You may also whipstitch or crochet motifs together if you prefer.
- For best appearance, block each motif after completing several.
- Use a stitch marker to mark the first stitch of each round or corner spaces for ease.
- All instructions use US terms.
Detailed Crochet Pattern
Part 1: Motif Center – Foundation and Lacy Diamonds
Round 1 (Center): Make a MR (magic ring). Ch 3 (counts as dc), 3 dc into ring, ch 2. *(4 dc into ring, ch 2)* rep 3 more times. Sl st to top of beg ch-3 to join. (4 groups of 4 dc, 4 ch-2 spaces).
Note: You will have four clusters of 4 dc, separated by ch-2 spaces—these form the centers of each side.
Round 2 (Openwork Cross): Sl st in next 2 dc and into ch-2 sp. Ch 1, (sc, ch 5, sc) in same ch-2 sp (forms first corner loop). Ch 3, skip next 4 dc, *(sc, ch 5, sc) in next ch-2 sp, ch 3, skip 4 dc* rep 3 times. Sl st to first sc to join. (4 large corner loops, 4 ch-3 sps between them)
Round 3 (Petal Points): Sl st into ch-5 corner loop. Ch 3 (counts as dc), (2 dc, ch 2, 3 dc) in same ch-5 loop (first corner made), ch 1, (tr, ch 2, tr) in next ch-3 sp, ch 1, *(3 dc, ch 2, 3 dc) in next corner ch-5 loop, ch 1, (tr, ch 2, tr) in next ch-3 sp, ch 1* rep 2 more times. Sl st to top of beg ch-3. (4 corners, 4 ch-2 tr pairs)
If you’d like a more dimensional flower effect in the corners, try replacing each “tr, ch 2, tr” with a puff or cluster stitch for a fuller look.
Part 2: Motif Petals and Lacy Arches
Round 4 (Lacy Round): Sl st into next 2 dc and into ch-2 corner sp. Ch 1, (sc, ch 5, sc) in corner, ch 4, skip 3 dc, sc in between tr stitches of previous round, ch 4, skip 3 dc, *(sc, ch 5, sc) in next corner, ch 4, sc between next two tr, ch 4* rep 3 times. Sl st to first sc to join. (4 long corner loops, 8 ch-4 side loops)
Round 5 (Petal Puff and Border Diamonds): Sl st into ch-5 corner loop. Ch 3 (counts as dc), (2 dc, ch 3, 3 dc) in same loop. *In next ch-4 sp, make puff stitch (yarn over, insert hook in sp, yarn over, pull up loop, repeat 4 times, yarn over, pull through all loops, ch 1 to secure). (sc, ch 3, sc) in next ch-4 sp; repeat from * across side. Repeat for each motif side/corner. Sl st to join. (4 corners, 8 puffs+side arches)
At this stage, your motif should have a four-petaled floral center, with open diamond shapes at each corner and arches/petals between.
Part 3: Scalloped Outer Edge
Round 6 (Final Border & Join-as-You-Go): Sl st to ch-3 corner space. Ch 1, (sc, ch 3, sc) in each corner space. *(Ch 2, skip next puff, dc in next sc, ch 2, skip next puff, sc in next sp)* rep to next corner. Continue around motif. Sl st to first sc to join.
If joining motifs as you go: On final round, replace the first ch of a ch-3 corner with a slip stitch into the adjacent motif’s corner. For sides that need to be joined, replace one ch with a slip stitch into the matching side space of the joined motif. Continue around, joining each motif on final round to all edges/corners touching completed motifs.
Part 4: Decorative Elements and Customization
If you wish, you can add a picot (ch 3 and sl st into same st) at the tip of each corner for extra lacy detail. For a thicker, more pronounced border, consider one or two rounds of (sc, ch 2, sc) around the final joined blanket edge.
Part 5: Assembly
After creating your motifs, join each motif to its neighbors during the final round (join-as-you-go method). Lay your motifs flat as you join, making sure to align corners and sides exactly for crisp edges and neat joins. If you prefer, motifs can be sewn together using whip stitch or mattress stitch through the corner and side loops.
Assembly and Finishing
- Lay all motifs out on a flat surface, arranging them in your desired pattern and ensuring the motifs are oriented the same way for a uniform look.
- Join motifs as described above, either using the join-as-you-go slip stitch method on the last round, or by sewing finished motifs together through outer loops.
- Weave in all yarn ends carefully with a tapestry needle, making sure to pull tails gently to avoid puckering.
- When all motifs are joined, gently hand wash the bedspread (if your yarn allows), then block it flat by pinning each corner and edge to blocking mats. Smooth and gently stretch the fabric so each square is even and all motifs align.
- Allow to air dry thoroughly before removing pins for best drape and shape.
Customization Ideas
- Switch up the yarn color for a more modern or traditional effect—try monochrome brights, soft pastels, or a gradient palette.
- Use thicker yarn and a larger hook for a chunkier throw, or finer thread for a tablecloth or delicate lace shawl.
- Upgrade single motifs into coasters, trivets, or sewing together for pillow shams to match the spread.
- Frame a group of motifs as a wall hanging, or use a single motif as a statement doily or applique.
- Add an elaborate border (ruffled, scalloped, or picot edge) for extra flair.
Troubleshooting Tips
- If motifs curl, gently stretch and block them or size up your hook.
- For uneven edges, ensure you have the correct stitch counts and mark corners each round.
- If the blanket grows too large or small, check your gauge and switch hooks as needed.
- Loose color joins or gapping: Always secure old yarn tail and start new color at a corner or sturdy post.
- Maintain even tension, especially on chains and puff stitches, to keep motifs uniform.
Care Instructions
- Hand wash in cold water with gentle detergent.
- Lay flat to dry, blocking to shape while damp.
- Do not wring; avoid harsh agitation as it may stretch delicate stitches.
- Store folded or rolled to prevent creases.
Final Notes
Always double-check your stitch counts between rounds to keep motifs symmetrical. Adjust your tension and hook size as needed if your squares aren’t matching up. Block each motif for best results, and use the original finished piece as a visual guide for stitch placement and motif arrangement. Enjoy the meditative process of building a beautiful, lasting work of art for your home.