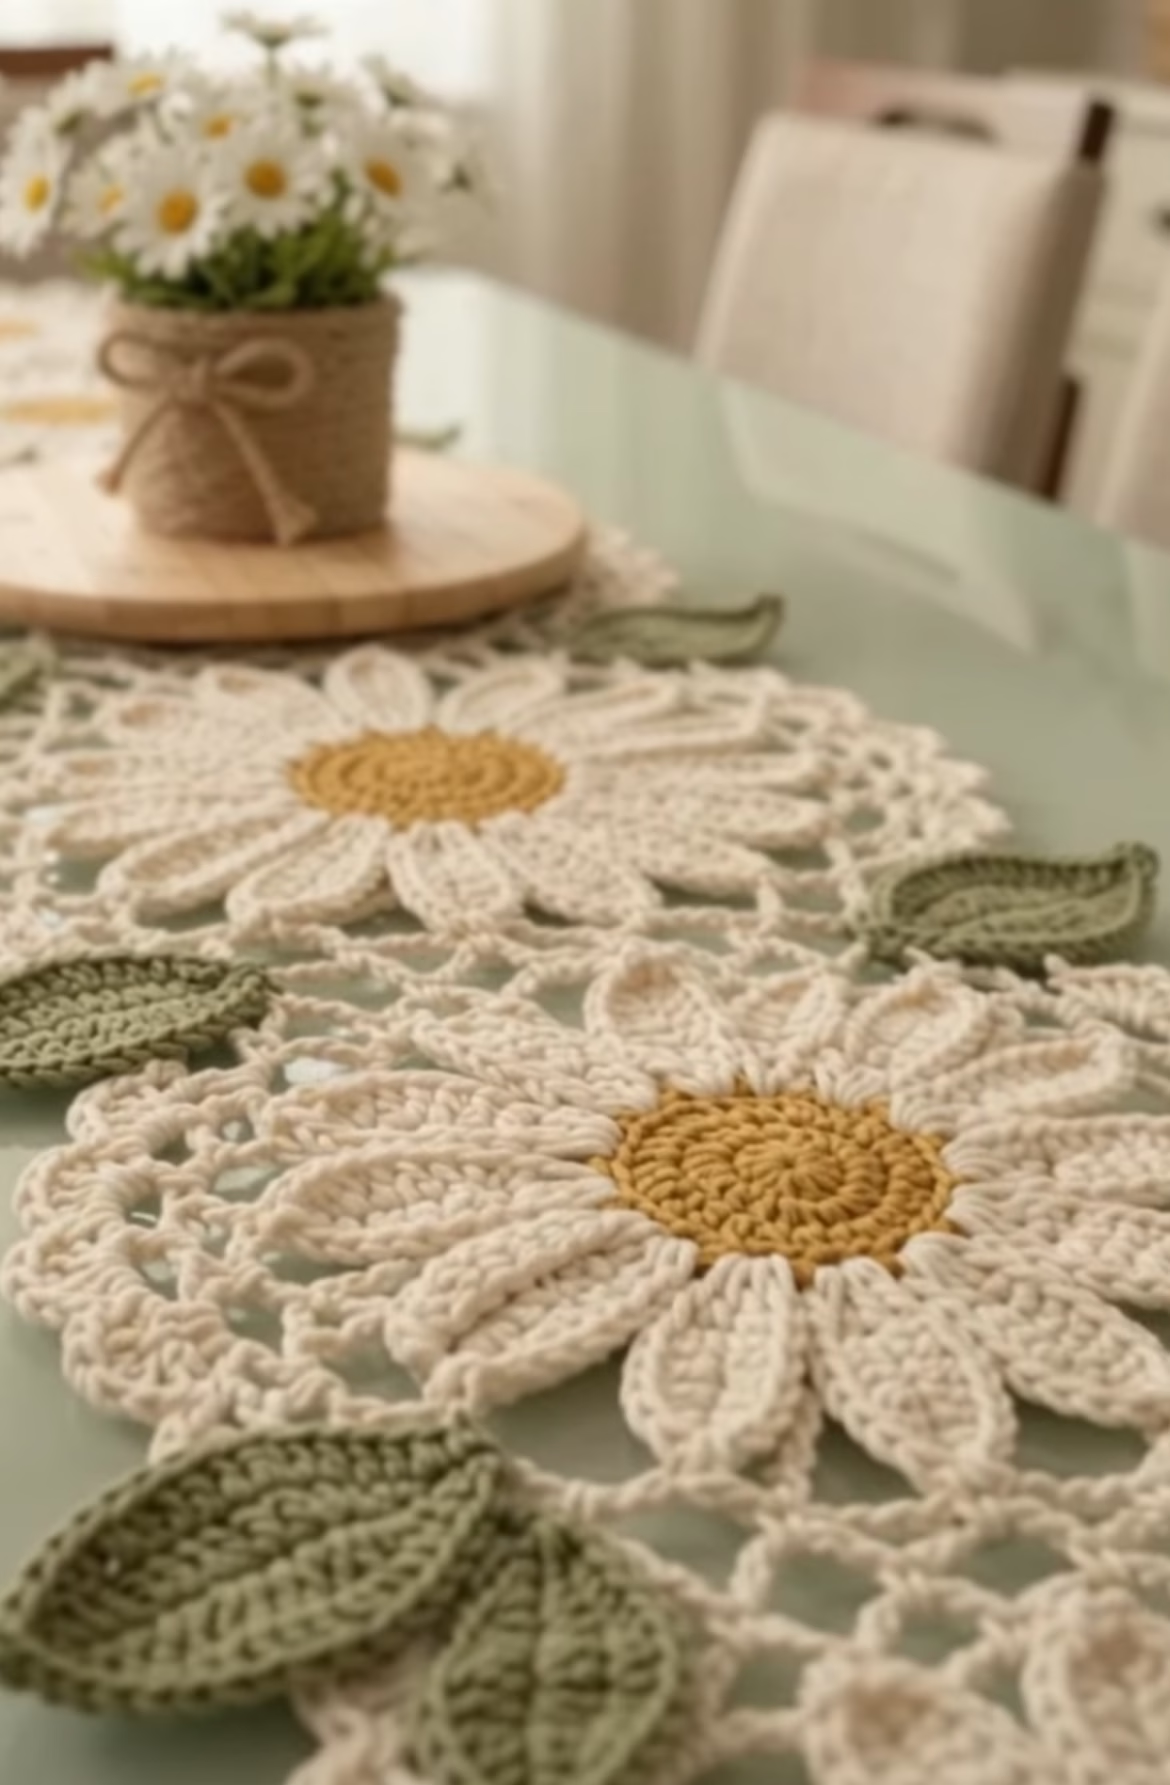
If you’re looking to bring a burst of natural charm and cheerful brightness to your home, this crochet daisy table runner project is for you. The runner features a series of large, intricate daisies radiating with creamy white petals surrounding rich golden centers, all connected in a visually striking arrangement. The soft sage-hued crochet leaves add a sweet, organic touch alongside each blossom. This runner is perfect as a spring centerpiece, a summer accent for your dining table, or a thoughtful handmade gift for flower lovers.
The lacy, openwork construction creates a delightfully airy feel, making this piece both decorative and practical. The overall look is elegant and inviting—guaranteed to brighten up a modern dining room, country kitchen, or festive party table. Creating each part—from the spiraled daisy centers to the dimensional petals and decorative leaves—offers plenty of variety along the way, so crocheters enjoy both relaxation and skill-building.
Project Overview
The table runner is constructed from multiple large daisy motifs, each worked in the round from the center out. Petals are crocheted individually and attached to the daisy center in the final round. Decorative leaves are made separately in rows, then sewn on or joined as you go. The motifs are joined together with a lacy, openwork border for a cohesive and flowing look. You can easily customize the length by adding or removing daisy motifs and adjusting the number and arrangement of leaves.
Skill Level
Intermediate. While the stitches are straightforward, this project requires good control over shaping, color changes, and joining motifs. Experience with working in the round and crocheting separate appliqués is helpful, but detailed instructions make it approachable for ambitious advanced beginners.
Materials
- Worsted weight (medium, #4) cotton yarn for best stitch definition and durability:
- Yellow/gold (center): Approx. 50g
- Cream or white (petals and lace): Approx. 200g
- Light sage green (leaves): Approx. 50g
- 5.0 mm (H-8) crochet hook, or size needed to obtain gauge
- Tapestry needle for sewing and weaving in ends
- Scissors
- Stitch markers (helpful for marking motif joins)
- Measuring tape
- Blocking mat and rustproof pins (for shaping)
Finished Size
Approximate size for three daisy motifs with connecting lace and leaves:
- Length: 95 cm (37.5 inches)
- Width: 30 cm (12 inches)
To adjust the size, simply add or remove motifs or modify the connecting lace length as needed.
Gauge
Gauge is not critical, but for reference: One completed daisy motif (center with petals, before lump joining and blocking) measures approximately 28 cm (11 inches) in diameter. Small variations in gauge will change the finished size—use a consistent tension for best results.
Stitches and Abbreviations
- ch – chain
- sl st – slip stitch
- sc – single crochet
- hdc – half double crochet
- dc – double crochet
- tr – treble crochet
- MR – magic ring
- inc – increase (2 stitches in one stitch)
- dec – decrease (crochet two stitches together)
Important Pattern Notes
- Ch-1 or ch-2 at beginning of rounds does not count as a stitch unless noted.
- Motifs are worked in joined rounds; always join with a slip stitch to the first stitch of the round unless otherwise instructed.
- Change colors by finishing the last stitch of the previous round with the new color.
- Motifs are joined with slip stitches using the lace border as you go or can be sewn together afterward.
- Work leaves on the right side for consistent shaping; attach with a tapestry needle or by slip stitching in predetermined spaces.
- Use stitch markers to keep track of joining points between motifs for neat alignment.
Detailed Crochet Pattern
Part 1: Daisy Flower Center
With yellow/gold yarn:
- Round 1: Make a MR, ch 1, 10 sc into ring. Join with sl st. (10 sts)
- Round 2: Ch 1, 2 sc in each st around. Join. (20 sts)
- Round 3: Ch 1, *sc in next st, 2 sc in next st* repeat around. Join. (30 sts)
- Round 4: Ch 1, *sc in next 2 sts, 2 sc in next st* repeat around. Join. (40 sts)
- Round 5: Ch 1, *sc in next 3 sts, 2 sc in next st* repeat around. Join. (50 sts)
- Fasten off and weave in end.
Part 2: Daisy Petals (Work in White/Cream and Attach Around Center)
Petals are made individually and attached as you go to the center, worked into the Round 5 stitches.
- Join white yarn in any stitch of the flower center, ch 1.
- Petal (make 20 per flower):
- In same st as join, sc. In next st, hdc. In next st, dc. In next st, tr. In next st, dc. (You have used 5 center stitches for one petal.)
- Ch 2, turn.
- Dc in first st, tr in next, dc in next, hdc in next, sc in last. Ch 1, sl st into the same stitch in the flower center to secure the petal base.
- Sl st into next st along the daisy center (to move to next petal base point), then repeat Petal instructions around.
- After the last petal has been made, sl st to the base of the first petal.
- Fasten off and weave in ends.
This gives you large, dimensional daisy petals neatly spoked around the center. If you find 20 petals too crowded or too sparse, adjust by using more or fewer center stitches per petal as desired.
Part 3: Lacy Motif Border (White/Cream Yarn)
The lacy border is worked directly on the outer points of the petals, bridging each petal point with chains forming gentle arches. This offers both a fancy finish and connection points between motifs.
- Round 1: Join yarn at the tip of any petal (top of last stitch), ch 7, sl st to the tip of next petal, *ch 7, sl st to next petal tip* repeat around. Join with sl st to the base of the first ch-7. (20 arches)
- Round 2: Sl st into the first ch-7 space, ch 1, (sc, ch 4, sc) in same space, *(ch 3, sc in next ch-7 space, ch 4, sc in same space)* repeat around. Join to first sc.
Optional: For extra lace detail, work another round in a similar manner, adjusting chain lengths and joining at intervals so the border lays flat and forms gentle picot points or loops for joining motifs together.
Part 4: Leaf Appliqués (Light Sage Green Yarn, Make for Each Motif)
- Leaf (Make as many as desired, 2–3 per motif looks balanced):
- Row 1: Ch 14. Sc in 2nd ch from hook, hdc in next 2 ch, dc in next 4 ch, tr in next 4 ch, dc in next 2 ch, 3 sc in last ch (working around the end of the chain).
- Row 2 (Work along opposite side of chain): Dc in next 2 ch, tr in next 4 ch, dc in next 4 ch, hdc in next 2 ch, sc in next, sl st to starting sc to close.
- Fasten off, pull ends to the back, and weave in neatly. Gently pinch the tip for more leaf dimension.
Part 5: Assembling Motifs Into a Table Runner
- Arrange the daisy motifs along your desired path—usually a straight line for a classic runner, or offset diagonally for interest.
- To join motifs, use the final lacy border round. When making the border on a new motif, slip stitch to the corresponding chain spaces of the already-completed motif as you go.
- Use stitch markers to help align points that will be joined for an evenly spaced connection.
- Sew or slip stitch leaves into position along the outer lacy border, angling them out naturally from between petals. Place evenly along both sides for symmetry.
Assembly and Finishing
- Weave in all loose yarn tails on the wrong side of the work using a tapestry needle and secure to prevent unraveling.
- Lay the finished runner flat on a blocking mat, pat and shape each daisy and leaf. Pin the outer lacy edges and leaf tips to straight lines and soft curves for a gentle shape.
- Steam or spritz lightly with water and allow to dry fully for neat lace. This step helps petals and lacy joins open up and lie flat.
- If you prefer a firmer runner, lightly starch the completed piece following yarn care instructions.
Customization Ideas
- Color Variation: Swap the yellow/gold centers for pink, blue, or orange for a playful twist. Try deep green for leaves or bold white for modern contrast.
- Runner Length: Add or remove daisy motifs to fit any table—make a short accent version or a dramatic long centerpiece.
- Other Uses: Sew a single daisy as a wall hanging, stitch one motif to a pillow cover, or use with extra leaves as a placemat or decorative mat. Connect three motifs for a dresser scarf or transform into coasters by making smaller daisies.
- Yarn Weight: Use fine cotton thread for a delicate, lace-like doily or chunky yarn for a bold, oversized flower runner.
Troubleshooting Tips
- If petals curl upward or downward, blocking with pins and light steam usually flattens them nicely.
- For uneven lacy joins, count carefully between each petal and adjust chain lengths to maintain symmetry.
- If motif is too loose or tight, adjust hook size until the fabric looks just right—firm yet flexible.
- Color changes look neatest if you finish the last yarn-over of the previous stitch with the new color and crochet over the loose end for a smooth transition.
- Keep your tension even in the lace border and leaves for the most professional finish.
Care Instructions
Hand wash gently in cool water with mild detergent. Lay flat to dry, reshaping motifs and leaves as needed. If blocked with starch, avoid soaking and spot clean. Store flat or rolled to prevent creasing.
Final Notes
Check your stitch counts after each round to keep daisies symmetrical. Don’t hesitate to adjust your hook size or tension if your motifs look too loose or tight compared to the sample size. Let the photo be your visual guide for petal, leaf, and layout placement. Enjoy the process and take pride in crafting a floral showpiece that brings handmade beauty and bright charm to any table!