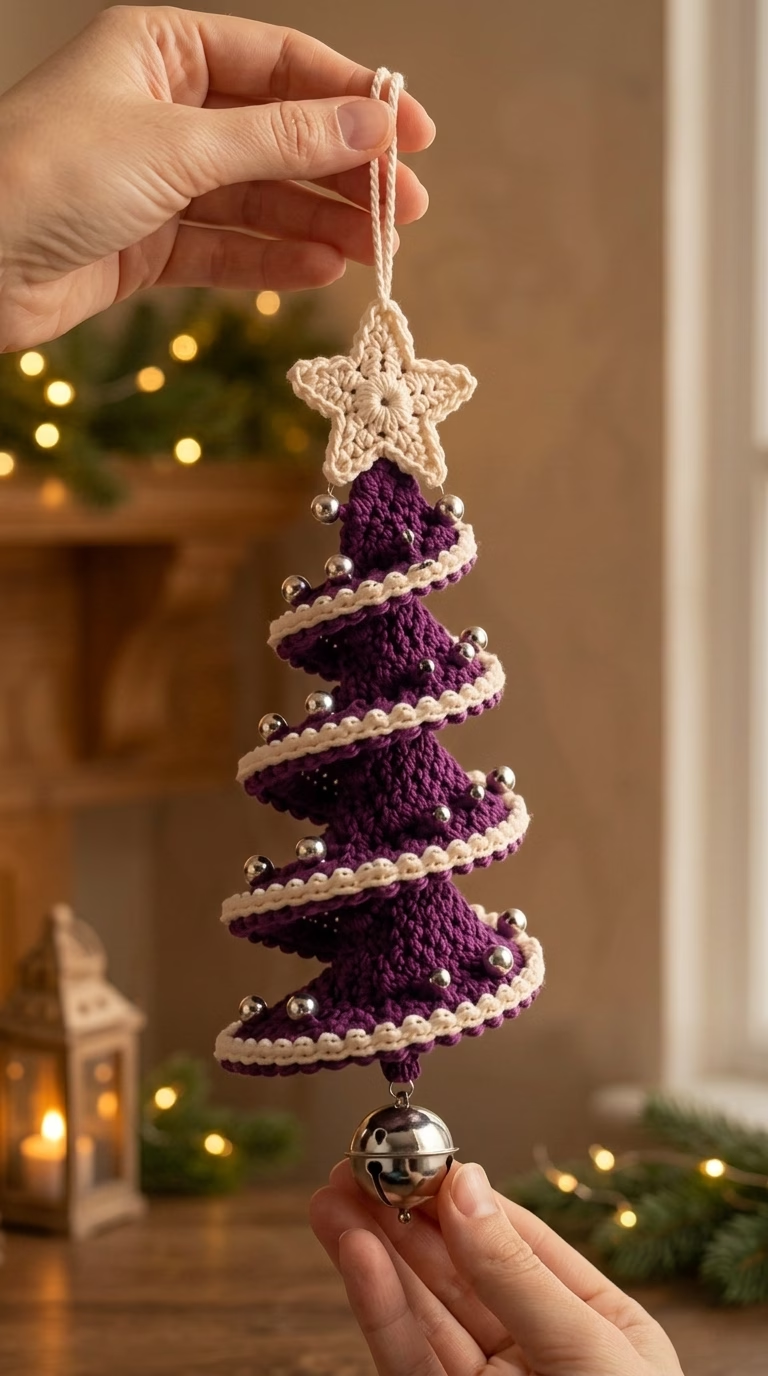
Crocheting festive decorations for the holiday season brings creativity and warmth to your home. This unique project makes a small spiral Christmas tree ornament designed to add whimsical charm to your tree, presents, or holiday décor. The spiral tree features a bold purple core, a delicate white spiral that wraps gracefully around the tree, and a cute yellow star perched atop. The result is a three-dimensional, playful ornament that stands out from classic flat tree motifs and ball ornaments.
The vibrant color contrast between the purple cone and white spiral creates visual interest and depth, with just enough playfulness to catch the eye. The touch of gold or yellow in the star adds a classic festive note. Because this project uses basic amigurumi and spiral techniques, it’s soft to handle and lightweight, perfect for hanging on branches, adding to wreaths, or tying onto seasonal gifts. Crocheters will enjoy experimenting with color combinations and perhaps even making a whole forest of spiral trees as part of their holiday traditions.
This crochet spiral Christmas tree ornament is not just a beautiful decoration; it’s also a perfect way to use up small yarn scraps and practice working in the round, increasing, and adding decorative spiral elements. It’s enchanting, quick to make, and easily personalized, making it a great project for both personal use and holiday gifting.
Project Overview
This ornament is constructed in three parts: a cone-shaped tree body worked in spiral rounds, a separate spiral band crocheted and sewn onto the tree, and a small star topper crocheted separately and attached last. The cone is formed by increasing in the round from the tip to the base. The spiral garland effect is achieved by crocheting a chain or thin band and sewing it around the tree as you spiral down. The star is made with flat rounds and slight shaping, then sewn neatly to the tip. The hanging loop is then attached to the top, just above the star.
Skill Level
Advanced Beginner to Intermediate. The pattern is suitable for crocheters comfortable with working in the round, increasing, and decreasing, as well as joining separate pieces. The spiral technique requires careful placement for best visual effect, and the star includes some shaped stitches.
Materials
- DK (Light Worsted/#3) weight yarn in three colors:
- Purple (tree body): approx. 20g
- White (spiral band): approx. 4g
- Yellow or gold (star): small scrap, approx. 2g
- 3.5 mm (E) crochet hook
- Tapestry/yarn needle
- Sharp scissors
- Stitch markers (to mark beginning of rounds)
- Small amount of fiberfill stuffing
- Optional: thin wire (for shaping spiral band)
Finished Size
- Height (with star and loop): approx. 13 cm (5 in)
- Base diameter: approx. 6.5 cm (2.5 in)
To adjust the size, use thicker or thinner yarn and a corresponding hook size. Increasing or decreasing the number of rounds in the cone will result in a taller or shorter tree.
Gauge
Gauge is not critical for this ornament, but for reference: 10 sc x 10 rows = approx. 5 x 5 cm (2 in). A tighter gauge is preferable to keep stuffing and shape neat. Small gauge differences will slightly affect the size of your ornament.
Stitches and Abbreviations
- ch – chain
- sl st – slip stitch
- sc – single crochet
- hdc – half double crochet
- dc – double crochet
- inc – increase (2 sc in same stitch)
- dec – decrease (sc 2 together)
- st/sts – stitch/stitches
- MR – magic ring
Important Pattern Notes
- The tree and star are worked in continuous spirals; use a stitch marker to mark the first st of each round.
- Chains do not count as stitches unless specified.
- Change colors cleanly: finish the last stitch of the round before a color change with the new color.
- Keep the right side (RS) facing out throughout.
- Spiral band can be crocheted flat then sewn, or attached as-you-go; see notes in the relevant section.
- Stuff the cone lightly as you go to retain shape but avoid overstuffing.
Detailed Crochet Pattern
Part 1: Cone-Shaped Tree Body (Purple)
- Round 1: Using purple, MR, ch 1, work 4 sc into the ring. Pull tight. (4 sts)
- Round 2: [1 sc, 1 inc] x 2 (6 sts)
- Round 3: sc in each st around (6 sts)
- Round 4: [2 sc, 1 inc] x 2 (8 sts)
- Round 5: sc in each st around (8 sts)
- Round 6: [3 sc, 1 inc] x 2 (10 sts)
- Round 7: sc in each st around (10 sts)
- Round 8: [4 sc, 1 inc] x 2 (12 sts)
- Round 9: sc in each st around (12 sts)
- Round 10: [5 sc, 1 inc] x 2 (14 sts)
- Round 11: sc in each st around (14 sts)
- Round 12: [6 sc, 1 inc] x 2 (16 sts)
- Round 13: sc in each st around (16 sts)
- Round 14: [7 sc, 1 inc] x 2 (18 sts)
- Round 15: sc in each st around (18 sts)
- Round 16: [8 sc, 1 inc] x 2 (20 sts)
- Round 17: sc in each st around (20 sts)
- Round 18: [9 sc, 1 inc] x 2 (22 sts)
- Round 19: sc in each st around (22 sts)
- Round 20: [10 sc, 1 inc] x 2 (24 sts)
- Round 21: sc in each st around (24 sts)
- Round 22: [11 sc, 1 inc] x 2 (26 sts)
- Round 23: sc in each st around (26 sts)
- Round 24: [12 sc, 1 inc] x 2 (28 sts)
- Stuff the cone gently as you progress.
- Round 25: sc in each st around (28 sts)
- Round 26: [13 sc, 1 inc] x 2 (30 sts)
- Round 27: sc in each st around (30 sts)
- Round 28: [14 sc, 1 inc] x 2 (32 sts)
- Round 29: sc in each st around (32 sts)
- Round 30: [15 sc, 1 inc] x 2 (34 sts)
- Round 31: sc in each st around (34 sts)
- Finish stuffing lightly. Fasten off and use tail to close last round neatly.
Part 2: Spiral Garland Band (White)
-
Option A (Removable Spiral Band):
- With white, ch 80 (adjust length to fit around tree in a 4-5 tier spiral, depending on tension and ornament size).
- Turn, sl st in 2nd ch from hook and in each ch across (79 sl sts).
- Fasten off with a long tail for sewing.
-
Option B (Curly-Q Spiral Band):
- With white, ch 70 (length varies with tension and desired spiral effect).
- Turn, work 2 sl st in each ch across, to force the band to curl (139 sl sts).
- Fasten off, leave tail for sewing.
- Wrap the spiral band gently from the top of the cone downward, creating 4-5 even spirals. Pin as needed to check placement before sewing.
Part 3: Star Topper (Yellow)
- Round 1: With yellow/gold, MR, ch 1, 10 sc into ring, pull tight, sl st to join (10 sts).
- Round 2: (Star points): [ch 3, sl st in 2nd ch from hook, sc in next ch, sl st in next st of the ring] repeat around (creates 5 star points).
- Fasten off, leaving a tail for sewing.
Part 4: Assembly & Hanging Loop
- Use the long white tail to sew the spiral band gently onto the surface of the tree body, starting near the tip and spiraling down evenly. Take care to anchor only every 4-5 stitches so the spiral appears slightly raised. Adjust and pin as you go to maintain even spacing.
- Sew the star securely to the tip of the cone. Hide the thread ends neatly inside the tip.
- For the hanging loop: With white or a color of your choice, ch 16, sl st to first ch to form a loop, fasten off. Sew the loop behind the star, anchoring very securely.
Assembly and Finishing
- Weave in all loose ends with a tapestry needle, hiding them inside the body for a neat finish.
- Gently shape the cone and spiral; shape the star points by pinching slightly.
- If desired, lightly steam block the spiral band and star before sewing in place (avoid blocking the cone or it may lose its structure).
- Press the spiral so it rests evenly and symmetrically.
- Ensure the hanging loop sits directly above the center.
Customization Ideas
- Colors: Use green, teal, red, or metallic yarns for the tree body; silver, gold, or colorful yarn for the spiral; make the star in glitter boucle or metallic thread for extra sparkle.
- Sizes: Work with heavier worsted (#4) yarn and a 4.5 mm hook for a larger tree; use fingering weight for a tiny version.
- Uses: Attach to gifts, add to wreaths, string several on a garland, use as a table place setting, or mount to a card for a 3D holiday greeting.
- Other finishes: Add beads or sequins to the spiral, embroider decorations onto the cone, or stuff with scented fiberfill for a fragrant ornament.
Troubleshooting Tips
- Curling: If the cone shape flattens or twists, adjust stuffing or lightly shape by hand. Use slightly denser stitches for a sturdier base.
- Uneven Edges: If the spiral slips out of place, anchor more frequently with fine, invisible stitches.
- Size Issues: If your ornament feels too large or too small, adjust stitch counts when increasing, or change yarn/hook size for proportional scaling.
- Loose Color Changes: Always finish the last yarn-over of a stitch with the new color for neat transitions.
- Tension Problems: Work with a tight, even tension; if you notice gaps, switch to a smaller hook.
Care Instructions
Hand wash gently in cold water with mild soap. Squeeze out excess water without twisting. Reshape and air dry completely. Store flat or hanging. Avoid ironing as heat may deform synthetic fibers and amigurumi shapes.
Final Notes
Check your stitch counts at the end of each round to keep your cone shape even. Adjust tension as needed for best results, and use the project photo as a visual guide for how your spiral garland and star should be positioned. Remember, each ornament has its own charm, so enjoy the creativity as you crochet your own spiral holiday tree!