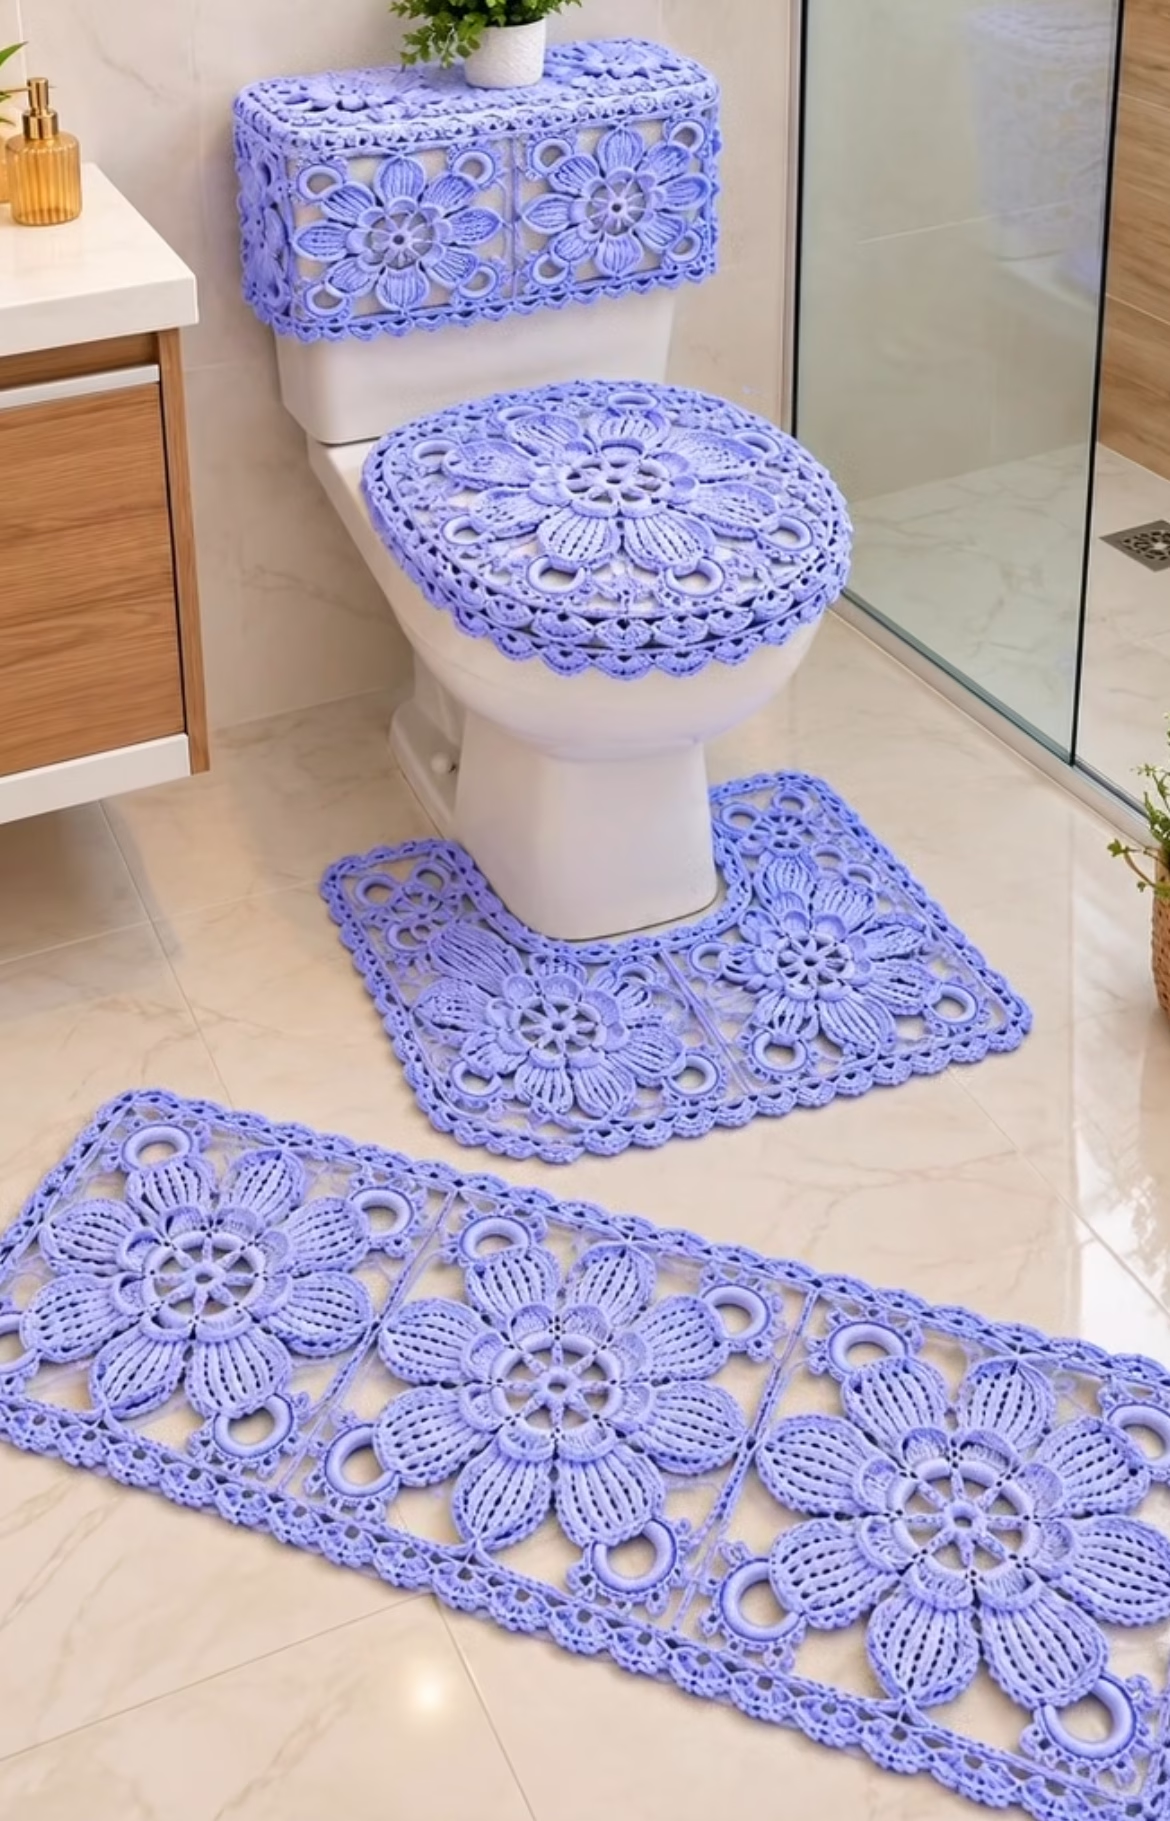
Transform your bathroom into a serene, elegant retreat with a crochet bathroom set that draws all eyes with its exquisite floral lace motifs. This set features beautifully detailed, square-shaped motifs worked in a lovely lavender yarn, joined into adaptable shapes to fit the tank topper, toilet seat cover, and the floor mats. The airy, openwork petals and layered lace edges create a light, fresh aesthetic, while rounded corners and picot trims add softness. Each motif is carefully joined to build rectangular and square mats that fit seamlessly around your fixtures, turning everyday bathroom essentials into works of art. This versatile set not only upgrades your decor but is also a rewarding exploration of texture, motif assembly, and lacy openwork technique.
With its inviting color and plush, dimensional florals, this project brightens small spaces, protects surfaces, and brings handmade grace to your daily routine. Its modular construction makes customization easy: add or subtract squares for the ideal fit or adapt the motifs for other home decor projects. Whether as a thoughtful housewarming gift or a personal indulgence, this set promises sophistication and long-lasting charm.
Project Overview
This bathroom set is composed of large, four-petaled floral square motifs joined into precise configurations: two motifs make the tank topper, three motifs for the long mat, and a single motif for the smaller mat. For the toilet seat cover, the motif is edged in rounded rows and shaped to fit. Each motif is crocheted in the round with petal and open ring detail, then joined to create the final rectangles and squares. The set is completed with a lacy border around each finished piece. Assembly involves crocheting individual motifs, joining with slip stitches or single crochet, then adding additional border rounds as needed for shape and stability. This modular approach makes it easy to adjust for different bathroom dimensions.
Skill Level
Intermediate. This project requires confident familiarity with working in the round, cluster and picot stitches, creating openwork/petal effects, joining motifs during or after crochet, and working shaped edging. Some blocking and assembling skills are needed to achieve professional results.
Materials
- Worsted weight (Category 4) cotton or cotton-blend yarn in lavender (approx. 600–800g total):
- Tank topper: 150g
- Toilet seat cover: 150g
- Small mat: 120g
- Rectangular mat: 220g
- Size H/8 (5.0 mm) crochet hook (or hook size required for gauge)
- Tapestry needle for weaving in ends
- Sharp scissors
- Stitch markers (especially helpful for border shaping)
- Measuring tape
- Optional: Non-slip matting for placement under mats
- Optional: Blocking pins and a blocking board
Finished Size
- Finished motif (1 square): Approx. 27 x 27 cm (10.5 x 10.5 in)
- Tank topper (2 motifs joined): 54 x 27 cm (21 x 10.5 in)
- Long mat (3 motifs): 81 x 27 cm (32 x 10.5 in)
- Small mat (1 motif): 27 x 27 cm (10.5 x 10.5 in)
- Toilet seat cover: Adjustable, stretches to fit a standard elongated seat (approx. 45 x 38 cm / 17.5 x 15 in)
To customize, add or remove motifs. Adjust border rounds for slightly larger or smaller mats.
Gauge
1 finished square motif = approx. 27 x 27 cm (10.5 x 10.5 in) after gentle blocking.
If your motifs are larger or smaller, adjust hook size accordingly. For fitted pieces (like the seat cover), check motif size before joining for best results.
Stitches and Abbreviations
- ch – chain
- sl st – slip stitch
- sc – single crochet
- hdc – half double crochet
- dc – double crochet
- tr – treble crochet
- dtr – double treble crochet
- MR – magic ring
- cl – cluster (see notes)
- picot – 3 ch, sl st in 1st ch
- inc – increase (2 sts in one st)
- dec – decrease (draw up a loop in each of next 2 sts, yo and draw through all loops)
Important Pattern Notes
- Ch-3 at the beginning of rounds counts as a dc unless otherwise stated.
- Rounds are joined with a sl st unless otherwise specified.
- Work with the right side facing at all times.
- Weave in ends securely after joining motifs and borders.
- Picot stitches add delicate detail; keep picots even for best effect.
- To join motifs, work through both the edge stitch of one motif and the corresponding stitch of the adjoining motif. See assembly notes.
- Use stitch markers for corners and edges, especially during border shaping.
- For the best finish, block motifs before joining to help them relax to square.
Detailed Crochet Pattern
Part 1: Floral Square Motif (make 7–8 for full set)
Each motif is worked in the round, starting from a central ring, with large layered petals separated by open ring details.
Central Ring
- Start with MR, ch 3 (counts as dc), 15 dc into ring (16 dc total). Pull MR closed. Join with sl st to top of ch-3.
(16 sts)
Petal Foundation
- Ch 1, *sc in next st, ch 3, skip st*; repeat around (should get 8 ch-sps). Join to first sc.
(8 ch-sps, 8 sc) - In each ch-sp, work: (sc, hdc, 5 dc, hdc, sc). Repeat for each petal. Join with sl st to first sc of round.
(8 petals formed)
Petal Expansion & Open Rings
- Sl st to the third dc of adjacent petal, ch 10, sl st in third dc of next petal (forms open arch). Repeat for all petal spaces; you will have 8 large open arches around. Join last ch-arch with sl st.
- In each ch-10 arch: (sc, hdc, 8 dc, hdc, sc). Join with sl st.
After completing all arches, you should see flower radiating, each petal now larger. - Repeat previous round, but ch 12 for arches to layer a second round of petals if desired. In each arch: (sc, 2 hdc, 8 dc, 2 hdc, sc).
- Fasten off and weave in center tail securely on the back.
Motif Corners and Square Up
- With right side facing, join yarn with sl st at top of petal. Ch 6, sl st to peak of next petal (repeat) – you will make 8 corner arches. In every even-numbered arch, ch 6 + dc in base to form pronounced corners. End with sl st.
- Next round, work in each corner arch: (sc, hdc, 3 dc, hdc, sc, ch 3 for picot, sc, hdc, 3 dc, hdc, sc); in side arches: (sc, 2 dc, sc, picot). This further squares the motif. Join with sl st, fasten off.
Part 2: Joining Motifs
- Block motifs gently to exact size if desired.
- Lay motifs out in the needed set: one for the mat, two joined for tank, three for the larger mat, one for the seat cover.
- Join motifs with sc or sl st through both loops of each touching stitch along the sides. Join motifs after last border round or crochet together as you work the final border for a more seamless join.
Part 3: Finishing Borders
- After all motifs are joined to form the needed shapes, work a border in the round.
- Join yarn at any corner, Border Round 1: ch 1, sc evenly along sides, working (sc, ch 2, sc) in each corner. Join with sl st.
- Border Round 2: *sc in next st, ch 3, skip 1 st* around; (sc, ch 3, sc) in each corner. Join.
- Border Round 3 (optional): Add picots for a more lacy look: (sc in next st, picot) around, working (sc, ch 3, sc) in corners.
- Fasten off and weave in ends.
Part 4: Toilet Seat Cover Shaping
- Follow Floral Motif through petal expansion, then continue adding several rounds of sc border to reach the desired oval/rectangular shape, increasing at corners and sides as needed.
- For back edge, work short rows: mark the widest 2/3 of border, work extra rows of sc/hdc only along these sides to build a lip for seat hugging. Edge entire piece with a round of sl st or reverse sc.
- Add a final round of ch-3 loops with sc to form anchor loops for elastic if desired.
Part 5: Tank Topper and Mat Edging
- For tank topper and rectangular mats, ensure your motifs are joined lengthwise (2 in a row for the tank, 3 for long mat).
- Work around with the Finishing Border as above, adding extra dc stitches where squares meet to keep edge even—especially at join intersections.
- Block pieces lightly for square corners and crisp edges.
Assembly and Finishing
- Weave in all ends with a tapestry needle, pulling gently but securely along the wrong side of motifs.
- To install seat cover, use optional fine elastic threaded through anchor loops to help grip the seat underside if needed.
- For mats, lay on a flat surface and gently block with pins and steam (cotton only); do not overstretch.
- Optionally, sew a thin line of non-slip mesh on the back of mats for added bathroom safety.
- Keep motifs centered by aligning motif seams and checking mat edges stay perpendicular and straight.
Customization Ideas
- Experiment with white, pale pink, mint, or bold jewel-toned cotton for a different effect.
- Use bamboo, acrylic, or blended yarn for various texture and washability options.
- Join four or more motifs for a luxurious area rug, or reduce to single motif trivets or chair covers.
- Adapt the motifs for decorative towel toppers, bag panels, or a unique wall hanging.
- Simplify edging for a modern look, or add even more layers of petals for a maximalist touch.
Troubleshooting Tips
- If motifs curl, block with gentle steam and pin flat.
- Uneven edges may be straightened by careful blocking, or by adding extra sc in corners/joins.
- Finished motifs coming out too large: try a smaller hook, use lighter yarn, or tighten tension.
- Mats too small: add extra border rounds before joining or after finishing assembly.
- Loose color changes: drop and pick up yarn at the back, weaving in ends after each round.
- Uneven tension: Practice making clusters and picots with a relaxed grip to maintain consistency.
Care Instructions
- Hand or machine wash mats on gentle cycle in cool water with mild detergent.
- Reshape and lay flat to dry; avoid wringing.
- For best results, block after washing to restore motifs’ crispness.
- Avoid bleach and direct ironing on lace petals.
- Regularly shake out mats to keep dust from accumulating in the stitches.
Final Notes
Take time to count stitches between petals and corners for perfectly balanced motifs. Adjust your tension and border rounds to make all items fit neatly together. Reference the image while working for motif placement and floral detail consistency. The beauty of this set lies both in its elegant appearance and your creative touch—enjoy every step as it brings your bathroom to life in lace!