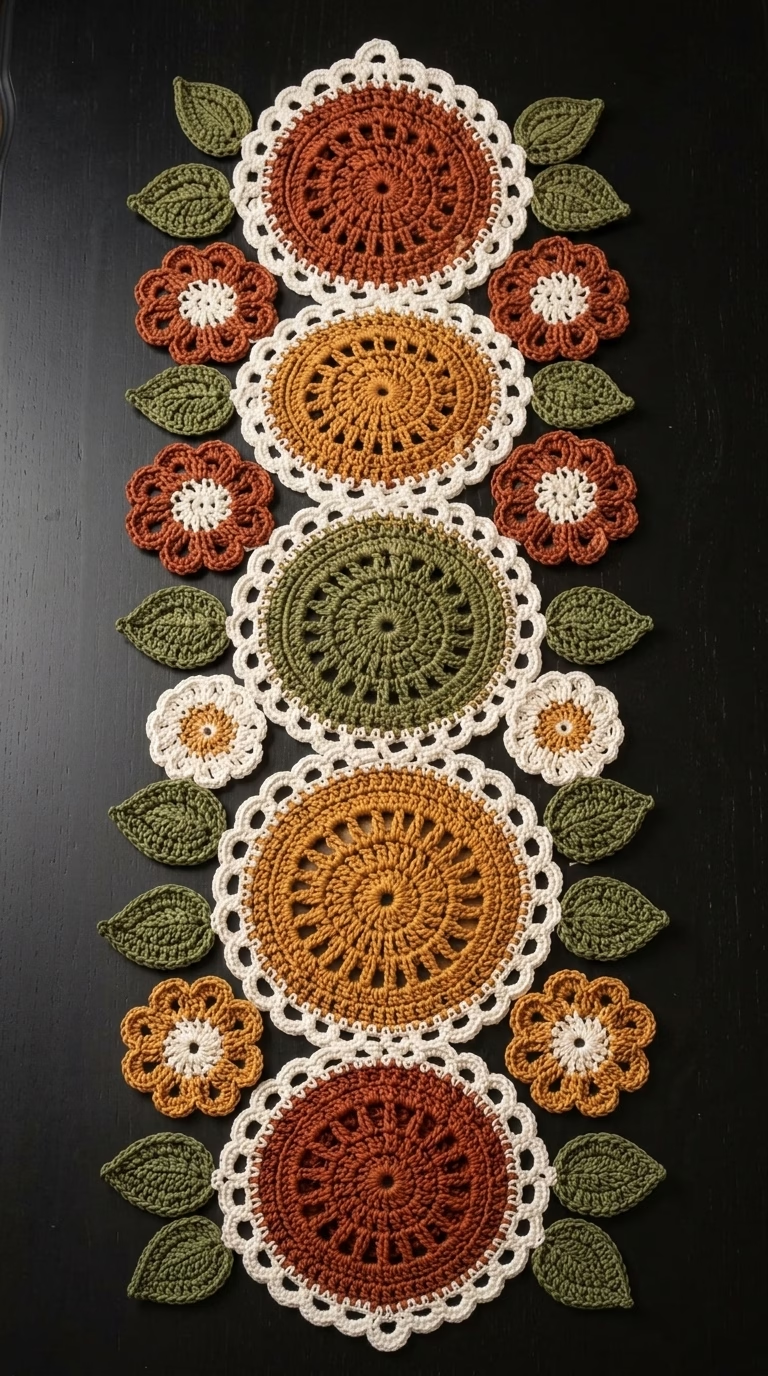
Invite the warmth of autumn and the cheer of sunflowers into your dining or coffee table with this vibrant crochet table runner. Featuring a repeating row of large, sunflower-inspired medallions in rich burnt orange, sage green, and golden yellow, this runner is framed with a delicate white lacy border, smaller flower motifs, and textured green leaves. The overall look is bold yet intricate, reminiscent of both vintage doilies and rustic farmhouse decor. The palette pairs beautifully with fall themes, but you can easily change the colors to match any season or occasion.
This crochet project creates an eye-catching centerpiece for entertaining, or just for brightening up your home year-round. The layered circular motifs interspersed with small flowers and leafy accents make it a feast of texture and color, perfect for showcasing on a wooden table or a sideboard. It’s also a fantastic project for practicing color changes, working motifs, and assembling multi-piece designs into a flattering composition. Whether you’re looking to challenge your crochet skills, gift a handmade treasure, or create a family heirloom, this table runner is as satisfying to make as it is to display.
Project Overview
The table runner is constructed from multiple motifs: five large central sunflower circles, twelve smaller flowers, and twenty-four leaves. Each motif is worked separately in the round (except the leaves, which are worked in rows), then arranged and joined by sewing. The motifs are bordered and arranged in straight alignment, with layered flowers and pairs of leaves adding a lush, organic feel. Assembly is finished with neat joining and weaving in of ends for a polished look.
Skill Level
Intermediate. This project is suitable for crocheters comfortable with working in the round, increasing and decreasing, managing color changes, and basic seaming. Some motifs use lacy elements and layering, which may be challenging for advanced beginners but provide great practice for intermediate crocheters. The pattern’s repetitive components also make it relaxing once you’ve mastered one motif.
Materials
- Worsted weight (category 4) cotton yarn in five colors:
- Main flower colors: Burnt orange (~90g), golden yellow (~90g), olive green (~90g)
- Accent/border color: Cream or white (~120g)
- Leaf color: Deep olive or sage green (~70g)
>
- 5.0 mm (H-8) crochet hook (use a 4.5 mm hook if you crochet loosely)
- Tapestry needle for weaving in ends and sewing motifs together
- Sharp scissors
- Stitch markers (optional, for marking rounds/joins)
- Blocking board and pins (optional but highly recommended for crisp motifs)
Finished Size
- Approximate finished length: 84 cm (33 inches)
- Width (at the widest, including leaves): 30 cm (12 inches)
To adjust the size, add or subtract central medallions, or only use a subset of the smaller motifs or leaves. Each large motif adds about 16 cm (6.3 in) to the length.
Gauge
Gauge is not critical, but to achieve a similar size, one large flower motif (including border) should measure about 16 cm (6.3 in) across. If significantly different, adjust your hook size or tension. Small gauge differences will only slightly alter finished size.
Stitches and Abbreviations
- ch – chain
- sl st – slip stitch
- sc – single crochet
- hdc – half double crochet
- dc – double crochet
- tr – treble (triple) crochet
- MR – magic ring
- inc – increase (2 sts in same st)
- dec – decrease (combine 2 sts into 1)
- st(s) – stitch(es)
- sp – space
- RS – right side
- WS – wrong side
Important Pattern Notes
- Ch 3 at start of dc and ch 4 at start of tr rounds always count as the first stitch unless otherwise noted.
- Rounds are closed with a slip stitch in the top of initial chain unless otherwise specified.
- Change colors between rounds; always finish the last yarn-over of the final stitch with the new color for a neat change.
- Motifs are worked with RS facing at all times.
- Use markers to mark the beginning of rounds, especially on larger motifs.
- Blocking motifs before joining helps them lay flat and neat.
Detailed Crochet Pattern
Part 1: Large Sunflower Circle Motifs (Make 5: 2 burnt orange, 2 golden yellow, 1 olive green)
With main flower color and a 5 mm hook:
- MR, ch 3 (counts as dc), 15 dc in ring. Tighten and join with sl st to top of ch-3. (16 dc)
- Ch 3, dc in same st, 2 dc in each st around. Join. (32 dc)
- Ch 3, *dc in next st, 2 dc in next st; rep from * around. Join. (48 dc)
- Ch 3, dc in next 2 sts, 2 dc in next st; rep around. Join. (64 dc)
- Change to white/cream. Ch 1, *sc in next 3 sts, ch 2, skip 1 st; rep from * around. Join. (16 ch-2 sps)
- Sl st into first ch-2 sp, ch 4 (counts as tr), 3 tr in same sp, *sl st in next ch-2 sp, 4 tr in next ch-2 sp; rep from * around, ending with sl st in last ch-2 sp. Join to base of first ch-4. Fasten off. (8 tr groups, 8 sl sts)
(Motif should measure approx. 16 cm / 6.3 in across after blocking. Make 2 burnt orange, 2 golden yellow, 1 olive green.)
Part 2: Small Flowers (Make 4 burnt orange, 4 golden yellow, 4 white/cream)
With accent color for the center:
- MR, ch 1, 10 sc in ring, join to first sc. (10 sc)
- Change petal color. *(Ch 2, 3 dc in same st, ch 2, sl st in next st); rep from * around. (5 petals) Fasten off.
(Small flower should measure about 5.5 cm / 2.2 in across after blocking.)
Part 3: Leaves (Make 24 in green)
With green:
- Ch 10, sc in 2nd ch from hook, hdc in next, dc in next 3 ch, tr in next 3 ch, 5 dc in last ch (turning point).
- Working on opposite side: tr in next 3 ch, dc in next 3 ch, hdc in next, sc in last. Fasten off, weave in ends.
(Each leaf should measure about 6 cm / 2.4 in long after blocking.)
Part 4: Motif Arrangement and Assembly
- Lay the five large sunflower motifs in a straight row, alternating colors as shown (orange, yellow, green, yellow, orange).
- With tapestry needle and matching yarn, neatly whipstitch or sew together motifs edge-to-edge, aligning the scalloped (tr group) edges.
- Position the small flowers in pairs along each gap between large motifs, alternating colors as shown; sew in place, catching only the back loops of outer petals to preserve texture.
- Attach two leaves per small flower (one left, one right), and one leaf at each tip of the row, sewing invisibly along the leaf stem to anchor them but not flatten their shape.
- Pin the finished runner to blocking board, steam block or dampen and allow to dry flat for ideal shape.
Assembly and Finishing
- Use invisible whipstitch (or your preferred method) to attach motifs with minimal show on the right side.
- To keep the runner straight, lay pieces on a flat surface or blocking board during assembly.
- Weave in all loose yarn ends with a tapestry needle on the wrong side.
- Block runner gently: Pin flat, steam lightly, and let dry to crisp up petals, ripples, and scallops.
- Shaping is crucial for the round motifs and leaves to lay flat; if motifs curl, steam and reshape before final seaming.
Customization Ideas
- Change palette to bright summer (yellow, orange, jade, cream) or winter (reds, whites, ice blue).
- Try sport weight cotton for a more delicate, lacier result.
- Make a single flower with leaves for a bold coaster, pot holder (add backing), or appliqué for tote bags and pillows.
- Create a square by adding motifs on all sides and use as a centerpiece or small placemat.
- Stitch motifs edge-to-edge for a unique wall hanging or dresser scarf.
- Embellish with beads or embroidery in the center of each flower for special occasions.
Troubleshooting Tips
- Curling motifs: Loosen tension and block. Increase hook size if needed, especially on lacy scallops.
- Wavy, ruffled edges: Too many increases; double-check stitch counts at ends of rounds.
- Uneven motifs: Steam block each piece before assembly to standardize size and smooth out bumps.
- Loose color changes: Always pull through last yarn-over with new color. Fasten off and weave in carefully.
- Tension variances: Practice on a gauge swatch before making all motifs to keep consistency across pieces.
Care Instructions
- Hand wash the table runner gently in cold water with mild detergent.
- Lay flat to air dry. Do not wring or twist.
- If needed, lightly steam with an iron (do not press directly) to reshape and refresh motifs after washing.
Final Notes
Careful counting and consistent tension are key for motif projects like this. Always double-check your stitch counts at the end of each round, and block motifs before joining for best results. Use the original image as a general visual reference but feel free to improvise your own color choices and arrangement. Enjoy the process and let each motif showcase your unique handwork!