Introduction
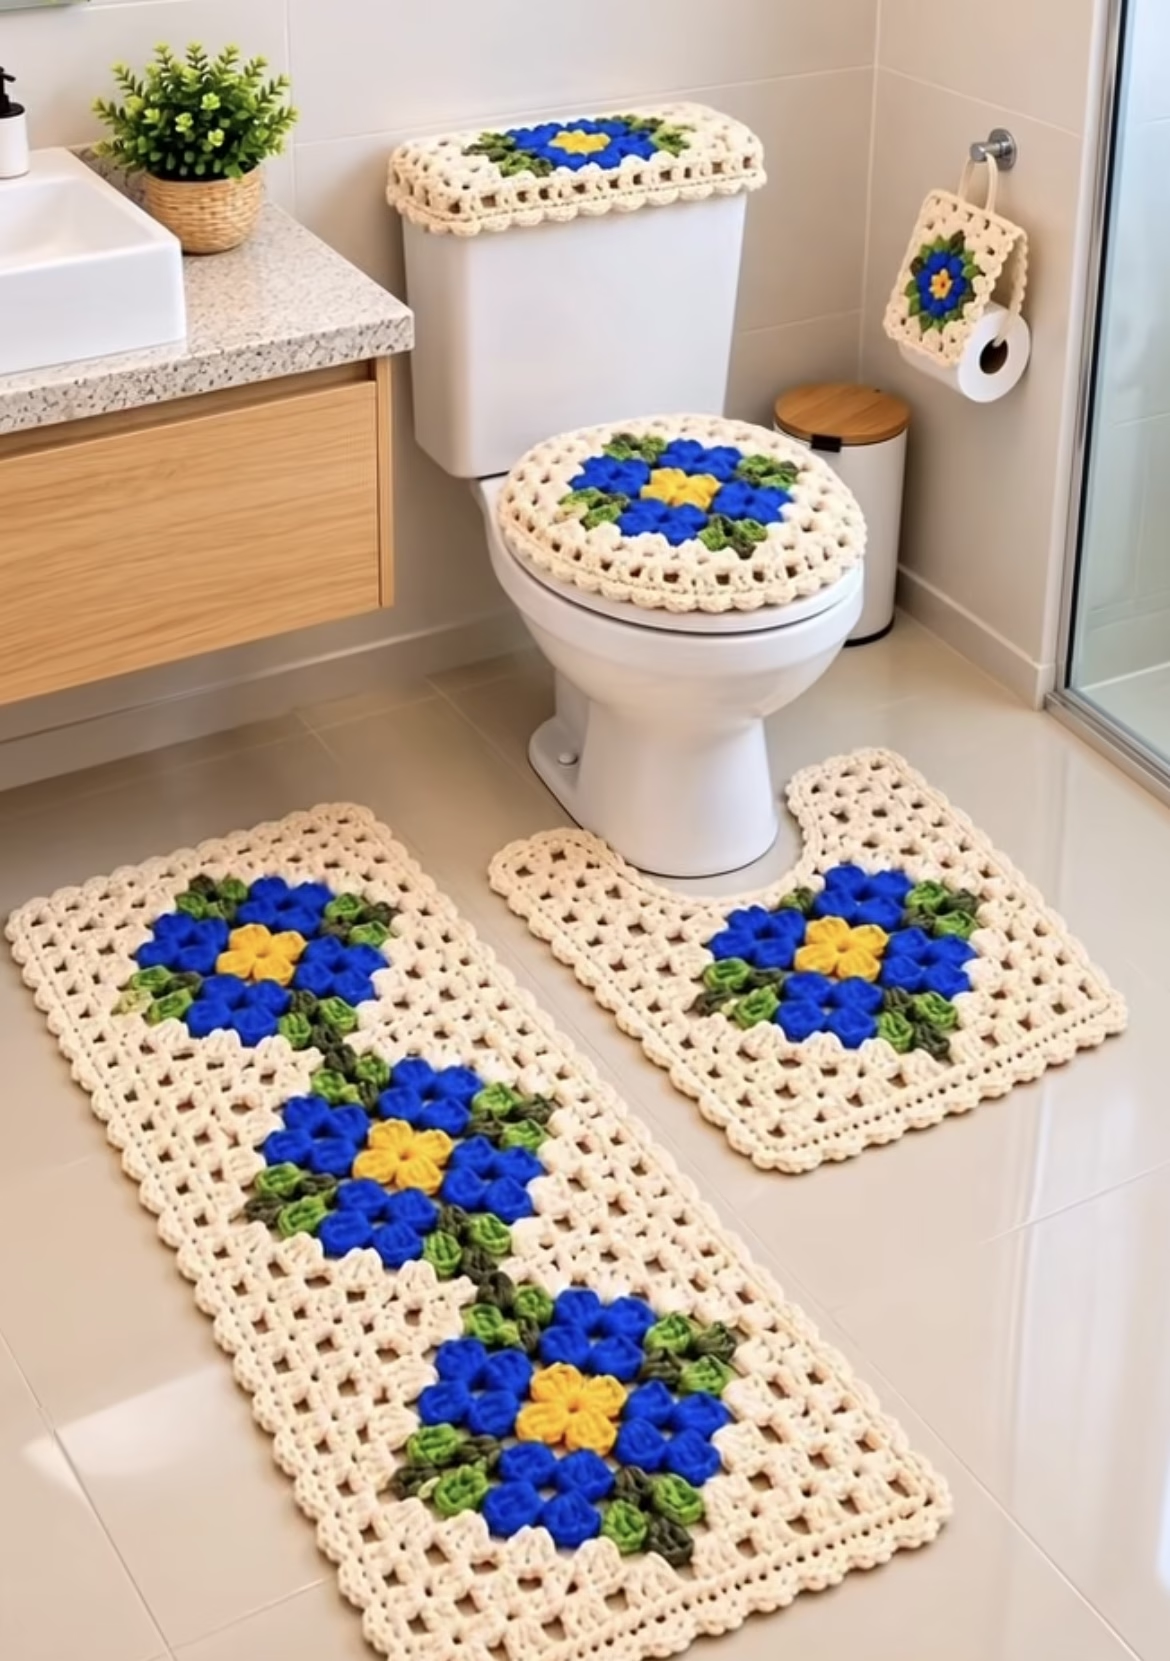
This striking crochet bathroom set instantly adds a burst of color and personality to any washroom. The set features cheerful blue and yellow flower motifs surrounded by soft cream granny square borders. The flowers are three-dimensional, almost popping out of the background, and are repeated throughout the large rectangular rug, the U-shaped mat, toilet lid and tank covers, as well as a charming matching toilet paper roll holder. The visual impact is bold yet delightful, and the texture is plush and cushioned, perfect for a cozy bathroom upgrade.
These pieces bring together classic granny square construction with 3D floral appliqués. Their vibrant visual appeal can brighten up neutral bathroom decor, making them ideal for spring, summer, or year-round cheer. This project is perfect for anyone looking for a satisfying, coordinated crochet makeover for their bathroom. Making this set offers a wonderful opportunity to practice colorwork, granny square techniques, and joining methods while creating practical yet beautiful home decor.
Project Overview
This bathroom set is composed of several distinct pieces: a rectangular runner rug, a U-shaped toilet base mat, a round or oval toilet seat cover, a rectangular tank lid cover, and a square hanging toilet paper roll holder. The core design element of each piece is a floral granny motif—a round bloom in yellow, blue, and green, seamlessly transitioning into a cream lacy border. The mats and covers are made by joining multiple granny floral motifs, then building out with granny rows or other simple crochet, and finishing with a decorative border. Pieces are either worked in rounds (for circles/ovals) or rows (for rectangles), with motif assembly required for multi-flower items.
Skill Level
Advanced Beginner to Intermediate: This pattern combines basic granny squares, 3D flowers, color changes, and joining motifs. The stitches themselves are mostly simple, but assembly, colorwork, and shaping keep it interesting. Some experience with granny squares and following multi-part patterns will be helpful.
Materials
- Worsted weight (category 4) yarn:
- Color A: Cream or Off-white (main border) – approx. 500g total
- Color B: Royal Blue (flower petals) – approx. 150g total
- Color C: Bright Yellow (flower center) – approx. 60g total
- Color D: Green (leaves) – approx. 80g total
- 5.0 mm (H-8) crochet hook (or size needed for gauge)
- Tapestry needle
- Scissors
- Stitch markers
- Measuring tape
- Sewing pins (optional, for assembly)
- Elastic cord (for toilet lid cover – optional for snug fit)
Finished Size
- Large rectangle rug: approx. 100 x 40 cm (39 x 16 in)
- U-shaped toilet mat: approx. 50 x 40 cm (20 x 16 in)
- Toilet seat cover: approx. 40 cm (16 in) diameter
- Tank lid cover: approx. 40 x 25 cm (16 x 10 in)
- Toilet paper holder: approx. 18 x 18 cm (7 x 7 in)
To adjust sizing, increase or decrease the number of motifs used or add/remove rounds to the borders as needed.
Gauge
Approximate gauge: 14 dc and 8 rows = 10 x 10 cm (4 x 4 in) in granny square pattern, using 5.0 mm hook. Your gauge may vary based on yarn and tension. Exact gauge is not critical unless you need specific sizing, but it may affect final dimensions and yarn usage.
Stitches and Abbreviations
- ch – chain
- st(s) – stitch(es)
- sl st – slip stitch
- sc – single crochet
- hdc – half double crochet
- dc – double crochet
- tr – treble crochet
- MR – magic ring
- inc – increase (2 sts in 1 st)
- dec – decrease
- sp – space
Important Pattern Notes
- Ch-3 at beginning of round/row counts as first dc unless otherwise specified.
- When joining motifs, work with right sides facing up.
- Use a neat join when changing colors—complete the last pull-through of previous st with the new color.
- Most granny squares are joined as-you-go, or can be whipstitched/seamed later.
- Use stitch markers to keep track of corner spaces on larger rounds.
- The flower motif is slightly raised for a three-dimensional look.
Detailed Crochet Pattern
Part 1: 3D Floral Granny Motif (Make as many as specified for each section below)
- Color C (yellow): flower center
- Color B (blue): petals
- Color D (green): leaves
- Color A (cream): granny square background
- Round 1 (Center – Yellow):
Begin with a MR, ch 2 (counts as first hdc), 11 hdc into ring (12 hdc). Join to top of beg ch-2 with sl st. Pull MR tight. Fasten off yellow. - Round 2 (Petals – Blue):
Attach blue to any st, *(ch 2, 2 dc, ch 2, sl st) in same st* – 1 petal.
Repeat in each hdc around for 12 petals. Join with sl st to base of first petal. Fasten off blue. - Round 3 (Leaves – Green):
Attach green behind any blue petal base, *ch 4, sl st in next petal base* around. (12 ch-4 loops behind petals).
In each ch-4 loop: (sl st, ch 1, 4 dc, ch 1, sl st) for a leaf. Repeat in every loop. Fasten off green. - Round 4 (Granny Square – Cream):
Attach cream to any space between leaves.
Ch 3 (counts as dc), 2 dc in same space, ch 2 (corner), 3 dc in next space, ch 1, *[3 dc, ch 2, 3 dc] in next space (corner), ch 1, [3 dc in next space, ch 1] twice* – repeat this sequence, placing corners at 4 points evenly around, and 3-dc groups (with ch 1 between) on the sides.
Join with sl st to top of beg ch-3. (You should have a 4-sided square motif.)
If needed, add another round of granny stitch (3 dc in each space, ch 2 at each corner) for larger squares. Fasten off and weave in all ends.
Note: Always ensure each motif is the same size; block if needed.
Part 2: Large Rectangle Rug (Main Floor Rug)
- Make 3 floral motifs as above.
- Layout & Join:
Lay motifs in a vertical row (long side). Use cream and whipstitch or sc join on the wrong side through the back loops only, making a strip of three connected motifs. - Granny Rows Around Strip:
Attach cream in any corner, ch 3 (counts as dc), 2 dc in same space, ch 2 (corner), 3 dc in next space along edge.
Along long sides: Work 3 dc in each space between groups from motif side; ch 1 between each set.
At short ends: (3 dc, ch 2, 3 dc) in corners, 3 dc in each space.
Continue working in rounds: Add 3-5 rounds of granny stitch around the entire piece, always placing (3 dc, ch 2, 3 dc) at corners, and 3 dc with ch 1 between on sides.
Adjust the number of rounds to reach desired size. Finish last round with sl st to join. Fasten off. - Border:
For decorative edging, work 1 round of sc in every st and ch-sp around in cream. Optionally, add a picot edge: *(sc, ch 2, sl st in first ch, sc) in each ch-1 space.* Fasten off and weave in ends.
Part 3: U-Shaped Toilet Mat
- Make 1 floral motif as above.
- Join Side Panels:
With cream, ch enough foundation chains for the mat width, matching the motif’s width (approx. 18-20 ch). Join with sc or sl st across one side of the motif (this forms base of the ‘U’).
Work rows of dc or granny stitch (3 dc, ch 1) until you reach length to match one side of the mat, then fasten off. Repeat for the other side, creating two rectangular panels attached to either side of the motif. (This creates the ‘U’ shape, motif centered in the arch.) - Shape Curve:
For the curve, attach cream at inside edge and sc around, increasing evenly at the inside curve.
Work at least 2 rows of sc or hdc around the entire mat, increasing at the curve to prevent puckering. Check fit around your toilet base for a custom fit. - Border:
Work a final decorative sc or picot edge in cream around the whole mat for a unified look.
Part 4: Toilet Seat Cover
- Make 1 floral motif as above.
- Expand Motif:
Attach cream in any corner and continue working in the round as for a granny square, but increase each round symmetrically to create a circle or oval shape. To achieve a round, work 3 dc in each space, with ch 2 at the 4 original corners. In subsequent rounds, replace the sharp-corner increases with evenly spaced 2-dc clusters along edges, shaping into a near-circle.
Continue until the piece is roughly the size of your toilet lid (approx. 40 cm or 16 in diam.). - Elastic Edging (Optional):
For a snug fit, work 1-2 rounds of sc around the edge, placing every 5-6th sc over a length of elastic cord as you go. Cut elastic to size for your lid, join ends and weave into the final round for stretch. - Border:
Add a round of decorative edging (picots or reverse sc) in cream.
Part 5: Tank Lid Cover
- Make 1 floral motif as above.
- Expand to Rectangle:
Work granny stitch rows/rounds in cream to create a rectangle matching your tank lid dimensions (approx. 40 x 25 cm / 16 x 10 in). Work extra granny rows on sides as needed to elongate. - Edge:
Add 1-2 rounds sc or picot edging in cream. At ends, work increases to avoid curling.
Part 6: Toilet Paper Holder
- Make 1 floral motif as above.
- Edging:
Work 2-3 more rounds of granny stitch in cream to achieve a 7 in (18 cm) square. - Make Strap:
With cream, ch enough for an 18 cm (7 in) strap. Row 1: sc in 2nd ch from hook and across. Rows 2-5: ch 1, turn, sc across. Fasten off, leaving long tail for sewing. - Attach:
Fold square and sew strap securely to top back corners, creating a handle for hanging. Weave in all ends.
Assembly and Finishing
- Joining Motifs: For rugs and mats, use whipstitch or sc join on wrong side with cream. Align motifs carefully and stitch using a tapestry needle.
- Weaving Ends: Use tapestry needle to weave in ends on the wrong side, tucking securely under stitches.
- Shaping/Blocking: Dampen finished pieces, lay flat to dry in correct shape, and pin corners for crisp edges.
- Tank/Seat Cover: If needed, add a round of elastic or ties to keep covers snug.
- Neat Motif Placement: Arrange motifs with right side up and consistently oriented for the neatest look.
Customization Ideas
- Swap blue for purple, red, or pink for a different flower vibe.
- Use variegated green for a lifelike leaf effect.
- Try cotton yarn for greater absorbency, or acrylic for durability.
- Make extra motifs and join for a pillow, tote bag, blanket square, or decorative wall hanging.
- Change border style—add scallops, shells, or a simple sc edge as desired.
- Make a single motif as a matching coaster or soap mat.
Troubleshooting Tips
- If your piece curls, increase more at corners during edging.
- If edges are uneven, block the piece damp and pin flat.
- If motifs are too small/large, change hook size or yarn weight.
- For loose joins, work seams tighter or sc join for firmness.
- Keep color changes tidy by always finishing the last st with the new color.
- Maintain even tension, especially on decorative borders.
Care Instructions
- Machine wash on gentle or hand wash as suits yarn fiber.
- Lay flat to dry for best shape and to protect 3D flowers.
- Do not bleach. Do not tumble dry on high heat.
Final Notes
Always double-check your stitch count at the end of each motif and round for accuracy. Adjust tension as needed to keep flower motifs consistent and borders straight. Use the photos as a visual guide for motif arrangement and color placement. With care and creativity, your finished bathroom set will be both stunning and practical!