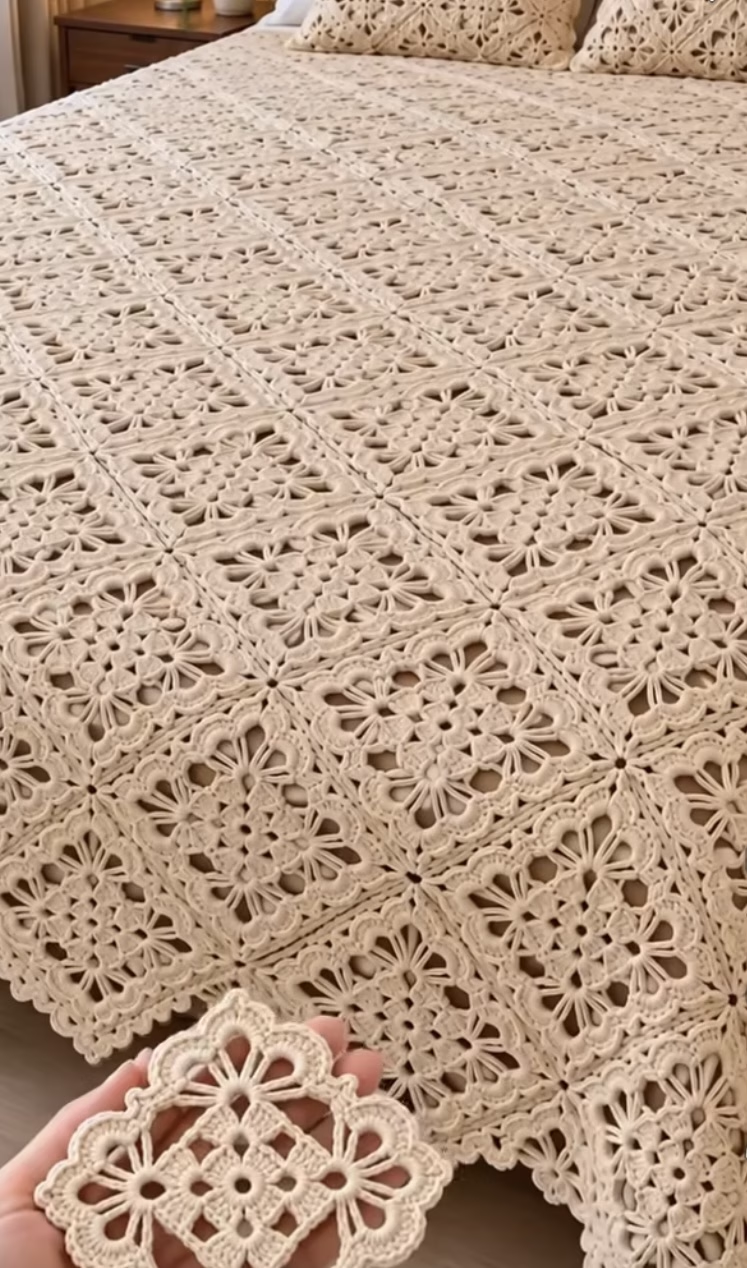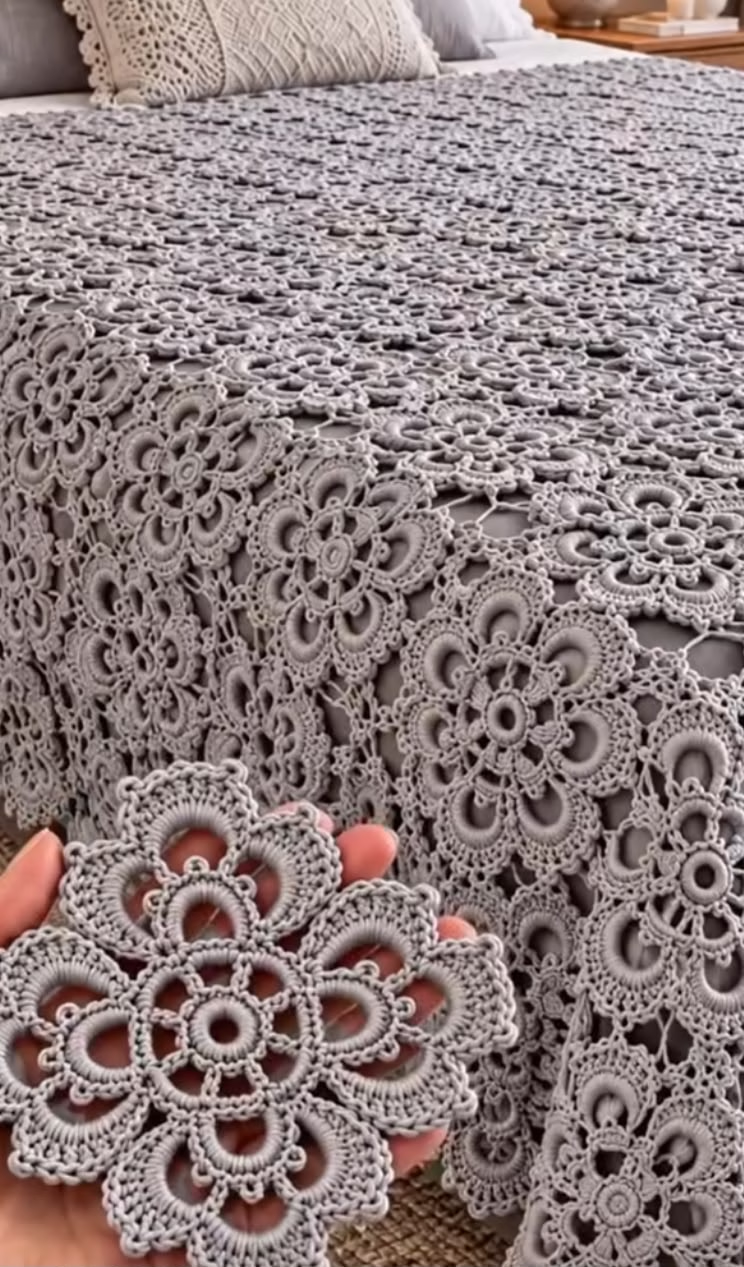
The visually striking piece displayed here is a breathtaking, vintage-style crochet bedspread composed of intricate, overlapping floral motifs. Each motif features a central openwork ring, radiating petals, and delicate scalloped edges, all joined seamlessly to create an elegant filigree of lace. The monochromatic silvery grey color enhances the timeless, sophisticated appearance, allowing the texture and detail of the motifs to shine without distraction. The piece exudes a sense of calm luxury, making it a showpiece for any bedroom.
This crochet bedspread isn’t just visually beautiful—it is impressively versatile. The open, lacy motifs create a lightweight yet substantial cover, ideal for layering over bedding, using as a throw, or even as a large decorative table cover. The inviting floral pattern and delicate negative space invite close inspection, making it as artful as it is functional. Constructing this project is both relaxing and rewarding, offering endless enjoyment as each motif connects to form an ever-growing expanse of lace.
Project Overview
This project is based on assembling identical lace motifs, worked in the round from the center outward. Each motif is joined to its neighbors during the final round using Join-As-You-Go (JAYGO) techniques, forming a seamless connection across the entire bedspread. The motifs are made individually, then attached in rows or as-you-go, creating a continuous effect without visible seams. A border can be added after joining all motifs for a finished look.
Skill Level
Intermediate. The pattern uses multiple techniques including magic rings, picots, clusters, and joining motifs in the final round. Intermediate experience (confident with basic stitches, working in the round, counting stitches, and following multipart instructions) is recommended.
Materials
- Yarn: Mercerized cotton thread, size 10, or fingering weight yarn for a slightly heavier result.
- Total Yardage: Approximately 1500–1800g (15–18 x 100g balls) for a queen-sized bedspread (adjust for desired size).
- Color: Pale grey (sample shown). Substitute desired color; 1 solid color recommended for maximum elegance.
- Crochet Hook: 1.75mm (US size 6/7 steel hook) or size needed for yarn/thread.
- Tapestry Needle: For weaving in ends and sewing any final tail joins.
- Scissors
- Stitch Markers (optional): For marking motif starting points or join locations.
- Blocking Supplies: Rustproof pins, blocking mat, and gentle spray bottle.
Finished Size
Each motif is approximately 13 cm (5 inches) in diameter after blocking.
Queen-size bedspread (measuring approx. 220 x 220 cm / 86 x 86 inches) requires about 17 motifs x 17 motifs = 289 motifs total. Adjust size by adding or subtracting motifs.
To customize: Make a swatch motif, measure it after blocking, then calculate how many are needed for your desired area.
Gauge
1 finished motif should measure approximately 13 cm (5 inches) across, after blocking.
Gauge is not critical, but slight changes will affect total bedspread size and yarn amounts. Make 1 motif and block before proceeding.
Stitches and Abbreviations
- ch – chain
- sl st – slip stitch
- sc – single crochet
- hdc – half double crochet
- dc – double crochet
- tr – treble crochet
- cl – cluster (see Special Stitches)
- picot – ch 3, sl st in third ch from hook
- MR – magic ring
- sp – space
- st – stitch
Important Pattern Notes
- Ch-3 at the beginning of a round counts as a dc unless specified otherwise.
- Work motifs in joined rounds. Fasten off at the end of each motif when making them individually.
- For Join-As-You-Go, in the last round, replace certain ch spaces with sl st into adjacent motif’s ch space (see assembly section for details).
- Right side faces you throughout unless otherwise noted.
- Weaving ends as you go is recommended, but final weaving is done after blocking and joining.
- Use stitch markers to keep track of motif centers or joining points if needed.
Detailed Crochet Pattern
Part 1: Center Ring
- Make an MR (magic ring). Ch 3 (counts as dc), 15 dc in ring. Join with sl st to top of starting ch-3. (16 dc)
- Ch 1, sc in same st, *ch 3, skip 1 dc, sc in next dc* repeat around (you will have 8 ch-3 spaces). Join with sl st to first sc. Fasten off if desired color change (if staying with one color, continue).
Part 2: Main Petal Rounds
- Join with sl st in any ch-3 sp.
*(Ch 3, 5 dc in same sp, ch 3, sl st in next ch-3 sp)* repeat in each ch-3 sp around. You will create 8 groups (petals) of 6 dc each, separated by ch-3 and sl sts. Join with sl st to base of beginning ch-3. - Sl st to top of first petal (into 3rd dc of petal). Ch 1. *Sc in same st, hdc in next dc, dc in next, tr in next, dc in next, hdc in next, sc in last dc (petal top). Ch 2, sl st in sl st between petals.* Repeat for each petal around. Join with sl st to first sc. (Petal shapes become more defined.)
Part 3: Petal Ridges & Small Picots
- Sl st to next tr at top of petal. *Ch 3 (counts as first dc), work 2 dc in same st, ch 3, sl st back into first ch (picot made), 2 dc in same st, dc in next dc, hdc in next, sc in next.* Sl st into ch-2 between petals, ch 2, sl st in next petal tr. Repeat around for a total of 8 ridged petals, each petal topped with a small picot. Join with sl st. Fasten off if desired.
Part 4: Outer Lace and Scallops
- Attach yarn in center top of any petal (in the picot). Ch 5 (counts as first tr and ch-1), tr in same picot, *ch 3, sc in base of the ch-2 sp between petals, ch 3, (tr, ch 1, tr) in next petal’s picot* repeat around. Join with sl st to 4th ch of starting ch-5.
- Sl st into next ch-1 sp between tr sts. Ch 1, (sc, hdc, dc, 5 tr, dc, hdc, sc) in sp (forms large scallop over petal). Ch 2, sc in next ch-3 sp over sc, ch 2, (sc, hdc, dc, 5 tr, dc, hdc, sc) in next ch-1 sp between tr on next petal. Repeat for all 8 petals. Join with sl st. Fasten off if making separate motifs. Leave last round open if joining as you go to other motifs.
Special Stitch – Cluster (cl):
Cluster used in some decorative options, but not required for basic motif. To work a dc cluster: [yo, insert hook in st, yo, pull up loop, yo, pull through 2 loops] repeat as needed, yo, pull through all loops.
Part 5: Join-As-You-Go Instructions
- For your first motif, complete all rounds. Fasten off and weave in ends.
- On subsequent motifs, work all rounds until the last round of large scallops (Part 4, Round 7 above). As you work the last round, align new motif next to an assembled motif. Instead of ch-2 between scallops, ch 1, sl st into adjacent motif’s corresponding ch-2 sp, ch 1, then continue in pattern. For corners (when four motifs meet), join into the common point of the adjacent three motifs for a seamless look.
Continue assembling motifs in row-by-row or diagonal layout, repeating join as you go for each motif, ensuring openwork aligns cleanly. Periodically lay flat to check alignment and tension.
Part 6: Optional Border
Once all motifs are joined and bedspread reaches desired dimensions, add a simple border:
- Attach thread to any point on outer edge. Ch 1, sc evenly around entire outer edge, placing an extra sc at any motif join for smooth transitions. Join with sl st.
- Work a round of small shell scallops: *(sc, hdc, 3 dc, hdc, sc) in next st, skip 2 sts* repeat around, adjusting spacing for corners and neatness.
Assembly and Finishing
- Block each motif as you finish (dampen, pin to shape, allow to dry)—this ensures uniformity.
- Weave in all thread tails securely with a tapestry needle, hiding them in motif backside.
- When joining, work on a flat surface to keep motifs from twisting or overstretching.
- After all motifs are joined, block the entire assembled bedspread for crisp edges and even drape.
- Take care to keep motifs straight—occasionally check alignment and gently tug motifs into shape as needed.
Customization Ideas
- Alternative Colors: Use classic white for a timeless lace look, or try ecru, blush, or soft blue for a different mood. Multicolor motifs can create a bohemian effect, but a single color maintains an elegant, unified result.
- Different Yarn Weights: Use thicker yarn and a larger hook for a cozier, warmer throw, or fine thread for more delicate lace. Adjust motif and total bedspread size accordingly.
- Other Uses: Make motifs individually as coasters or placemats, or join a small number for a table runner, wall hanging, pillow cover, bag panel, or window covering. Frame a motif for a unique piece of art.
- Edging Variation: Add a more elaborate lace border or fringe if desired.
Troubleshooting Tips
- Curling Motifs: Make sure you’re not pulling your stitches too tight, especially the chains and joining stitches. Block motifs thoroughly.
- Uneven Edges: Count your stitches carefully on each petal and motif side. Gently block to reshape.
- Motif Size Inconsistency: Try to keep your tension even, and always block motifs before joining.
- Loose Color Changes/Joins: Secure joins and pull end tails back into the fabric for tidy motifs. Use invisible joins if you fasten off between rounds.
- Gaps at Joins: Pin motifs carefully as you join, and be sure you connect in the same corresponding spot on adjacent motifs.
Care Instructions
- Hand wash your completed piece in cool water with gentle detergent.
- Do not wring; roll in a towel to remove excess water.
- Lay flat to dry, reshaping while damp for best results.
- If using mercerized cotton, you may gently iron on wrong side under a cloth if desired.
- Store folded flat to avoid stretching.
Final Notes
Pace yourself as you work through the motifs. Regularly count stitches, block motifs, and adjust tension if your piece is warping or growing unevenly. Refer to the original image throughout as a visual guide for motif shape, placement, and joins. With patience and attention to joining, your lace bedspread will become a treasured heirloom piece—enjoy each step of the process!