📖 B. INTRODUCTION
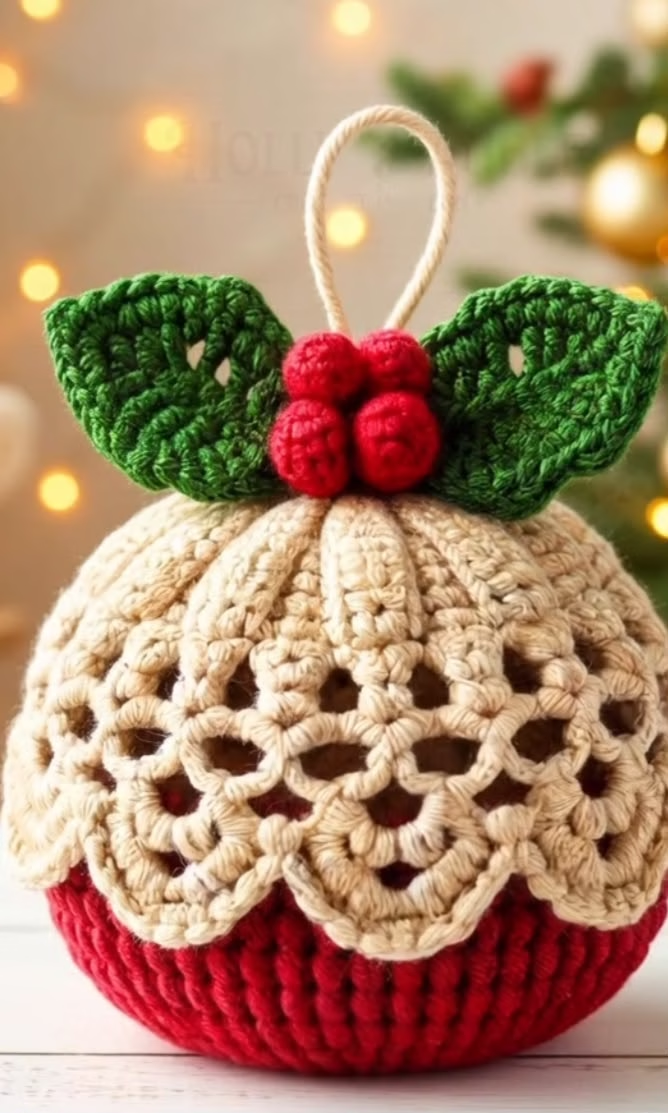
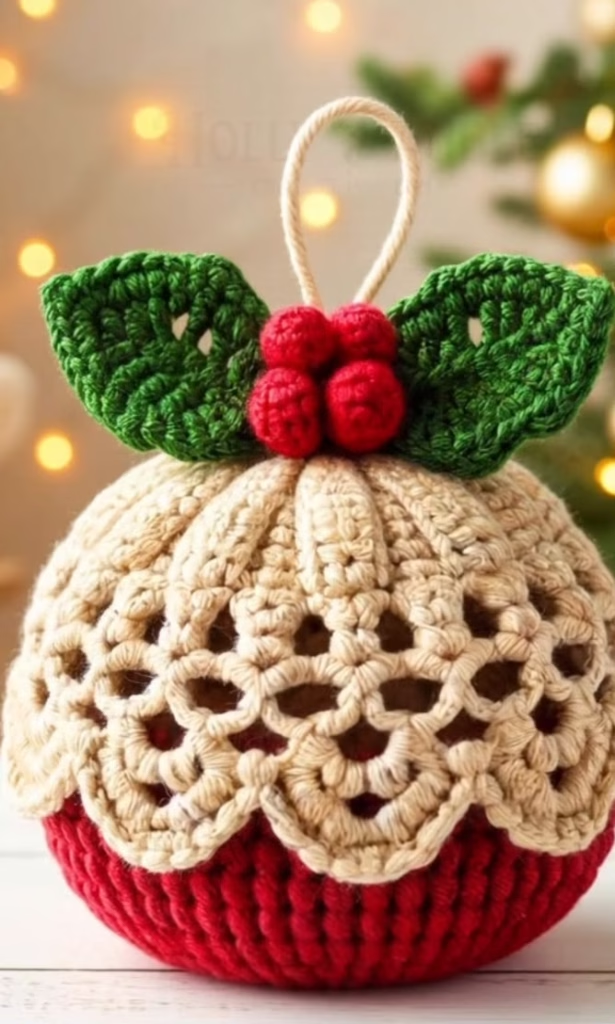
Bring classic festive charm to your holiday tree with this exquisite handmade Christmas pudding ornament. Featuring a rich crimson crocheted bauble base topped with a delicate cream sauce cap and a cluster of vibrant holly leaves and berries, this piece combines traditional Christmas nostalgia with refined amigurumi craftsmanship.
Crocheting seasonal ornaments is one of the most rewarding holiday traditions. Whether you are crafting a set to adorn your own tree, creating thoughtful handmade gifts for loved ones, or preparing inventory for holiday artisan markets, this Christmas pudding bauble offers a quick yet deeply satisfying project. Its classic color palette and textured openwork icing drip make it a standout piece among standard tree decorations.
The visual beauty of this ornament lies in its striking texture contrast: a tight, structural continuous-round base that holds its plush spherical shape, paired with an elegant, lace-inspired scalloped overlay that drapes effortlessly over the top half. Finished with glossy crimson berries and structured green holly leaves, every angle provides dimension and festive warmth.
This project is wonderfully adaptable. You can easily personalize your ornaments by experimenting with yarn fiber types (like mercerized cotton for crisp lace detail or soft acrylic for a fuzzy vintage look), adding subtle gold metallic thread to the icing trim, or inserting a tiny jingle bell inside the fiberfill stuffing for an interactive musical surprise.
🔍 C. MAIN PATTERN OVERVIEW
This project is constructed in modular components to ensure maximum visual impact and clean structural assembly:
- 🔴 Main Pudding Base: A stuffed, dense sphere worked in seamless continuous spiral single crochet to provide a firm, perfectly smooth crimson foundation.
- 🍦 Scalloped Drip Icing Cap: An openwork lace cover worked in joined rounds using double crochets, lace chain-arches, and picot-edged shell scallops that cascade over the top half of the base.
- 🍃 Holly Leaves: Two structured, textured green leaves worked in flat rows around a foundation chain with central treble stitches and pointed picot tips.
- 🍒 Holly Berries: Four tiny three-dimensional spheres in bright red that form a lush, clustered crown at the apex of the ornament.
- ➰ Hanging Loop: A neat, durable cord worked in natural twine or cream yarn for effortless display on tree branches or holiday garlands.
🎯 D. SKILL LEVEL
Skill Level: Easy to Intermediate
This pattern is ideal for confident beginners looking to expand their skills or intermediate crocheters seeking an enjoyable weekend holiday project.
Key Techniques Involved:
- 🧶 Working in continuous spirals (amigurumi method)
- ⭕ Magic Ring (Magic Circle) technique
- 📐 Standard increases and invisible decreases
- 🍦 Working in joined rounds with slip stitches and chain steps
- 🌿 Basic lace openwork, chain arches, and picot stitch points
- 🪡 Basic needle assembly, surface tacking, and fiberfill shaping
📏 E. FINISHED SIZE
- 📏 Diameter: Approximately 3.5 inches (9 cm) at the widest circumference.
- 📏 Height: Approximately 4.0 inches (10 cm) from the flat base to the top of the holly berries (excluding the hanging loop).
- 💡 Note on Sizing: Sizing will vary depending on your choice of yarn weight and hook size. Using lightweight yarn (Category 3 DK) with a 2.5 mm hook will yield a mini 2.5-inch bauble, while using bulky yarn with a 5.0 mm hook creates a large tabletop statement piece.
🧮 F. GAUGE
- 🧮 Gauge: 20 single crochet stitches and 22 rounds = 4 inches (10 cm) using a 3.5 mm (US E/4) hook in dense spiral work.
- 💡 Tension Guidance: Gauge is not critical for fit, but maintaining tight, even tension on the crimson base is essential so that the white polyester fiberfill does not show between stitches.
🧶 G. REQUIRED YARN AMOUNTS
All yardage estimates are based on worsted weight (Category 4) medium yarn:
- 🧵 Main Crimson Red (Pudding Base): Approx. 25 grams / 55 yards (50 meters)
- 🧵 Warm Cream / Oatmeal (Lace Icing Cap): Approx. 15 grams / 33 yards (30 meters)
- 🧵 Forest Green (Holly Leaves): Approx. 8 grams / 18 yards (16 meters)
- 🧵 Bright Berry Red (Holly Berries): Approx. 5 grams / 11 yards (10 meters)
- 📦 Total Project Yarn Requirement: Approx. 53 grams / 117 yards
🧰 H. MATERIALS
- 🪡 Crochet Hook: 3.5 mm (US E/4) or size needed to obtain dense gauge
- ☁️ Stuffing: Premium high-loft polyester fiberfill stuffing
- ✂️ Notions: Sharp yarn needle / tapestry needle with a large eye, sharp thread scissors
- 📍 Tools: Stitch marker, straight dressmaker pins for positioning assembly
- ➰ Hanging Cord: 10 inches of natural jute twine or leftover cream yarn
- ⚠️ Safety Note: Keep small parts, needles, and fiberfill out of reach of pets and infants. Ensure all berries and leaves are double-knotted and securely sewn.
🔤 I. ABBREVIATIONS – US TERMS
- 🔤 MR: Magic Ring (Magic Circle)
- 🔤 st(s): stitch(es)
- 🔤 ch: chain stitch
- 🔤 sl st: slip stitch
- 🔤 sc: single crochet
- 🔤 hdc: half double crochet
- 🔤 dc: double crochet
- 🔤 tr: treble (triple) crochet
- 🔤 inc: single crochet increase (2 sc in the same st)
- 🔤 dec: invisible single crochet decrease (sc 2 sts together)
- 🔤 BLO: back loop only
- 🔤 FLO: front loop only
- 🔤 picot: ch 3, sl st into the 1st ch of the chain
- 🔤 sk: skip
- 🔤 sp: space
- 🔤 rnd(s): round(s)
- 🔤 [ ]: repeat instructions within brackets as indicated
- 🔤 ( ): total stitch count at the end of the round
📝 J. NOTES BEFORE YOU BEGIN
- 🌀 Spiral Base vs. Joined Lace: The crimson pudding base is worked in a continuous spiral without joining at the end of rounds. Do not chain 1 or slip stitch unless explicitly directed. Use a stitch marker to track the first stitch of each round. The cream lace icing cap is worked in joined rounds.
- 🧵 Invisible Decreases: On the red pudding sphere, always use the invisible decrease technique (insert hook into FLO of next 2 sts, yarn over, pull through 2 loops, yarn over, pull through remaining 2 loops) for a smooth surface.
- ☁️ Stuffing Strategy: Stuff the base firmly, shaping it into an even sphere as you go. Top off the stuffing before closing Round 24.
- 🧵 Tail Lengths: Leave a generous 15-to-20-inch tail on the icing cap and a 12-inch tail on each holly leaf and berry for clean, effortless assembly.
🪡 K. COMPLETE PATTERN
🔴 MAIN PUDDING BASE
- Function: Main spherical body of the ornament
- Yarn Color: Main Crimson Red
- Quantity: Make 1
- Construction: Continuous spiral rounds from top to bottom
- R1: MR 6 sc. (6)
- R2: inc in each st around. (12)
- R3: [sc 1, inc] x6. (18)
- R4: [sc 2, inc] x6. (24)
- R5: [sc 3, inc] x6. (30)
- R6: [sc 4, inc] x6. (36)
- R7: [sc 5, inc] x6. (42)
- R8: [sc 6, inc] x6. (48)
- R9–R17: sc in each st around. (48 sts for 9 rounds)
- R18: [sc 6, dec] x6. (42)
- R19: [sc 5, dec] x6. (36)
- R20: [sc 4, dec] x6. (30)
- R21: [sc 3, dec] x6. (24)
- ☁️ Stuffing Note: Begin stuffing firmly with polyester fiberfill.
- R22: [sc 2, dec] x6. (18)
- R23: [sc 1, dec] x6. (12)
- ☁️ Stuffing Note: Add final bits of fiberfill to achieve a perfectly smooth, firm sphere.
- R24: dec x6. (6)
- 🧵 Fasten Off: Cut yarn, leaving an 8-inch tail. Thread yarn needle through the front loops of the remaining 6 stitches, pull tight to close the hole, tie off, and weave the end inside the sphere.
🍦 SCALLOPED DRIP ICING CAP
- Function: Decorative draped sauce overlay
- Yarn Color: Warm Cream / Oatmeal
- Quantity: Make 1
- Construction: Worked in joined rounds from crown outward
- R1: MR, ch 2 (counts as 1 dc), 11 dc into ring, sl st to top of starting ch-2 to join. (12 dc)
- R2: ch 2 (counts as dc), dc in same st, 2 dc in each st around, sl st to top of starting ch-2 to join. (24 dc)
- R3: ch 2 (counts as dc), 2 dc in next st, [1 dc in next st, 2 dc in next st] x11, sl st to top of starting ch-2 to join. (36 dc)
- R4: ch 2 (counts as dc), dc in next st, 2 dc in next st, [dc in next 2 sts, 2 dc in next st] x11, sl st to top of starting ch-2 to join. (48 dc)
- R5 (Openwork Spoke Round): ch 3 (counts as dc + ch-1 sp), sk next st, [dc in next st, ch 1, sk next st] x23, sl st to 2nd ch of starting ch-3 to join. (24 dc, 24 ch-1 spaces = 48 total sts/spaces)
- R6 (Arched Loop Round): ch 1, sc in same st, *ch 4, sk [ch-1 sp, 1 dc, ch-1 sp], sc in next dc; repeat from * around, ending with ch 4, sl st to first sc to join. (6 chain-4 arches, 6 sc)
- R7 (Dripping Scallop Shells with Picots): Working directly into each ch-4 space around:
- *[1 sc, 1 hdc, 2 dc, picot, 2 dc, 1 hdc, 1 sc] into ch-4 space, sl st into next sc; repeat from * around for all 6 arches. (6 scalloped icing drips)
- 🧵 Fasten Off: Leave a long 20-inch (50 cm) tail for sewing the cap onto the red pudding base.
🍃 HOLLY LEAVES
- Function: Foliage accents at top of ornament
- Yarn Color: Forest Green
- Quantity: Make 2
- Construction: Worked down both sides of a center foundation chain
- Foundation Chain: Ch 11.
- Rnd 1: Starting in 2nd ch from hook, work down the foundation chain:
- sl st in 2nd ch, sc in next ch, hdc in next ch, dc in next 2 ch, tr in next 2 ch, dc in next ch, hdc in next ch, [1 sc, ch 2 picot, 1 sc] all into the last ch (leaf point).
- Rotate piece to work along opposite side of foundation chain:
- hdc in next ch, dc in next ch, tr in next 2 ch, dc in next 2 ch, hdc in next ch, sc in next ch, sl st into starting loop.
- 🧵 Fasten Off: Cut yarn leaving a 12-inch tail for securing during assembly.
🍒 HOLLY BERRIES
- Function: Berry cluster accent at top
- Yarn Color: Bright Berry Red
- Quantity: Make 4
- Construction: Mini continuous spiral spheres
- R1: MR 5 sc. (5)
- R2: inc in each st around. (10)
- R3: sc in each st around. (10)
- R4: dec x5. (5)
- 🧵 Fasten Off: Cut yarn leaving an 8-inch tail. Push the initial starting tail inside the berry as light padding. Thread needle through FLO of remaining 5 sts, pull tight to cinch closed, and keep tail for sewing.
➰ HANGING LOOP
- Function: Attachment point for hanging on branches
- Material/Yarn: Cream yarn or natural jute twine
- Quantity: Make 1
- Attach cream yarn to center apex of Icing Cap (Round 1), ch 35, sl st into same center stitch. Fasten off securely and knot tail on underside. (Alternatively, thread a 10-inch piece of natural jute twine through center and tie a secure double knot inside).
🎨 L. STYLING / ASSEMBLY / STABILITY / FINAL SHAPING
📌 HEAD-TO-BODY ASSEMBLY & ALIGNMENT
- Center the Icing Cap: Place the Scalloped Drip Icing Cap (Component 2) directly over the top apex of the Crimson Pudding Base (Component 1). Pin Rnd 1 of the icing cap over Rnd 1 of the base.
- Secure the Cap: Using the long cream tail and yarn needle, make tiny, invisible tacking stitches through Rnd 4 of the icing cap into the red base to keep it centered.
- Shape the Drips: Smooth the 6 scalloped lace drips outward over the sphere curves. Pin each picot point gently against the base. Lightly tack the underside of each drip tip to the red base so the scallops stay contoured and flat against the curve.
🍃 HOLLY LEAF & BERRY PLACEMENT
- Leaf Arrangement: Position the two Forest Green Holly Leaves on top of the center icing cap in an asymmetrical “V” shape with stems meeting in the center apex. Pin in place.
- Stitch Leaves: Sew along the center stem line of each leaf using the green yarn tail, leaving the pointed leaf margins slightly free for realistic texture.
- Cluster Berries: Position the 4 Bright Red Holly Berries in a tight cluster directly over the leaf stem join in the center top. Sew each berry securely to the top of the leaves and icing cap, grouping them together tightly so they press against each other in a 3D mound.
⚖️ STABILITY & STRUCTURE
- Spherical Rolling: Once assembly is complete, gently roll the ornament between your palms using light pressure. This redistributes the inner polyester stuffing and eliminates any flat spots or lumps created during sewing.
- Firmness Check: Ensure the ornament maintains a sturdy, plump shape that won’t sag when hung by its loop.
📋 RECOMMENDED ASSEMBLY ORDER
- Complete Main Crimson Pudding Base and weave in end.
- Complete Cream Icing Cap and attach hanging loop to center apex.
- Pin and tack Icing Cap onto Pudding Base.
- Complete 2 Holly Leaves and 4 Holly Berries.
- Pin and stitch Holly Leaves over center apex.
- Attach Holly Berry cluster securely over leaf base.
- Conduct final shaping and palm-rolling.
✅ FINAL SHAPING & FINISHING CHECKLIST
- ✅ Base sphere is plump, firm, and completely symmetrical.
- ✅ Cream lace drips are evenly distributed around all sides.
- ✅ Hanging loop is firmly anchored in the center top.
- ✅ Holly leaves lie neatly angled with sharp picot tips.
- ✅ Holly berries form a secure, tight cluster over stem ends.
- ✅ All yarn tails are knotted securely and woven deeply into fiberfill interior.
💡 M. HELPFUL CROCHET TIPS
- 💡 Tip 1 (Prevent Gaps): Use a hook size 0.5 mm to 1.0 mm smaller than the yarn band recommends to ensure your amigurumi base stitches are tight and gap-free.
- 💡 Tip 2 (Crisp Picots): When making the leaf and drip picots, pull the slip stitch extra tight to make the decorative point sharp and defined.
- 💡 Tip 3 (Seamless Color Join): Keep color components separate; do not join yarn directly on the main body. Make each piece independently and assemble with yarn needles for a cleaner finish.
- 💡 Tip 4 (Invisible Sewing): When tacking the cream lace cap, insert the needle only through the back loops of the cream stitches so thread lines remain hidden on the surface.
- 💡 Tip 5 (Berry Stuffing): Small berries do not require synthetic stuffing; simply tuck the starting tail inside the micro-sphere before cinching it closed.
- 💡 Tip 6 (Steam Blocking Leaves): If your green holly leaves curl upwards, steam them lightly with an iron (holding iron 2 inches away) or wet block them flat before sewing.
🧼 N. CARE INSTRUCTIONS
- 🧼 Cleaning: Dust gently with a soft dry brush or lint roller. For minor spots, dabbing gently with a damp cloth and mild soapy water is recommended. Do not submerge completely in water.
- 🧼 Drying: Allow to air dry completely away from direct sunlight or radiant heat sources.
- 🧼 Off-Season Storage: Store inside a breathable cotton bag or sturdy ornament box during off-season months. Avoid compressing under heavy holiday storage totes to preserve 3D leaf and berry shapes.
❓ R. FAQ
- ❓ Q: Can I use double-knit (DK) or light worsted yarn instead?
- A: Yes! Using DK yarn with a 2.75 mm or 3.0 mm hook will produce a slightly smaller, delicate ornament measuring approximately 2.5 inches across—perfect for mini trees.
- ❓ Q: How can I make my holly leaves stand out flat instead of curling?
- A: Curl occurs if your foundation chain tension is too tight. Try using a hook one size larger for the foundation chain (ch 11), or steam-block the leaves flat prior to assembly.
- ❓ Q: Is this ornament safe for homes with toddlers or pets?
- A: Yes! Because this design uses 100% embroidered and crocheted soft elements with no plastic safety eyes or small metal wires, it is shatterproof and child-safe when all parts are sewn securely.
- ❓ Q: Can I use a real glass or plastic bauble inside instead of stuffing?
- A: Absolutely. You can slip a standard 70 mm or 80 mm clear plastic fillable bauble inside the red base before completing the final decrease rounds (R18–R24) for perfect spherical rigidity.
- ❓ Q: How long does it take to make one ornament?
- A: An experienced crocheter can complete one ornament in approximately 1.5 to 2 hours, making it an excellent weekend gift project.
Thank you for crafting this Christmas Pudding Ornament! Personalize your creations with subtle metallic accents or custom colors, and enjoy sharing your handmade holiday cheer!