📖 B. INTRODUCTION
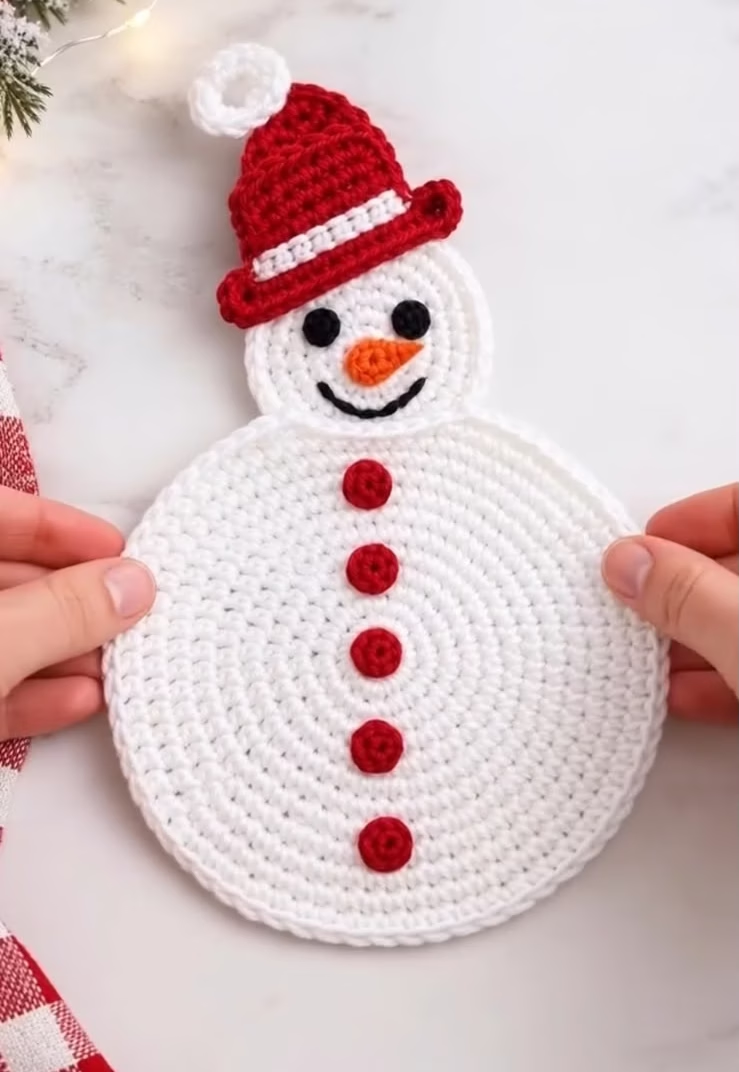
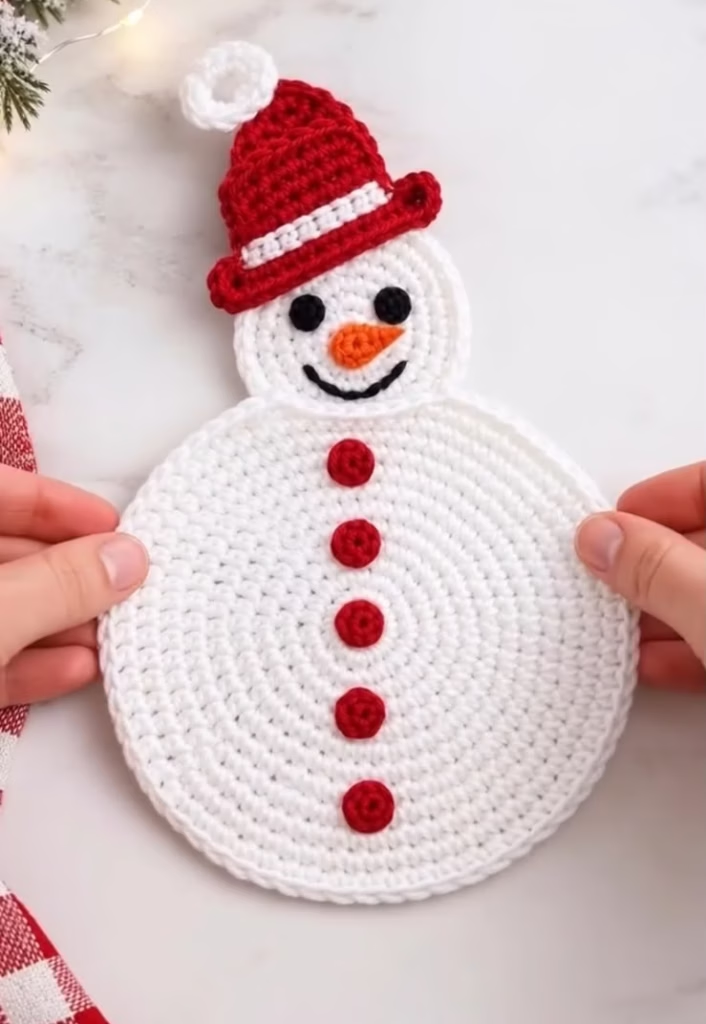
Bring a touch of whimsical handmade magic into your holiday home with this flat crochet snowman pattern! Designed as a versatile, lay-flat piece, this cheerful snowman works wonderfully as a festive place setting, trivet, large mug rug, wall hanging, or decorative holiday accent. Featuring a crisp snow-white circular body, a bright red Santa hat with white brim detailing, five bold red buttons, and a classic carrot nose, this piece captures all the nostalgia of winter snowman building without any melting.
Whether you are crafting for holiday craft fairs, decorating your dining table for Christmas dinner, or stitching thoughtful handmade gifts for loved ones, this project delivers quick satisfaction and high visual appeal. The flat circular construction makes it accessible for beginner and intermediate crocheters alike, while the modular assembly allows you to customize facial expressions and color accents.
Unlike bulky stuffed amigurumi, flat crochet home accents are exceptionally practical. They store easily year after year, pack flat for mailing in holiday cards, and lie perfectly against tables or walls. You can easily adjust the yarn weight and hook size to craft everything from tiny tree ornaments to full-sized table placemats!
This complete guide provides step-by-step instructions, precise stitch counts, yarn color guidelines, assembly tips, and finishing tricks so your final piece lays perfectly flat and looks published-ready. Grab your hook and festive yarn, and let’s get stitching!
🔍 C. MAIN PATTERN OVERVIEW
The festive snowman consists of a smooth, flat circular base constructed in two primary pieces: a large body circle and a smaller head circle. These components are joined together seamlessly along a shared edge to form a balanced, two-tiered silhouette.
The character details are worked separately and sewn flat onto the base:
- 🎅 Santa Hat: A tapered red cone with an integrated white accent row and extended red brim that rests securely on the head circle.
- ⭕ Hat Top Loop: A crisp white crocheted ring fixed to the hat peak, giving a clean modern twist on the classic pom-pom while providing an optional hanging loop.
- 🔴 Red Buttons: Five miniature circular appliques sewn vertically down the center line of the main body.
- 👀 Facial Features: Two solid black crocheted eye appliques, a tapered orange carrot nose applique, and a delicate hand-embroidered black smile.
🎯 D. SKILL LEVEL
Level: Easy / Advanced Beginner
This pattern requires basic crochet stitches worked both in continuous spiral rounds and in flat back-and-forth rows. It is ideal for crocheters comfortable with the magic ring and basic increases.
- 🌀 Techniques Involved:
- ⭕ Magic Ring (MR)
- 🧵 Single Crochet (sc)
- 📐 Half Double Crochet (hdc) and Double Crochet (dc)
- 📈 Single Crochet Increases (inc)
- 🔄 Working in continuous rounds & flat back-and-forth rows
- 🎨 Color changing (Red, White, Orange, Black)
- 🪡 Applique positioning, flat sewing, and surface embroidery
📏 E. FINISHED SIZE
- 📏 Width (Body Diameter): Approximately 8.5 inches (21.5 cm) at the widest point of the body circle.
- 📏 Height (Total Length): Approximately 14.5 inches (37 cm) from the top white hat loop down to the bottom edge of the body circle.
- 💡 Note on Size Variation: Finished size will vary if you change yarn weight or hook size. Using Category 4 worsted weight cotton yarn yields a sturdy 8.5″ wide mat, whereas Category 3 dk yarn with a 3.0 mm hook will produce a smaller coaster size.
🧮 F. GAUGE
- 🧮 Gauge Target: 18 sc x 20 rounds = 4 inches x 4 inches (10 cm x 10 cm) using a 3.5 mm (E-4) hook in single crochet worked in the round.
- 📌 Tension Note: Exact gauge is not strictly critical for this project, but consistent tight stitches are recommended so the circular circles stay flat without cupping (too tight) or ruffling (too loose).
🧶 G. REQUIRED YARN AMOUNTS
All estimates are based on standard Medium Worsted Weight (Category 4) yarn. Cotton yarn (such as Lily Sugar’n Cream or Paintbox Yarns Cotton Aran) is recommended for flat table mats.
- ⚪ Snow White (Main Body, Head, Hat Ring): approx. 95 yards / 52 grams
- 🔴 Bright Red (Santa Hat, 5 Buttons): approx. 35 yards / 20 grams
- 🟧 Bright Orange (Carrot Nose): approx. 5 yards / 3 grams
- 🖤 Jet Black (Eyes, Embroidered Smile): approx. 5 yards / 3 grams
- 🧶 Total Project Requirement: approx. 140 yards / 78 grams
🧰 H. MATERIALS
- 🪡 Crochet Hook: 3.5 mm (US Size E-4) aluminum or ergonomic hook
- 🧵 Yarn: Category 4 Medium Worsted Weight Cotton Yarn in White, Red, Orange, and Black
- 🪡 Tapestry / Yarn Needle: Blunt tip needle for sewing appliques and weaving in ends
- 📍 Stitch Markers: 1-2 locking stitch markers to mark the start of rounds
- ✂️ Scissors: Precision embroidery or yarn scissors
- 📌 Blocking Pins & Mat (Optional): Rust-proof pins and foam mat for final steam blocking
🔤 I. ABBREVIATIONS – US TERMS
- ⭕ MR: Magic Ring (Magic Circle)
- 🧵 st(s): Stitch(es)
- 🔗 ch: Chain stitch
- 💧 sl st: Slip stitch
- 🧱 sc: Single crochet
- 📐 hdc: Half double crochet
- 🏛️ dc: Double crochet
- 📈 inc: Single crochet increase (2 sc worked into the same stitch)
- 🔁 rep: Repeat
- 🔄 rnd(s): Round(s)
- ↔️ row(s): Row(s)
- 🧶 FO: Fasten off
- 🧵 BLO: Back Loop Only
- 🧵 FLO: Front Loop Only
📝 J. NOTES BEFORE YOU BEGIN
- 🌀 Spiral Rounds: The body and head circles are worked in continuous spiral rounds without joining at the end of each round. Do not chain 1 at the end of a round unless explicitly specified. Always place a stitch marker in the first stitch of each round.
- 📐 Maintaining Flat Circle Math: Each round increases standard circle geometry by 6 stitches. If you notice the circle cupping, loosen your tension slightly; if it begins to ripple or ruffle, ensure stitch counts are exact.
- 🪡 Tail Ends for Assembly: When fastening off components (eyes, nose, buttons, hat, head), leave long sewing tails (approx. 8–12 inches) to facilitate clean assembly without needing to join new yarn.
- 🎨 Color Transitions: When switching colors on flat rows (such as the Santa hat brim), perform the final yarn-over of the last stitch of the previous row using the new color.
🪡 K. COMPLETE PATTERN
⚪ Large Body Circle
Worked in continuous spiral rounds using Snow White yarn and 3.5 mm hook.
- 🌀 R1: MR 6 sc. (6)
- 🌀 R2: inc in each st around. (12)
- 🌀 R3: (1 sc, inc) x6. (18)
- 🌀 R4: (1 sc, inc, 1 sc) x6. (24)
- 🌀 R5: (3 sc, inc) x6. (30)
- 🌀 R6: (2 sc, inc, 2 sc) x6. (36)
- 🌀 R7: (5 sc, inc) x6. (42)
- 🌀 R8: (3 sc, inc, 3 sc) x6. (48)
- 🌀 R9: (7 sc, inc) x6. (54)
- 🌀 R10: (4 sc, inc, 4 sc) x6. (60)
- 🌀 R11: (9 sc, inc) x6. (66)
- 🌀 R12: (5 sc, inc, 5 sc) x6. (72)
- 🌀 R13: (11 sc, inc) x6. (78)
- 🌀 R14: (6 sc, inc, 6 sc) x6. (84)
- 🌀 R15: (13 sc, inc) x6. (90)
- 💧 Edging: sl st in next st, FO using seamless invisible join. Weave in starting tail securely.
🗣️ Head Circle
Worked in continuous spiral rounds using Snow White yarn and 3.5 mm hook.
- 🌀 R1: MR 6 sc. (6)
- 🌀 R2: inc in each st around. (12)
- 🌀 R3: (1 sc, inc) x6. (18)
- 🌀 R4: (1 sc, inc, 1 sc) x6. (24)
- 🌀 R5: (3 sc, inc) x6. (30)
- 🌀 R6: (2 sc, inc, 2 sc) x6. (36)
- 🌀 R7: (5 sc, inc) x6. (42)
- 💧 Edging: sl st in next st. FO leaving an 18-inch (45 cm) tail for joining to the body circle.
🎅 Santa Hat
Worked flat top-down in rows using Bright Red and Snow White yarn.
- 🧶 Start: With Bright Red yarn, ch 3.
- ↔️ Row 1: sc in 2nd ch from hook and next ch, turn. (2)
- ↔️ Row 2: Ch 1, inc in each st, turn. (4)
- ↔️ Row 3: Ch 1, sc in each st across, turn. (4)
- ↔️ Row 4: Ch 1, inc in 1st st, sc 2, inc in last st, turn. (6)
- ↔️ Row 5: Ch 1, sc in each st across, turn. (6)
- ↔️ Row 6: Ch 1, inc in 1st st, sc 4, inc in last st, turn. (8)
- ↔️️ Row 7: Ch 1, sc in each st across, turn. (8)
- ↔️ Row 8: Ch 1, inc in 1st st, sc 6, inc in last st, turn. (10)
- ↔️ Row 9: Ch 1, sc in each st across, turn. (10)
- ↔️ Row 10: Ch 1, inc in 1st st, sc 8, inc in last st, turn. (12)
- 🎨 Row 11 (White Accent Stripe): Switch to Snow White yarn on last yarn-over of Row 10. Ch 1, sc in each st across, turn. (12)
- 🎨 Row 12 (Hat Brim Base): Switch back to Bright Red yarn. Ch 1, 2 sc in 1st st, sc 10, 2 sc in last st, turn. (14)
- ↔️ Row 13 (Brim Edge): Ch 1, sc in each st across. (14)
- 💧 FO: Fasten off leaving a 14-inch (35 cm) red tail for attaching to the snowman head.
⭕ Hat Top Loop / Ring
Worked in the round using Snow White yarn.
- 🧶 Ch Ring: Ch 8, sl st to 1st ch to form a clean ring.
- 🌀 Rnd 1: Ch 1, work 12 sc directly into the ring loop, sl st to 1st sc to join. (12)
- 💧 FO: Fasten off leaving an 8-inch (20 cm) tail for attaching to the top peak of the red hat.
🔴 Red Buttons (Make 5)
Worked in small circular appliques using Bright Red yarn.
- 🌀 R1: MR 6 sc, sl st to 1st sc to join. (6)
- 💧 FO: Fasten off leaving an 8-inch (20 cm) tail for each button.
👀 Black Eyes (Make 2)
Worked in small circular appliques using Jet Black yarn.
- 🌀 R1: MR 6 sc, sl st to 1st sc to join. (6)
- 💧 FO: Fasten off leaving an 8-inch (20 cm) tail for each eye.
🥕 Carrot Nose
Worked flat in a small tapered triangle using Bright Orange yarn.
- 🧶 Start: Ch 5.
- ↔️ Row 1: Working down the chain starting from 2nd ch from hook: sl st in 1st ch, sc in next ch, hdc in next ch, dc in last ch. (4 sts)
- 💧 FO: Fasten off leaving a 10-inch (25 cm) tail for sewing.
🎨 L. STYLING / ASSEMBLY / STABILITY / FINAL SHAPING
📐 Head-to-Body Assembly
- 📍 Lay the Large Body Circle and Head Circle flat on a smooth surface with right sides facing up.
- 🪡 Overlay the bottom edge of the Head Circle over the top edge of the Body Circle by approximately 3 stitch rows (about 0.75 inches / 2 cm overlap).
- 🧵 Using the long white tail from the head and a tapestry needle, whipstitch the overlapping edges together securely along both the front and back for a clean, flush join.
🎅 Hat Attachment
- 📍 Position the Santa Hat over the top of the Head Circle so the red brim sits tilted slightly or straight across rounds 5–7 of the head circle.
- 🪡 Sew the bottom brim and red side edges down onto the head circle using the long red tail.
- ⭕ Position the white hat loop ring at the top point of the red hat peak and sew securely with the white tail.
👀 Facial Alignment & Features
- 📍 Eyes: Pin the two black circle eyes onto the head circle around Round 4, spaced about 4 stitches apart. Sew flat using black yarn tails.
- 📍 Carrot Nose: Position the orange carrot nose horizontally between and just below the eyes (pointing to the right, as shown in the original design). Sew along all edges.
- 👄 Embroidered Smile: Thread a needle with 18 inches of black yarn. Using a simple backstitch or stem stitch, embroider a curved, cheerful smile starting below the left eye and curving gently down to Round 2 before sweeping up beneath the right eye.
🔴 Button Alignment
- 📏 Position the 5 red button appliques in a straight vertical line down the central axis of the Large Body Circle.
- 📍 Space the buttons evenly starting from just below the head join line down to Round 3 of the body circle.
- 🪡 Sew each button securely in place, pulling the yarn tails to the back and weaving them in neatly.
🔢 Recommended Assembly Order
- ⚪ Join Head Circle to Large Body Circle.
- 🎅 Attach Santa Hat to top of Head Circle.
- ⭕ Attach White Loop to peak of Santa Hat.
- 👀 Sew Black Eyes onto Head Circle.
- 🥕 Sew Carrot Nose below Eyes.
- 👄 Embroider Black Smile below Nose.
- 🔴 Align and sew all 5 Red Buttons down the Body Circle.
- 🧵 Weave in all loose yarn ends on the back side of the piece.
✅ Final Shaping & Finishing Checklist
- ✅ Symmetry Check: Is the head centered relative to the body circle?
- ✅ Flatness Check: Does the mat lay completely flat without cupping at the center or waving along the outer rim?
- ✅ Facial Alignment: Are the eyes, nose, and smile balanced evenly?
- ✅ Button Spacing: Are all 5 red buttons arranged in a straight vertical line?
- ✅ Back Cleanliness: Are all loose ends securely knotted and woven into the back side?
- ✅ Steam Blocking (Optional): Pin the completed snowman flat on a blocking mat and steam lightly with an iron (holding iron 2 inches away, do not press directly) to set perfect circular edges.
💡 M. HELPFUL CROCHET TIPS
- 💡 Tip 1 (Preventing Oval Distortion): Staggering the increase locations on even-numbered rounds (as written in the pattern) prevents the white circles from developing hexagonal corners, ensuring perfectly smooth rounded edges.
- 💡 Tip 2 (Seamless Round Finish): Use an invisible join method on the last round of the body circle to eliminate a visible bump along the outer edge.
- 💡 Tip 3 (Flat Applique Attachment): When sewing the eyes, buttons, and nose, stitch through only the surface loops of the base circle to keep the back of your mat looking neat.
- 💡 Tip 4 (Yarn Choice Matters): Choose 100% worsted cotton yarn if planning to use this item as a coaster, mug rug, or warm trivet, as cotton resists heat and absorbs moisture far better than acrylic.
- 💡 Tip 5 (Neat Facial Embroidery): Outline your smile line using sewing pins first as a guide before stitching with black yarn.
- 💡 Tip 6 (Non-Slip Backing for Mats): If using as a table coaster or placemat, consider applying a few dots of washable fabric puff paint or silicone sealant to the back side to create a non-slip grip.
- 💡 Tip 7 (Hanging Option): The white ring at the top of the hat naturally doubles as a sturdy wall-hanging loop for hanging on hooks or Christmas tree branches.
🧼 N. CARE INSTRUCTIONS
- 🧼 Washing: Hand wash in cold water with mild laundry detergent. Do not wring or twist.
- 🧼 Drying: Roll the snowman gently between two dry towels to remove excess water, then reshape and lay flat on a dry towel to air dry completely.
- 🧼 Ironing & Steam: Steam lightly if necessary to re-flatten edges. Avoid direct iron contact if using acrylic yarn to prevent melting fibers.
- 🧼 Storage: Store flat in a dry box or drawer between holiday seasons to prevent creasing.
❓ R. FAQ
- ❓ Can I make this pattern larger or smaller?
- Yes! To make a larger placemat, continue the body circle increase pattern (e.g., R16:
(14 sc, inc) x6, R17:(7 sc, inc, 7 sc) x6) and add 2–3 rounds to the head. To make smaller tree ornaments, use DK/Sport weight yarn with a 2.5 mm hook.
- Yes! To make a larger placemat, continue the body circle increase pattern (e.g., R16:
- ❓ Why is my body circle cupping or turning into a bowl?
- Cupping occurs when stitches are too tight or rounds are missed. Try stepping up to a 4.0 mm hook or relaxing your tension slightly on the single crochet stitches.
- ❓ Can I use safety eyes instead of crocheted eyes?
- Crocheted eyes are recommended for a lay-flat coaster/mat. Safety eyes have plastic backings that create a protrusion on the back, preventing the piece from sitting flush on flat surfaces.
- ❓ What is the best way to attach the buttons in a straight line?
- Lay a ruler or piece of yarn vertically down the center of the body circle from the neck join to the bottom edge, using it as a central alignment line while pinning the buttons.
- ❓ Is this pattern suitable for complete beginners?
- Yes! If you know how to make a magic ring, single crochet, and increase, you can successfully complete this project.
- ❓ Can I turn this into a double-sided hot pad/trivet?
- Absolutely! Make a second white body and head circle without appliques, then place them back-to-back with the front piece and single crochet around the outer edges to join them into a thick, double-layer pad.