📖 B. INTRODUCTION
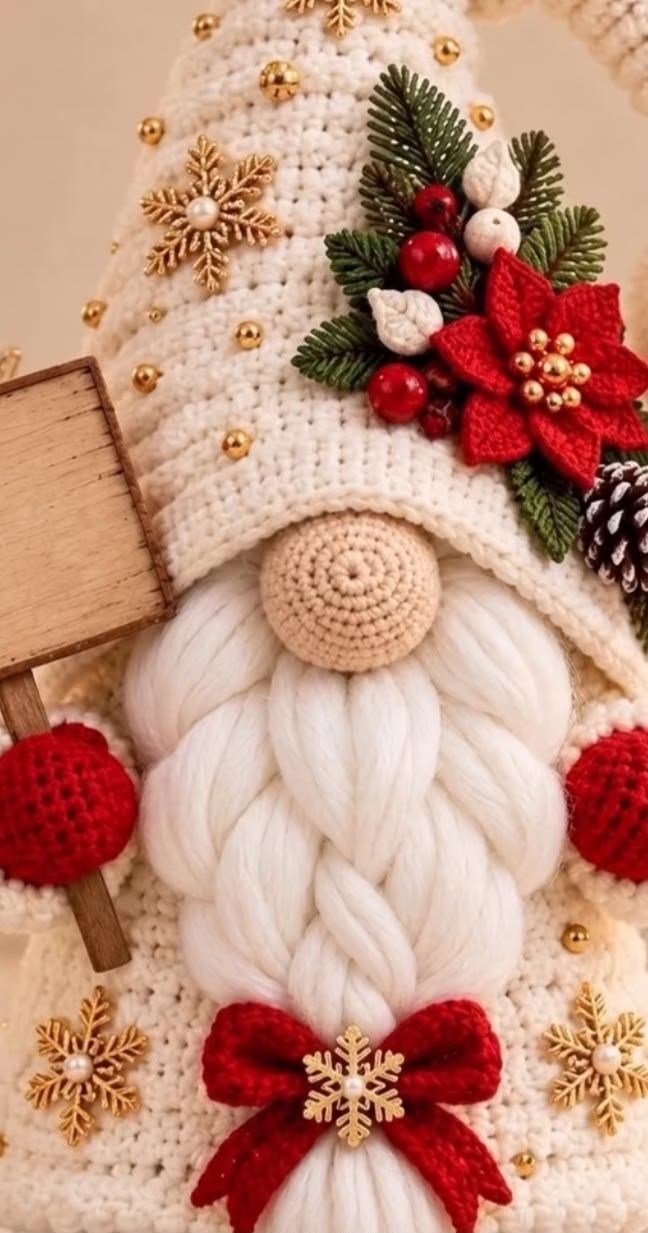
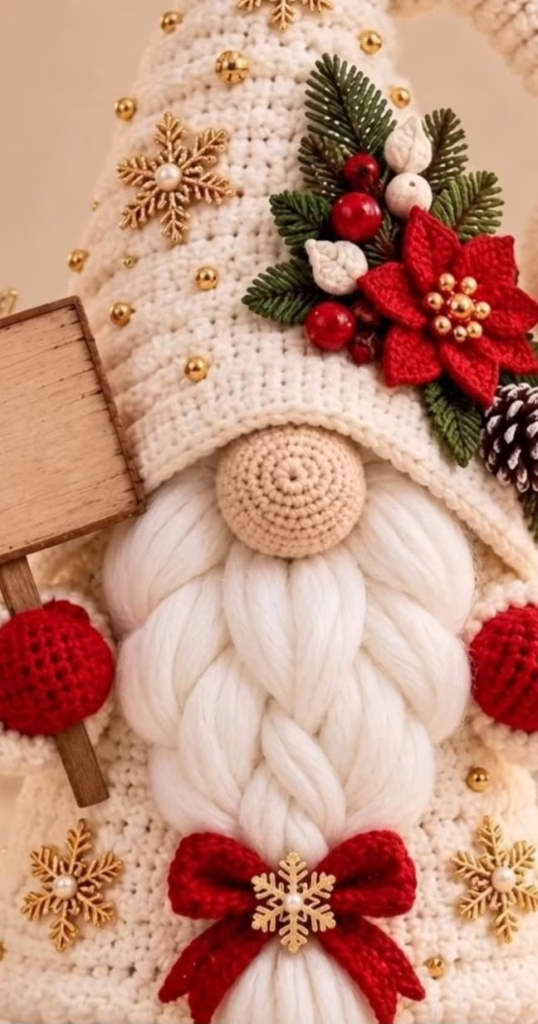
Welcome to the festive magic of holiday crafting with this elegant crochet gnome. This beautiful, textured centerpiece features a tall, slightly slouchy cream-colored hat beautifully adorned with golden snowflakes, a rich red poinsettia, and festive winter greenery. Designed to be a sturdy, freestanding decorative piece, this gnome brings an upscale, cozy charm to your mantelpiece, entryway, or holiday table.
Whether you are crocheting a striking seasonal decoration, a memorable holiday gift, or a magical winter keepsake, the details in this project make it a true standout. The magnificent, thick braided white beard contrasts perfectly with the bright red mitten hands, which are perfectly sized to hold a charming miniature wooden sign. A bright red bow sits at the bottom center of the beard, tying the traditional holiday color palette together.
One of the best parts of this design is its versatility. While the pattern uses a classic cream, rich red, and natural green aesthetic, you can easily swap the yarn colors to match your personal holiday decor. Grab your hook, and let’s create a stunning piece of holiday crafting magic.
🔍 C. MAIN PATTERN OVERVIEW
This pattern constructs a highly detailed, freestanding holiday gnome through a modular assembly process. The body and head are crocheted as a single, heavily stuffed cone base using a beautiful neutral cream yarn.
The tall, slightly curved hat is crocheted separately from the top down, allowing it to be pulled down snugly over the top of the body to create the classic eyeless gnome silhouette. A prominent, round peach nose is crocheted and sewn just below the hat brim.
The gnome’s magnificent braided beard is crafted using thick, bulky white roving yarn. Strands are attached directly to the body and woven into a thick, textured braid. Simple cream arms ending in red bulbous mittens are attached to the sides, positioned to hold a small wooden craft sign. Finally, the piece is brought to life with carefully placed embellishments: a crocheted red poinsettia with a golden center, faux pine sprigs, a red bow, and scattered gold beads and snowflakes.
🎯 D. SKILL LEVEL
Intermediate.
This pattern involves continuous rounds, shaping with increases and decreases, attaching hair/beard using larks-head knots, and detailed assembly.
- Working in the round (magic ring)
- Invisible decreases
- Basic sewing and amigurumi assembly
- Working with thick roving yarn for styling
📏 E. FINISHED SIZE
Height: Approximately 12 inches (30.5 cm) from the base to the folded tip of the hat.
Width: Approximately 5.5 inches (14 cm) across the base.
Note: Your finished size may vary depending on your chosen yarn weight, hook size, and stuffing density.
🧮 F. GAUGE
5 sc x 5 rows = 1 inch (2.5 cm) working in the round with worsted weight yarn and a 4.0mm hook.
For amigurumi, exact gauge is less critical than maintaining tight, consistent stitches. Ensure your stitches are dense enough that the polyfil stuffing does not show through the fabric.
🧶 G. REQUIRED YARN AMOUNTS
- Main Color (Cream/Off-White): Worsted weight (Category 4) — Approx. 150 yards (137 m) for the body, hat, and arms.
- Contrast Color 1 (Rich Red): Worsted weight (Category 4) — Approx. 40 yards (36 m) for the mittens, bow, and poinsettia.
- Contrast Color 2 (Peach/Light Beige): Worsted weight (Category 4) — Approx. 10 yards (9 m) for the nose.
- Beard Yarn (Bright White): Super Bulky / Roving Yarn (Category 6) — Approx. 30 yards (27 m) for the thick braided beard.
🧰 H. MATERIALS
- Crochet Hook: 4.0mm (G) for main components; 3.5mm (E) for the poinsettia and bow.
- Stuffing: High-quality polyester fiberfill.
- Base Weight (Optional): Poly-pellets inside a nylon stocking, or a flat heavy cardboard/plastic circle (4.5 inches in diameter) to keep the base flat and stable.
- Tapestry Needle: For sewing components together and weaving in ends.
- Stitch Markers: To track the beginning of continuous rounds.
- Scissors: Sharp craft scissors.
- Embellishments:
- Small gold bead pearls.
- Gold snowflake charms/buttons.
- Faux pine greenery, red berries, and miniature pinecones.
- A miniature wooden craft sign on a stick.
- Hot glue gun or fabric glue (for attaching non-yarn embellishments safely).
- ⚠️ Safety Note: This item contains small beads, faux berries, and charms which are choking hazards. It is intended for decorative purposes, not as a toy for small children or pets.
🔤 I. ABBREVIATIONS – US TERMS
- MR: Magic Ring
- ch: chain
- sc: single crochet
- hdc: half double crochet
- dc: double crochet
- tr: treble crochet
- inc: increase (2 sc in the same stitch)
- dec: invisible decrease (sc 2 together using front loops only)
- BLO: back loop only
- FLO: front loop only
- sl st: slip stitch
- st(s): stitch(es)
- (…): stitch count at the end of the round/row
- […] x#: repeat the instructions in brackets the specified number of times
📝 J. NOTES BEFORE YOU BEGIN
- Continuous Rounds: Unless otherwise specified, all amigurumi parts (body, hat, nose, arms) are worked in continuous spirals. Do not slip stitch to join or chain 1 at the end of a round.
- Stitch Markers: Place a stitch marker in the first stitch of every round to keep track of your counts. Move it up as you start each new round.
- Stuffing: Stuff the base firmly to ensure a solid foundation. Stuff the body firmly up to the top. The hat should only be lightly stuffed at the very top to maintain its slouchy fold.
- Sewing Tails: When fastening off a component that needs to be attached to the main body, leave a long yarn tail (approx. 12 inches) for sewing.
🪡 K. COMPLETE PATTERN
🧶 Body Base & Cone
This piece forms the main structure of the gnome. Worked from the bottom up.
Yarn: Cream (Worsted Weight)
Hook: 4.0mm
R1: MR 6. (6)
R2: inc around. (12)
R3: [1 sc, inc] x6. (18)
R4: [2 sc, inc] x6. (24)
R5: [3 sc, inc] x6. (30)
R6: [4 sc, inc] x6. (36)
R7: [5 sc, inc] x6. (42)
R8: [6 sc, inc] x6. (48)
R9: [7 sc, inc] x6. (54)
R10: BLO sc in each st around. (54) This creates the flat bottom edge.
Insert your flat plastic/cardboard circle base inside now if using one.
R11-R18: sc in each st around. (54) 8 rounds total.
R19: [7 sc, dec] x6. (48)
R20-R23: sc in each st around. (48) 4 rounds total.
R24: [6 sc, dec] x6. (42)
R25-R28: sc in each st around. (42) 4 rounds total.
Begin stuffing the base firmly, adding weight (poly-pellets) if desired.
R29: [5 sc, dec] x6. (36)
R30-R33: sc in each st around. (36) 4 rounds total.
R34: [4 sc, dec] x6. (30)
R35-R38: sc in each st around. (30) 4 rounds total.
R39: [3 sc, dec] x6. (24)
R40-R42: sc in each st around. (24) 3 rounds total.
Continue stuffing firmly.
R43: [2 sc, dec] x6. (18)
R44: [1 sc, dec] x6. (12)
R45: dec around. (6)
Fasten off, leaving a short tail. Thread the tail through the front loops of the remaining 6 stitches and pull tight to close. Weave in the end.
🎓 Slouchy Hat
Worked from the top down to create a tall, naturally bending shape. Yarn: Cream (Worsted Weight) Hook: 4.0mm
R1: MR 4. (4)
R2-R3: sc in each st around. (4) 2 rounds total.
R4: [1 sc, inc] x2. (6)
R5-R6: sc in each st around. (6) 2 rounds total.
R7: [2 sc, inc] x2. (8)
R8-R10: sc in each st around. (8) 3 rounds total.
R11: [3 sc, inc] x2. (10)
R12-R14: sc in each st around. (10) 3 rounds total.
R15: [4 sc, inc] x2. (12)
R16-R18: sc in each st around. (12) 3 rounds total.
R19: [1 sc, inc] x6. (18)
R20-R22: sc in each st around. (18) 3 rounds total.
R23: [2 sc, inc] x6. (24)
R24-R26: sc in each st around. (24) 3 rounds total.
R27: [3 sc, inc] x6. (30)
R28-R30: sc in each st around. (30) 3 rounds total.
R31: [4 sc, inc] x6. (36)
R32-R34: sc in each st around. (36) 3 rounds total.
R35: [5 sc, inc] x6. (42)
R36-R38: sc in each st around. (42) 3 rounds total.
R39: [6 sc, inc] x6. (48)
R40-R42: sc in each st around. (48) 3 rounds total.
R43: [7 sc, inc] x6. (54)
R44-R48: sc in each st around. (54) 5 rounds total.
R49: [8 sc, inc] x6. (60)
R50: sl st in each st around. (60) This gives the brim a clean, thick finish.
Fasten off, leaving a very long tail (approx. 24 inches) for sewing the hat to the body later.
👃 Nose
A prominent, round sphere. Yarn: Peach/Light Beige (Worsted Weight) Hook: 4.0mm
R1: MR 6. (6)
R2: inc around. (12)
R3: [1 sc, inc] x6. (18)
R4: [2 sc, inc] x6. (24)
R5-R7: sc in each st around. (24) 3 rounds total.
R8: [2 sc, dec] x6. (18)
Stuff the nose firmly.
R9: [1 sc, dec] x6. (12)
R10: dec around. (6)
Fasten off, leaving a long tail. Thread through the remaining 6 stitches to close, but do not weave in the rest of the tail—use it to sew the nose to the body.
💪 Arms & Mittens (Make 2)
Simple arms ending in bright red bulbous mittens. Yarn: Red and Cream (Worsted Weight) Hook: 4.0mm
Start with Red (Mitten):
R1: MR 6. (6)
R2: inc around. (12)
R3: [3 sc, inc] x3. (15)
R4-R6: sc in each st around. (15) 3 rounds total.
R7: [3 sc, dec] x3. (12)
R8: dec around. (6)
Stuff the red mitten firmly. Do not stuff the rest of the arm.
Change to Cream Yarn:
R9: sc in each st around. (6)
R10: [1 sc, inc] x3. (9)
R11-R18: sc in each st around. (9) 8 rounds total.
Fasten off, leaving a long tail for sewing. Press the top opening flat.
🌸 Poinsettia Applique
A layered red flower for the hat decoration. Yarn: Red (Worsted Weight) Hook: 3.5mm
Layer 1 (Large Petals):
R1: MR 5 sc, sl st to first sc to join. (5)
R2: [Ch 6. Working down the chain: sl st in 2nd ch from hook, sc in next, hdc in next, dc in next, tr in last ch. Sl st into the NEXT st on the MR.] Repeat 5 times to create 5 petals. Fasten off.
Layer 2 (Small Petals):
R1: MR 5 sc, sl st to first sc to join. (5)
R2: [Ch 5. Working down the chain: sl st in 2nd ch from hook, sc in next, hdc in next, dc in last ch. Sl st into the NEXT st on the MR.] Repeat 5 times to create 5 smaller petals. Fasten off, leaving a tail for sewing.
Stack the small petals on top of the large petals, offsetting them slightly. Sew them together through the center.
🎀 Red Bow
A decorative bow for the base of the beard. Yarn: Red (Worsted Weight) Hook: 3.5mm
Row 1: Ch 13. Sc in 2nd ch from hook and each ch across. (12)
Row 2-4: Ch 1, turn. Sc in each st across. (12)
Fasten off, weave in ends.
Take a 12-inch piece of red yarn and wrap it tightly around the center of the rectangle 8-10 times to cinch it into a bow shape. Tie securely at the back, leaving the tails to attach the bow to the gnome.
🎨 L. STYLING / ASSEMBLY / STABILITY / FINAL SHAPING
The magic of this gnome happens during assembly. The exact placement of each element is crucial to achieving the elegant holiday look.
1. Attaching the Nose
Pin the peach nose to the body. Place it horizontally centered, with the top of the nose roughly between Round 32 and Round 35 of the body. Sew it firmly in place using the leftover peach yarn tail.
2. Creating the Braided Beard
The thick braided beard is a defining feature.
- Cut the Roving Yarn: Cut approx. 20-24 strands of your super bulky/roving white yarn, each about 18 inches long.
- Attach to Body: Using your crochet hook, attach the strands using a larks-head knot (fold the strand in half, pull the loop through a stitch on the body, pull the tails through the loop). Attach them in a U-shape closely hugging the bottom and sides of the nose. Add a second layer just beneath the first to ensure the beard is thick and no cream body shows through.
- Braiding: Carefully divide the hanging white strands into thick sections. Create 2 or 3 large, loose twists or simple braids, crossing them over each other in a Celtic knot or intertwined style.
- Secure: Once the braids look aesthetically pleasing, use a thin piece of white sewing thread or yarn to invisibly tie the ends together at the bottom center, just above the flat base.
3. Attaching the Hat
Stuff the hat very lightly—only in the top 3 inches, leaving the rest empty so it can fold over naturally. Pull the brim of the hat down completely over the top of the body. The front brim should pull down to rest directly on top of the nose, hiding the tops of the beard strands. Use the long cream tail to sew the hat securely to the body, placing hidden stitches under the brim. Fold the top of the hat to one side and use a single invisible stitch to tack it down so it stays slouched.
4. Attaching the Arms and Sign
Pin the flat tops of the arms to the sides of the body, just beneath the hat brim. Sew them securely. Bring the red mitten hands forward to the front of the belly. Place the miniature wooden sign between the mittens. Sew or hot glue the mittens to the sign stick so the gnome appears to be holding it firmly.
5. Applying the Embellishments
- Poinsettia & Greenery: Pin the crocheted red poinsettia to the side of the hat. Tuck faux pine sprigs, white/red berry clusters, and miniature pinecones behind the poinsettia. Sew or carefully hot glue these into place. Sew 3-5 small gold beads into the very center of the poinsettia.
- Red Bow: Tie or sew the crocheted red bow right at the bottom center of the braided beard, covering the spot where you tied the strands together.
- Snowflakes & Beads: Scatter gold snowflake charms and small gold pearls across the cream hat and the visible cream body sections. Sew them down with matching thread or carefully glue them.
✅ Final Shaping Checklist
- ✅ Base Check: Does the gnome stand flat without tipping?
- ✅ Hat Alignment: Is the brim resting snugly on top of the nose?
- ✅ Beard Volume: Are the roving yarn twists thick, covering the front belly area completely?
- ✅ Arm Position: Do the hands naturally meet in the middle to support the wooden sign?
- ✅ Embellishment Security: Are the beads, snowflakes, and greenery firmly attached?
💡 M. HELPFUL CROCHET TIPS
- 💡 Working with Roving Yarn: Super bulky roving yarn can pull apart easily. Handle it gently while tying your larks-head knots, and avoid pulling the braids too tight.
- 💡 Invisible Decreases: Always use invisible decreases (sc2tog in the front loops only) for amigurumi to prevent gaps where stuffing can peek through.
- 💡 Adding Weight: If your gnome wants to lean forward due to the weight of the beard and sign, add a small pouch of heavy poly-pellets or glass craft beads into the back-bottom half of the cone before finishing the stuffing.
- 💡 Stiffening the Brim: The slip-stitch round at the very edge of the hat brim (R50) helps prevent the edge from curling up, keeping it perfectly crisp over the nose.
- 💡 Avoiding Hot Glue Mess: If using hot glue for the metal charms or faux greenery, use a low-temp gun and apply the glue to the charm first, not directly to the yarn, to avoid melting the acrylic or creating messy strings.
- 💡 Poinsettia Placement: Attach the floral arrangement to the side opposite of the hat’s fold. This balances the visual weight of the design beautifully.
🧼 N. CARE INSTRUCTIONS
Due to the heavy embellishments (beads, wooden sign, faux greenery, and delicate roving yarn), this gnome is strictly spot-clean only.
Use a damp microfiber cloth with a tiny amount of mild detergent to gently dab any stains on the cream yarn. Do not rub the white roving beard, as friction will cause the unspun fibers to felt and pill. Store your gnome in a cool, dry place wrapped in tissue paper during the off-season to keep the white yarn bright and prevent dust buildup in the faux greenery.
❓ R. FAQ
❓ Can I use blanket yarn or chenille yarn for this pattern?
Yes! However, blanket yarn is much thicker than worsted weight. If you substitute a chunky chenille yarn, use a 6.0mm or 7.0mm hook. The resulting gnome will be significantly larger (potentially twice the size), and you will need to scale up your wooden sign and embellishments to match.
❓ The base of my gnome is rounded and it won’t stand up. What did I do wrong?
This usually happens if the back-loop-only (BLO) round (R10) isn’t tight enough, or if the bottom is overstuffed. To fix it, press the bottom firmly against a table to flatten the stuffing, or insert a sturdy cardboard circle cut to size inside the bottom before stuffing.
❓ How do I prevent the roving yarn beard from shedding?
Roving yarn naturally sheds a bit. You can lightly mist the finished braided beard with a flexible hold hairspray or a watered-down fabric stiffener to help bind the loose fibers on the surface without losing the soft look.
❓ Is this pattern safe for a baby or toddler?
No. Because of the small gold beads, snowflake charms, wooden stick, and faux berries, this specific finished project is a choking hazard and should be used purely as a decorative item out of reach of small children.
❓ Can I crochet the greenery instead of using faux floral picks?
Absolutely. You can easily crochet simple leaf appliques and small red bobble stitches to substitute the plastic pine sprigs and berries if you prefer a 100% yarn creation.
Happy Crocheting, and enjoy the holiday crafting magic! What color palette will you choose for your gorgeous new gnome?