📖 B. INTRODUCTION
Welcome to a truly special project that elevates a simple gift bag into an unforgettable, handcrafted heirloom. This Festive Floral Crochet Gift Pouch is a stunning combination of tight, structured amigurumi techniques and elegant three-dimensional floral appliques. Whether you are crafting for the holiday season, preparing a unique bridal favor, or creating content to showcase your crochet skills, this pouch is designed to impress.
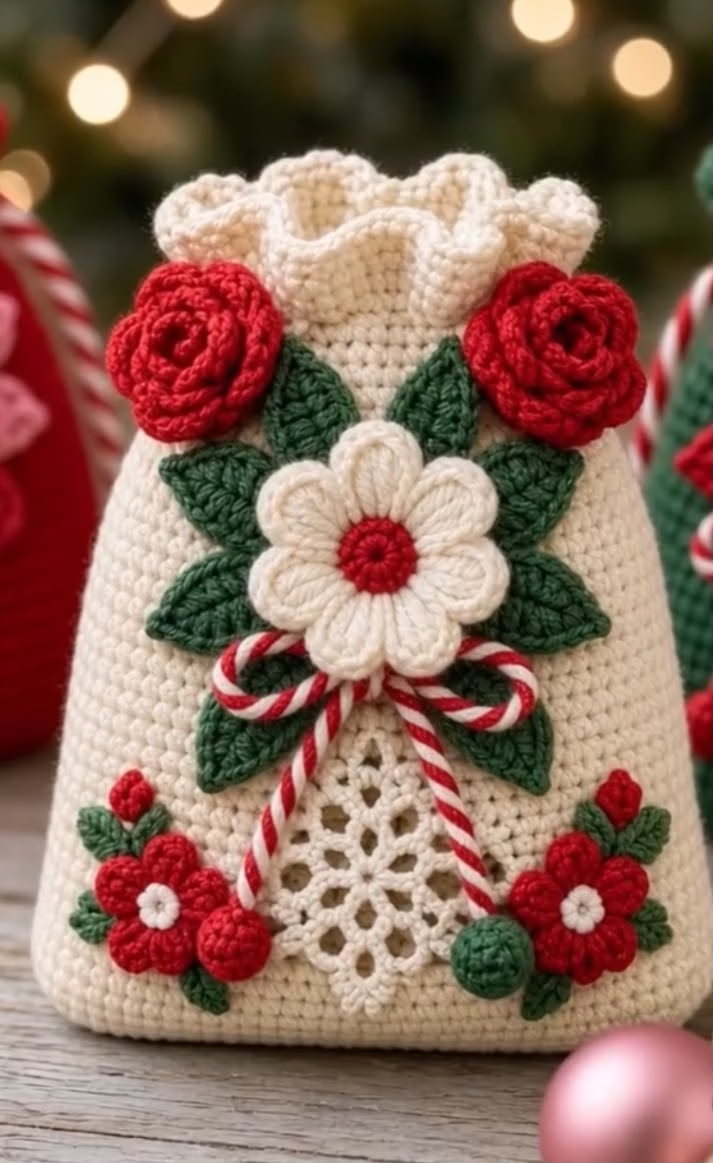
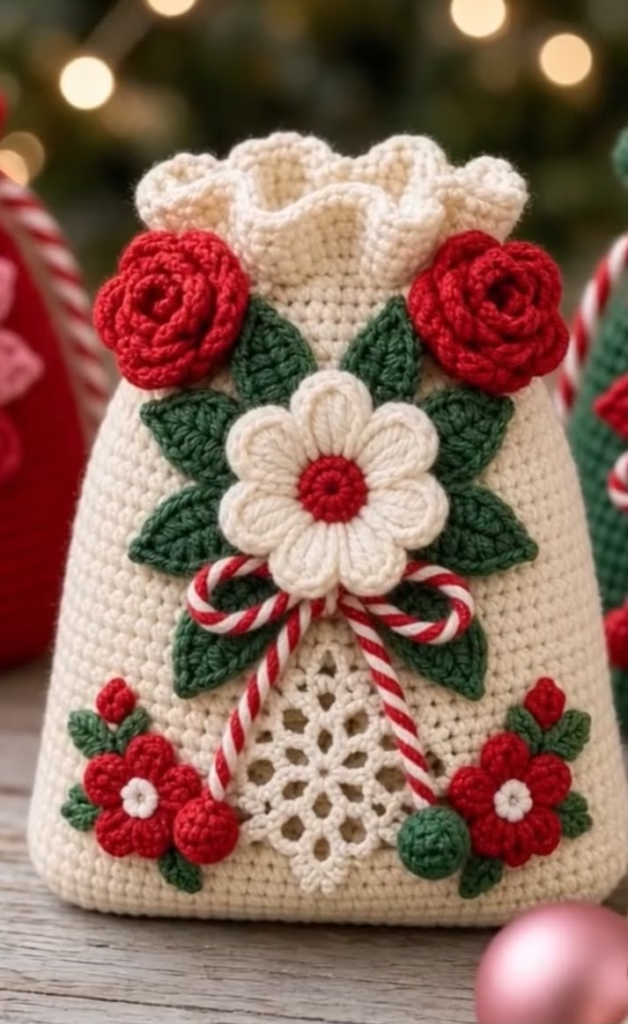
The design features a sturdy, cream-colored base with a beautifully fluted, ruffled top edge that cinches perfectly. But the true magic lies in the details: a striking arrangement of rich red 3D roses, a textured central puff-stitch flower, crisp green foliage, and charming berry accents. A delicate lace diamond at the bottom adds a touch of vintage elegance, while a twisted “candy cane” drawstring pulls the entire festive aesthetic together.
Personalization possibilities are endless with this canvas. Swap the holiday reds and greens for soft pastels to make a spring-themed pouch, or use elegant metallics for a wedding keepsake. By treating the bag as a base and the flowers as modular appliques, you have complete creative control over the final masterpiece.
🔍 C. MAIN PATTERN OVERVIEW
This pattern is constructed in modular sections to make the process enjoyable and manageable.
First, we will create the Bag Base, crocheted seamlessly from the bottom up in continuous rounds to ensure a dense, sturdy fabric that will hold small gifts securely. The top is finished with an integrated row of eyelets for the drawstring, topped with a dramatic, flared ruffle.
Next, we move to the Floral Appliques. You will crochet a collection of botanicals: layered 3D roses, a plump puff-stitch daisy, flat multi-petal accent flowers, and structured leaves. We also include instructions for the Lace Diamond Applique, which is stitched over the solid bag base to give the illusion of an intricate openwork window without compromising the bag’s ability to hold items. Finally, everything is brought together in the Styling & Assembly section to recreate the lush, balanced floral arrangement seen in the reference design.
🎯 D. SKILL LEVEL
Intermediate
This pattern requires comfort with working tightly in continuous rounds (amigurumi style) and reading multi-step stitch sequences.
- Techniques used: Magic ring, continuous rounds, joined rounds, increasing/decreasing, puff stitches, working into chain spaces, and sewing multiple layered components.
📏 E. FINISHED SIZE
- Height: 8.5 inches (21.5 cm) from the flat base to the top of the ruffle.
- Width: 6.5 inches (16.5 cm) across the widest point when laid flat.
- Note on Size: Using a thicker yarn (like bulky/chunky) will result in a significantly larger sack, while a sport-weight cotton will yield a petite jewelry pouch. Changing your tension or hook size will also alter the final dimensions.
🧮 F. GAUGE
- 18 sc x 20 rows = 4 x 4 inches (10 x 10 cm) using a 3.5mm hook and worsted-weight yarn.
- Note on Gauge: While strict gauge is not critical for this pouch, a tight, consistent tension is highly recommended so that the bag fabric is completely opaque and stands up well on its own.
🧶 G. REQUIRED YARN AMOUNTS
All estimates are based on Worsted/Aran weight (Category 4) yarn.
- Main Color (Cream/Off-White): Approximately 120 yards (110 meters) for the bag base, ruffle, central flower petals, and lace diamond.
- Contrast Color A (Deep Red): Approximately 50 yards (45 meters) for the 3D roses, flower centers, bottom flowers, and berry buds.
- Contrast Color B (Forest Green): Approximately 40 yards (36 meters) for all leaves and green berry buds.
- Contrast Color C (Bright White): Approximately 10 yards (9 meters) for the small flower centers and the twisted drawstring cord.
🧰 H. MATERIALS
- Crochet Hook: 3.5 mm (US E/4) – or size needed to obtain a dense fabric.
- Yarn: Worsted weight acrylic or cotton (cotton is highly recommended for crisp stitch definition on the flowers).
- Tapestry/Yarn Needle: For weaving in ends and sewing appliques.
- Stitch Markers: Essential for tracking continuous rounds.
- Scissors: Sharp craft scissors.
- Straight Pins: To hold appliques in place before sewing (crucial for symmetry).
- Optional: A small piece of flat cardboard or plastic canvas (oval shaped) to place at the bottom of the bag for extra standing stability.
🔤 I. ABBREVIATIONS – US TERMS
- MR: Magic Ring
- ch: chain
- ch-sp: chain space
- sl st: slip stitch
- sc: single crochet
- hdc: half double crochet
- dc: double crochet
- tr: treble crochet
- inc: single crochet increase (2 sc in the same stitch)
- dec: single crochet decrease (invisible decrease recommended)
- puff: puff stitch (Yarn over, insert hook, pull up a loop) repeat 4 times in the same stitch (9 loops on hook), yarn over and pull through all loops, ch 1 to close.
- st(s): stitch(es)
- BLO: back loop only
- FLO: front loop only
- [ … ]: repeat instructions within brackets the stated number of times
- ( … ): total stitch count at the end of the round/row
📝 J. NOTES BEFORE YOU BEGIN
- Round Types: The main bag body is worked in continuous, unjoined spiral rounds. Do not slip stitch or chain 1 at the end of these rounds; simply move your stitch marker to the first stitch of the new round. The flowers and lace diamond are worked in joined rounds or rows as specified.
- Sewing Tails: When fastening off your floral appliques, leave a generously long yarn tail (about 12-15 inches). This saves you from having to attach new yarn when sewing the pieces to the bag.
- The Lace Illusion: To keep the pouch functional (so nothing falls out!), the lace diamond at the bottom is crocheted as a separate openwork applique and sewn flat onto the solid cream bag. This provides the gorgeous visual texture of the reference design while maintaining structural integrity.
🪡 K. COMPLETE PATTERN
👜 Bag Base
Yarn: Cream
Quantity: Make 1
Starting Point: Worked around a foundation chain to create an oval base.
R1: Ch 21. Starting in the 2nd ch from the hook, sc 19. Work 3 sc in the last ch. Rotate your work to crochet down the opposite side of the foundation chain. sc 18, inc in the last ch. (42)
R2: inc, sc 18, [inc] 3 times, sc 18, [inc] 2 times. (48)
R3: sc 1, inc, sc 18, [sc 1, inc] 3 times, sc 18, [sc 1, inc] 2 times. (54)
R4: sc 2, inc, sc 18, [sc 2, inc] 3 times, sc 18, [sc 2, inc] 2 times. (60)
R5: sc 3, inc, sc 18, [sc 3, inc] 3 times, sc 18, [sc 3, inc] 2 times. (66)
The flat oval base is now complete. We will now build the walls of the pouch.
R6: Working in BLO for this round only, sc in each st around. (66)
R7-R38: sc in each st around. (66) (32 rounds of solid single crochet. The bag should look like a tall, sturdy cylinder.)
Drawstring Eyelet Round:
R39: [sc 4, ch 2, sk 2] 11 times. (66 sts/chs total)
R40: [sc 4, 2 sc in the ch-2 space] 11 times. (66)
R41: sc in each st around. (66)
Ruffle Creation:
R42: [2 dc in the next st, 3 dc in the next st] around. (165)
R43: dc in each st around. (165)
R44: sc in each st around. (165)
Fasten off and weave in the end seamlessly.
✨ Lace Diamond Applique
Yarn: Cream
Quantity: Make 1
Starting Point: Worked flat in rows from the bottom point up, then decreasing to the top point.
Row 1: Ch 2, sc in the 2nd ch from hook. (1)
Row 2: Ch 4 (counts as tr), turn. 3 tr in the sc. (4)
Row 3: Ch 4, turn. tr in same st. [ch 2, sk 1, tr] across, ending with 2 tr in the top of the turning ch.
Row 4: Ch 4, turn. tr in same st. ch 2, sc in next ch-sp, ch 3, sc in next ch-sp, ch 2, 2 tr in top of turning ch.
Row 5: Ch 4, turn. tr in same st. ch 2, sc in next ch-sp, [ch 3, sc in next ch-sp] twice, ch 2, 2 tr in top of turning ch.
Decrease half to form diamond:
Row 6: Ch 3, turn. tr in next ch-sp. ch 3, sc in next ch-sp, ch 3, tr in next ch-sp, tr in top of turning ch.
Row 7: Ch 3, turn. tr in next ch-sp, ch 1, tr in next ch-sp, tr in top of turning ch.
Row 8: Ch 3, turn. sk 1, tr in next ch-sp, sk 1, sl st in top of turning ch.
Border: Do not fasten off. Ch 1, sc evenly around the entire perimeter of the diamond. Sl st to first sc.
Fasten off, leaving a long tail for sewing.
🌹 3D Red Roses
Yarn: Deep Red
Quantity: Make 2
Starting Point: Worked in a flat strip, then rolled up.
Row 1: Ch 31. dc in the 4th ch from hook. [ch 1, sk 1, (dc, ch 1, dc) in next ch] across to the end. Turn.
Row 2: Ch 1. In the first ch-1 space of the V-stitch below, work (sc, hdc, 3 dc, hdc, sc). Work this same petal sequence (sc, hdc, 3 dc, hdc, sc) into every ch-1 space across the row.
Fasten off, leaving a 15-inch tail.
Assembly: Thread the tail onto your needle. Starting from the opposite end, roll the strip tightly in a spiral. Use the needle to sew back and forth through the foundation chain base to secure the rolled shape.
🌼 Central Puff Flower
Yarn: Deep Red (Center) and Cream (Petals)
Quantity: Make 1
Starting Point: Joined rounds.
R1 (Red): MR, 8 sc. Sl st to first sc. Fasten off Red. (8)
R2 (Cream): Attach Cream in any st. [Ch 2, puff st in same st, ch 2, sl st into same st. Sl st into the next st.] Repeat the bracketed sequence 8 times to create 8 plump petals.
Fasten off, leaving a long tail for sewing.
🌸 Small Bottom Flowers
Yarn: Bright White (Center) and Deep Red (Petals)
Quantity: Make 2
Starting Point: Joined rounds.
R1 (White): MR, 5 sc. Sl st to first sc. Fasten off White. (5)
R2 (Red): Attach Red in any st. [Ch 3, 2 dc in same st, ch 3, sl st into same st. Sl st into the next st.] Repeat 5 times for 5 petals.
Fasten off, leaving a long tail for sewing.
🍃 Green Leaves
Yarn: Forest Green
Quantity: Make 8 (4 large, 4 small)
Large Leaves (Make 4):
R1: Ch 11. Working down the chain: sl st in 2nd ch, sc, hdc, dc, tr 2, dc, hdc, sc, 3 sc in the last ch.
Rotate to work up the other side of the chain: sc, hdc, dc, tr 2, dc, hdc, sc, sl st.
Fasten off, leaving a long tail.
Small Leaves (Make 4):
R1: Ch 8. Working down the chain: sl st in 2nd ch, sc, hdc, dc 2, hdc, sc, 3 sc in the last ch.
Rotate to work up the other side: sc, hdc, dc 2, hdc, sc, sl st.
Fasten off, leaving a long tail.
🍒 Berry & Bud Accents
Yarn: Deep Red (Make 2), Forest Green (Make 2)
Quantity: 4 total
R1: MR, 5 sc. (5)
R2: sc in each st around. (5)
Add a tiny pinch of stuffing or use the yarn tail to plump the berry.
R3: dec around until closed.
Fasten off, leaving a tail for sewing.
🎀 Twisted Candy Cane Drawstring
Yarn: Deep Red and Bright White
Quantity: Make 1 long cord
- Cut three 50-inch (125 cm) strands of Red and three 50-inch strands of White.
- Knot them together at one end.
- Tape the knotted end to a table or have a friend hold it.
- Twist the Red strands tightly in one direction. Twist the White strands tightly in the same direction.
- Bring the two twisted sections together and let them naturally twist around each other in the opposite direction.
- Tie a firm knot at the desired length (approx. 24 inches / 60 cm) and trim the fringe evenly.
🎨 L. STYLING / ASSEMBLY / STABILITY / FINAL SHAPING
The visual impact of this bag relies entirely on the precise placement of the appliques. Take your time with this section!
1. The Lace Base:
Lay the bag completely flat. Pin the Cream Lace Diamond Applique to the bottom center of the front panel. Sew it down carefully around the perimeter, stretching it slightly so the holes in the lace remain open and visible.
2. The Central Focal Point:
Pin the large Cream Puff Flower directly above the top point of the Lace Diamond. Arrange four large Green Leaves peeking out from behind the four “corners” of the flower (top-left, top-right, bottom-left, bottom-right). Sew the leaves down securely first, then sew the Puff Flower on top.
3. The Top Roses:
Place the two 3D Red Roses near the top corners of the bag’s front panel (just below the drawstring eyelets). Angle them slightly inward. Sew them firmly through the thick base of the rose to keep them protruding nicely.
4. The Bottom Flowers:
Pin the two Small Bottom Flowers at the bottom left and bottom right corners, flanking the Lace Diamond. Tuck a Small Green Leaf under the top edge of each flower, pointing upward toward the roses. Sew the leaves, then the flowers.
5. Berry Placement:
Sew a Red Berry next to the bottom-left flower, and a Green Berry next to the bottom-right flower for an asymmetrical, organic look.
6. Inserting the Drawstring:
Thread your twisted candy cane cord in and out of the eyelets created in R39. Ensure both ends of the cord come out through the front-center eyelets. Pull gently to cinch the bag, allowing the ruffle to flare out naturally. Tie a neat bow directly underneath the Central Puff Flower.
✅ Final Finishing Checklist
- ✅ Symmetry Check: Are the top roses and bottom flat flowers relatively balanced on the left and right?
- ✅ Security: Are all thick 3D elements (especially the heavy roses) sewn down tightly so they don’t droop?
- ✅ Drawstring Flow: Does the bag cinch smoothly without catching on the applique stitches on the inside?
- ✅ Shaping: Insert your hands into the pouch and gently push outward to round out the shape and give volume to the base.
💡 M. HELPFUL CROCHET TIPS
- 💡 Pin Before You Sew: Never wing the placement! Use straight pins to attach every single leaf and flower to the bag at the same time. Prop the bag up and look at it from a distance before threading your needle.
- 💡 Invisible Finish: When fastening off the top ruffle round, use an invisible join (sewing the tail through the first stitch and back down through the last) for a seamless look.
- 💡 Leaf Veins: When sewing the leaves down, use your tapestry needle to stitch a straight line of matching green yarn right down the center of the leaf to mimic a deep vein and add structure.
- 💡 Cord Tension: If twisting yarn for the cord feels tricky, you can simply crochet a chain of 100 holding one strand of red and one strand of white together.
- 💡 Bag Stability: If you want the pouch to sit flat on a table like a display piece, cut an oval of plastic canvas slightly smaller than your R1-R5 base and tack it to the inside bottom of the bag.
- 💡 Sewing Appliques: Only sew through the front layer of the bag! Be very careful not to stitch the front and back of the pouch together.
🧼 N. CARE INSTRUCTIONS
Because of the dense 3D elements and twisted cord, spot cleaning is highly recommended. If the entire bag must be washed, hand wash gently in cool water with mild detergent. Do not wring or twist the bag, as this will crush the 3D roses and warp the lace diamond. Press between two dry towels to remove excess moisture. To dry, stuff the inside of the pouch with plastic grocery bags (not tissue paper, which bleeds) to help it hold its cylindrical shape, and let it air dry completely in a well-ventilated area.
❓ R. FAQ
❓ Can I make this bag larger?
Yes! To make the base larger, continue the oval increase pattern (R5 is sc 3, inc… R6 would be sc 4, inc, R7 sc 5, inc, etc.) until it reaches your desired width. Then, crochet the straight walls for as many rounds as you need for the height.
❓ What if my ruffle isn’t standing up stiffly?
If your ruffle flops over, your tension might be a bit loose, or your yarn is too soft. You can fix this by crocheting one final round of slip stitches tightly around the very edge of the ruffle to give it a structural “lip.”
❓ Can I line the inside of the pouch with fabric?
Absolutely. Lining the pouch will prevent small items like earrings or candies from poking through the stitches. Hand-stitch a small fabric pouch to the inside of the bag just below the drawstring eyelets.
❓ Is there an alternative to the twisted cord?
If you prefer, you can use store-bought satin ribbon, braided macrame cord, or a simple crocheted chain in a contrasting color.
❓ Can I use this pattern for a crossbody bag?
Yes, it makes a beautiful statement purse! Simply omit the drawstring cord. Instead, attach metal D-rings to the sides of the pouch during your final SC rounds, and clip on a leather or metal chain strap. I recommend lining it if you plan to carry heavy items like a phone or keys.