Dual-Layer Snowflake Christmas Tree Ornaments — Free Crochet Pattern
Category: Holiday Home Decor / Christmas Tree Ornaments / Festive Lacework Skill Level: Easy to Intermediate Terminology: US Crochet Terms
📖 B. INTRODUCTION
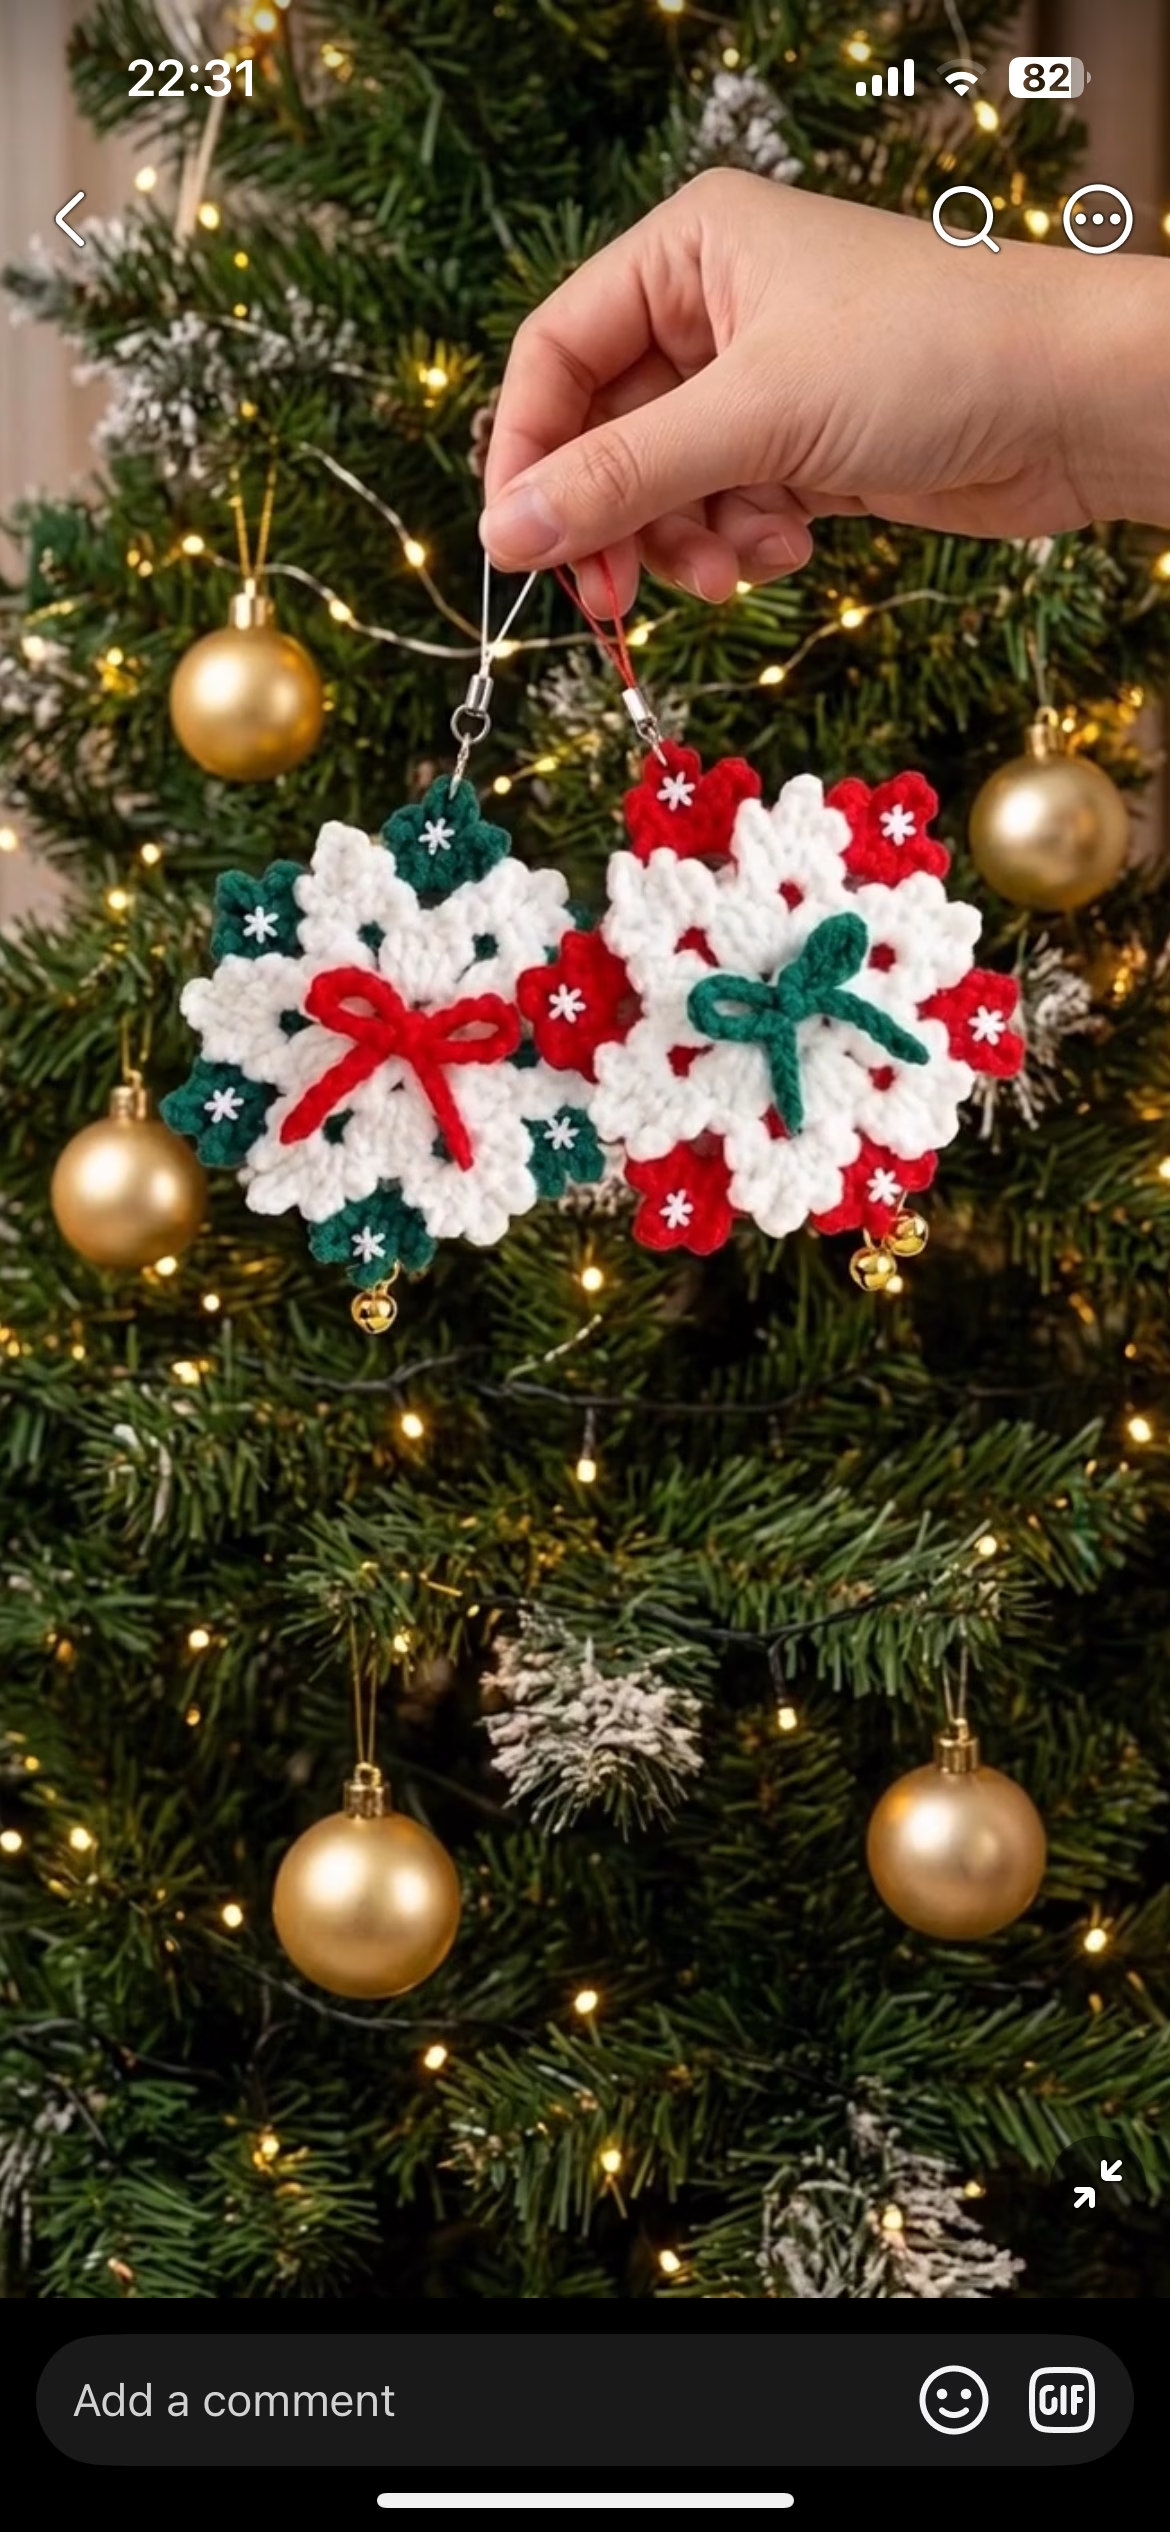
Add a touch of cozy handmade elegance to your Christmas tree with these Dual-Layer Snowflake Ornaments. Featuring a rich, textured two-tier construction, each ornament combines a vibrant colored background star (in deep forest green or rich festive red) with a delicate, crisp white lacework snowflake motif layered directly on top.
Each outer star point is delicately embellished with embroidered white mini stars, while a contrasting tied bow sits right at the center. To complete the festive charm, a tiny gold jingle bell dangles from the bottom tip, giving off a gentle ring whenever the tree branches sway.
These ornaments are quick to make, highly customizable, and perfect for stash-busting leftover holiday yarn. Whether you are crafting a full set for your own family tree, decorating holiday gift packages as reusable gift tags, or preparing inventory for winter craft fairs, this pattern offers a satisfying and rewarding project for crocheters of all skill levels.
Grab your favorite cotton yarn, a 2.5 mm hook, and a few festive bells, and let’s start creating these timeless holiday keepsakes!
🔠C. MAIN PATTERN OVERVIEW
This festive ornament design is built from four main elements:
- 🌿 Background Star Layer: A structured 6-pointed star base worked in vibrant Forest Green or Festive Red. Each point features a small embroidered star/snowflake accent.
- â„ï¸ Foreground Lace Snowflake: A light, openwork 6-pointed snowflake worked in Crisp White yarn, stitched directly over the background base to create a stunning 3D dimensional effect.
- 🎀 Center Bow Accent: A simple crocheted chain cord tied into a neat bow and secured to the center of the snowflake (Red bow on Green background, or Green bow on Red background).
- 🔔 Finishing Accents: A small brass jingle bell stitched to the bottom point and a sturdy lanyard/hanging cord attached to the top.
🎯 D. SKILL LEVEL
- 🎯 Level: Easy to Intermediate
- 🧵 Required Techniques:
- Working in joined rounds
- Basic amigurumi and motif stitches (sc, hdc, dc, tr)
- Picot stitches for lace points
- Simple surface embroidery (straight stitch stars)
- Layering and joining flat motifs
📠E. FINISHED SIZE
- 📠Diameter: Approximately 9 cm – 10 cm (3.5 – 4 inches) across from point to point.
- 📠Hanging Loop: Approximately 7 cm (2.75 inches) long.
- 💡 Note: The size can easily be scaled up or down by using heavier yarn (e.g., Worsted weight) or finer thread (e.g., Size 10 crochet thread).
🧮 F. GAUGE
- 🧮 Motif Gauge: Rounds 1–2 of the Background Base = 3.5 cm (1.4 inches) in diameter using a 2.5 mm hook.
- 🧮 Tension Guidance: Maintain a firm, crisp tension so the star points hold their flat shape without curling.
🧶 G. REQUIRED YARN AMOUNTS
Estimates per pair of ornaments (one Green base, one Red base) using Light Sport / Fine (#2) or DK (#3) Cotton Yarn:
- 🟢 Forest Green: approx. 15 grams / 35 meters
- 🔴 Festive Red: approx. 15 grams / 35 meters
- ⚪ Crisp White: approx. 20 grams / 45 meters
🧰 H. MATERIALS
- 🪡 Crochet Hook: 2.5 mm (US C-2 or B-1).
- 🔔 Jingle Bells: 2 small gold/brass jingle bells (8 mm – 10 mm).
- âž° Hanging Straps: 2 elastic lanyard cords or metal ornament ring hangers.
- 📠Notions: Tapestry/yarn needle, sharp scissors, stitch markers, blocking board & pins (optional).
- âš ï¸ Safety Note: Keep small jingle bells securely fastened and out of reach of very young children or pets.
🔤 I. ABBREVIATIONS – US TERMS
- mr = Magic Ring
- ch = Chain stitch
- sl st = Slip stitch
- sc = Single crochet
- hdc = Half double crochet
- dc = Double crochet
- tr = Treble crochet
- picot = Ch 3, sl st in 1st ch (or in front loop and front bar of stitch)
- sp(s) = Space(s)
- st(s) = Stitch(es)
- rnd(s) = Round(s)
- [ ] / ( ) = Repeat instructions within brackets/parentheses the indicated number of times
- st-count = Total stitches at the end of the round, shown as (X)
📠J. NOTES BEFORE YOU BEGIN
- â• Joined Rounds: Unlike continuous amigurumi, both motifs are worked in joined rounds. Always join at the end of each round with a slip stitch into the starting stitch as indicated.
- 🧵 Yarn Weight: 100% Mercerized Cotton gives the crispest stitch definition and structural stiffness for flat tree ornaments.
- 🪡 Color Schemes:
- Option A: Green Base + White Snowflake + Red Bow.
- Option B: Red Base + White Snowflake + Green Bow.
🪡 K. COMPLETE PATTERN
🌿 BACKGROUND STAR BASE (Make 1 Green, 1 Red)
Yarn: Forest Green or Festive Red | Hook: 2.5 mm
- R1: Start with a mr. Ch 1 (does not count as st), work [2 sc, ch 2] x6 times into ring. Join with sl st to 1st sc. (12 sc, 6 ch-2 sps)
- R2: Sl st into first ch-2 sp. Ch 2 (counts as hdc), (1 hdc, ch 2, 2 hdc) in same ch-2 sp. Work (2 hdc, ch 2, 2 hdc) in each of the remaining 5 ch-2 sps around. Join with sl st to top of starting ch-2. (24 hdc, 6 ch-2 sps)
- R3: Sl st across to next ch-2 sp. Ch 3 (counts as dc), (1 dc, ch 3, 2 dc) in same ch-2 sp. [Ch 1, skip 4 hdc, (2 dc, ch 3, 2 dc) in next ch-2 sp] repeat 5 times around. Ch 1, join with sl st to top of starting ch-3. (24 dc, 6 ch-3 corner sps, 6 ch-1 sps)
- R4 (Outer Star Points): Sl st into first ch-3 corner sp. Work point shell into corner: (1 sc, 1 hdc, 2 dc, picot, 2 dc, 1 hdc, 1 sc). [Sl st in next ch-1 sp, work (1 sc, 1 hdc, 2 dc, picot, 2 dc, 1 hdc, 1 sc) into next ch-3 sp] repeat 5 times around. Sl st in last ch-1 sp. (6 star points)
- Fasten off, weave in ends securely.
â„ï¸ FOREGROUND LACE SNOWFLAKE (Make 2 White)
Yarn: Crisp White | Hook: 2.5 mm
- R1: Start with a mr. Ch 1, work [1 sc, ch 3] x6 times into ring. Join with sl st to 1st sc. (6 sc, 6 ch-3 sps)
- R2: Sl st into first ch-3 sp. Ch 1, work (2 sc, ch 3, 2 sc) in same ch-3 sp and in each ch-3 sp around. Join with sl st to 1st sc. (24 sc, 6 ch-3 sps)
- R3 (Lace Points): Sl st into first ch-3 sp. [(1 sc, ch 4, sl st in 1st ch [picot], 1 dc, ch 5, sl st in 1st ch [large picot], 1 dc, ch 4, sl st in 1st ch [picot], 1 sc) all in same ch-3 sp, ch 2, skip 4 sc] repeat 6 times around. Join with sl st to 1st sc. (6 intricate snowflake points)
- Fasten off, leaving a 25 cm (10 in) sewing tail for joining to the background base.
🎀 CENTER BOW CORD (Make 1 Red, 1 Green)
Yarn: Festive Red or Forest Green | Hook: 2.5 mm
- Leave a 10 cm starting tail.
- Ch 35.
- Fasten off, leaving a 10 cm ending tail.
- Tie the chain into a neat bow with two small loops and two hanging tails approx. 2 cm long.
â EMBROIDERED STAR ACCENTS
Yarn/Thread: Crisp White Thread or Fine Yarn | Needle: Tapestry Needle
- On each of the 6 outer background star points (from R4 of the Background Base), embroider a small 4-point or 6-point star:
- Make one vertical straight stitch across the center of the point.
- Make one horizontal straight stitch crossing the center.
- Make two small diagonal stitches through the center intersection.
- Repeat for all 6 background points on both green and red base stars.
🎨 L. STYLING / ASSEMBLY / STABILITY / FINAL SHAPING
[ Hanging Cord / Lanyard ]
|
( Top Star Point )
|
+—————————+
| Background Star Base |
| (Green or Red Yarn) |
| |
| [ Embroidered Stars ] |
| + |
| Foreground White Lace |
| Snowflake |
| + |
| [ Center Tied Bow ] |
+—————————+
|
( Bottom Bell Tip )
|
[ Jingle Bell ]
📠Step-By-Step Assembly Sequence
- Embroider Outer Star Points:
- Take the completed Background Star Base and embroider small white star stitches onto each of the 6 outer points using white thread/yarn.
- Overlay & Attach Foreground Snowflake:
- Center the White Lace Snowflake over the Background Star Base, aligning the 6 white lace points so they sit neatly between the background outer points.
- Using the long white sewing tail and a tapestry needle, tack the center and inner loops of the snowflake to the background base with small hidden stitches.
- Attach Center Bow:
- Place the tied yarn bow at the exact center of the white snowflake.
- Pull the two bow tails through to the back of the ornament and knot tightly to secure, then weave in the ends.
- Attach Bottom Bell Accent:
- Stitch a small brass jingle bell securely to the lowest point of the background star using matching colored yarn.
- Attach Top Hanger:
- Thread a lanyard loop, metal ring, or crocheted chain loop through the top point of the background star.
💡 M. HELPFUL CROCHET TIPS
- 💡 Tip 1: Wet-blocking or stiffening the motifs with a light mist of fabric starch before assembly ensures the snowflake points remain flat and crisp.
- 💡 Tip 2: Mercerized cotton yarn gives the best shine and structural rigidity for flat holiday tree ornaments.
- 💡 Tip 3: Keep your embroidered star stitches light and even so they don’t pucker the background star points.
- 💡 Tip 4: Tie a double knot in the center bow before securing it to the ornament so it won’t untie over time.
- 💡 Tip 5: Use stitch markers on Round 3 of the background base to clearly identify your corner ch-3 spaces before working Round 4.
- 💡 Tip 6: Make a set matching both color variations (Green base/Red bow and Red base/Green bow) for a balanced look on your Christmas tree.
🧼 N. CARE INSTRUCTIONS
- 🧼 Cleaning: Gently spot clean with a damp cloth and mild detergent. Do not submerge completely in water to protect the jingle bell from rusting.
- 🧼 Reshaping: Lay flat on a dry towel and press gently with your fingers to smooth out the star points.
- âš ï¸ Off-Season Storage: Store flat inside a rigid container or tissue-lined box to prevent the lace points and bows from being crushed during storage.
â“ R. FAQ
â“ Q: Can I make these larger for window hangers?
A: Yes! Using Worsted weight (#4) yarn with a 4.0 mm hook will scale these ornaments up to approximately 15 cm (6 inches) in diameter, making them ideal for window displays or door wreaths.
â“ Q: What is the best way to keep the ornaments completely flat?
A: Pin the finished background base and white snowflake onto a blocking mat, spray lightly with liquid fabric starch or a 50/50 water and white PVA glue solution, and let them dry completely before final assembly.
â“ Q: Can I use metallic thread for the embroidered stars?
A: Absolutely! Using silver or gold metallic embroidery floss adds extra festive sparkle to the outer star points.
â“ Q: How long does one ornament take to complete?
A: Each ornament takes approximately 30 to 45 minutes to complete from start to finish, making it a wonderful weekend project or last-minute gift idea.