Introduction
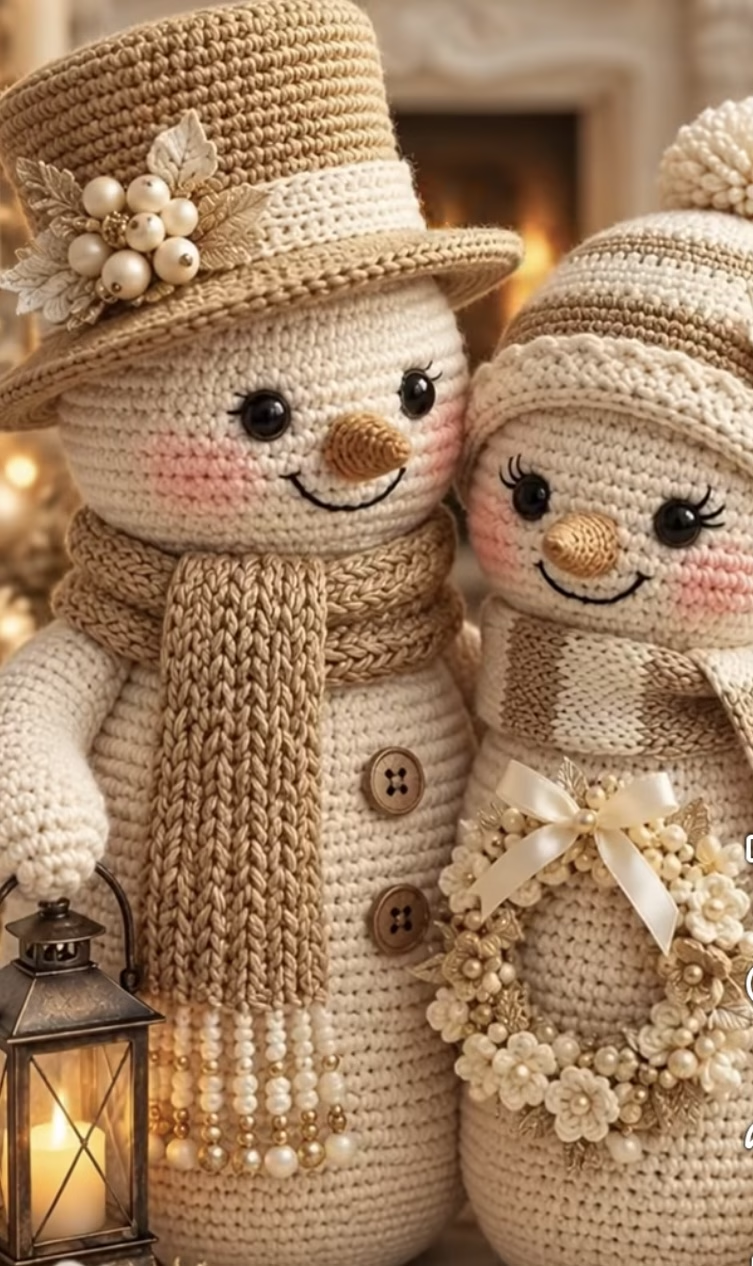
This crochet project features an utterly charming pair of amigurumi snowmen, lovingly detailed and dressed for a festive winter’s day. The snowmen are soft, rounded figures with adorable carrot noses, blushy cheeks, and expressive smiles. Their cozy accessories—a ribbed scarf with pearl bead fringe, a chunky striped hat with a pompom, a tall top hat with floral accents, and a miniature wreath—add irresistible personality. The neutral palette of creamy white, warm beige, soft taupe, and golden accents lends the design a sophisticated, cozy, and elegant feel, making these snowmen perfectly suited for both traditional holiday decor and modern, neutral-toned homes.
This project is delightful to display on a mantel, as a centerpiece, or to gift to someone special. The detailed finishing touches—like the beadwork, crocheted flowers, and large sewn buttons—make the snowmen stand out as heirloom-quality handcrafted pieces. Creating these snowmen offers a rewarding opportunity to practice amigurumi shaping, accessory-making, and adding beautiful embellishments, resulting in a memorable, heartwarming winter craft.
Project Overview
The snowman couple is crocheted as two separate amigurumi figures, each worked in continuous spiral rounds. Each snowperson’s body and head are crocheted in one piece. The accessories—scarves, hats, noses, buttons, floral bouquet, and wreath—are made separately in rows or small parts, then sewn or glued on. Decorative touches such as embroidered smiles, sewn-on safety eyes, and strategic blush accent complete the cozy look.
Skill Level
Intermediate: This pattern involves basic amigurumi construction (increases and decreases in the round), color changes, textured scarf and hat techniques, sewing on embellishments, and beadwork. Familiarity with shaping, joining, and decorative embroidery or embellishment is recommended for best results.
Materials
- Worsted weight yarn (#4) in the following colors:
- Cream/White (main body and head): approx. 220g
- Beige/Taupe (scarf, hat band, hat, accents): approx. 100g
- Tan (stripes, hat decor, additional scarf): approx. 40g
- Light brown or orange (noses): small amount
- Black (embroidery, eyes): a small amount
- Gold or soft metallic (wreath, hat bouquet): approx. 15g
- 3.5mm crochet hook (US E/4) for body
- 3.25mm crochet hook (US D/3) for accessories (optional, for a tighter fabric)
- 2 pairs of 15mm black safety eyes
- Polyester fiberfill stuffing
- Tapestry needle
- Sewing needle and thread (for attaching buttons, beads, or flowers)
- Scissors
- Stitch markers
- Assortment of pearl beads and gold beads (for scarf fringe and wreath)
- Small decorative wooden buttons (2-3 for snowman bodies)
- Optional: fabric blush/soft pink pastel for cheeks
- Hot glue gun (optional for attaching beads/flowers on wreath)
- Ribbon for the bow on the wreath and hat bouquets
Finished Size
- Each snowman: approximately 25cm tall by 14cm wide (10″ x 5.5″)
- May slightly vary based on yarn and hook used
To adjust sizing, use thicker or thinner yarn and a larger or smaller hook.
Gauge
Gauge is not strictly critical for amigurumi, but for reference: 8 rounds of sc in a spiral = 3.5 cm tall; 10 sc = 4 cm wide. Keep stitches tight to minimize stuffing showing through. Adjust hook size if needed for a firm fabric.
Stitches and Abbreviations
- ch – chain
- sc – single crochet
- hdc – half double crochet
- dc – double crochet
- tr – treble crochet
- inc – increase (2 sc in next st)
- dec – decrease (single crochet 2 together)
- sl st – slip stitch
- blo – back loop only
- flo – front loop only
- MR – magic ring
Important Pattern Notes
- Bodies and heads are worked in continuous spirals—do not join rounds; use a stitch marker to keep track of the first stitch.
- Chains at the beginning of rows for accessories do not count as stitches unless stated.
- Change colors by completing the last yarn-over of the last stitch in the old color with the new color.
- Stuff pieces firmly, especially the neck area to keep the heads upright.
- Right sides of most pieces should face outward; be consistent if using surface slip stitches for decorative ridges.
Detailed Crochet Pattern
Part 1: Snowman Body and Head (Make 2)
With cream or white yarn:
- Body (work from the bottom up):
- Round 1: MR, 6 sc into ring (6)
- Round 2: inc in each st around (12)
- Round 3: (sc in next st, inc) around (18)
- Round 4: (sc in next 2 sts, inc) around (24)
- Round 5: (sc in next 3 sts, inc) around (30)
- Round 6: (sc in next 4 sts, inc) around (36)
- Round 7: (sc in next 5 sts, inc) around (42)
- Round 8: (sc in next 6 sts, inc) around (48)
- Rounds 9–23: sc in each st around (48 for 15 rounds)
- Round 24: (sc in next 6 sts, dec) around (42)
- Round 25: (sc in next 5 sts, dec) around (36)
- Round 26: (sc in next 4 sts, dec) around (30)
- Round 27: (sc in next 3 sts, dec) around (24)
- Start stuffing as you go and continue stuffing firmly.
- Head: (worked as a continuation of the body)
- Round 28: (sc in next 3 sts, inc) around (30)
- Round 29: (sc in next 4 sts, inc) around (36)
- Round 30: (sc in next 5 sts, inc) around (42)
- Round 31: (sc in next 6 sts, inc) around (48)
- Rounds 32–40: sc in each st around (48 for 9 rounds)
- Add more stuffing as needed for a round head shape.
- Round 41: (sc in next 6 sts, dec) around (42)
- Round 42: (sc in next 5 sts, dec) around (36)
- Round 43: (sc in next 4 sts, dec) around (30)
- Round 44: (sc in next 3 sts, dec) around (24)
- Round 45: (sc in next 2 sts, dec) around (18)
- Round 46: (sc in next st, dec) around (12)
- Round 47: dec around (6)
- Fasten off and weave closing the top neatly.
Part 2: Snowman Nose (Make 2)
With orange or light brown yarn:
- Round 1: MR, 4 sc in ring (4)
- Round 2: sc in each st around (4)
- Round 3: (sc in next st, inc) around (6)
- Rounds 4-5: sc in each st around (6)
- Round 6: (sc in next 2 sts, inc) around (8)
- Rounds 7-8: sc in each st around (8)
- Fasten off, leaving a long tail for sewing. Shape and stuff lightly if desired.
Part 3: Safety Eyes and Facial Details
- Position eyes between Rounds 37 and 38 of the head, approx. 12-15 stitches apart depending on your preference. Insert safety eyes and fasten securely inside the head.
- With black yarn, backstitch or surface embroider a curved smile below the nose for each snowman. For the snow-woman, add two lines for eyelashes to each side of both eyes.
- With soft pink pastel or blush, gently brush circles on each cheek for warmth.
Part 4: Top Hat (for the Snowman)
With beige yarn and a 3.5mm hook:
- Round 1: MR, 6 sc in ring (6)
- Round 2: inc in each st around (12)
- Round 3: (sc in next st, inc) around (18)
- Round 4: (sc in next 2 sts, inc) around (24)
- Round 5: (sc in next 3 sts, inc) around (30)
- Round 6: (sc in next 4 sts, inc) around (36)
- Round 7: (sc in next 5 sts, inc) around (42)
- Rounds 8-13: sc in each st around (42)
- Round 14: In blo, sc in each st around (for a ridge, 42)
- Rounds 15–21: sc in each st around (42 for 7 rounds)
- Round 22: (sc in next 6 sts, inc) around (48)
- Round 23: (sc in next 7 sts, inc) around (54)
- Round 24: sc in each st around (54)
- Fasten off, leaving tail for sewing.
- Hat Band: With tan or contrasting yarn, ch enough to wrap snugly around the hat (approx. 40 ch). Turn, hdc in each ch across. Fasten off. Sew or glue securely to the hat above the brim ridge.
- Stuff hat softly (optional) and sew or pin neatly on the snowman’s head at a jaunty angle.
Part 5: Bobble Hat with Pompom (for the Snowwoman)
With cream and tan yarn (stripe at intervals):
- Round 1: MR, 6 sc in ring (6)
- Round 2: inc in each st around (12)
- Round 3: (sc in next st, inc) around (18)
- Round 4: (sc in next 2 sts, inc) around (24)
- Round 5: (sc in next 3 sts, inc) around (30)
- Round 6: (sc in next 4 sts, inc) around (36)
- Rounds 7–14: sc in each st around (36), alternating 2 rounds cream/white, 2 rounds tan, or as desired.
- Round 15: (sc in next 4 sts, dec) around (30)
- Round 16: (sc in next 3 sts, dec) around (24)
- Round 17–19: sc in each st around (24). Last round in cream.
- Round 20: In flo, hdc in each st around (24) for brim.
- Fasten off and weave in ends.
- Pompom: Wind cream yarn around three fingers 30–40 times, tie off tightly in center, cut loops, and trim to shape. Sew securely to top of hat.
- Position and sew onto snowwoman’s head at an angle.
Part 6: Scarves
- Snowman’s Scarf (with beaded fringe):
- With beige yarn, ch 70 (for a long scarf; adjust for desired length).
- Row 1: hdc in 2nd ch from hook and each ch across. (69)
- Rows 2–7: ch 1, turn, hdc in each st across (69)
- Fasten off. Weave in ends.
- For ribbing effect, work all hdc in blo for all rows.
- For fringe: Thread 5-7 pearl/gold beads onto each of 6 short strands of yarn. Fold each strand in half and use a crochet hook to pull through both ends of the scarf. Tie securely, arranging beads and trimming ends neatly.
- Snowwoman’s Scarf (striped):
- With cream and tan yarn, ch 63.
- Row 1: hdc in 2nd ch and across (62)
- Rows 2-8: ch 1, turn, hdc across, changing color every 2 rows for broad stripes.
- Fasten off and weave in ends.
Part 7: Buttons
- Sew two to three wooden buttons vertically down the front of each snowman using matching thread or yarn.
Part 8: Decorative Wreath and Hat Bouquet
- Mini Wreath:
- With gold or cream yarn, form a ring by ch 18, sl st to first ch to form a loop.
- Round 1: sc around ring, working 24-28 sc to fill it out.
- Fasten off, weave in ends.
- Sew or glue on pearl and gold beads, then 3-5 small crocheted rosettes (see below). Add gold painted leaves or similar accents purchased from a craft shop if desired.
- Attach a ribbon bow and tack the wreath to the snowwoman’s midsection as shown.
- Crocheted Rosettes (for wreath and hat bouquet):
- Ch 16 (or more for larger flower), turn.
- Row 1: Sc in 2nd ch, hdc in next, dc in next 10, hdc in next, sc in last 3 ch (or adjust for a curved petal look).
- Roll into a rosette and sew base together to secure.
- Sew or glue onto wreath or hat.
- Hat Bouquet:
- Make 2-3 rosettes as above with cream and gold yarn.
- Arrange with purchased or crocheted gold leaves and several pearl beads.
- Wrap a small ribbon bow and attach the bouquet to the side of the top hat using glue or needle and thread.
Assembly and Finishing
- Sew noses directly onto center of each head, placing the base between the eyes and slightly off-center for character.
- Embroider or backstitch the smile using black yarn.
- Sew or glue safety eyes and sew on eyelashes if desired.
- Stitch wooden buttons vertically down the snowman bodies.
- Wrap scarves around necks and secure with a few hidden stitches.
- Pin and sew (or glue) hats atop each head at an attractive angle. Attach hat bouquet and pompom securely.
- Pin and sew or glue the wreath to the front of the snowwoman.
- Add all finishing details, weaving in all ends neatly on the inside.
- Lightly brush on pink blush to cheeks for a warm, lively effect.
- Block the accessories (scarves, hat bands) by steaming or dampening and shaping on a flat surface if needed.
Customization Ideas
- Switch up yarn colors for a traditional red/green snowman or a pastel winter palette.
- Use special sparkle yarn or iridescent thread for the snow and hats for an extra frosty shimmer.
- Make the snowmen smaller (for ornaments) using sport/DK weight yarn and smaller hooks.
- Omit bead fringe and use simple yarn fringe for a child-friendly version.
- Turn the snowman motif into a pillow by flattening and making a back panel.
- Make just one snowman and enlarge for a plush children’s toy.
- Use the floral wreath motif as a stand-alone ornament or gift topper.
Troubleshooting Tips
- Body curling or slant: Make sure rounds are not too tight or too loose; adjust tension and stuff firmly as you work.
- Uneven edges: Place stitch marker each round and count regularly.
- Motif too large/small: Change hook or yarn size, adjust number of rounds for shaping.
- Loose color changes: Pull yarn snug when switching, and work tails in as you go.
- Scarf or hat too tight/loose: Adjust foundation chain and test around snowman’s neck/head before finishing.
- Accessories shift position: Sew down with small, secure stitches or use invisible thread.
Care Instructions
Spot clean gently by hand using mild soap and cool water. Pat dry with a towel and reshape. Avoid machine washing or wringing as it may deform stuffing and accessories. Lay flat to dry fully. Avoid direct sunlight to prevent color fading, especially on blush cheeks and ribbons.
Final Notes
Pay careful attention to stitch counts for symmetrical, well-shaped snowmen. Adjust stuffing as you go and keep tension even for best results. Don’t hesitate to use the image as a visual guide when positioning accessories or embellishments. With patience and attention to detail, you’ll create a heartwarming, one-of-a-kind snowman couple perfect for display or gifting every winter season.