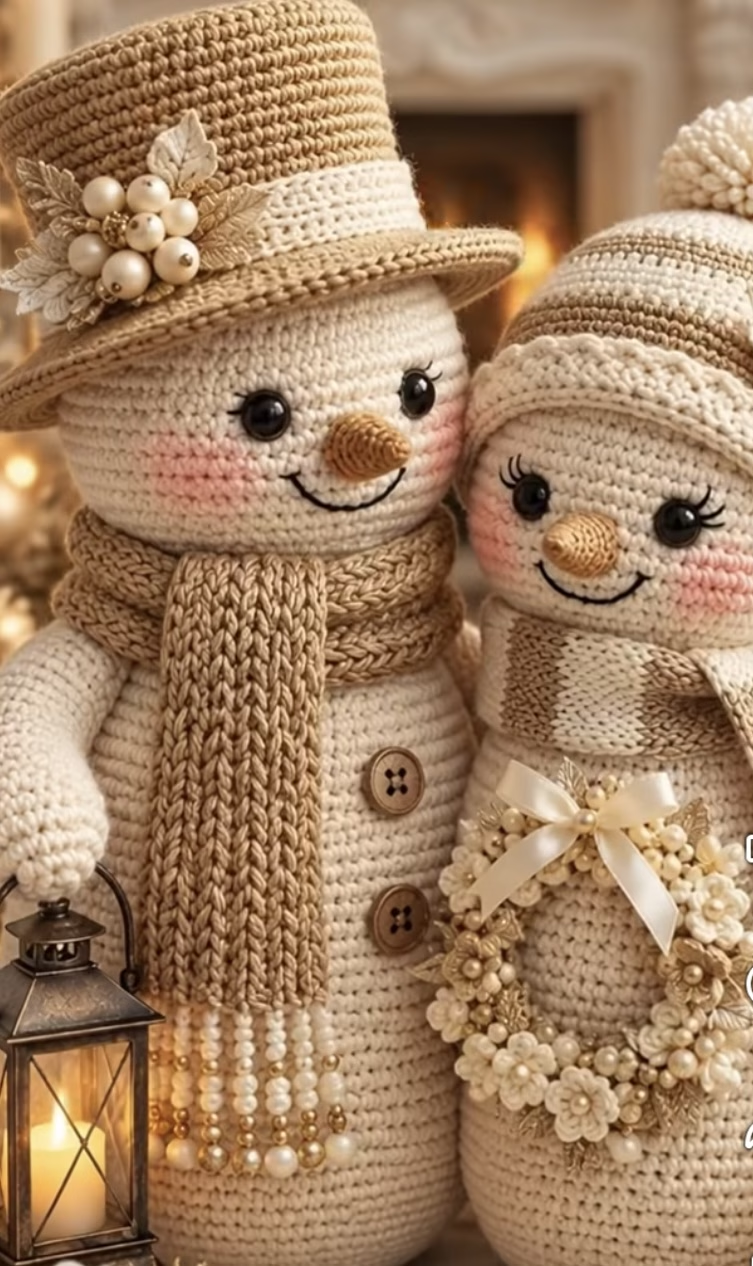
Bring a heartwarming touch of winter elegance to your home with this crochet snowman couple. This design features two adorable snowmen, lovingly crafted in soft neutral shades of cream and beige, detailed with endearing facial expressions, and accessorized with tasteful winter gear. The taller snowman dons a classic top hat adorned with pearls and leaves, while the companion wears a bobble hat and a striped scarf. Both display charming rosy cheeks, button accents, and unique hand-made accessories such as a beaded scarf fringe and a miniature floral wreath. This festive project makes a delightful seasonal decoration, a thoughtful gift, or a cherished keepsake for years to come. Working through this crochet pattern offers a satisfying creative challenge, resulting in heirloom-quality amigurumi full of personality and charm.
Project Overview
This snowman couple is created using amigurumi techniques and is worked in the round from the bottom up for the bodies and heads. The hats, noses, accessories, and scarves are crocheted separately and sewn onto the finished figures. Decorative elements like the top hat embellishment and wreath are crafted with small motifs and beads attached afterward. The result is a pair of three-dimensional, plush snowpeople richly adorned with crocheted and beaded details.
Skill Level
Intermediate. This project uses basic amigurumi shapes but involves numerous small details, frequent color changes, surface embellishment, and precise shaping for facial features and accessories. It’s perfect for those comfortable with working in the round, increasing/decreasing, sewing parts together, and adding embellishments like beads and appliqués.
Materials
- Yarn: Worsted weight (category 4), approx. 100g cream (main bodies), 60g beige/tan (hats and scarf), 30g darker beige/camel (contrast stripes/scarf), small amounts peach or blush pink (cheeks), orange (noses).
- Fiber: Soft acrylic or cotton/acrylic blend for easy shaping and durability.
- Crochet Hook: 3.5 mm (E-4) or size needed for a firm fabric.
- Safety Eyes: Two pairs, 12-15 mm diameter, glossy black or dark brown. Embroidery thread for eyelashes and smiles.
- Stuffing: Polyester fiberfill or wool roving.
- Buttons: 2 flat wooden or imitation wooden buttons (15-18 mm) for snowman’s body.
- Beads: Assorted faux pearls (5-10 mm) and gold/silver accent beads for scarf fringe and wreath, small flat flowers/leaves or matching gold metallic yarn for top hat decor.
- Ribbon: 6 mm satin ribbon for wreath bow (approx. 15 cm).
- Tapestry Needle: For sewing, embroidery, and weaving in ends.
- Stitch Markers: For keeping track of rounds/positions.
- Scissors.
- Hot glue or fabric glue (optional): For securely attaching some embellishments.
Finished Size
- Approximate height (with hat): 29 cm (11.5 inches) for the taller snowman, 25 cm (10 inches) for the smaller.
- Body diameter (widest part): 13 cm (5 inches).
To adjust size, use lighter/heavier yarn and proportionate hook size. Larger hook and chunky yarn yield larger snowmen; smaller hook/thread yields miniatures.
Gauge
- Approx. 18 single crochet (sc) and 20 rounds = 10 cm (4 inches).
For amigurumi, a tight, dense fabric is best; slight gauge differences will only affect overall finished size.
Stitches and Abbreviations
- ch – chain
- sl st – slip stitch
- sc – single crochet
- hdc – half double crochet
- dc – double crochet
- tr – treble crochet
- inc – increase (2 sc in one stitch)
- dec – decrease (sc 2 together)
- MR – magic ring
Important Pattern Notes
- Bodies, heads, and noses are worked in spiral rounds (use a stitch marker to mark first stitch of each round).
- Chains do not count as stitches unless stated.
- For neat color changes, switch to the new color on the last yarn over of the stitch before the change.
- Stuff firmly but shape gently as you go, especially at neck and head transitions.
- Right side (RS) faces outward throughout.
- For accessories and embellishments, join with a sl st unless otherwise noted and fasten off after each piece.
- Safety eyes are installed before closing the head; embroider features before final stuffing if possible.
Detailed Crochet Pattern
Part 1: Snowman Body and Head (make two, adjust hat style for each)
- Shown here is the pattern for one snowman. Repeat for the second, switching hat and accessory style as visible in the image.
Body: (work with cream yarn)
- MR, 6 sc in ring (6)
- inc in each st around (12)
- [sc, inc] around (18)
- [2 sc, inc] around (24)
- [3 sc, inc] around (30)
- [4 sc, inc] around (36)
- [5 sc, inc] around (42)
- [6 sc, inc] around (48)
- [7 sc, inc] around (54)
- sc in each st (54); repeat for 6 rounds for tall snowman or 5 rounds for smaller.
- [7 sc, dec] around (48)
- sc in each st (48); repeat for 2 more rounds.
- [6 sc, dec] around (42)
- sc in each st (42); repeat for 2 more rounds.
- [5 sc, dec] around (36)
- sc in each st (36); repeat for 2 more rounds.
- [4 sc, dec] around (30)
- sc in each st (30); repeat for 1 round.
- [3 sc, dec] around (24)
- sc in each st (24). Stuff body firmly; shape toward top for neck.
Head:
- [3 sc, inc] around (30)
- [4 sc, inc] around (36)
- [5 sc, inc] around (42)
- [6 sc, inc] around (48)
- [7 sc, inc] around (54) – taller/snowman only; for smaller snowman stop at (48); work even for 8 rounds.
- sc in each st (54 or 48) for 6-8 rounds (estimate 6 rounds for smaller, 8 for larger snowman).
- Install safety eyes about 12-14 stitches apart (between rounds 25 and 28 of the head), centered at the front. Embroider eyelashes and smile with black thread; add pink blush cheeks using peach yarn or a touch of fabric paint.
- [7 sc, dec] around (48 or 42)
- [6 sc, dec] around (42 or 36)
- [5 sc, dec] around (36 or 30)
- [4 sc, dec] around (30 or 24)
- [3 sc, dec] around (24 or 18); stuff head firmly.
- [sc, dec] around until closed (approx. 8-10 sts); fasten off, gather, and weave in ends.
Part 2: Nose (Carrot Style, make 2)
Use orange yarn. Work tightly in spiral.
- MR, 4 sc in ring (4)
- sc in each st (4)
- inc in 1 st, sc in next 3 (5)
- sc in each st (5)
- inc in 1 st, sc in next 4 (6)
- sc in each st (6) for 2 rounds. Stuff lightly as you go.
- Close with sl st. Leave a long tail for sewing. Embroider nostrils if desired with dark brown thread.
Sew nose firmly above the smile and just below eye line on each head.
Part 3: Top Hat (larger snowman)
Use beige/tan yarn.
- Hat Tube:
- MR, 6 sc (6)
- inc in each st (12)
- [sc, inc] around (18)
- [2 sc, inc] around (24)
- [3 sc, inc] around (30)
- sc in each st (30) for 9 rounds. (For a taller hat, add 1-2 rounds here.)
- Hat Brim:
- [4 sc, inc] around (36)
- [5 sc, inc] around (42)
- In the BACK LOOPS only, sc in each st (42).
- For extra curl: sc, hdc, dc in each st around (increase as needed for flare and even brim; 54 sts total). Fasten off; weave in ends.
Make a hatband with contrasting yarn: ch 36, sc across (35), fasten off and sew around base of tube. Sew/brim to hat tube so brim sticks out. Attach securely to top of the taller snowman’s head, slightly angled if desired.
Part 4: Bobble Hat (smaller snowman)
Use cream and tan; striped for a two-tone effect. Alternate every 2 rounds.
- MR, 6 sc (6)
- inc in each st (12)
- [sc, inc] around (18)
- [2 sc, inc] around (24)
- [3 sc, inc] around (30)
- sc in each st (30) for 5 rounds, alternating color every 2 rounds.
- Join tan for brim, work 2 rounds sc in each st through back loops only.
- Join yarn for pom-pom: Wrap yarn 40 times around 2 fingers, tie at center, cut loops, and sew pom onto hat’s top.
- Sew hat to smaller snowman’s head, rim slightly above eyes/eyebrows.
Part 5: Scarf (make 2, one long, one striped shorter)
Long Textured Scarf (tall snowman):
- With tan, ch 70 (adjust length as desired).
- Row 1: Hdc in 2nd ch from hook and across (69); ch1, turn.
- Row 2-7: Hdc in front loop only (FLO) across, ch1, turn. Fasten off; weave in ends.
- Beaded Fringe: Cut 10 x 12cm strands, thread pearls/gold beads on each. Fold, loop through scarf end, knot, and secure with glue if needed.
Striped Scarf (smaller snowman):
- With cream, ch 56.
- Row 1: Sc in 2nd ch from hook and across (55). Ch1, turn.
- Row 2-4: Sc in each in tan. Ch1, turn. Repeat stripe sequence (2 rows each color) for 7 stripes.
- Fasten off. Weave in ends.
- Wrap and sew lightly around snowperson’s neck to secure.
Part 6: Decorative Wreath Accessory (smaller snowman)
- With cream, ch 22, sl st to form loop.
- Row 1: Sc in each ch around (22), join with sl st. Fasten off.
- Flowers (make 5): MR, 6 sc in ring, join, fasten off.
- Mini Leaves: With gold yarn or embroidery thread, ch 5, sc in 2nd ch from hook, hdc, dc, sl st (leaf shape). Fasten off, make 5-7.
- Sew or glue flowers, pearls, and leaves onto the ring. Add satin ribbon bow at top. Attach wreath to snowperson’s arm or body as shown.
Part 7: Top Hat Embellishment (tall snowman)
- Make 3-4 small leaves as above, sew/glue to one side of hat band.
- Add cluster of pearl beads (using strong thread) at leaf base.
- Optional: Small crochet flower as in wreath. Sew/glue in place.
Part 8: Button Accents (tall snowman)
- Sew two buttons vertically down center of body, just under scarf. Position evenly.
Assembly and Finishing
- Sew noses, hats, and scarves into place securely with matching yarn.
- Sew buttons, embroider smiles, blush cheeks, and add eyelashes as per photo.
- Sew or glue on all decorative accents (wreath, hatband, beads, flowers, etc.).
- Ensure all ends are woven in neatly inside the pieces.
- Stuff and shape as you go so figures stand tall.
- Spot block plush pieces as needed—mist lightly with water, shape, and let dry thoroughly before adding beads or glue.
Customization Ideas
- Color Play: Swap out neutrals for bright reds, greens, or icy blues for a traditional or whimsical look.
- Size: Use finer or thicker yarn and adjust hook size for different-sized snowmen.
- Accessories: Change scarf textures or patterns; add ear muffs, mittens, or mini gifts.
- Home Decor: Attach a hanging loop for use as oversized ornaments, or build onto a flat square base for a pillow or wall hanging.
- Modular: Use the snowman alone as a winter amigurumi, or make multiples for a festive table centerpiece or mantel display.
Troubleshooting Tips
- If the body curls or tilts, add or reduce stuffing as needed, making sure you shape at the neck transition.
- Loose color changes can be tightened by pulling the ends invisibly to the inside using a tapestry needle.
- Uneven edges after joining can often be smoothed by blocking with gentle hand shaping.
- If your motif is too large or small, adjust tension by changing hook size.
- Wreath or scarf too bulky? Use lighter yarn or smaller beads for a daintier look.
Care Instructions
- Surface wash only with cold water and mild soap.
- Pat gently and air dry; reshape accessories while damp as needed.
- Avoid machine washing if using beads or glued embellishments.
Final Notes
Check your stitch counts at the end of each round for a neat shape, and use the image as a guide for placing facial features and finishing touches. Adjust tension for best results—firmer is better for amigurumi. Pay extra attention to the little details, as the finishing touches truly make these snowmen shine. Enjoy crafting your adorable, festive snowman couple!