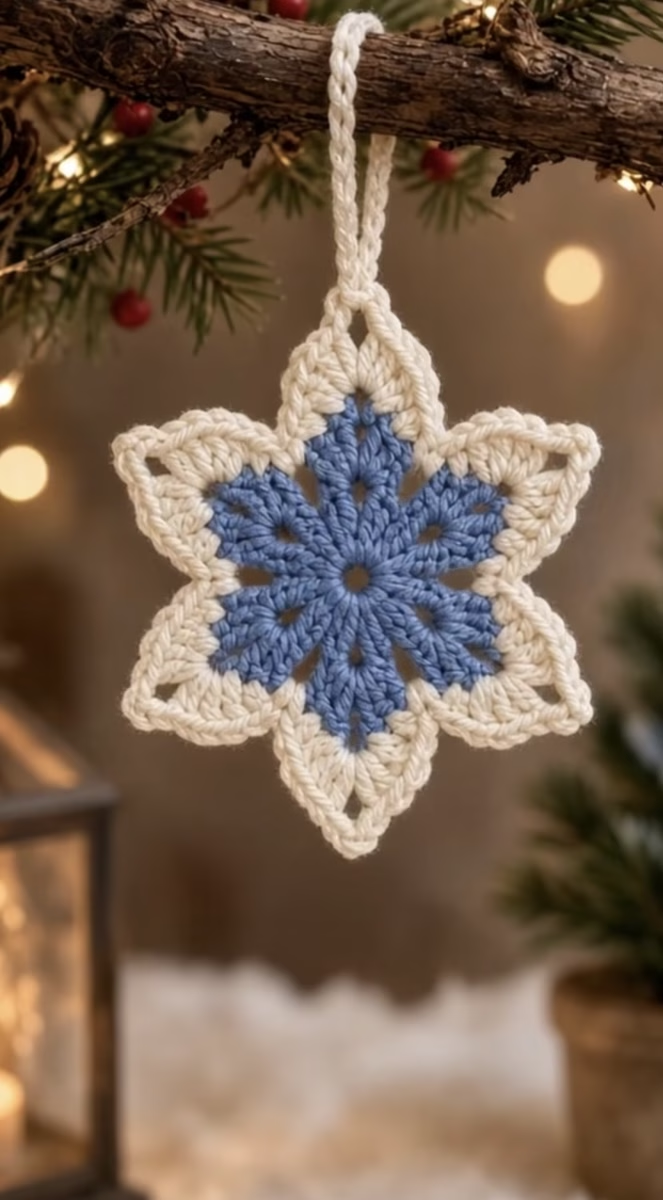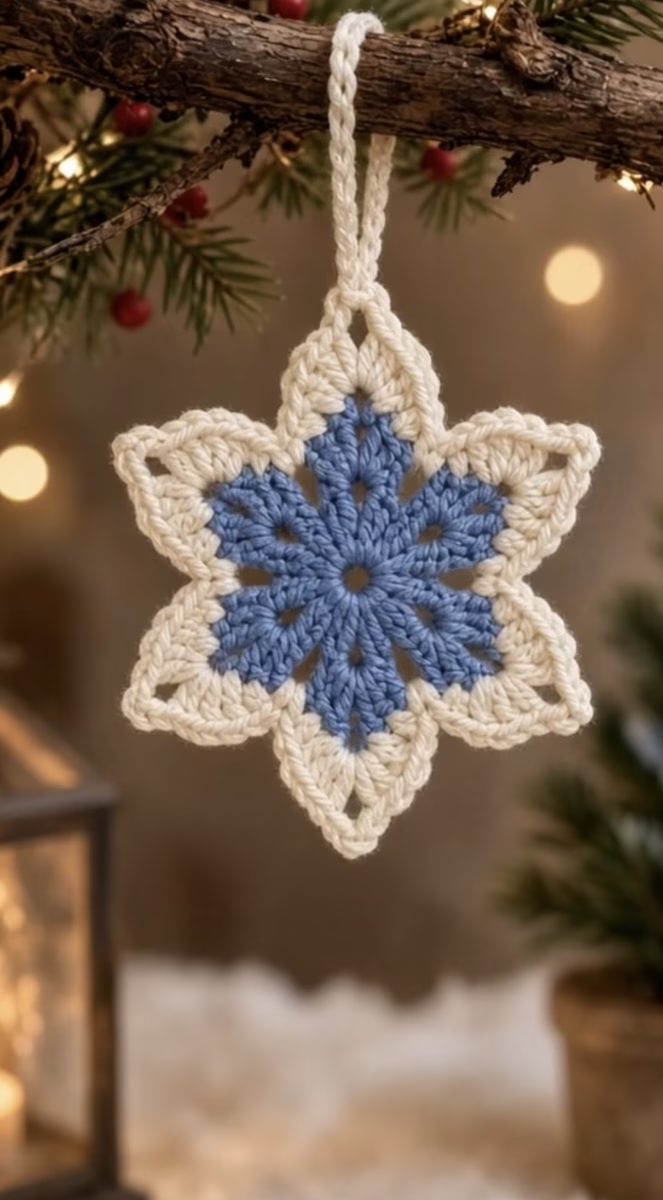
Bring a touch of winter wonder to your holiday décor with this charming crochet snowflake ornament. Featuring a bold, frosty-blue center surrounded by crisp ivory points, the snowflake’s symmetry and elegance make it a standout piece for any tree, garland, or window display. The motif is delicate yet sturdy, with six radiating points and airy details that catch the light beautifully. Crafted in classic winter hues, this ornament blends traditional holiday vibes with a modern twist, making it a perfect handmade gift or decor accent.
The snowflake’s hexagonal structure gives it authentic charm, and the combination of solid crochet stitches with open chain spaces creates visual interest and a lightweight feel. Its finished look is both crisp and soft, perfect for stringing onto wrapped gifts, tucking inside a greeting card, or displaying in your festive home. Not only does it add handmade beauty, but it’s also quick to make, allowing you to craft a whole flurry in just an afternoon. If you enjoy holiday crafts and want a satisfying project that blends colorwork with lacy details, you’ll love making this snowflake ornament!
Project Overview
This snowflake ornament is made in the round, working outward from the center. The piece is constructed in two main color sections: a solid blue center and a lacy cream border that forms the points. The snowflake is worked entirely in one piece, with the hanging loop crocheted directly onto one point at the end. You’ll use increasing rounds to form the core and then shape each point individually in the final rounds. The process is seamless, so there’s minimal assembling required.
Skill Level
Advanced Beginner to Intermediate. The project is suitable for crocheters comfortable with basic stitches and working in the round. You’ll need to know how to change colors, work increases, and crochet into chain spaces. The pattern uses simple joins and basic shaping techniques for the snowflake points, making it a great skill-building project for those ready to move beyond the basics.
Materials
- Yarn: Worsted weight (Category 4) cotton or acrylic yarn
- Color A: Soft blue – approx. 12 grams (20 yards)
- Color B: Cream or white – approx. 15 grams (25 yards)
- Crochet hook: US G/6 (4.0 mm) or size needed for gauge
- Tapestry needle (for weaving in ends)
- Scissors
- Stitch markers (optional, to mark rounds or points)
- Blocking pins and mat (optional, for shaped finished snowflake)
Finished Size
Approximate finished size (including points, not including hanging loop):
- 12 cm (4.75 inches) across from point to point
The size can easily be adjusted by choosing a thinner or thicker yarn, or by increasing/decreasing hook size. To make a larger snowflake, use a heavier yarn or larger hook; for a smaller ornament, use lighter yarn or a smaller hook.
Gauge
Gauge is not crucial for this ornament, but for reference, after Round 2 your piece should measure approximately 3.5 cm (1.4 inches) across. Small variations in tension will only slightly alter the finished size, but if you want uniform ornaments, check your gauge before starting multiples.
Stitches and Abbreviations
- ch – chain
- sl st – slip stitch
- sc – single crochet
- hdc – half double crochet
- dc – double crochet
- tr – treble crochet
- MR – magic ring
- sk – skip
- sp – space
- rep – repeat
Important Pattern Notes
- Chains at the beginning of each round/row count as a stitch unless otherwise stated.
- Always join rounds with a slip stitch to the initial chain or first stitch, unless indicated otherwise.
- When changing colors, complete the final yarn-over of the last stitch in the new color for a clean transition.
- Work with the right side (RS) facing you throughout.
- Use stitch markers to mark the beginning of rounds, or to identify point locations if helpful.
- Keep stitches snug but not too tight for neat, crisp edges.
Detailed Crochet Pattern
Part 1: Snowflake Center (Blue)
With Color A (Blue):
- Round 1: Make a MR, ch 2 (counts as first dc), 11 dc into the ring. Join with sl st to top of ch-2. (12 dc)
- Round 2: Ch 2 (counts as first dc), dc in same st, 2 dc in each st around. Join. (24 dc)
- Round 3: Ch 2, dc in same st, dc in next st, *2 dc in next st, dc in next st; rep from * around. Sl st to join. (36 dc)
Tip: The center should now be flat with no curling and have a defined hexagonal (six-sided) shape from subtle increases. If it domes, loosen your tension; if it ruffles, tighten.
Part 2: Transition Round (Blue, to prepare for color change)
- Round 4: Ch 1, sc in same st, ch 2, sk 2 sts, *sc in next st, ch 2, sk 2 sts; rep from * around (12 ch-2 sps). Join. Fasten off Color A.
Part 3: Base of Points (Cream)
Join Color B (Cream) in any ch-2 sp:
- Round 5: Join with sl st in ch-2 sp, ch 2 (counts as dc), (2 dc, ch 2, 2 dc) in same sp, dc in next sc, *(2 dc, ch 2, 2 dc) in next ch-2 sp, dc in next sc; rep from * around. Join. (Each shell=4 dc, ch-2; 6 shells, 6 dc between)
Tip: Each shell forms the base of a point.
Part 4: Building the Points (Cream)
- Round 6: Sl st to next ch-2 sp, ch 3 (counts as first tr), (tr, ch 3, 2 tr) in same sp; sk next 2 dc, sc in next dc between shells, *sk 2 dc, (2 tr, ch 3, 2 tr) in next ch-2 sp, sk 2 dc, sc in next dc; rep from * around. Join. (6 points formed)
- Round 7: Sl st to ch-3 sp of point, ch 2 (counts as first dc), (dc, ch 3, 2 dc) in same ch-3 sp; ch 2, sc in next sc between points, ch 2, *(2 dc, ch 3, 2 dc) in next ch-3 sp, ch 2, sc in next sc, ch 2; rep from * around. Join. (6 elongated points; 6 ch-3 sps; 6 ch-2 sps with sc between)
- Round 8: (Optional for added lacy detail and increased size) Sl st to ch-3 sp at tip of any point, ch 1, (sc, hdc, dc, ch 4, sl st into 1st ch—forms picot, dc, hdc, sc) all in ch-3 sp, sl st in next ch-2 sp, sc in next sc between points, sl st in next ch-2 sp; rep from * around for all 6 points. Join. Fasten off and weave in all ends.
Tip: Adjust the stitches in the point tips for sharper or more rounded ends. The picot is optional but creates a crisp, defined snowflake tip.
Part 5: Hanging Loop
- With Color B, attach yarn to the tip of any point using a slip stitch.
- Ch 26 (or desired length for hanging loop), sl st back into same ch-3 or ch-4 space to secure.
- Fasten off and weave in ends. Adjust and neaten the loop as needed.
Assembly and Finishing
- Weave in all yarn ends on the wrong side with a tapestry needle.
- Gently stretch the snowflake into shape, making sure all points are even. If needed, lightly steam block or pin each point onto a blocking mat. Mist with water, then let dry to set shape and maximize crispness of points.
- Ensure that the hanging loop is centered at the topmost point for a balanced look.
Customization Ideas
- Change up the colors: Try metallics (silver, gold), classic white-on-white, icy pastels (mint, lilac), or bold red/green for festive contrast.
- Yarn weight variations: Use thinner (#3 DK) yarn for more delicate snowflakes, or chunky yarn for oversized ornaments or wall hangings.
- Make a garland: Crochet multiple snowflakes and string them on a ribbon or chain for a winter garland.
- Coasters: Omit the hanging loop and block flat for a wintery drink coaster.
- Pillow or blanket squares: Crochet the motif, then square it off with rows of single or double crochet to build a cozy blanket or seasonal pillow front.
- Window or gift decor: Attach to a suction cup for window display, or tie as a gift embellishment.
Troubleshooting Tips
- Piece curling: If your snowflake curls, gently increase hook size, or be sure not to pull foundation chains too tightly. Block your finished snowflake for flatness.
- Edges uneven: Check that stitch counts match; missing or extra stitches may distort the points.
- Motif too small/big: Change hook size or yarn thickness to adjust. Try a smaller hook for denser fabric.
- Loose color changes: Pull up the new color snugly when switching at the end of a round. Weave ends firmly to prevent gaps.
- Uneven tension: Practice making consistent chains and stitches. Relax hands, and pause between rounds to check shape.
Care Instructions
If using cotton or acrylic yarn, spot clean or hand wash gently in cool water with mild soap. Lay flat to dry. For best results, block after every wash to maintain the snowflake’s shape and pointed edges.
Final Notes
Take your time with each round, double-checking stitch counts to keep the motif symmetrical. Adjust tension and blocking as needed for crisp points and even edges. Use a photo of your finished piece as reference whenever creating multiples. With a bit of care and creativity, you’ll have a flurry of beautiful snowflakes ready to brighten your winter season!