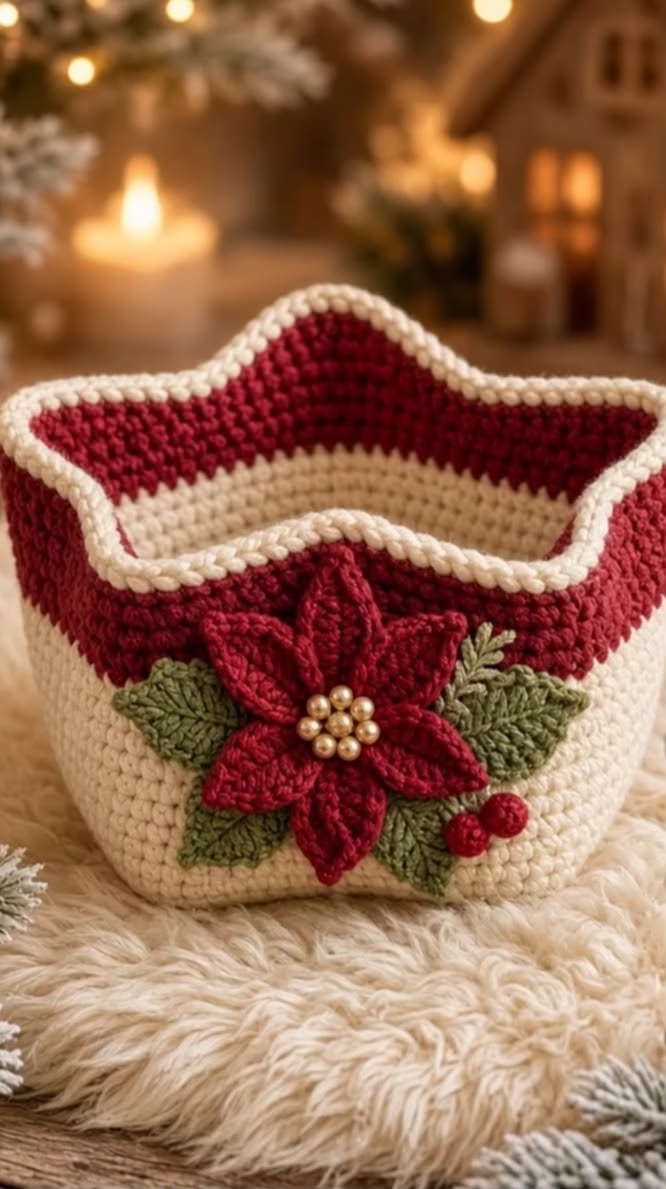
Bring seasonal warmth and handmade charm to your home with this festive crochet basket. This project features a unique star-shaped structure with a textured, solid build made from creamy off-white and bold red yarns. The basket is embellished with a beautifully detailed red poinsettia flower, three pearl-like center beads, lush green leaves, and decorative berry accents, adding a classic touch of holiday elegance. Perfect as a centerpiece, a storage catch-all, or for holding wrapped treats, this sturdy basket can brighten up any room or make a thoughtful gift during the holidays.
The signature star shape elevates the design while providing spacious corners and a sculptural profile, making it as eye-catching as it is practical. The smooth texture of single crochet stitches is both modern and durable. The bold two-tone stripes give a cheerful pop of color, beautifully offset by the lush, detailed appliqué on one side. This project is engaging and rewarding, blending precise stitch work with creative decorative elements, perfect for anyone seeking a festive and functional handmade piece for seasonal décor.
Project Overview
This star-shaped basket is worked from the base upward in continuous rounds, starting with a flat star motif for the bottom. The sides are built upwards using single crochet, with two main colors worked in color block sections. The embellishments—poinsettia, leaves, and berries—are made separately and sewn on at the end. The result is a seamless, sturdy storage basket featuring holiday flair and expert detailing.
Skill Level
Intermediate. The construction combines shaping, color changes, and the addition of appliqués. Experience with working in the round and basic shaping (increasing at defined corners to create points) is helpful. The project offers a fun challenge for those comfortable with basic stitches and looking to expand their repertoire into decorative assembly and motifs.
Materials
- Worsted Weight (Category 4) Yarn:
- Cream / Off-White – approx. 150g (main color)
- Rich Red – approx. 60g (stripe & flower)
- Leaf Green – approx. 25g (leaves)
- Berry Red (optional, for berry balls) – scrap amount
- Crochet Hook: 4.0 mm (G-6) or appropriate size for a firm fabric
- Tapestry Needle: For weaving in ends and sewing appliqué
- Scissors
- Stitch Markers: For marking corners and the start of rounds
- Six small pearl or gold beads (5–6 mm) for the flower center
- Optional: Hot glue gun for bead attachment (or sew beads securely)
Finished Size
Approximate completed basket dimensions:
- Width across points: 22 cm (8.5 inches)
- Height: 13 cm (5 inches)
- Base width (flat point-to-point): 20 cm (8 inches)
To adjust the size, use different yarn weights and hook sizes or increase the starting rounds for a larger basket. Maintain tight gauge for maximum structure.
Gauge
Approximate gauge: 15 single crochet stitches x 16 rows center over 10 cm (4 inches) in single crochet (worked in the round).
Check your gauge and adjust your hook size as needed. Tighter stitches will result in a sturdier basket; slight differences in gauge will alter the final size.
Stitches and Abbreviations
- ch – chain
- sl st – slip stitch
- sc – single crochet
- hdc – half double crochet
- dc – double crochet
- tr – treble crochet
- inc – work 2 sts in the same st (increase)
- dec – work 2 sts together (decrease)
- MR – magic ring
- st(s) – stitch(es)
- FLO – front loop only
- BLO – back loop only
Important Pattern Notes
- Basket is worked in continuous rounds unless stated otherwise—use a stitch marker to keep track of the first stitch in each round.
- Chains at the beginning of rounds do not count as stitches unless specified.
- For color changes between rounds, finish the last stitch of the round with new color, pulling through the last loop with the new yarn.
- Keep stitches tight for structure; consider using a smaller hook than you normally would for worsted weight yarn.
- Right side will face outward throughout; keep motif appliqué on the RS (right side).
Detailed Crochet Pattern
Part 1: Star-Shaped Base
- With cream/off-white yarn, make a MR.
- Round 1: Ch 1, 10 sc in MR. Pull tight to close. (10 sts)
- Round 2: 2 sc in each st around. (20 sts)
- Round 3: *Sc in next st, 2 sc in next st; repeat from * around. (30 sts)
- Round 4: *Sc in next 2 sts, 2 sc in next st; repeat from * around. (40 sts)
- Round 5: *Sc in next 3 sts, 2 sc in next st; repeat from * around. (50 sts)
- Round 6: *Sc in next 4 sts, 2 sc in next st; repeat from * around. (60 sts)
- Round 7: Mark every 10th stitch with a stitch marker. *Sc in next 5 sts, 2 sc in next st (corner inc), sc in next 4 sts; repeat from * 5 more times. (66 sts)
- Round 8: *Sc in sts up to the stitch before the marked stitch, 3 sc in marked st (to emphasize point), sc in next sts to next marked st; repeat 6 times (continue to use markers). (72 sts)
- Round 9-11: Continue as established: on each round, make 3 sc in each marked point, sc in each st in between. Move your markers to the center sc of each 3-sc group every round. (Stitch count will grow by 12 sts each round: End Round 11 with 108 sts)
- End star base when item measures 20 cm (8 in) point-to-point. Do not fasten off.
Part 2: Basket Walls
- Round 12 (turn sides up): Sc in BLO of each st around (creates a crisp edge for the sides to rise). (108 sts)
- Rounds 13-18: Sc in each st around. Continue to move marker to keep track of beginning of round. (108 sts each round)
- Switch to red yarn.
- Rounds 19-25: With red, sc in each st around. (108 sts each round) If you want deeper color band, add rounds.
- Round 26 (optional edging): Switch back to cream. Work reverse single crochet (crab stitch) around for a sturdy, corded rim. (108 sts)
Fasten off and weave in ends. Basket walls should be standing upright and molded into a star shape, with crisp points aligned over base points. If needed, gently adjust corners to define the star shape.
Part 3: Poinsettia Flower Appliqué
- Flower (make 6 petals in red):
- With red yarn, ch 10.
- Row 1: Sc in 2nd ch from hook, hdc in next ch, dc in next 2 ch, tr in next 3 ch, dc in next ch, hdc in next ch, sc in last ch. (9 sts)
- Pivot, rotate work to crochet on other side of foundation ch:
- Sc in first ch, hdc in next, dc in next, tr in next 3, dc in next, hdc in next, sc in last. (9 sts)
- Sl st to starting point to close. Fasten off, leaving a long tail for sewing.
- Repeat for a total of 6 petals.
- Assembly: Arrange 3 petals in a triangle. Layer remaining 3 on top, offsetting slightly. Sew together at centers.
- Stitch or glue 5–6 round beads to the center to mimic poinsettia stamens.
Part 4: Leaves and Berries
- Leaf (make 3–4 in green):
- With green, ch 8.
- Row 1: Sc in 2nd ch from hook, hdc in next, dc in next 3, hdc in next, sc in last. (7 sts)
- Ch 1, turn. Sl st in same st, sc in next, hdc in next, dc in next 2, hdc in next, sc in last. (7 sts)
- Continue in this fashion for one more row if a larger leaf is desired. Fasten off with a long tail.
- Pinch and sew base for shape. Needle-sculpt veins by running yarn up and down the center, if desired.
- Berries (optional, make 2–3):
- With berry red, make a MR. Work 6 sc into MR. Pull tight. Sl st to first st and fasten off with a tail. (6 sts)
- Shape into a small ball and sew into place.
Part 5: Appliqué Attachment
- Position flower on one star wall’s center. Arrange leaves behind and sew in place.
- Add optional berries beside the leaves; sew securely.
- Use sewing thread or yarn to firmly secure the appliqué; ensure ends are woven invisibly inside basket.
- With a tapestry needle, attach pearl beads to flower center (if not glued).
Assembly and Finishing
- Check star corners are crisply defined by gently shaping sides and pressing corners with your fingers, or damp block if needed (see below).
- Weave in all remaining ends securely using a tapestry needle.
- Optional: For extra stiffness, spray the basket lightly with water and shape over a matching-size container, allowing it to air dry completely.
- Block separately made flower, leaves, and berries if desired for neatness before attachment.
- Display with the appliqué centered on the most visible side.
Customization Ideas
- Change the stripe color to match your seasonal decor (forest green, gold, silver, navy, etc.).
- Use chunky yarn for a larger, more sculptural basket, or DK/light worsted for a smaller, daintier version.
- Switch out the appliqué for other motifs such as holly, snowflakes, or hearts for year-round use.
- Convert the basket into a wall hanging by adding loops to two star points and stringing up with ribbon or jute.
- Make several baskets and use as gift containers, organizer bins, or festive table decor.
Troubleshooting Tips
- Curling Base: Try going up a hook size for the base only, or block it gently before starting the sides.
- Floppy Sides: Use tighter stitches or a smaller hook; stiffen with a lining if needed.
- Uneven Edges: Check stitch counts, especially at the star points; adjust placement of inc sts to keep symmetry.
- Loose Color Changes: Pull up new color snugly and work yarn tails in sides for seamless transitions.
- Motif too large/small: Adjust hook or yarn size, and block applique pieces before sewing on.
Care Instructions
- Hand wash in cool water with mild soap if needed; do not wring. Lay flat to dry, reshaping basket and star points as it dries.
- Spot clean flower and embellishments with care. Avoid soaking if beads are glued on.
Final Notes
Before finishing, check your stitch counts and ensure the walls are symmetrical and star points are crisp. Adjust tension as you work to keep the basket sturdy. Use the project photo as a reference for color placement and applique layout. The combination of a festive shape and ornate applique makes this a show-stopping project for your handmade holiday traditions. Enjoy your festive creation, and happy crocheting!