Introduction
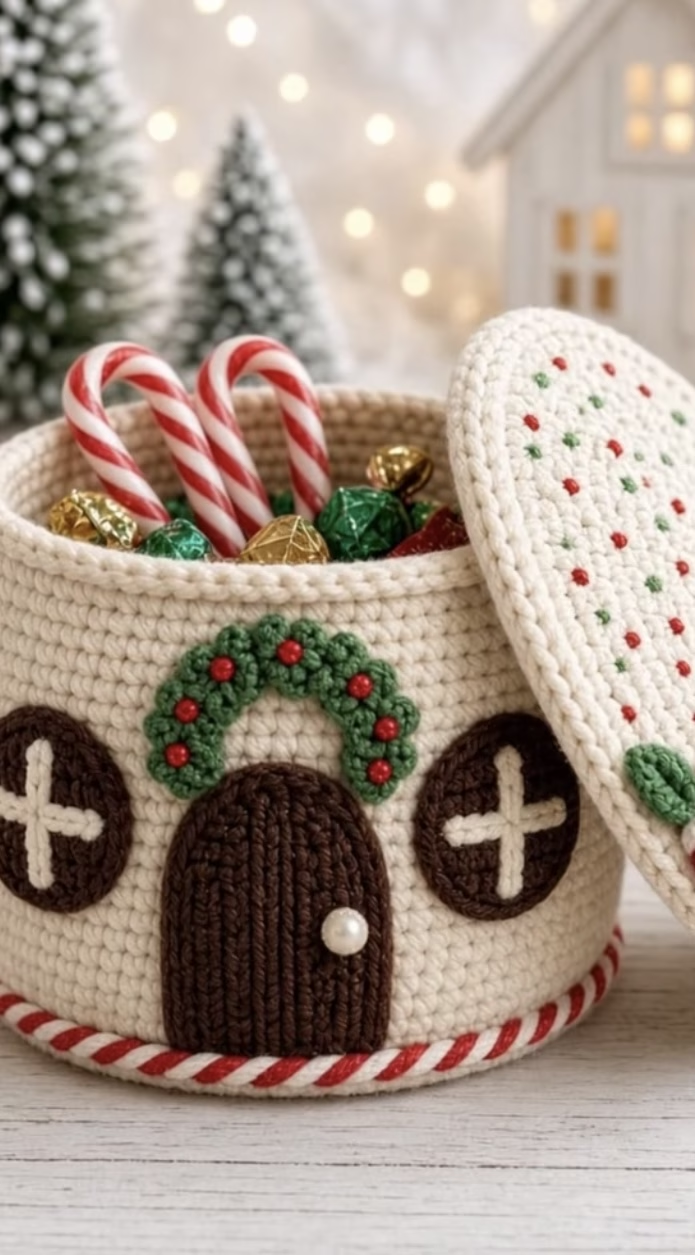
Bring festive cheer to your home with this adorable crochet gingerbread house treat box! Reminiscent of cozy winter cottages, this circular box features a beautifully textured beige body adorned with playful details. Its front showcases a chocolate-brown arched door with a decorative pearl knob, two round windows featuring cross-shaped panes, and a cheerful green crochet wreath topped with red “berries.” The removable lid fits snugly and is dotted with tiny red and green “sprinkles”, enhancing the festive theme. The bottom rim is highlighted with a whimsical swirled red-and-white candy cane border.
This delightful box is perfect for holding wrapped candies, small gifts, or serving as a unique centerpiece for holiday gatherings. Use it as a keepsake holder or fill it with treats for a special homemade gift. The gingerbread house project will add warmth and personality to your seasonal decor while offering functional storage.
Crocheting this box is not just a joy—it’s an exploration of creative construction, colorwork, and three-dimensional shaping. Perfect for those looking to enhance their holiday decor or create a charming, practical handmade gift.
Project Overview
The gingerbread house treat box is constructed in several steps: the main body and lid are crocheted in the round, using sturdy stitches for structure. Separate applique pieces (windows, wreath, door, and berries) are made individually and sewn onto the house for bold, dimensional detail. Finally, the candy cane border is crocheted as a long strip and attached around the base. All parts are joined and finished with attention to neatness and function.
Skill Level
Intermediate
This pattern is ideal for intermediate crocheters due to its use of color changes, dimensional appliques, shaping for sturdy sides and lid, and some sewing/assembly. Basic knowledge of working in the round, increasing and decreasing, and joining pieces is required. Those with experience in amigurumi or 3D crochet will find the project especially approachable.
Materials
- Yarn: Worsted weight (category 4) cotton or acrylic yarn works best for structure.
- Color A – Cream or light beige (main house and lid): 120g (approx. 200 yds)
- Color B – Dark brown (door, windows): 30g (approx. 45 yds)
- Color C – White (windowpanes, candy cane stripes): 15g (approx. 25 yds)
- Color D – Red (candy cane, lid sprinkles, wreath berries): 12g (approx. 18 yds)
- Color E – Green (wreath): 12g (approx. 18 yds)
- Crochet Hook: US size E/4 (3.5mm) or hook needed to achieve stiff fabric
- Tapestry (yarn) needle (for sewing pieces and weaving in ends)
- Stitch markers
- Scissors
- Optional: Small pearl bead (or button) for door knob
- Optional: Thin flexible plastic canvas or cardboard (for stiffening base and lid, if needed)
Finished Size
- Approximate diameter: 14 cm (5.5 inches)
- Approximate height (without lid): 8.5 cm (3.3 inches)
To adjust the size, increase or decrease the rounds for the base and the height of the sides, making sure to adjust the lid diameter accordingly.
Gauge
Gauge: 17 single crochet x 18 rows = 10cm x 10cm (4″ x 4″).
Check gauge to ensure your box is firm and holds its shape. Small differences will alter the finished size slightly but won’t affect the assembly.
Stitches and Abbreviations
- ch – chain
- sl st – slip stitch
- sc – single crochet
- inc – 2 single crochet in same stitch (increase)
- dec – single crochet 2 stitches together (decrease)
- hdc – half double crochet
- dc – double crochet
- FO – fasten off
- MR – magic ring (adjustable circle)
Important Pattern Notes
- All pieces are worked in the round unless stated otherwise.
- The base and lid use continuous spiral rounds; do not join at the round end unless indicated—use a stitch marker to keep track.
- Change colors at the last yarn over of the last stitch in the old color to ensure clean color transitions.
- For a neater finish, the right side should always face outward unless otherwise specified.
- Stuff or reinforce the base and lid with cardboard or plastic canvas for extra stability if desired.
Detailed Crochet Pattern
Part 1: Main Box Base (Cream, Color A)
Base:
- With Color A, MR, ch 1, 6 sc into ring (6)
- 2 sc in each st around (12)
- [1 sc, inc] around (18)
- [2 sc, inc] around (24)
- [3 sc, inc] around (30)
- [4 sc, inc] around (36)
- [5 sc, inc] around (42)
- [6 sc, inc] around (48)
- [7 sc, inc] around (54)
- [8 sc, inc] around (60)
(Size check: After Round 10, the diameter should be about 14 cm/5.5 inches. Add further rounds as necessary, keeping to the increase pattern, if you wish to make it larger.)
Sides:
- Working in back loops only (BLO), sc in each st around (60)
- Sc in each st around for 13 more rounds (or until side is 8.5 cm/3.3 inches high). Use regular sc, not BLO, unless you prefer a ribbed look. Fasten off and weave in end.
Part 2: Main Box Lid (Cream, Color A)
Lid Top:
- Repeat base Rounds 1–10 for a circle matching the box’s diameter. (60 sts at round 10)
- Work 2 additional rounds of sc (60 sts per round). This helps the lid slightly overhang the box base.
Lid Sides:
- Sc in BLO around (60)
- Sc in each st around for 4 more rounds to form lid lip (total 5 rounds for the lip). FO and weave in end.
Part 3: Candy Cane Rim (Red and White, Colors D and C)
Crochet I-cord-style Trim:
- Using Color C (white), ch 70 (or measure rim circumference and adjust chain as needed for a snug fit with slight stretch).
- Turn, hdc in 2nd ch from hook, hdc along to end, switch to Color D (red) at last hdc, ch 1, do not turn.
- With D, sl st along the hdc row, picking up the top loops only. (Alternately, carry both yarns and alternate every stitch for a fine spiral effect.)
- Fasten off both colors; weave in ends.
Neatly sew or glue the cord around the base, overlapping ends for a seamless look.
Part 4: Decorative Door (Brown, Color B)
- With Color B, MR, ch 1, 6 sc into ring (6)
- 2 sc in each st (12)
- [1 sc, inc] x 4 (18)
- Continue in rows for arch shape: ch 1, turn, 9 sc across center 9 st only
- Ch 1, turn. Dec, 5 sc, dec (7)
- Ch 1, turn. Dec, 3 sc, dec (5)
- Ch 1, turn. Dec, 1 sc, dec (3)
- Sc evenly around edge to finish, placing 2 sc in each arch corner as you turn. FO and leave tail for sewing.
- Sew a pearl bead or small button near the right side of the door for the knob.
Part 5: Windows (Brown, Color B & White, Color C)
Make 2 windows:
- With Color B, MR, ch 1, 6 sc into ring (6)
- 2 sc in each st (12)
- [1 sc, inc] around (18). Sl st to first sc, FO, leave tail for sewing.
- With Color C, embroider a cross over the center as windowpanes (stitch vertically and horizontally across center, pulling thread to form the “+”).
Part 6: Wreath (Green, Color E & Red, Color D for berries)
- With Color E, ch 26, join with sl st to first ch (make sure it is not twisted).
- [Sc in next ch, hdc, sc] in same ch, skip next ch, repeat around (this gives a slightly lumpy, leafy texture). Join, FO with a tail for sewing.
- Using Color D, make 6 French knots or tiny embroidered berries spaced evenly.
Part 7: Lid Sprinkles (Red and Green, Colors D & E)
- With a tapestry needle, embroider small French knots or surface stitches randomly over the lid in red and green to mimic confetti or sprinkles. Securely weave in any ends.
Assembly and Finishing
- Position the door slightly off-center on the side facing you, about 2 rounds above the base. Sew into place with matching yarn, hiding stitches on wrong side. Attach the bead or button as the doorknob if using.
- Sew one window on each side of the door, spacing evenly left and right. Use pinned placements first to check symmetry.
- Shape the wreath into an arch; sew above door, tacking both ends and arch center securely. Adjust berry placement if needed.
- Sew the candy cane cord snug around the bottom edge of the base for a neatly finished rim.
- Check for any loose ends and weave them quietly into the inside of the structure.
- If desired for extra stability, cut a circle of cardboard or plastic canvas the size of the base and insert it between two layers (before weaving in the final round of the base or while making the base, work a second base to sandwich the stiffener inside).
- If needed, gently steam block the lid and base to help them hold their shape. Allow to dry thoroughly before use.
Customization Ideas
- Use different house colors—try gingerbread brown, pastel pink, or snowy white for a variety of cottage styles.
- Switch up the trim colors for different holidays or to match your decor.
- Make the box larger as a storage basket, or smaller as a trinket dish.
- Add a base or lining inside with felt for added structure and a polished finish.
- Sew a loop to the lid and use as a festive gift basket or wall hanging.
- Replace the door motif with a window for an alternate look.
- Embellish with sequins, small bells, or felt details for extra sparkle.
- Use the front motif as a blanket square, pillow front, or applique on bags and tote projects.
Troubleshooting Tips
- If the box sides curl outwards, use a smaller hook for a firmer shape, or insert a stiffener.
- If the rim or lid feels loose, go down half a hook size for those parts, or add a decrease round to snug the fit.
- If your stitches look uneven or details curl, block gently with steam (for natural fibers) and shape while drying.
- Loose color changes can be avoided by always switching colors on the last yarn over, and tugging ends to snug up stitches.
- If the box becomes too tall or short, simply add or subtract rounds to the sides, checking measurement as you go.
- Use stitch markers to mark the first stitch of each round, especially in continuous spiral rounds, to keep track of your progress.
Care Instructions
Hand wash gently in cool water with mild soap. Gently shape and air dry flat. Avoid wringing out. Spot clean as needed, especially before storing seasonal treats inside. If you’ve used a stiffener, check that it is water-resistant before washing.
Final Notes
Always double-check your stitch counts at the end of each round for consistent, even results. Adjust your personal tension to keep the fabric firm enough to hold its shape. Refer to the photos as a visual guide and feel free to get creative with the decorative details! Most of all, have fun infusing your personal touches into this festive gingerbread house treat box—a true holiday keepsake you’ll treasure for years to come.