📖 B. INTRODUCTION
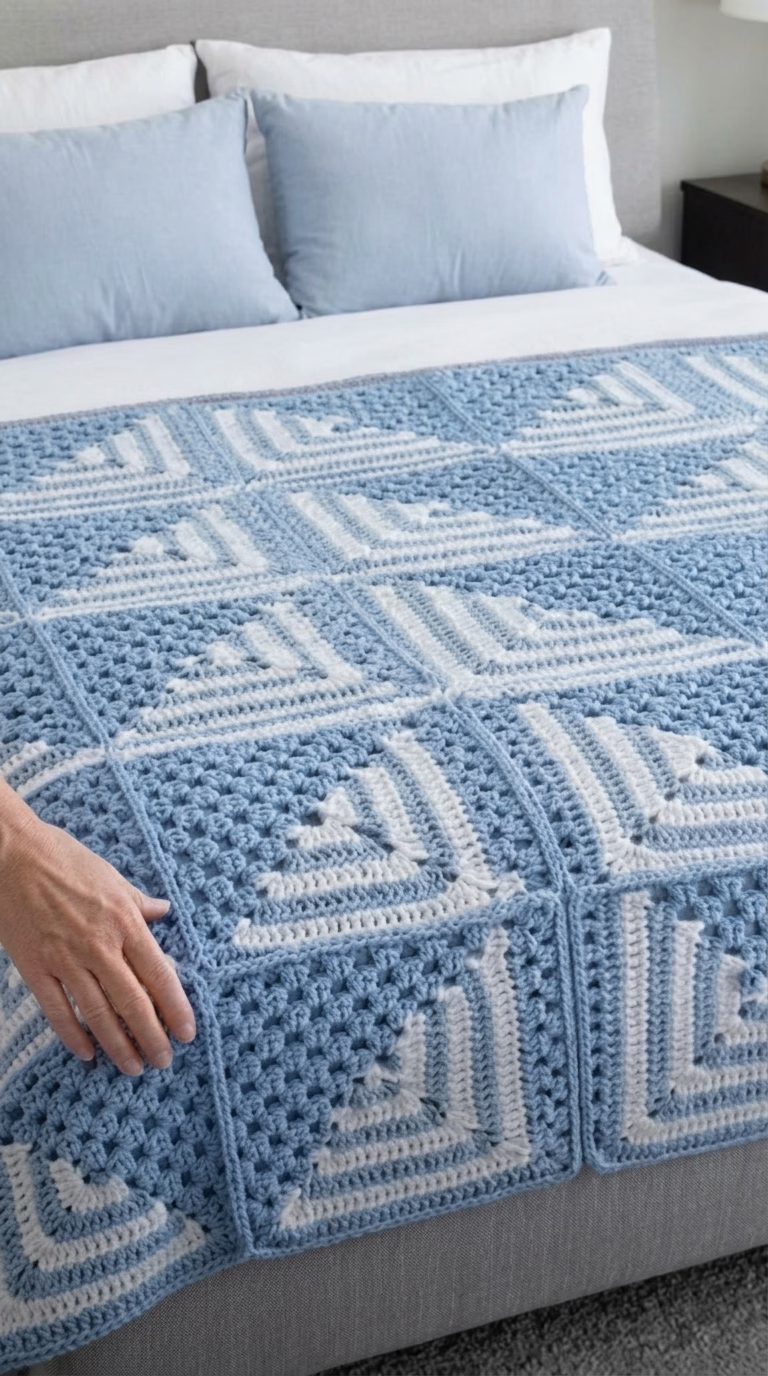
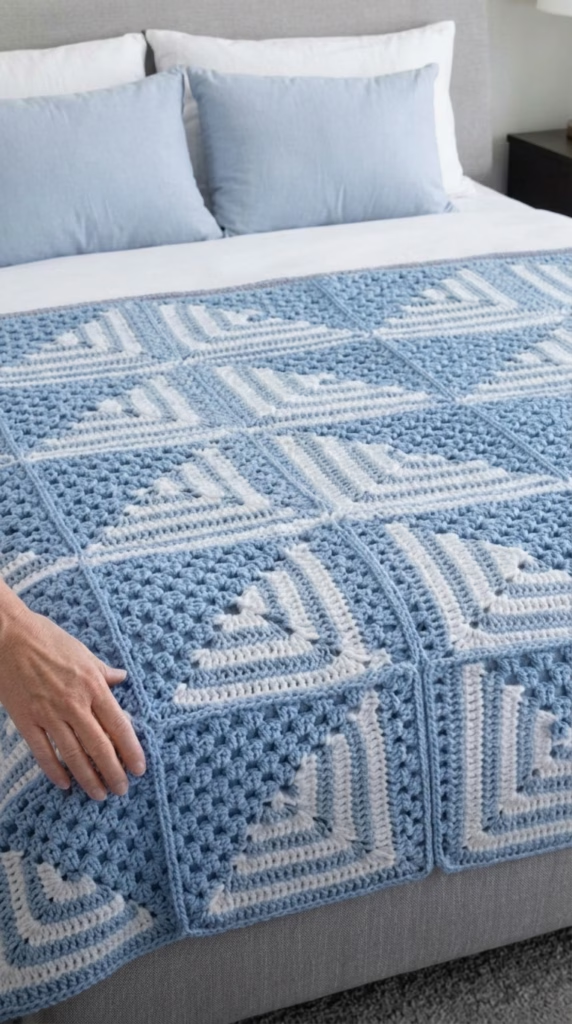
Bring a fresh, modern aesthetic into your living space with this striking geometric throw blanket. Blending the timeless charm of classic granny stitch clusters with crisp, contemporary L-shaped mitered stripes, this design creates a mesmerizing optical pattern across every motif. The serene pairing of dusty slate blue and crisp white delivers a calm, boutique-hotel vibe that effortlessly elevates any bedroom or sofa.
Whether you are crafting a cozy keepsake for your own home or making a memorable housewarming or wedding gift, this blanket offers an endlessly engaging crochet project. The modular construction allows you to work piece-by-piece, making it easy to carry with you on the go before joining the squares into a grand, cohesive throw.
Each motif features a solid mitered corner that transitions into open, airy granny cluster rows on the opposite sides. When assembled in a uniform grid, these alternating textures form dynamic diagonal lines that draw the eye across the entire blanket. Customize the palette with bold jewel tones, earthy neutrals, or soft pastels to tailor this heirloom pattern to your personal decor.
🔍 C. MAIN PATTERN OVERVIEW
This project is constructed from 12 individual geometric motif squares arranged in a 3-column by 4-row grid layout. Each square measures approximately 15 inches (38 cm) when blocked, resulting in a generous full-body throw blanket.
+-------------------+-------------------+-------------------+
|  [Mitered Square] |  [Mitered Square] |  [Mitered Square] |
|     (Row 1, Col 1)|     (Row 1, Col 2)|     (Row 1, Col 3)|
+-------------------+-------------------+-------------------+
|  [Mitered Square] |  [Mitered Square] |  [Mitered Square] |
|     (Row 2, Col 1)|     (Row 2, Col 2)|     (Row 2, Col 3)|
+-------------------+-------------------+-------------------+
|  [Mitered Square] |  [Mitered Square] |  [Mitered Square] |
|     (Row 3, Col 1)|     (Row 3, Col 2)|     (Row 3, Col 3)|
+-------------------+-------------------+-------------------+
|  [Mitered Square] |  [Mitered Square] |  [Mitered Square] |
|     (Row 4, Col 1)|     (Row 4, Col 2)|     (Row 4, Col 3)|
+-------------------+-------------------+-------------------+
Each motif square is composed of three integrated construction phases:
- 📐 The Mitered L-Corner Block: Worked back-and-forth in solid double crochet rows around a central corner point, switching between Crisp White and Dusty Slate Blue to build concentric L-stripes.
- 🧶 The Granny Cluster Fill Section: Worked directly onto the remaining two sides of the L-block using Dusty Slate Blue to complete the square using 3-double-crochet cluster rows.
- 🔳 The Framing Round: A final solid edge worked around all four sides of each motif to establish perfect 90-degree corners and exact stitch counts for seaming.
Once all 12 motifs are completed and blocked, they are joined using a crisp single crochet seam on the wrong side and framed with a simple, elegant double crochet outer border.
🎯 D. SKILL LEVEL
Skill Level: Easy to Intermediate
This project is suitable for adventurous beginners and intermediate crocheters who are comfortable with basic stitches and yarn color changes.
- 🧶 Magic Ring / Adjustable Loop: Starting the mitered corner point smoothly.
- 📐 Mitered Turning Increases: Adding stitches at row ends and corner spaces to form right angles.
- 🎨 Color Switching: Carrying and changing yarn colors neatly at the end of rows.
- 🧵 Granny Stitch Clusters: Working groups of 3 double crochets into chain spaces.
- 🪡 Motif Seaming: Joining motif squares evenly along edge stitches.
📏 E. FINISHED SIZE
- 📐 Individual Motif Square: 15 in x 15 in (38 cm x 38 cm) after blocking.
- 🛌 Overall Blanket Dimensions: Approx. 48 in x 64 in (122 cm x 163 cm) including the outer border.
Note on Sizing: You can easily adjust the total blanket size by making fewer or more motif squares. For example, a 4×4 grid (16 squares) yields a square 64 in x 64 in (163 cm x 163 cm) throw.
🧮 F. GAUGE
- 🧶 Solid Double Crochet Gauge: 14 dc sts and 7.5 rows = 4 in x 4 in (10 cm x 10 cm) using a 5.0 mm (US H/8) crochet hook.
- 📏 Motif Gauge Check: Rows 1–8 of the Mitered L-Block should measure approximately 7.5 inches (19 cm) along each straight top edge before adding the granny cluster fill.
Tension Note: Amigurumi requires extremely tight gauge, but blanket motifs require even, comfortable tension so the squares lie completely flat without curling at the corners.
🧶 G. REQUIRED YARN AMOUNTS
Amounts are estimated for standard Medium Worsted Weight (#4) yarn (100% Acrylic or Wool Blend):
- 🧵 Color A (Dusty Slate Blue / Main Color): Approx. 1,500 yards (1,370 meters) / 8 skeins (100g each).
- ⚪ Color B (Crisp White / Accent Stripe): Approx. 750 yards (685 meters) / 4 skeins (100g each).
- 📦 Total Project Yarn: Approx. 2,250 yards (2,055 meters) total.
🧰 H. MATERIALS
- 🪡 Crochet Hook: US Size H/8 (5.0 mm) or size required to obtain gauge.
- 🧶 Yarn: Worsted weight (#4) yarn in Dusty Slate Blue and Crisp White.
- ✂️ Tapestry Needle: Large-eye yarn needle for weaving in ends and seaming.
- 📏 Tape Measure: For checking motif dimensions.
- 📍 Stitch Markers: 8–12 locking markers to align squares during assembly.
- 🧱 Blocking Equipment: Blocking boards and T-pins (highly recommended for crisp corners).
🔤 I. ABBREVIATIONS – US TERMS
- 🟢 ch: chain
- 🟢 sc: single crochet
- 🟢 dc: double crochet
- 🟢 sl st: slip stitch
- 🟢 st(s): stitch(es)
- 🟢 sp(s): space(s)
- 🟢 ch-sp: chain space
- 🟢 MR: magic ring
- 🟢 cluster / 3-dc grp: granny cluster (3 double crochet stitches worked into the same stitch or chain space)
- 🟢 RS: right side
- 🟢 WS: wrong side
- 🟢 FO: fasten off
- 🟢 ea: each
📝 J. NOTES BEFORE YOU BEGIN
- 🧵 Working in Rows: The mitered L-block and granny fill sections are worked in back-and-forth rows; the framing round is worked continuously around the square perimeter.
- 🎨 Color Changes: Change yarn colors on the last yarn-over of the final double crochet in a row before chaining to turn.
- ✂️ Weaving Ends: Weave in yarn ends every 3–4 rows or upon completing each square. Leaving all ends until blanket completion will make assembly tedious.
- 📐 Blocking is Key: Because solid double crochet and open granny clusters have slightly different stretch qualities, wet-blocking or steam-blocking each square to 15 in x 15 in before joining guarantees flat, flawless seams.
🪡 K. COMPLETE PATTERN
📐 Component 1: The Mitered L-Corner Block (Make 12)
This block forms the solid corner of the square with nested L-stripes in alternating colors.
Row 8 (White):   [24 dc] -- (ch 2 corner) -- [24 dc]
Row 7 (Blue):    [21 dc] -- (ch 2 corner) -- [21 dc]
Row 6 (White):   [18 dc] -- (ch 2 corner) -- [18 dc]
Row 5 (Blue):    [15 dc] -- (ch 2 corner) -- [15 dc]
Row 4 (White):   [12 dc] -- (ch 2 corner) -- [12 dc]
Row 3 (Blue):    [ 9 dc] -- (ch 2 corner) -- [ 9 dc]
Row 2 (White):   [ 6 dc] -- (ch 2 corner) -- [ 6 dc]
Row 1 (White):   [ 3 dc] -- (ch 2 corner) -- [ 3 dc]  <-- Started in MR
- Row 1 (White): Start with Color B (White) in a MR. Ch 3 (counts as 1 dc throughout pattern), work 2 dc in ring, ch 2, work 3 dc in ring. Pull center ring tight. Turn. (3 dc on Arm 1, ch-2 corner sp, 3 dc on Arm 2 = 6 dc total)
- Row 2 (White): Ch 3, 1 dc in first st (edge increase made). 1 dc in next 2 dc. In corner ch-2 sp: work (2 dc, ch 2, 2 dc). 1 dc in next 2 dc, 2 dc in top of turning ch-3 (edge increase made). Fasten off White on last yarn-over. Turn. (6 dc per arm = 12 dc total)
- Row 3 (Dusty Blue): Join Color A (Dusty Blue). Ch 3, 1 dc in first st. 1 dc in next 5 dc across to corner. In corner ch-2 sp: work (2 dc, ch 2, 2 dc). 1 dc in next 5 dc across, 2 dc in top of turning ch-3. Fasten off Blue on last yarn-over. Turn. (9 dc per arm = 18 dc total)
- Row 4 (White): Join Color B (White). Ch 3, 1 dc in first st. 1 dc in next 8 dc across to corner. In corner ch-2 sp: work (2 dc, ch 2, 2 dc). 1 dc in next 8 dc across, 2 dc in top of turning ch-3. Fasten off White on last yarn-over. Turn. (12 dc per arm = 24 dc total)
- Row 5 (Dusty Blue): Join Color A (Dusty Blue). Ch 3, 1 dc in first st. 1 dc in next 11 dc across to corner. In corner ch-2 sp: work (2 dc, ch 2, 2 dc). 1 dc in next 11 dc across, 2 dc in top of turning ch-3. Fasten off Blue on last yarn-over. Turn. (15 dc per arm = 30 dc total)
- Row 6 (White): Join Color B (White). Ch 3, 1 dc in first st. 1 dc in next 14 dc across to corner. In corner ch-2 sp: work (2 dc, ch 2, 2 dc). 1 dc in next 14 dc across, 2 dc in top of turning ch-3. Fasten off White on last yarn-over. Turn. (18 dc per arm = 36 dc total)
- Row 7 (Dusty Blue): Join Color A (Dusty Blue). Ch 3, 1 dc in first st. 1 dc in next 17 dc across to corner. In corner ch-2 sp: work (2 dc, ch 2, 2 dc). 1 dc in next 17 dc across, 2 dc in top of turning ch-3. Fasten off Blue on last yarn-over. Turn. (21 dc per arm = 42 dc total)
- Row 8 (White): Join Color B (White). Ch 3, 1 dc in first st. 1 dc in next 20 dc across to corner. In corner ch-2 sp: work (2 dc, ch 2, 2 dc). 1 dc in next 20 dc across, 2 dc in top of turning ch-3. Fasten off White completely. (24 dc per arm = 48 dc total)
🧶 Component 2: The Granny Cluster Fill Section
Now we fill in the opposite two sides using Color A (Dusty Blue) to complete the square shape.
- Row 9 (Granny Fill Row 1 – Dusty Blue):
- 🧵 Attach Color A (Dusty Blue) at the top outer corner st of Row 8 (Arm 1).
- 🧵 Ch 3 (counts as 1 dc), 2 dc in same first st (first 3-dc cluster made).
- 🧵 (Ch 1, skip edge of 1 row, work 3 dc into side of next row-end) 7 times evenly down the 8 raw row-ends of Arm 1. (8 clusters total on Arm 1)
- 🧵 In the magic ring center base point: work (3 dc, ch 2, 3 dc) to create the outer bottom corner of the square.
- 🧵 (Ch 1, skip edge of 1 row, work 3 dc into side of next row-end) 7 times evenly up the 8 raw row-ends of Arm 2.
- 🧵 Work 3 dc in the outer top corner st of Row 8. Turn. (8 side clusters + 1 corner cluster per side = 9 clusters per arm)
- Row 10 (Granny Fill Row 2 – Dusty Blue):
- 🧵 Ch 3, turn. 2 dc in first ch-1 sp.
- 🧵 (Ch 1, 3 dc in next ch-1 sp) across to the corner ch-2 sp.
- 🧵 Ch 1, in corner ch-2 sp: work (3 dc, ch 2, 3 dc).
- 🧵 (Ch 1, 3 dc in next ch-1 sp) across to end space.
- 🧵 3 dc in top of turning ch-3. Turn. (10 clusters per arm)
- Row 11 (Granny Fill Row 3 – Dusty Blue):
- 🧵 Repeat Row 10 instructions. (11 clusters per arm). Turn.
- Row 12 (Granny Fill Row 4 – Dusty Blue):
- 🧵 Repeat Row 10 instructions. (12 clusters per arm). Turn.
- Row 13 (Granny Fill Row 5 – Dusty Blue):
- 🧵 Repeat Row 10 instructions. (13 clusters per arm). Fasten off Dusty Blue.
🔳 Component 3: The Motif Framing Round (Make 12)
This framing round wraps all 4 outer edges of the motif in solid Color A (Dusty Blue) to create uniform edges for joining.
- Round 14 (Framing Round – Dusty Blue):
- 🧵 Attach Color A (Dusty Blue) in any outer corner ch-2 sp.
- 🧵 In corner ch-2 sp: work (ch 3, 1 dc, ch 2, 2 dc) — corner made.
- 🧵 Along Solid L-Stripe Sides (24 dc sts each): Work 1 dc in ea dc st across (24 dc).
- 🧵 In corner sp: work (2 dc, ch 2, 2 dc).
- 🧵 Along Granny Cluster Sides: Work (1 dc in ea dc of cluster, 1 dc in ea ch-1 sp) across (38 dc).
- 🧵 In corner sp: work (2 dc, ch 2, 2 dc).
- 🧵 Repeat for remaining sides until returning to start. Sl st to top of starting ch-3 to join. Fasten off and weave in ends.
🧩 Component 4: Layout & Grid Assembly
- Quantity Check: Ensure you have 12 identical finished motif squares, blocked to 15 in x 15 in.
- Layout Direction: Arrange squares in a 3-column by 4-row grid. Position every square so that its solid Mitered L-Corner points toward the top-right corner of the blanket, creating a unified diagonal stripe illusion.
[Mitered L]  [Mitered L]  [Mitered L]
[Mitered L]  [Mitered L]  [Mitered L]
[Mitered L]  [Mitered L]  [Mitered L]
[Mitered L]  [Mitered L]  [Mitered L]
- Seaming Steps (Single Crochet Seam on WS):
- 🪡 Place two adjacent motif squares Right Sides facing together.
- 🪡 Attach Color A (Dusty Blue) at the matching corner ch-2 spaces.
- 🪡 Working through the back loops only of both corresponding stitches, single crochet across the seam to join.
- 🪡 Join all horizontal seams first across all 4 rows, then join all vertical seams across all 3 columns.
🌾 Component 5: Outer Blanket Border
Work this border continuously around the perimeter of the assembled blanket to tie all squares together.
- Border Round 1 (Dusty Blue):
- 🧵 Attach Color A (Dusty Blue) in any blanket outer corner ch-2 sp.
- 🧵 In corner sp: work (ch 3, 1 dc, ch 2, 2 dc).
- 🧵 Work 1 dc in ea st across the outer blanket edge. When reaching a seam where two squares meet, work 1 dc into the first corner sp, 1 dc directly into the seam, and 1 dc into the next square corner sp.
- 🧵 Work (2 dc, ch 2, 2 dc) in ea of the 4 outer blanket corners.
- 🧵 Sl st to top of starting ch-3 to join.
- Border Round 2 (Dusty Blue):
- 🧵 Ch 3, 1 dc in next st.
- 🧵 Work 1 dc in ea dc across each side. In outer corner ch-2 sps: work (2 dc, ch 2, 2 dc).
- 🧵 Sl st to top of starting ch-3 to join. Fasten off and weave in all remaining ends securely.
🎨 L. STYLING / ASSEMBLY / STABILITY / FINAL SHAPING
- 📐 Layout Alignment: Check that every square is oriented in the exact same direction before seaming so the Mitered L-stripes point uniformly diagonally.
- 🪡 Symmetry & Tension: Keep seaming tension moderate. Pulling seam stitches too tight will cause the blanket grid to pucker along the join lines.
- 📍 Pinning Seams: Use locking stitch markers every 10 stitches along adjacent squares to keep corners and edges aligned during joining.
- ✅ Final Shaping Checklist:
- ✅ All 12 squares oriented correctly with L-corners pointing top-right.
- ✅ All yarn ends securely woven into same-color stitch sections on the wrong side.
- ✅ Seams lie flat without ridge twisting.
- ✅ Outer border rounds are even with clean 90-degree outer corners.
💡 M. HELPFUL CROCHET TIPS
- 💡 Tip 1: Weave in ends as you finish each square. Waiting until all 12 motifs are completed leaves dozens of loose ends to manage at once.
- 💡 Tip 2: Use blocking boards with metal T-pins to pin each square to exactly 15 in x 15 in before joining. This ensures seamless alignment along every edge.
- 💡 Tip 3: When switching yarn colors on Row turns, execute the final yarn-over of the last double crochet using the new color for a invisible color join.
- 💡 Tip 4: Count your double crochet stitches on Row 8 of the Mitered Block (24 per arm) to ensure the granny fill section lines up evenly.
- 💡 Tip 5: If your corners curl inward, check your corner ch-2 spaces — ensure you don’t drop the chain stitches at turning points.
- 💡 Tip 6: Maintain consistent hook sizes throughout the project; switching hooks midway can alter motif sizing.
🧼 N. CARE INSTRUCTIONS
- 🧼 Washing: Hand wash or machine wash on a gentle/delicate cycle in cold water using mild liquid detergent.
- 🧼 Drying: Lay flat to dry on clean dry towels. Re-shape corners and edges gently while damp. Do not tumble dry on high heat to prevent acrylic fuzzing or wool shrinkage.
- 🧼 Storage: Fold neatly and store in a breathable cotton bag in a cool, dry closet. Avoid hanging on coat racks to prevent stretch distortion over time.
❓ R. FAQ
- ❓ Q1: Can I make this blanket larger or smaller?
- Answer: Absolutely! To make a throw blanket, use a 3×4 grid (12 squares) as written. For a square lap blanket, make 9 squares (3×3 grid). For a large bed bedspread, make 20 squares (4×5 grid).
- ❓ Q2: Can I substitute yarn weights?
- Answer: Yes. You can use DK weight yarn with a 4.0 mm hook for a lighter throw, or bulky weight yarn with a 6.5 mm hook for a thick winter blanket. Note that motif dimensions and yarn quantities will vary accordingly.
- ❓ Q3: Is blocking strictly necessary for this design?
- Answer: While optional, blocking is highly recommended. Because solid double crochet rows and open granny clusters stretch differently, blocking square motifs to equal dimensions ensures flat seams and straight grid lines.
- ❓ Q4: How do I prevent loose ends from coming undone in the wash?
- Answer: Weave yarn ends through at least 2 inches of stitches in one direction, then reverse direction for another inch using your tapestry needle before trimming the excess.
- ❓ Q5: What other color combinations look great for this pattern?
- Answer: Charcoal grey and cream create an industrial modern vibe; sage green and soft ivory offer a cozy cottage aesthetic; mustard yellow and white give a vibrant mid-century modern look.
- ❓ Q6: Can I use a flat slip stitch join instead of single crochet seaming?
- Answer: Yes! A flat slip stitch join worked through back loops creates an ultra-flat seam that makes the blanket lay completely seamless.