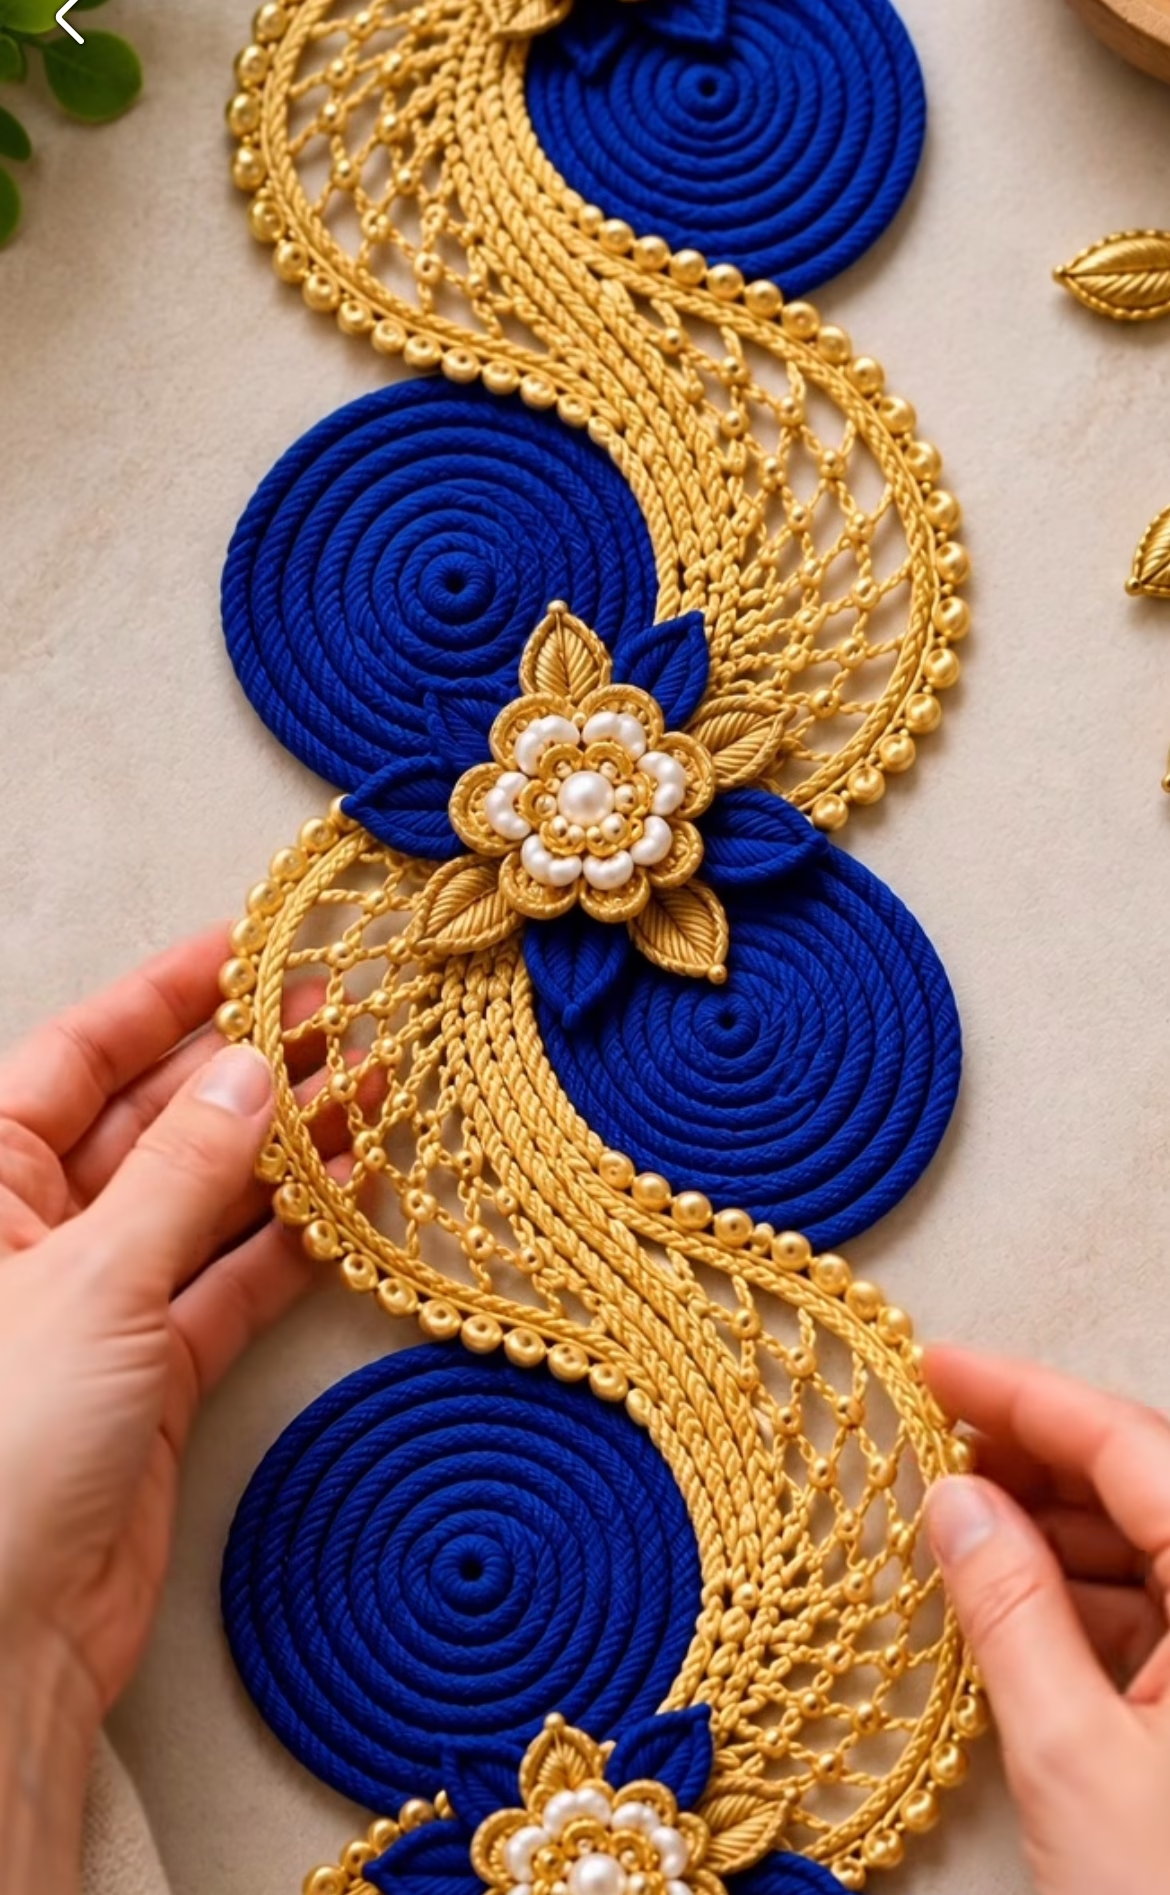
This sophisticated crochet project features a captivating interplay of bold blue spirals, intricate golden lattice lacework, and luxurious pearl-accented flower motifs. The base is composed of three large, deep blue spiral circles arranged in an undulating, wave-like fashion, seamlessly linked with curving golden mesh strips. At the intersections, ornate 3D flowers with bead and petal embellishments create focal points full of richness and texture. The entire composition is bordered by golden bead accents, adding sparkle and refinement to this elegant piece.
With its vibrant contrast of colors – regal royal blue and luminous gold – and ornamental details, this piece functions beautifully as a table runner, festive centerpiece, or decorative wall hanging. The robust spirals provide visual stability, while the delicate lace and layered floral elements make it both a statement piece and a conversation starter. Not only visually appealing, this project also allows crocheters to explore textural techniques and thoughtful, modular assembly.
This is an engaging crochet journey, perfect for those seeking to refine their skills with spirals, join-as-you-go lace, and dimensional flowers. The end result is a functional work of art that’s sure to add elegance to any setting.
Project Overview
The piece is made in several parts:
- The base consists of three large spiral motifs worked in continuous rounds.
- Curving lattice strips are crocheted separately and joined along the spirals to create the iconic S-shaped border and interconnected effect.
- Three layered 6-petal flower motifs, each embellished with beads or pearls, are attached at the meeting points of the spirals.
- The outer S-curve is edged with beads for a finished, ornate look.
The construction involves both continuous spiral rounds, separate lace panels in rows, appliqué flowers, and final assembly with sewing or careful joining.
Skill Level
Intermediate. This pattern combines spiral crochet, openwork mesh, join-as-you-go techniques, and multi-layered flower appliqués. Experience with shaping, working in the round, crocheting lace, and assembling motifs is helpful. The beaded edging and flower assembly are not difficult, but do require attention to detail and careful finishing.
Materials
- Yarn:
- Worsted weight cotton or a cotton-blend yarn for good stitch definition and structure
- Main Blue: 100-130g
- Gold: 80-100g
- Optional: A small amount of white or pearl for flower centers
- Crochet Hook: US size G/6 (4.0mm) or H/8 (5.0mm), depending on stitch tension. Adjust size for firmer/lacier result.
- Beads or Pearls: 30-50 gold pearls (8mm-10mm) for edging and flower centers, or use high-quality faux pearls.
- Tapestry Needle for sewing motifs and weaving in ends
- Scissors
- Stitch Markers: To mark joins and count spiral rounds
- Measuring tape
- Fabric glue (optional): For fixing beadwork securely
- Fine wire (optional): If securing beads firmly on outer edge.
Finished Size
Approximate finished size is about 58cm x 24cm (23in x 9.5in).
- Each spiral: ~16cm (6.25in) diameter
- S-curve length: ~58cm (23in) from tip to tip
If you want a shorter or longer design, adjust the number of spirals (add or subtract one) and scale the mesh border accordingly.
Gauge
Spiral motif: 8 rounds = 10cm (4in) diameter (after gently blocking).
Lace mesh section: 8 mesh spaces = 10cm (4in) in width.
Slight gauge changes will affect finished size, which is not critical for this piece. Use a consistent, moderate tension for best appearance.
Stitches and Abbreviations
- ch – chain
- sl st – slip stitch
- sc – single crochet
- hdc – half double crochet
- dc – double crochet
- tr – treble crochet
- MR – magic ring
- inc – increase (2 sts in same st)
- dec – decrease
- sp – space (usually ch space)
- st(s) – stitch(es)
Important Pattern Notes
- Chains at start of rounds/rows do count as stitches unless otherwise stated.
- Spirals are worked in continuous rounds (no joining), so use a stitch marker to mark the first stitch of each round.
- Lace mesh and S-curve sections are made separately and sewn/joined carefully to the spirals.
- Change colors as directed by fastening off and rejoining, or by careful slip stitch join to minimize knots.
- Join motifs with right sides facing up for neatest finish.
- Beads for the border can be crocheted in as you go or sewn on after assembly.
Detailed Crochet Pattern
Part 1: Spiral Motifs (Make 3 in Blue)
- Begin with a magic ring (MR) using blue.
- Round 1: Work 6 sc into MR, pull tight. Place stitch marker in first sc. (6 sts)
- Round 2: 2 sc in each st around (inc in each st). (12 sts)
- Round 3: *1 sc, inc in next st; repeat from * around. (18 sts)
- Round 4: *2 sc, inc; repeat from * around. (24 sts)
- Round 5: *3 sc, inc; repeat from * around. (30 sts)
- Round 6: *4 sc, inc; repeat from * around. (36 sts)
- Round 7: *5 sc, inc; repeat from * around. (42 sts)
- Round 8: *6 sc, inc; repeat from * around. (48 sts)
- Round 9: *7 sc, inc; repeat from * around. (54 sts)
- Increase rounds as needed until spiral measures about 16cm (6.25in) across. Total 12-13 rounds, ending on a full increase round. Fasten off; weave in end on back.
Repeat for a total of three spirals.
Part 2: Lattice S-Curve Lace Border (Make 2 in Gold)
You will make two long, curved mesh panels that will be joined along the sides of the three spirals. The mesh widens at both ends and narrows at the waist for the signature S-curve effect.
- With gold, ch 58 (for the length of 3 spirals, adjusting if you made fewer/more rounds).
- Row 1: Starting in 6th ch from hook, *dc, ch 3, skip 2 ch; repeat from * across. (Ends with dc in last ch and 18 mesh spaces). Turn.
- Row 2: Ch 5 (counts as dc + ch 3), *dc in next dc, ch 3; repeat from * across. End with dc in last dc. Turn.
- Rows 3-6: Repeat Row 2 four more times, creating a mesh panel about 5 rows deep.
- Rows 7-14: On even rows, decrease one mesh space at start and end (by skipping 1 extra mesh), then work established pattern. Repeat until panel curves and narrows in the central part (this creates a waviness). On odd rows, maintain pattern without decreasing. This gives a slight S-shaped contour—lay panel next to your spirals for fit.
- Rows 15-18: Work even, no further decreases; finish with 4 rows mesh at full width as at start.
- Fasten off, weave in end. Make a second identical mesh strip.
Part 3: Golden S-Curve Braid Overlay (Make 2, Optional for Raised Effect)
- With gold, ch 58.
- Sc in 2nd ch from hook and in each ch across; turn. (57 sc)
- Optional: For an even more raised braid, hold 2 strands together for the braid.
- Twist and shape braid to overlay mesh border, attaching gently with small invisible stitches as you go (do while assembling centerpiece).
Part 4: 3D Flower Motifs (Make 3 in Gold, Blue, and Pearl/White)
- Flower Center:
With gold, MR, 6 sc in ring. Join with sl st. (6 sts)
Add a small pearl bead at center before closing MR if you wish. - First Petal Layer:
- Ch 1, *(sc, hdc, dc, hdc, sc) in next st*; repeat from * to * in each st around (6 petals). Join with sl st to first petal.
- Fasten off, leave tail for sewing.
- Second Layer (Behind):
- Attach blue to unused loops behind each petal; ch 2, dc, tr, dc, ch 2, sl st to next petal base, repeat around for slightly larger petals.
- Leaf Layer (Gold):
- Attach gold at flower back; *ch 7, sl st in 2nd ch, sc, hdc, dc, tr, sl st in base*, repeat 3–4 times to create gold leaves/spikes radiating behind.
- Pearl Accents: Sew pearls around the gold center or at base of petals as desired.
- Make 3 flowers in this manner.
Part 5: Assembly
- Lay out the three spirals in an S-shaped arrangement, with their sides just touching.
- Pin or lightly baste the mesh lattice panels along both outer and inner curves, making sure the mesh panel follows the undulating curve and fits against the edge of the spirals for a seamless appearance.
- Using a tapestry needle and yarn (or invisible thread), neatly whipstitch the edge of the mesh panels to the outer edge of each spiral. Ensure each spiral motif is solidly attached along at least 1/3 to 1/2 of its circumference as shown (leaving the rest of each spiral exposed).
- Place the three flower motifs at the intersection points of the spirals where they touch. Sew securely. Fan out the blue and gold petal/leaf layers around the flower so they look dimensional.
- Overlay the golden braid along the central S-shaped curve, tacking in place lightly or using fabric glue for extra hold.
- Edging with Beads: Sew or crochet gold pearl beads along the outer curves of the mesh (either join-as-you-go in your last mesh row or sew on after blocking for firmer placement). Place beads evenly 1–1.5cm apart for a professional look.
- Weave in all remaining ends on the back. Gently block the entire work: lay flat, mist lightly, and shape the mesh and spirals so the S-curve, spirals, and flowers are crisp and untwisted. Allow to dry completely.
Assembly and Finishing
- All motifs should be joined with invisible or matching yarn/thread to preserve the clean lines of the design.
- Use a blunt tapestry needle to weave in any stray yarn ends neatly on the back.
- Blocking is essential for lace mesh – pin out to shape while damp for crisp definition.
- Sew or glue decorative beads firmly, especially if this will be washed or handled frequently.
- Arrange the flower petals and leaves before final sewing for best effect.
Customization Ideas
- Try omitting the beads for a subtler, more modern look.
- Use contrasting or tone-on-tone colors (e.g., emerald and silver, burgundy and cream).
- Make more (or fewer) spiral motifs to expand or shrink the runner to fit your table or wall space.
- Weave metallic thread into the mesh panel for extra sparkle without beads.
- Use lighter mercerized cotton (sport or DK) for a more delicate version, or chunky yarn for a bolder, larger piece.
- Mount your centerpiece on a canvas or frame as wall art, or use the motif as a base for a festive tray or platter mat.
- The flower motif can be used alone as an appliqué, brooch, or hair accessory.
Troubleshooting Tips
- If your spirals curl up, try using a larger hook or gently blocking them to flatten.
- If the mesh panel edge is wavy or loose, block it carefully and steam lightly to encourage straight lines.
- If motifs seem too large or small, check your gauge and switch hook size if needed.
- Loose color joins can be woven in on the back, or stabilized by tying and sewing in ends.
- If your motifs refuse to line up, pin them in place from both ends before sewing; adjust mesh rows as needed on the go.
- For even bead spacing, mark mesh panel with small dots or use a ruler for consistency.
Care Instructions
- Hand wash gently in cool water with mild soap to preserve shape and beadwork.
- Do not wring or twist; blot excess moisture with a towel and lay flat to dry.
- Store flat to prevent creasing, especially if using as a table centerpiece.
- If beads or pearls loosen, reinforce with a small, clear-drying fabric glue.
Final Notes
Be sure to periodically count your stitches, especially in the spiral rounds and mesh shaping rows, to keep everything even and mathematically consistent. Adjust tension throughout for the cleanest edges and smoothest mesh. Use the example image as a visual workspace reference – customize colors and beadwork for your own unique version. With care and attention to detail, your finished crochet centerpiece will rival any store-bought décor in both beauty and craftsmanship.