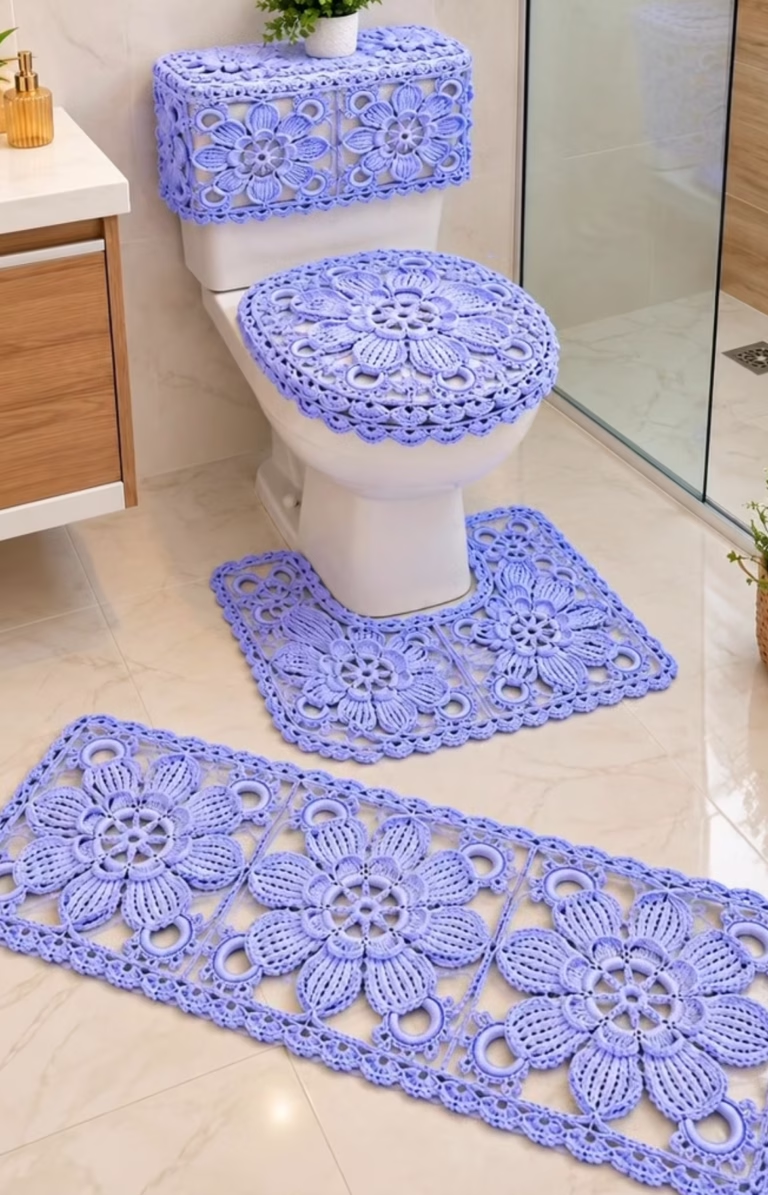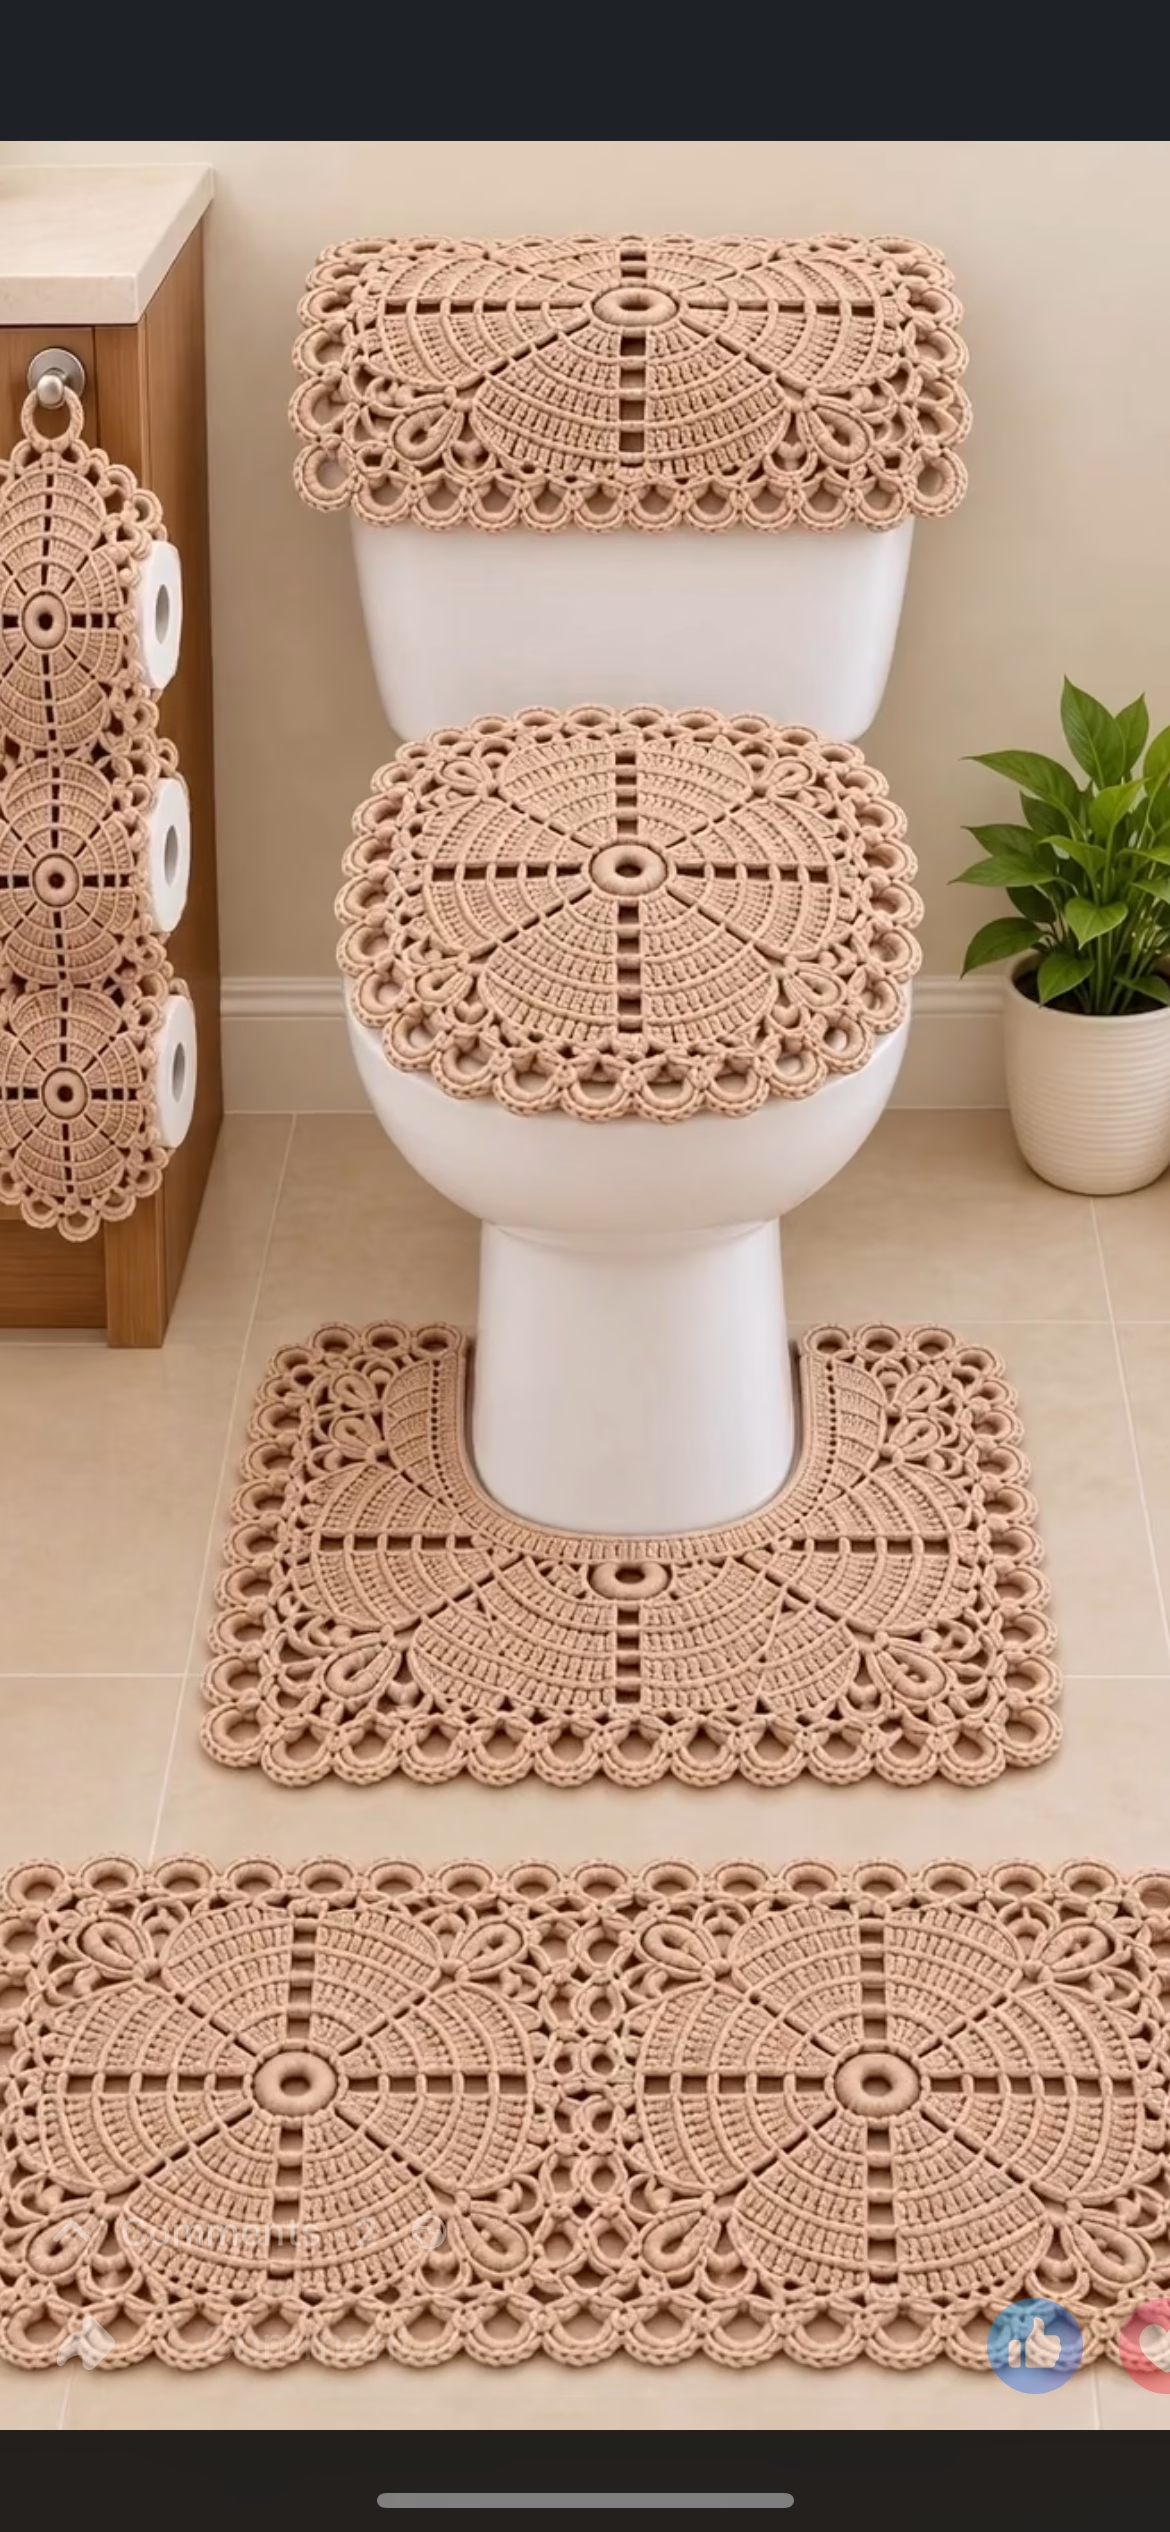
This elegant crochet bathroom set features a refined design of mandala-inspired medallions and lacy borders, perfect for adding a touch of sophistication to any bathroom. The entire set is worked using a warm, solid beige yarn for a cohesive and modern look, though the classic motif could be personalized in any colorway. The project includes matching rectangular and rounded pieces: a toilet seat cover, a tank lid cover, a contour mat, a rectangular rug, and an ingenious toilet paper holder.
The standout visual element is the large mandala motif at the center of each piece, radiating intricate clusters and open lace for beautiful texture and lightness. Decorative round picot and looped edging frames each section for a delicate finish. This set instantly transforms utilitarian items into eye-catching features. It works beautifully as a thoughtful handmade gift or to refresh your own space, demonstrating the versatility and artistry of crochet in home decor.
Project Overview
Each piece in this set is composed of one or more large mandala motifs worked in-the-round from the center outward, using a combination of basic and decorative stitches. The motifs form circles or rounded squares that are then bordered with a distinctive open lace and picot-style edging. For rectangular items, motifs are joined in the final rounds, while the toilet lid and seat covers are shaped to fit by adjusting the final border. The toilet paper holder is constructed with motifs joined vertically and finished with a hanging loop.
Skill Level
Intermediate. This pattern is ideal for crocheters who are comfortable working in the round, using various increases, and changing stitch heights. The piece includes some intermediate-level shaping, controlled joining of motifs, and decorative borders that may be new to advanced beginners. Reading your crochet as you go and counting stitches accurately are important for success.
Materials
- Worsted weight yarn (4-medium), approximately 650-850 yards total (see below)
- Main color (beige): 650-850 yds for full 5-piece set
- Suggested fiber: 100% cotton or a cotton-blend for absorbency and durability
- Crochet hook size: 4.5 mm (US 7) or size needed for gauge
- Tapestry needle for weaving in ends and seaming (blunt tip)
- Stitch markers (for marking round starts and key joins)
- Sharp scissors
- Flexible measuring tape
- (Optional) Anti-slip spray or shelf liner for mats
Finished Size
- Toilet seat cover motif: approx. 43 cm (17 in) in diameter (includes border, fits standard seat lid)
- Tank lid cover: approx. 47 cm (18.5 in) wide (includes border, rectangular)
- Contour mat: approx. 55 x 55 cm (21.5 x 21.5 in) with U notch for base
- Rectangular rug: approx. 33 x 82 cm (13 x 32 in)
- Toilet paper holder: 12 x 45 cm (4.5 x 18 in) (fits 3 rolls vertically)
To adjust size, work more or fewer rounds, or use a larger/smaller hook. For segment-based pieces, adjust motif count.
Gauge
Gauge is not critical but affects finished size. Approximate gauge: 16 sc x 18 rows = 10 x 10 cm (4 x 4 in) in pattern stitch. Consistent tension ensures motifs and motifs join correctly. Swatch in the round for best accuracy.
Stitches and Abbreviations
- ch – chain
- sl st – slip stitch
- sc – single crochet
- hdc – half double crochet
- dc – double crochet
- tr – treble crochet
- MR – magic ring
- inc – increase (2 stitches in same stitch)
- dec – decrease (draw up a loop in next 2 sts, yarn over, pull through all loops)
- picot – ch 3, sl st in 1st ch
Important Pattern Notes
- Ch-3 at start of round counts as first dc unless otherwise stated.
- Work motifs in continuous rounds unless joined (sl st join as indicated).
- When joining motifs, keep right sides out for a neat finish.
- Color changes are not needed unless personalizing.
- Use stitch markers to keep track of round beginnings or motif corners when joining.
- The set is designed with both rectangular and circular shapes for a coordinated look.
Detailed Crochet Pattern
General Instructions: The main pieces are all based on a large mandala motif worked from the center out. Rectangular pieces contain two or more motifs joined together with a lacy border. Each motif is worked in the round, and borders are added in the final rows. All pieces are made in a solid color unless noted. Adjust as needed for your exact fixtures.
Part 1: Crochet Mandala Motif (Make multiples as needed)
This central motif is used for all main set pieces. Make the required number for your desired pieces (1 for seat lid, 1 for tank, 2 for rug, etc.).
- With beige yarn, start with a magic ring (MR).
- Round 1: Ch 3 (counts as dc), work 15 dc into MR. Join with sl st to top of ch 3. (16 dc)
- Round 2: Ch 3, dc in same st, 2 dc in each dc around. Join with sl st to top of ch 3. (32 dc)
- Round 3: Ch 3, dc in next dc, 2 dc in next dc, *dc in next dc, 2 dc in next* repeat around. Join. (48 dc)
- Round 4: Ch 3, dc in next 2 dc, 2 dc in next dc, *dc in next 2 dc, 2 dc in next* repeat around. Join. (64 dc)
- Round 5: Ch 1, sc in next 7 dc, ch 3, skip next dc, *sc in next 7, ch 3, skip 1* repeat around. Join. (8 x ch-3 loops and 56 sc)
- Round 6: Sl st into first ch-3 loop. In each ch-3 loop: (ch 3, 3 dc, ch 2, 3 dc, ch 3, sl st in loop)—petal created. Between petals: sl st in next 7 sc to next ch-3 loop. Repeat for all 8 petals. Join at start. (8 petals)
- Round 7: Ch 1, sc around posts of each petal dc, placing 2 sc in each ch-2 space and 1 sc in each ch-3 space (making total 12 sc per petal section), continue around entire motif. Join. (96 sc)
- Round 8: Ch 2, hdc in next 11, ch 3, skip 2 sts (creates divide), *hdc in next 12, ch 3, skip 2*, repeat around. Join. (8 x ch-3 loops, 96 hdc)
- Round 9: Sl st to next ch-3 loop. In each loop (ch 3, 2 dc, ch 2, 2 dc, ch 3, sl st in loop). In between, sl st in each hdc. (8 wedge petals again)
- Round 10: Ch 1, sc around all dc and in each ch-2/3 space, increasing 1 extra sc in each center ch-2 for shaping. (approx. 120 sc)
Repeat increase rounds, alternating petal clusters and sc/hdc rounds, until motif reaches desired diameter for your project. For toilet lid, work until about 40 cm (16 in) wide before lace border; for tank lid and rectangular pieces, stop at 37 cm (14.5 in).
Part 2: Motif Dividers and Lace Border
For each motif, add the signature lacy edge, which creates the openwork, looped finish.
- Round 11: Ch 5 (counts as dc + ch 2), skip 1 st, dc in next, ch 2, skip 1, dc in next—continue around. (60 dc, 60 ch-2 sps)
- Round 12: In each ch-2 space: work (sc, ch 3, sc), sl st in each dc. This gives a pretty eyelet picot look. (120 sc, 60 x ch-3 loops)
- Round 13: In each ch-3 loop, (sc, ch 4, sc). Sl st in next sc between loops to anchor. (60 ch-4 arches)
- Round 14: In each ch-4 arch: (sc, hdc, dc, hdc, sc), picot, sl st in next arch to anchor. End off and weave in ends.
To square-off motifs for rectangular pieces, after Round 10, work 3 additional short rows across 2 opposite motifs’ sides to extend, then proceed with border rounds working evenly across sides and along extended rows. This allows for rectangle assembly.
Part 3: Toilet Lid Cover and Tank Lid Cover
- Work one motif as above for each cover, ending with a slightly smaller diameter if your lid is petite. For a closer fit, after final border round, add 2 rounds of sc, working 2 sc together at each corner, and lightly decreasing on straight sections to create a gentle curve. Add an extra round of sc through the back loop for slight elasticity if needed.
- For securing: add a round of ch-5 loops on the underside or sew small ties for tucking under the lid.
Part 4: Toilet Contour Mat
- Work a large motif as center (stopping at ~36 cm), then add 2 short rows on opposite sides (work 10 sc rows, turning each time).
- Join a second motif started from Round 1, working only up to Round 8, then joining as you go along the edge of first motif for a symmetrical shape.
- After joining motifs, work border rounds as above, turning the otherwise round motif into a soft square with corners by adjusting increases at 4 corners (work (2 sc, ch 2, 2 sc) in each marked corner for first border round).
- Create U opening by omitting stitches along one side in the final border rounds, then finish that edge with sc or reverse single crochet (crab stitch) for firmness.
Part 5: Rectangular Rug
- Make 2 full motifs (Round 1-10) and stop at desired size.
- Work 3 additional short rows on each motif on 2 opposite sides to square off.
- Join motifs by slip stitching edges together on the wrong side.
- Work border rounds—first border should be evenly spaced sc all around (increase at corners), then work ch-3 loops round, then eyelet lace borders as for motif. Finish with decorative arches and picots.
Part 6: Toilet Paper Holder
- Work 3 smaller motifs (stop at Round 6–8 depending on roll size).
- Join motifs vertically by whipstitch or sl st through back loops only, keeping lace borders facing outward.
- Add a strip worked in sc for the backing: ch to length of three motifs, work 5 rows of sc. Sew to the back of motifs along two long sides.
- Work hanging loop: ch 24, attach to top of stack, sl st back along chain for firmness and join to motif. Weave in ends.
Assembly and Finishing
- Position motifs right sides up, use a tapestry needle and matching yarn for invisible joins.
- Block each motif before joining for neatening—pin to finished dimension and lightly steam or spritz with water.
- For covers: attach optional ties or stretchy bands to help secure them to seat/tank lids.
- Weave in all yarn ends on the WS using a tapestry needle.
- For mats: lightly spray the underside with anti-slip product or attach non-slip pad if used on smooth floors.
Customization Ideas
- Use multiple colors for center motif and border for a vibrant look.
- Make all components in different solid shades for a patchwork effect.
- Substitute chunky yarn for extra-plush mats (adjust hook size up).
- Work motifs in lace weight as doilies or placemats.
- Join two motifs for a decorative pillow cover or wall hanging.
- Single motif makes a lovely large coaster or table centerpiece.
Troubleshooting Tips
- Piece curling: Use a larger hook or add a blocking step; check your increases in each round.
- Uneven edges: Double-check stitch counts on each border round; keep tension consistent.
- Motif too large or small: Try changing hook size; add or omit final rounds for size adjustment.
- Loose color joins: Pull yarn firmly and weave tail along the WS through several stitches to secure.
- Openwork gapping too much: Anchor lacy edges with additional sc or hdc for a firmer finish.
Care Instructions
- Hand wash or gentle machine wash cold with mild detergent.
- Lay flat to dry or block in shape after washing.
- Avoid bleach or harsh chemicals for longevity.
- Reshape while damp if any piece stretches or deforms.
Final Notes
Carefully count your stitches every round for a neat, symmetrical result. Adjust tension for matching motif sizes if needed. Refer to the image for visual guidance on proportions and placement of motifs as you assemble your elegant crochet bathroom set. Above all, enjoy the process of transforming simple yarn into a striking decorative feature for your home!