Introduction
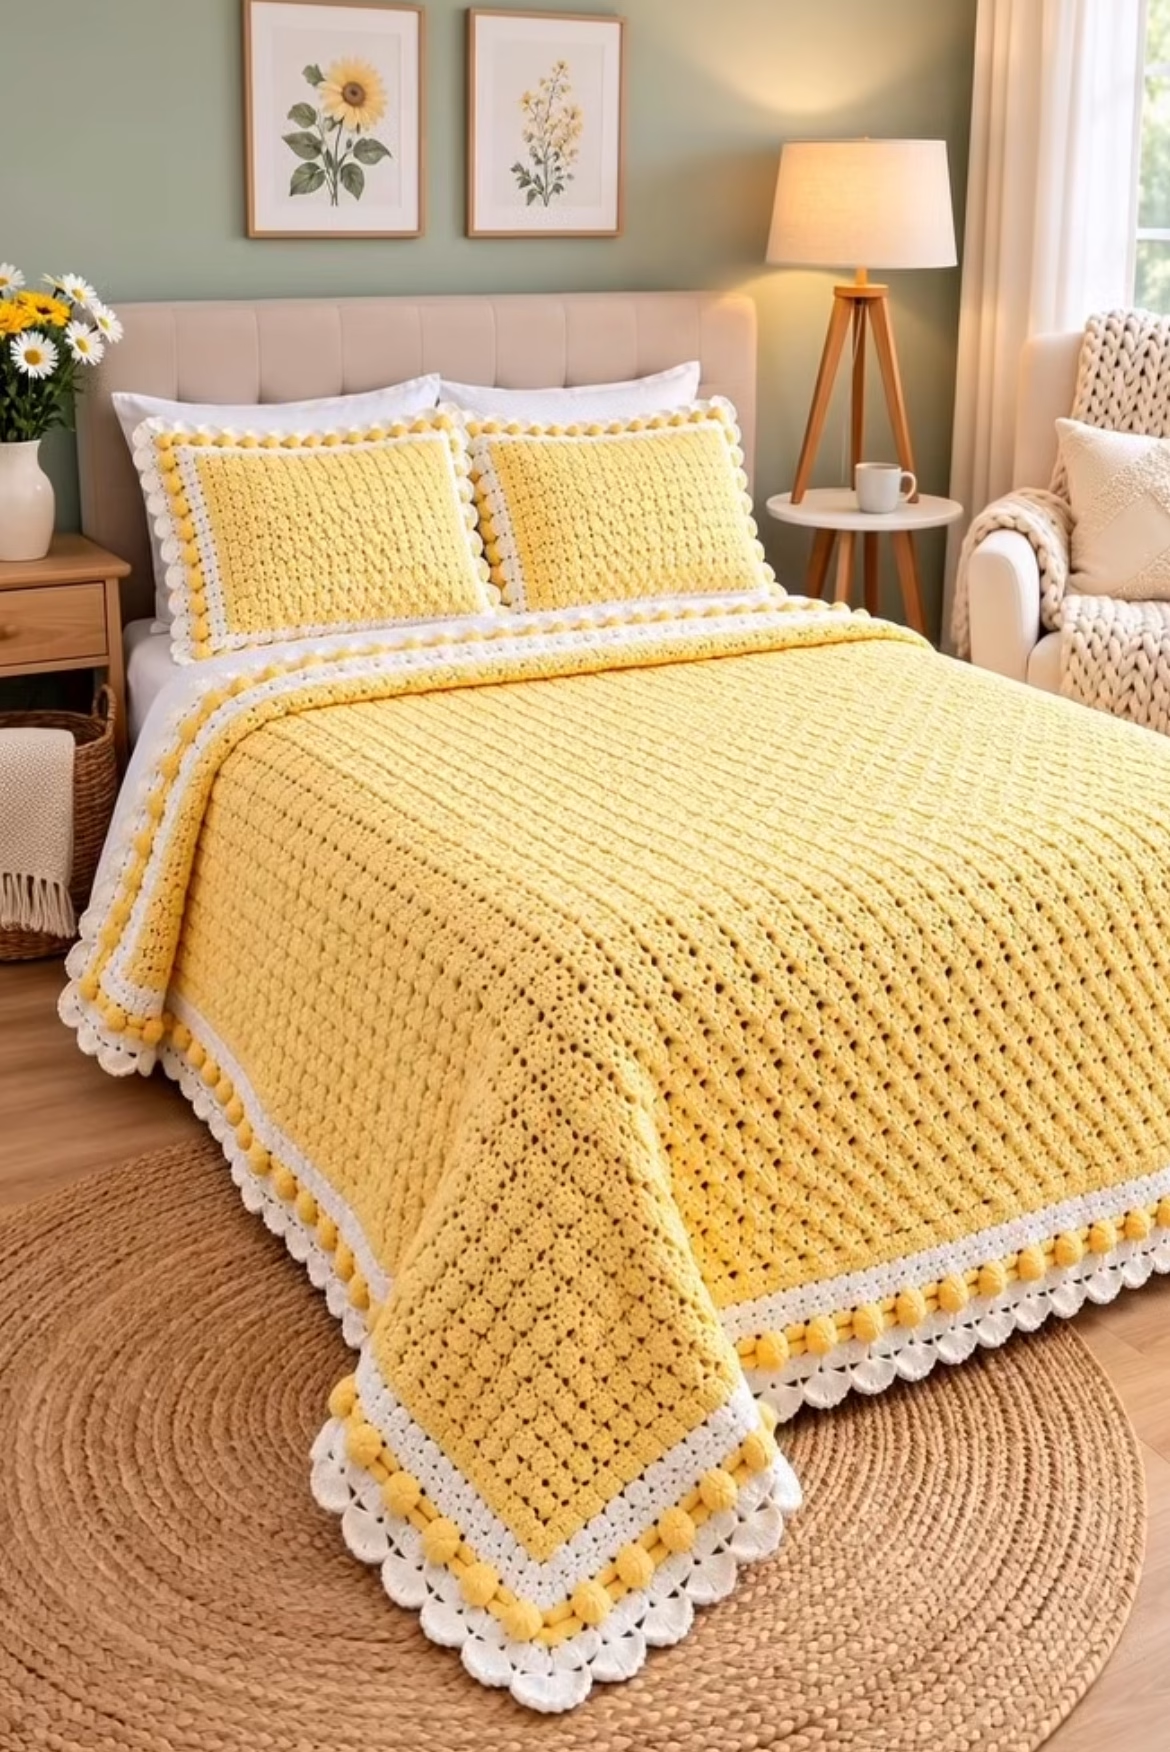
This radiant crochet bedspread and pillow set instantly brightens any bedroom. Featuring a soft yellow body accented by a playful white bobble and scallop border, this piece exudes both comfort and character. The blanket showcases a repeating textured stitch that mimics sunshine, bordered by dimensional puffed bobbles and a delicate shell edge. The matching pillows echo the same pattern and finishing, creating a harmonious, sun-kissed look that’s lively yet classic.
Perfect as a bedspread, throw, or even a statement cover for a guest room, this project invites warmth and cheerfulness into the home. The stitch work gives a cozy feel and satisfying visual interest, while the unique border transforms a simple blanket into a striking decorative piece. This crochet project is rewarding to make, blending straightforward techniques with eye-catching finishing touches, and makes an amazing handmade gift or a personal heirloom.
Project Overview
The blanket is constructed entirely in rows, using a simple but textured repeat stitch for the main panel. After completing the body, stitches are worked around all sides to add a bold bobble border and an outer scallop edge. Pillow covers are made as separate rectangles, edged in the same fashion, and finished with an envelope-style back for easy removal. Most of the project is achieved through frequent color changes and attention to detail along the borders.
Skill Level
Advanced Beginner to Intermediate. The main body uses accessible stitches, but the pattern does involve some familiarity with cluster and bobble techniques, color changes, working evenly around edges, and shell stitches. Careful counting and finishing skills are helpful for the neatest results.
Materials
- Yarn Weight: Worsted (Category 4)
- Suggested Yarn Type: Soft acrylic or cotton-acrylic blend for comfort and durability
- Approximate Yarn Amounts:
- Sunshine Yellow: Blanket 1700 g (3400 yds); 2 Pillow Covers 300 g (600 yds)
- White (border/accent): Blanket 350 g (700 yds); 2 Pillow Covers 100 g (200 yds)
- Crochet Hook: US size H-8 (5.0 mm) or size to obtain gauge
- Tapestry Needle (for weaving in ends and sewing pillow backs)
- Scissors
- Stitch Markers (optional, for marking corners and keeping track of rows)
- Pillow Inserts: Two standard size (approx. 20″ x 26″ / 51 x 66 cm)
Finished Size
- Bedspread: Approx. 90 x 90 inches (229 x 229 cm), suitable for a full/queen size bed. For a throw, make a smaller version (e.g., 50 x 70 inches / 127 x 178 cm).
- Pillow Covers: Each approx. 20 x 26 inches (51 x 66 cm) before border.
To adjust size, add or subtract stitches in multiples of 4 to start chain and adjust number of rows for desired length.
Gauge
In pattern stitch (main body), 16 sts and 9 rows = 4″ (10 cm) square. Gauge will affect final blanket size. Small differences are acceptable, but significantly looser or tighter tension will alter the look and measurements of your finished piece.
Stitches and Abbreviations (US Terminology)
- ch – chain
- sl st – slip stitch
- sc – single crochet
- hdc – half double crochet
- dc – double crochet
- tr – treble crochet
- st(s) – stitch(es)
- rep – repeat
- YO – yarn over
- BOB – bobble stitch: (YO, insert hook in indicated st, YO, pull up loop, YO, pull through 2 loops) 4 times in same st, YO, pull through all 5 loops on hook
- Shell – 5 dc in same st
Important Pattern Notes
- Turning chains do not count as a stitch unless otherwise noted.
- Always begin and end each row in the first and last stitch for straight edges.
- When changing colors, finish the last YO of final stitch with new color, and carry or weave ends neatly.
- Rounds on the border are joined with a slip stitch in the top of the first st of the round. Turn at the end of main body rows only.
- Use stitch markers to mark corners for working border evenly.
- The right side will be facing you when working the border unless otherwise specified.
Sunshine Bobble Border Bedspread & Pillow Set – Detailed Crochet Pattern
Part 1: Main Panel (Bedspread Body)
With yellow, ch 226 (multiple of 4 + 2 for foundation chain, adjust for size as needed).
- Row 1: Sc in 2nd ch from hook and in each ch across, turn. (225 sts)
- Row 2: Ch 3 (counts as dc), dc in next st, *sk 2 sts, (sc, 2 dc) in next st; rep from * to last 3 sts, sk 2 sts, sc in last st, turn. (225 sts)
- Row 3: Ch 3, dc in next st, *(sc, 2 dc) in next sc of previous row, sk next 2 dc; rep from * to last 3 sts, sk 2 dc, sc in last st, turn. (225 sts)
- Rows 4–204: Rep Row 3 for a total of 204 rows (or until blanket is approximately square, or your desired size).
Note: Keep edges straight by working last sc of each row into the ch-3 turning chain space.
Part 2: Main Panel (Pillow Covers)
With yellow, ch 86 (multiple of 4 + 2 for standard pillow).
- Row 1: Sc in 2nd ch from hook and in each ch across, turn. (85 sts)
- Row 2: Ch 3 (counts as dc), dc in next st, *sk 2 sts, (sc, 2 dc) in next st; rep from * to last 3 sts, sk 2 sts, sc in last st, turn. (85 sts)
- Row 3: Ch 3, dc in next st, *(sc, 2 dc) in next sc of previous row, sk next 2 dc; rep from * to last 3 sts, sk 2 dc, sc in last st, turn. (85 sts)
- Rows 4–56: Rep Row 3 for a total of 56 rows (or until rectangle is 20″ tall; check against your pillow’s depth).
- Make 2 rectangles for the fronts.
Part 3: Bobble Border (All Sides of Blanket & Pillow Fronts)
Switch to white for the border. Work with right side facing. If necessary, evenly space sts (work 1 st in the end of each row and 2 sts in each corner).
- Round 1 (white): Join white yarn in any corner. Ch 1, sc evenly around all 4 sides with 3 sc in each corner, join with sl st to first sc, do not turn.
- Round 2 (white): Ch 1, sc in each st around with 3 sc in each corner sc, join.
- Round 3 (yellow, bobble round): Switch to yellow. Ch 1, *sc in each of next 2 sts, BOB in next st; rep from * around, with 3 sc in each corner, join.
- Round 4 (white): Switch to white. Ch 1, sc in each st around (work 3 sc in each corner and 1 sc in the top of each bobble), join. Fasten off, weave in ends.
Tip: For a uniform look, ensure bobbles are puffed to the same side (front/RS).
Part 4: Scallop Edge (All Sides)
Still with white. Work with right side facing.
- Attach white yarn to any corner.
- Round 1: Ch 1, sc in same st, *sk next st, Shell (5 dc) in next st, sk next st, sc in next st; rep from * around. At each corner, after the sc in corner st, Shell in the next st to turn. Join with sl st to first sc.
- Fasten off. Weave in all ends.
Part 5: Back of Pillow Covers & Assembly
The back piece for each pillow is worked in two overlapping rectangles (envelope closure).
- With yellow, ch 86.
- Row 1: Sc in 2nd ch from hook and in each ch across. (85 sts)
- Rows 2–32: Ch 1, sc in each st across, turn.
- Fasten off.
- Make two panels per pillow. These will overlap about 4–5 inches to allow for easy pillow insert removal.
Whipstitch or crochet the pillow backs to each pillow front, placing the two back panels so that they overlap at the opening. Seam along all four sides, incorporating the border, with the right sides facing out.
Assembly and Finishing
- Weave in all loose yarn ends with a tapestry needle.
- For the bedspread, block gently if needed by soaking in lukewarm water with mild soap, pressing out excess water, and laying flat to shape. Let dry completely.
- For pillows, insert the pillow form and arrange the bobble and shell border so it lies flat and evenly spaced around all sides.
- Ensure all corners are straight, and borders do not pucker. Light steam blocking can help even out the border for a crisp finish.
Customization Ideas
- Alternative Colors: Try pastels for a spring look, vivid brights for a playful room, or neutral tones for a modern classic. Each color combination gives the bedspread a distinct mood.
- Different Yarn Weights: Use lighter yarn and a smaller hook for a delicate baby blanket, or chunky yarn for a super-plush throw.
- Additional Uses: Make just the blanket as a summer bedcover, the motif as a lapghan, sofa throw, or wall hanging, or work individual panels for matching coasters or placemats.
- Creative Borders: Add extra bobble or shell rounds for more dramatic edging, or choose a contrasting color for the outermost scallops for added flair.
Troubleshooting Tips
- Puckering or Curling: If the body or edges curl, try blocking your work or going up a hook size to loosen your stitches.
- Uneven Edges: Make sure you count stitches at the end of every row and keep your tension consistent for straight sides.
- Motif Too Large/Small: Match the listed gauge or adjust hook and yarn size as needed before starting the main project.
- Color Changes Loosening: Pull the first new stitch snug after every color change, and weave in ends carefully at the border joins.
- Uneven Tension in Bobbles: Practice a few bobble stitches separately to ensure they’re all the same size and fullness.
Care Instructions
- For acrylic and blends: machine wash on gentle cycle, cold water, mild soap.
- Lay flat to dry, or tumble dry on lowest setting if your yarn label permits.
- Do not iron directly; lightly steam if needed to reshape border after washing.
Final Notes
Take your time to ensure stitch count accuracy, especially along edges and with the border, for the neatest finish. If you notice your blanket or border shifting shape, gently adjust as you work and block at the end. Refer to the photograph as a visual checkpoint—use it to guide your color placement and proportions. Most of all, enjoy the cheerful process and the stunning effect when your sunshine-inspired bedspread and pillow set brightens up the room!