📖 B. INTRODUCTION
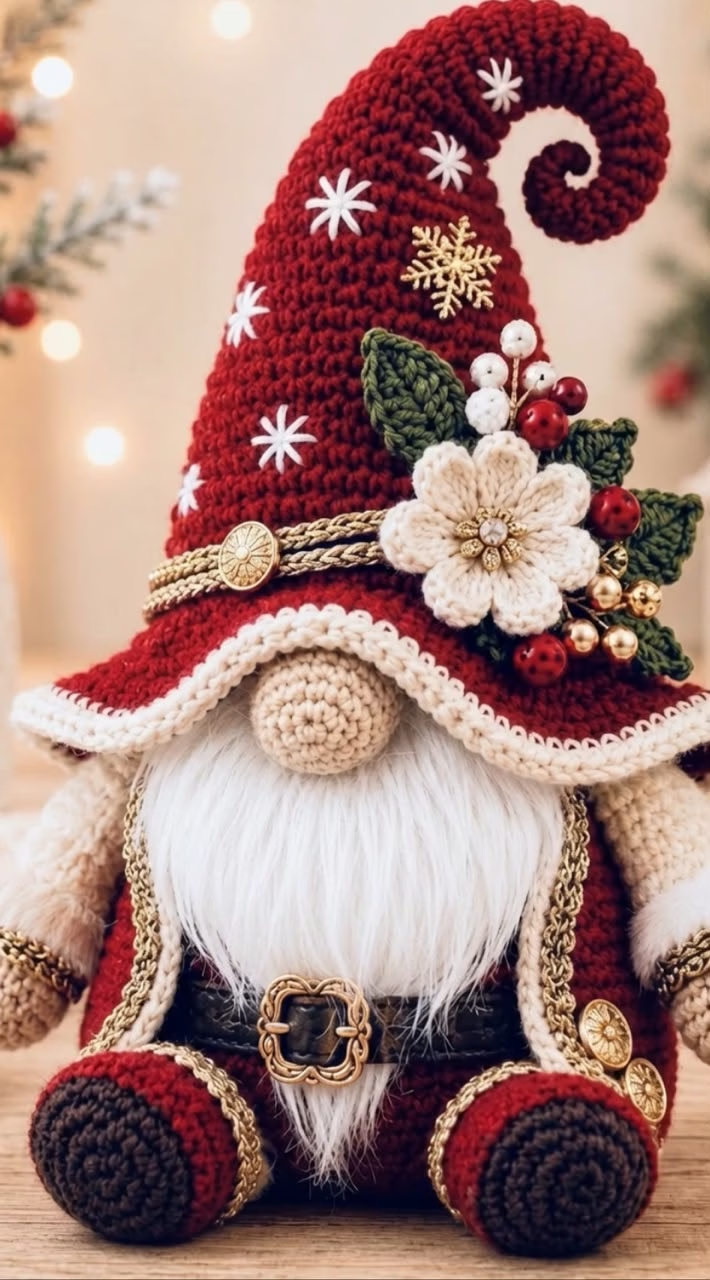
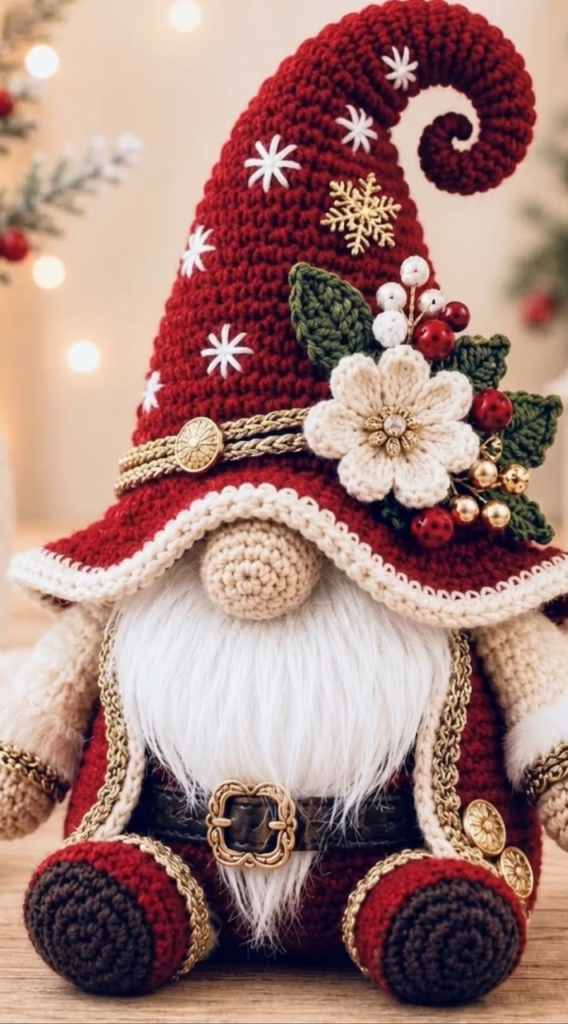
Bring the enchanted charm of Scandinavian folklore directly to your holiday hearth with this Heritage Holiday Gnome Crochet Pattern. Inspired by traditional Christmas Tomte and Nordic gnomes, this handcrafted character features a signature oversized slouchy cone hat with a dramatic spiral tip, a rich crimson coat adorned with metallic gold trim, a sculpted bulbous nose, and a soft, flowing white beard. Designed to sit securely on mantels, bookshelves, or holiday tray displays, this centerpiece design blends cozy rustic warmth with opulent winter detail.
Whether you are looking to create a memorable handmade holiday keepsake, assemble a festive mantel arrangement, or craft an unforgettable Christmas gift for a loved one, this heirloom-quality gnome delivers an exceptionally satisfying crochet project. The design thoughtfully pairs classic amigurumi construction with elegant decorative touches, including embroidered snowflakes, a dimensional cream floral brooch, winter holly leaves, and burnished gold braid details.
Every aspect of this pattern has been engineered for clarity and structural integrity. From the weighted base that keeps the gnome sitting upright without tipping to the flexible wire insertion in the tall curled hat, you will enjoy a seamless making experience that yields a stunning, boutique-worthy result.
This project offers ample opportunity for personal expression. You can easily adapt the palette to suit a snowy pastel winter aesthetic, switch the metallic accents to antique silver, or customize the botanical hat embellishments to reflect your favorite winter foliage.
🔍 C. MAIN PATTERN OVERVIEW
This project is constructed in modular components that come together seamlessly during assembly:
- 🧸 Weighted Torso & Base: Worked bottom-up in a sturdy continuous spiral, featuring a built-in waist belt and a flattened bottom reinforced with a weighted insert for self-standing stability.
- 🧢 Curly Slouchy Cone Hat: Worked from the curled tip downward to a wide flared brim with picot cream edging. The upper section incorporates craft wire to maintain its playful spiral shape.
- 🧠 Bulbous Nose: A round, soft skin-toned sphere tucked directly under the brim of the hat.
- 👢 Seated Boots (Make 2): Sculpted oval shoes worked in dark espresso brown and deep crimson, finished with gold surface accents and pinned forward to create a cozy seated stance.
- 💪 Arms & Cuffs (Make 2): Tapered sleeves with plush off-white wrists and cream hands, stitched neatly against the sides of the body.
- 🧔 Fluffy Beard: Formed from combed yarn fibers or faux fur strands layered under the nose to give the gnome his classic whimsical look.
- 🌺 Botanical Accessories: A layered 6-petal cream flower brooch, deep green leaves, gold braid trims, and embroidered star snowflakes.
🎯 D. SKILL LEVEL
Skill Level: Intermediate
This pattern is ideal for crocheters who are comfortable with foundational amigurumi techniques and are ready to incorporate simple structural elements, color changes, and decorative surface embellishments.
Key Techniques Required:
- ➰ Magic Ring (MR) and continuous spiral round work
- ➕ Basic increases (
inc) and single crochet decreases (dec) - 🧵 Working in Front Loops Only (
FLO) and Back Loops Only (BLO) - 📐 Oval base construction (working along both sides of a foundation chain)
- 🎨 Color switching and simple surface slip stitching
- 🧵 Basic tapestry needle embroidery (snowflake star stitches)
- 🪡 Component shaping, wire placement, and secure assembly sewing
📏 E. FINISHED SIZE
- 📏 Height: Approximately 14.5 inches (37 cm) from the base to the highest point of the curled hat.
- 📏 Width: Approximately 7.5 inches (19 cm) across the seated boots and body.
- 📏 Depth: Approximately 6.5 inches (16.5 cm) from front boot toes to the back of the hat brim.
Note: Individual finished dimensions will vary based on yarn choice, hook size, stuffing density, and hook tension.
🧮 F. GAUGE
- 🧮 Gauge: 20 single crochet (sc) stitches × 22 rounds = 4 inches × 4 inches (10 cm × 10 cm) using a 3.25 mm (US D-3) hook and worsted weight yarn.
Amigurumi gauge does not need to match perfectly, but stitch density should be firm and uniform to ensure the polyfill stuffing does not show through the fabric.
🧶 G. REQUIRED YARN AMOUNTS
All estimates are based on Medium Worsted Weight (Category 4) yarn unless noted:
| Color Accent | Color Name | Yardage / Weight Estimate |
| 🔴 Primary Color | Crimson Red | ~185 yards (170 m) / 90g |
| 🍦 Secondary Accent | Cream / Off-White | ~75 yards (68 m) / 40g |
| 🤎 Base & Boots | Dark Espresso Brown | ~45 yards (41 m) / 25g |
| 🍑 Nose / Skin | Warm Peach / Soft Nude | ~20 yards (18 m) / 10g |
| 🌿 Foliage | Forest Green | ~20 yards (18 m) / 10g |
| ✨ Trim & Details | Metallic Gold (DK or Sport) | ~35 yards (32 m) / 15g |
| ⚪ Beard Fiber | Brushed White Acrylic or Faux Fur | ~30 yards (27 m) / 15g |
🧰 H. MATERIALS
- 🪡 Crochet Hooks: 3.25 mm (US D-3) for main components; 2.50 mm (US C-2) for gold trims and small flower accents.
- ☁️ Stuffing: High-loft polyester fiberfill.
- ⚖️ Stability Weight: 1 cup of plastic poly-pellets or clean glass craft beads enclosed inside a small fabric pouch or nylon stocking.
- 🔌 Structural Support: 18-gauge coated aluminum craft wire or chenille pipe cleaners (~16 inches / 40 cm long) to support and shape the curled hat.
- 🪡 Notions: Tapestry needle, stitch markers, sharp scissors, straight sewing pins.
- 💎 Embellishments: 1 small decorative gold/jewel button for the flower center, gold braid/metallic cord, small white/red decorative pearls/berries (optional).
- 🪮 Beard Tools: Slicker brush or fine-tooth comb (if brushing out acrylic yarn strands).
🔤 I. ABBREVIATIONS – US TERMS
- MR = Magic Ring
- ch = Chain
- sl st = Slip stitch
- sc = Single crochet
- hdc = Half double crochet
- dc = Double crochet
- tr = Treble (triple) crochet
- inc = Single crochet increase (2 sc in same stitch)
- dec = Single crochet decrease (invisible dec preferred)
- FLO = Front loop only
- BLO = Back loop only
- st(s) = Stitch(es)
- rnd(s) = Round(s)
- FO = Fasten off
- ( ) x N = Repeat instructions within parentheses N times
- [ ] = Total stitch count at the end of the round/row
📝 J. NOTES BEFORE YOU BEGIN
- 🌀 Spiral Working: Work all amigurumi parts in continuous spiral rounds without joining at the end of each round unless explicitly instructed.
- 📍 Stitch Markers: Place a stitch marker in the first stitch of every round and move it up as you progress to track your stitch counts accurately.
- 🧵 Seamless Color Changes: Change yarn colors on the final yarn-over of the last stitch in the previous color for clean transitions.
- ☁️ Stuffing Strategy: Stuff components firmly as you go, particularly the torso base and boots. Keep the tip of the hat un-stuffed or lightly stuffed around the wire frame to maintain flexibility.
- ⚠️ Safety Caution: If making this gnome as a toy for young children under 3 years old, omit small decorative beads, glass weight pellets, and craft wire; substitute with embroidered details and pure fiberfill stuffing.
🪡 K. COMPLETE PATTERN
🧠 Nose
Start in Warm Peach / Nude yarn with a 3.25 mm hook.
- Rnd 1: MR 6 sc. [6]
- Rnd 2: inc in each st around. [12]
- Rnd 3: (1 sc, inc) x6. [18]
- Rnd 4: (2 sc, inc) x6. [24]
- Rnd 5–7: sc in each st around. [24] (3 rounds)
- Rnd 8: (2 sc, dec) x6. [18]
- Rnd 9: (1 sc, dec) x6. [12]
- ☁️ Stuff firmly with polyester fiberfill.
- Rnd 10: dec x6. [6]
- ✂️ FO leaving a 10-inch (25 cm) tail for sewing. Thread needle through remaining front loops, pull tight to close center, and knot securely.
🧸 Body & Torso
Start in Dark Espresso Brown yarn with a 3.25 mm hook to create the base.
- Rnd 1: MR 6 sc. [6]
- Rnd 2: inc in each st around. [12]
- Rnd 3: (1 sc, inc) x6. [18]
- Rnd 4: (2 sc, inc) x6. [24]
- Rnd 5: (3 sc, inc) x6. [30]
- Rnd 6: (4 sc, inc) x6. [36]
- Rnd 7: (5 sc, inc) x6. [42]
- Rnd 8: (6 sc, inc) x6. [48]
- Rnd 9: (7 sc, inc) x6. [54]
- Rnd 10: In BLO, sc in each st around. [54]
- 🧵 Switch to Crimson Red yarn.
- Rnd 11–18: sc in each st around. [54] (8 rounds)
- 🧵 Switch to Dark Espresso Brown yarn for the belt line.
- Rnd 19–21: sc in each st around. [54] (3 rounds)
- 🧵 Switch back to Crimson Red yarn.
- Rnd 22: (7 sc, dec) x6. [48]
- Rnd 23–24: sc in each st around. [48] (2 rounds)
- ⚖️ Place poly-pellet/bead weight pouch inside the flat base of the body, then begin filling firmly with polyfill around it.
- Rnd 25: (6 sc, dec) x6. [42]
- Rnd 26–27: sc in each st around. [42] (2 rounds)
- Rnd 28: (5 sc, dec) x6. [36]
- Rnd 29–30: sc in each st around. [36] (2 rounds)
- Rnd 31: (4 sc, dec) x6. [30]
- Rnd 32: (3 sc, dec) x6. [24]
- Rnd 33: (2 sc, dec) x6. [18]
- ☁️️ Add final stuffing to ensure upper torso holds a smooth, firm cone shape.
- Rnd 34: (1 sc, dec) x6. [12]
- Rnd 35: dec x6. [6]
- ✂️ FO, weave through remaining front loops, pull tight to close, and hide thread end inside body.
👢 Boots & Feet (Make 2)
Start in Dark Espresso Brown yarn with a 3.25 mm hook.
- Foundation Chain: Ch 7.
- Rnd 1: Working in 2nd ch from hook: sc 4, 3 sc in last ch st; rotate to work along opposite side of foundation chain: sc 4, inc in last ch space. [14]
- Rnd 2: inc, sc 4, inc x3, sc 4, inc x2. [20]
- Rnd 3: sc 1, inc, sc 4, (sc 1, inc) x3, sc 4, (sc 1, inc) x2. [26]
- Rnd 4: In BLO, sc in each st around. [26]
- 🧵 Switch to Crimson Red yarn.
- Rnd 5–6: sc in each st around. [26] (2 rounds)
- Rnd 7: sc 7, dec x6, sc 7. [20]
- Rnd 8: sc 6, dec x4, sc 6. [16]
- Rnd 9–11: sc in each st around. [16] (3 rounds)
- ☁️ Stuff boot foot section firmly; keep upper cuff lightly stuffed.
- ✂️ FO leaving a 12-inch (30 cm) tail for sewing.
- ✨ Sole Welt Detail: Attach Metallic Gold yarn to unworked front loop of Rnd 4, sl st in each loop around sole, sl st to first st. FO and weave in end.
💪 Arms & Sleeves (Make 2)
Start in Cream / Off-White yarn with a 3.25 mm hook for the hands.
- Rnd 1: MR 6 sc. [6]
- Rnd 2: (1 sc, inc) x3. [9]
- Rnd 3–4: sc in each st around. [9] (2 rounds)
- 🧵 Switch to Crimson Red yarn for sleeve.
- Rnd 5: In BLO, (2 sc, inc) x3. [12]
- Rnd 6–16: sc in each st around. [12] (11 rounds)
- ☁️ Stuff lower hand firmly and lower half of arm lightly; leave top 3 rounds un-stuffed so arms lay flat against body.
- Rnd 17: Flatten top opening of arm, sc 6 across both layers to close top. [6]
- ✂️ FO leaving a 10-inch (25 cm) tail for sewing.
- ⚪ Plush Wrist Cuff: Join White Brushed/Faux Fur yarn into unworked front loop of Rnd 5. Work 1 sc in each front loop around [9 sts]. FO and weave in ends.
🧢 Curly Slouchy Holiday Hat
Start at top spiral tip in Crimson Red yarn with a 3.25 mm hook.
- Rnd 1: MR 4 sc. [4]
- Rnd 2: (1 sc, inc) x2. [6]
- Rnd 3: sc in each st around. [6]
- Rnd 4: (2 sc, inc) x2. [8]
- Rnd 5–6: sc in each st around. [8] (2 rounds)
- Rnd 7: (3 sc, inc) x2. [10]
- Rnd 8–9: sc in each st around. [10] (2 rounds)
- Rnd 10: (4 sc, inc) x2. [12]
- Rnd 11–12: sc in each st around. [12] (2 rounds)
- Rnd 13: (3 sc, inc) x3. [15]
- Rnd 14–15: sc in each st around. [15] (2 rounds)
- 🔌 Insert Craft Wire: Fold a 16-inch (40 cm) piece of craft wire in half, loop top tip inside Rnds 1–15, letting remainder extend down inside cone.
- Rnd 16: (4 sc, inc) x3. [18]
- Rnd 17–18: sc in each st around. [18] (2 rounds)
- Rnd 19: (5 sc, inc) x3. [21]
- Rnd 20–21: sc in each st around. [21] (2 rounds)
- Rnd 22: (6 sc, inc) x3. [24]
- Rnd 23–24: sc in each st around. [24] (2 rounds)
- Rnd 25: (3 sc, inc) x6. [30]
- Rnd 26–27: sc in each st around. [30] (2 rounds)
- Rnd 28: (4 sc, inc) x6. [36]
- Rnd 29–30: sc in each st around. [36] (2 rounds)
- Rnd 31: (5 sc, inc) x6. [42]
- Rnd 32–33: sc in each st around. [42] (2 rounds)
- Rnd 34: (6 sc, inc) x6. [48]
- Rnd 35–36: sc in each st around. [48] (2 rounds)
- Rnd 37: (7 sc, inc) x6. [54]
- Rnd 38–39: sc in each st around. [54] (2 rounds)
- Rnd 40: (8 sc, inc) x6. [60]
- Rnd 41–42: sc in each st around. [60] (2 rounds)
- Rnd 43: (9 sc, inc) x6. [66]
- Rnd 44–45: sc in each st around. [66] (2 rounds)
- 🧢 Flared Outer Brim:
- Rnd 46: In FLO, (10 sc, inc) x6. [72]
- Rnd 47: (11 sc, inc) x6. [78]
- Rnd 48: sc in each st around. [78]
- 🧵 Switch to Cream / Off-White yarn for Picot Trim.
- Rnd 49: (sl st in next st, ch 2, sl st in 2nd ch from hook, sl st in next st) repeat around to form scalloped picot edge.
- ✂️ FO, weave in cream ends securely.
🌺 Cream Flower Accent
Worked in Cream / Off-White yarn with a 2.50 mm hook.
- Rnd 1: MR, (ch 3, 3 dc, ch 3, sl st into ring) x6 to form 6 petals.
- ✂️ Pull ring tight. FO leaving an 8-inch tail.
- 💎 Stitch decorative gold/jewel button into center of flower using needle and gold thread.
🍃 Holly Leaves (Make 3)
Worked in Forest Green yarn with a 3.25 mm hook.
- Foundation Chain: Ch 10.
- Row 1: Working down chain: sl st in 2nd ch, sc in next, hdc in next, dc in next 2, hdc in next, sc in next, 3 sc in last ch. Rotate to work along opposite side of chain: sc in next, hdc in next, dc in next 2, hdc in next, sc in next, sl st in last ch.
- ✂️ FO leaving an 8-inch (20 cm) tail for sewing.
🧔 Beard Construction
Using Brushed White Acrylic or Faux Fur Yarn.
- 🧵 Option A (Combed Yarn Method): Cut 30 strands of white acrylic yarn, each 8 inches (20 cm) long. Fold each strand in half and loop-latch stitch onto lower-front torso (Rnds 16–22) in a dense V-shape pattern. Comb thoroughly with slicker brush until soft and fluffy; trim into tapered beard point.
- 🧵 Option B (Crochet Base Method): Ch 12 in white yarn, work 3 rows of sc decreasing at edges to form a triangle; comb out surface fibers and pin to body.
✨ Gold Braid Trim & Belt Buckle
- Hat Band Braid: Using Metallic Gold yarn and 2.50 mm hook, Ch 85, turn and sl st across. Wrap around hat base right above Rnd 46 brim join and knot neatly.
- Belt Buckle: Using tapestry needle and Metallic Gold yarn, embroider a 1.5-inch square buckle frame centered over Rnds 19–21 on front belt line.
🎨 L. STYLING / ASSEMBLY / STABILITY / FINAL SHAPING
           [ Curled Hat Tip ]
                 /   \
               /  ✨  \  <-- Snowflake Embroidery
             /  🌺🍃   \ <-- Flower & Holly Arrangement
           [ Cream Brim ]
            (  🧠 Nose  )
           / [ Beard ]   \
          / [Coat Trim]   \
        [Hand] [Belt] [Hand]
         \               /
          [Boot]   [Boot]
🧠 Nose & Beard Alignment
- Beard Attachment: Pin top edge of beard flat against front torso spanning Rnds 17–20. Sew top edge securely using white yarn.
- Nose Placement: Center the nose directly over top edge of beard on Rnd 21. Sew nose securely to body using peach yarn tail, letting lower half overhang top of beard.
🧢 Hat Positioning & Curling
- Wire Preparation: Wrap lower exposed wire end inside body polyfill or curve into smooth loop inside hat so sharp wire tip does not pierce stitches.
- Placement: Fit hat down over top of body, pulling back brim so lower edge sits directly over top third of nose, covering upper edge of beard completely.
- Sewing: Stitch unworked back loops of hat Rnd 45 to body torso using Crimson yarn.
- Curling: Bend internal craft wire into a tight forward-or-side curl at top of hat cone.
👢 Boot & Arm Placement
- Boots: Position boots side-by-side at front base of body, angled slightly outward. Sew upper boot tops to Rnds 9–11 of body base so boots sit flat on surface in front of gnome.
- Arms: Pin upper arm tops to sides of body at Rnd 27, tilted forward slightly. Sew top edge flat against torso.
🌺 Decorating the Hat
- Snowflake Embroidery: Using white yarn, embroider 5–7 eight-point star snowflakes randomly across front upper hat cone.
- Botanical Cluster: Pin 3 Forest Green leaves and cream flower brooch onto left side of hat brim. Stitch securely in place.
- Gold Accents: Drape double gold braid around coat front panels or hat band as desired.
🔢 Recommended Assembly Sequence
- 🪡 Step 1: Complete all crochet components and weave in hidden internal ends.
- 🪡 Step 2: Insert bottom pouch weight into torso and stuff body firmly; seal top.
- 🧔 Step 3: Attach beard to front torso; attach nose over top edge of beard.
- 👢 Step 4: Sew boots to bottom front edge; sew arms to torso sides.
- 🧢 Step 5: Install wire frame inside hat, place hat over body, and sew securely.
- ✨ Step 6: Embroider hat snowflakes and belt buckle.
- 🌺 Step 7: Sew flower brooch, green leaves, and gold braid trim onto hat.
- 🪮 Step 8: Brush and trim beard into final sharp V-shape.
✅ Final Shaping Checklist
- ✅ Stability: Does gnome sit upright on flat surface without tipping backward or forward?
- ✅ Hat Curl: Is internal wire bent into a clean, smooth spiral that holds shape?
- ✅ Nose Fit: Is nose nestled securely right under hat brim with zero gaps showing?
- ✅ Beard Symmetry: Is beard combed smooth and centered beneath nose?
- ✅ Trim Alignment: Are gold hat braid and belt buckle straight and centered?
💡 M. HELPFUL CROCHET TIPS
- 💡 Tip 1 (Invisible Decrease): Always use invisible decreases (
dec) on amigurumi outer surfaces to eliminate gaps and bumps in stitch texture. - 💡 Tip 2 (Poly-Pellet Safety): Always seal plastic poly-pellets inside a nylon stocking or fabric pouch before putting them in body base so pellets cannot leak out through crochet stitches.
- 💡 Tip 3 (Faux Fur Brushing): When combing out acrylic yarn for the beard, brush gently from bottom ends upward to avoid tearing yarn out at knot root.
- 💡 Tip 4 (Wire Safety Ends): Fold wire tips over into small closed loops and wrap with electrical or masking tape before inserting into hat to prevent wire poking through yarn.
- 💡 Tip 5 (Tight Tension): Use a hook size smaller than yarn ball band recommends to keep stitches tight so stuffing stays completely invisible.
- 💡 Tip 6 (Color Changing): Pull new color yarn through final two loops of stitch prior to color transition for clean color lines.
- 💡 Tip 7 (Pinning Strategy): Always pin all main body parts (nose, boots, hat, arms) in place first to review proportions before sewing anything permanently.
🧼 N. CARE INSTRUCTIONS
- 🧼 Cleaning: Spot clean gently with a damp cloth and mild soap. Do not submerge completely in water to protect internal wire frame and poly-pellets.
- 💨 Drying: Air dry thoroughly at room temperature. Do not put in machine dryer or apply direct heat.
- 🪮 Grooming: Gently brush beard with clean slicker brush or wide-tooth comb periodically to keep fibers soft and untangled.
- 📦 Storage: Store upright in a cool, dry breathable container during off-season months. Do not crush hat cone under heavy holiday storage boxes.
❓ R. FAQ
❓ Can I use velvet or chenille blanket yarn for this gnome pattern?
Yes! You can use plush velvet or bulky yarn. Be sure to upscale your hook size (typically 5.0 mm to 6.0 mm) and adjust wire gauge to a thicker wire. The finished gnome will be significantly larger (around 20–24 inches tall).
❓ How do I make sure my gnome doesn’t fall over?
The key is adding weight (1 cup of poly-pellets, glass craft beads, or clean dry bean pouch) at the flat bottom of the body base before adding polyfill stuffing. Stuff firmly around the weight to create a wide, flat bottom disc.
❓ What is the best yarn for combing out the beard?
Standard 100% acrylic worsted yarn works best for combed beards. Wool yarn can felt when brushed, while cotton yarn will untwist into flat threads rather than fluffing up.
❓ Can I make this gnome without wire in the hat?
Yes! If you prefer a wire-free toy for young children, simply stuff the hat cone lightly with polyfill. The hat will fall naturally into a relaxed slouchy curve rather than a structured curl.
❓ How do I embroider the snowflakes on the red hat?
Use white yarn and a tapestry needle. Stitch a simple 6-point or 8-point star by making straight vertical, horizontal, and diagonal crossing stitches over a 3-round span on the hat surface.
❓ My hat brim looks wavy. How do I fix it?
If your brim flares too much, check your stitch count on Rnd 46–48. Amigurumi tension can tighten; if needed, drop down one hook size (2.75 mm) for the picot edging round to pull brim edge into a clean shape.