INTRODUCTION
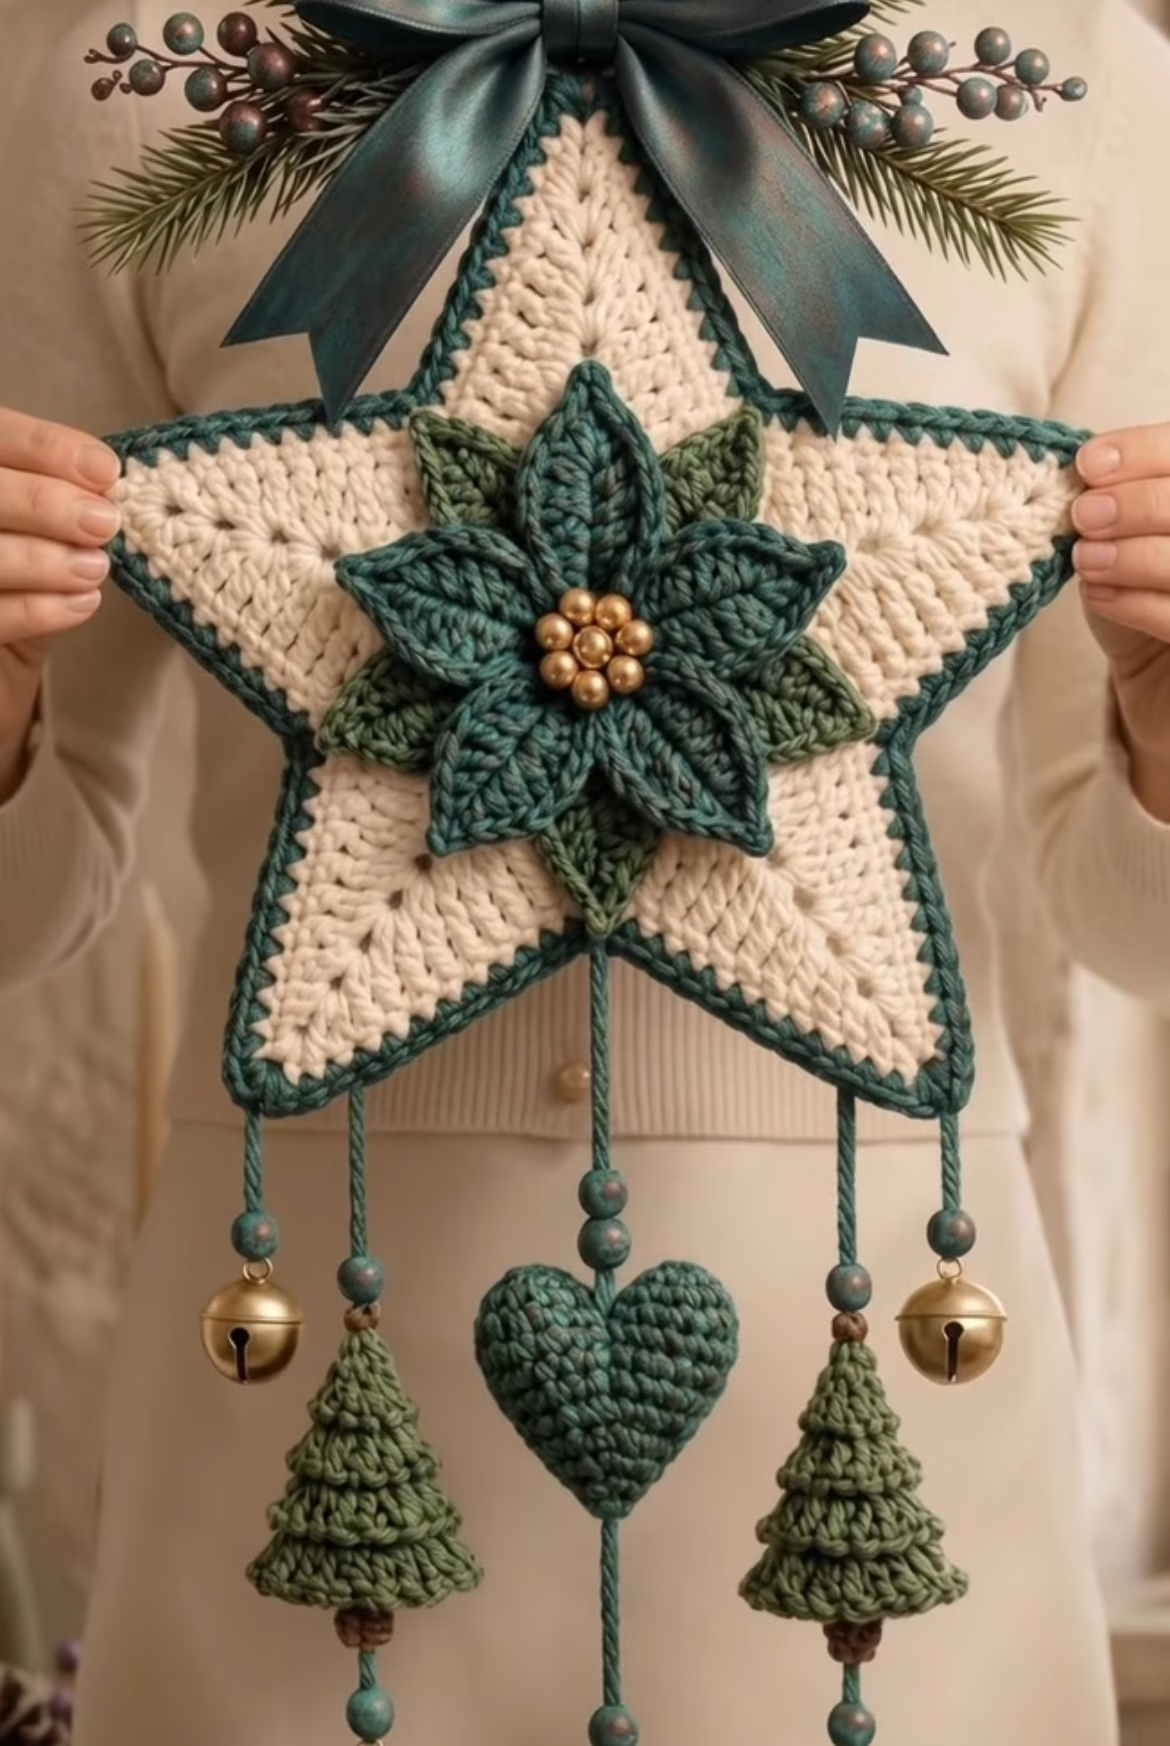
This eye-catching crochet project brings festive elegance and handmade charm to your home. The main focal point is a beautifully constructed large star, worked in classic cream with a striking deep green border. The centerpiece is a 3D poinsettia flower, layered with intricate, sculpted petals and adorned with golden bead “berries.” From the bottom points of the star dangle playful crocheted tree charms, a plump stuffed heart, and shiny metallic bells, all hanging from sturdy twist cords with wooden beads. The star is topped with a lavish satin ribbon and clusters of pine and berry accents, perfect for holiday decorating. The design is textural, tactile, and finished with rich, complementary colors that suit winter celebrations and cozy interior decor.
Displaying this wall hanging over your mantel, on your front door, or even as a statement piece in your hallway, instantly invites a sense of warmth and creativity. Besides its showstopping look, this project is enjoyable to make with its mix of flat and 3D motifs, making it both a joyful process and a stunning result. Gift it to loved ones, or use as a memorable part of your seasonal traditions!
PROJECT OVERVIEW
The piece is constructed by crocheting the large star shape in rounds, adding a 3D poinsettia appliqué, and creating small amigurumi-style charms (trees and heart) separately. These elements are then assembled with cords, beads, and bells. The star is finished with a bold border, decorative ribbon, and festive foliage/floral touches at the top.
SKILL LEVEL
Intermediate: This project suits crocheters comfortable with working in the round and reading patterns. It involves increases, decreases, joining motifs, amigurumi, and surface embellishments, but all techniques are manageable with patience and attention to detail.
MATERIALS
- Yarn: Worsted weight (Medium #4) cotton yarn for crisp stitch definition and durability.
- Colors Approximation:
- Cream (star main body): ~100g
- Deep green (star border, poinsettia, heart, cord, trees): ~120g
- Light green (inner poinsettia petals): ~20g
- Crochet Hook: US H-8 (5.0 mm) or size needed for a firm, even fabric.
- Tapestry needle for sewing and weaving in ends.
- Small gold round beads for the poinsettia center (or substitute sequins, buttons, or crocheted baubles).
- Three jingle bells, medium to large size (approx. 2.5–3cm or 1–1.2″ in diameter).
- Wooden or plastic beads (about 2 cm/0.8” diameter) for cord decoration.
- Satin ribbon (at least 3 cm/1.2” wide) for the bow.
- Artificial pine sprigs and berries, or similar decorative picks for finishing touches (optional).
- Polyester fiberfill stuffing for heart and trees (~20g).
- Scissors, measuring tape, stitch markers.
FINISHED SIZE
- Star (main body): Approx. 38 cm (15 in) across point to point
- Total hanging length (with charms): Approx. 62 cm (24.5 in)
To adjust the size, use a different yarn weight/hook or alter the number of rounds in the star motif. Increasing will make the motif and overall hanging larger; decreasing rounds will shrink it.
GAUGE
Gauge is not critical but for reference: 13 dc and 8 rows = 10 cm (4 in) square in pattern. Check your gauge if you want a precise size.
Note: Small variations in gauge will affect finished measurements and yarn amounts.
STITCHES AND ABBREVIATIONS
- ch – chain
- sl st – slip stitch
- sc – single crochet
- hdc – half double crochet
- dc – double crochet
- tr – treble crochet
- MR – magic ring
- inc – increase (2 sts in same st)
- dec – decrease (work 2 sts together)
- sc2tog – single crochet 2 together (decrease)
IMPORTANT PATTERN NOTES
- Ch 3 at the start of dc rounds counts as the first dc.
- Rounds of the star are joined with a sl st to the top of the starting ch-3 (or first st) unless noted.
- Use stitch markers to keep track of points and round starts as star grows.
- Change colors at the end of the round before starting a motif or border using the last yarn over of the previous stitch.
- Work with the right side facing throughout. Lay work flat frequently to check symmetry.
- For amigurumi charms, work in a tight spiral (do not join unless noted).
DETAILED CROCHET PATTERN
PART 1: LARGE CROCHET STAR
Star Center (Cream)
- With cream yarn, make a MR. Ch 3 (counts as dc), work 9 dc into ring. Join with sl st to top of ch-3. (10 dc)
- Ch 3 (counts as dc), dc in same st, 2 dc in each st around. Join. (20 dc)
- Ch 3, *dc in next, 2 dc in next; repeat from * around. Join. (30 dc)
- Ch 3, dc in next 2, 2 dc in next; repeat around. Join. (40 dc)
Shaping Star Points (Cream)
- Ch 3, dc in same st. *Dc in next 7 sts, 2 dc in next*; repeat from * around (should have 5 increases evenly spaced for 5 points). Join. (45 dc)
- Now, mark the 5 increase spots—these become point centers.
- Star Points (each created across 9 sts, repeat 5 times): *(Dc in next 2, tr in next 2, ch 2, sl st into top of previous tr (for sharp tip), tr in next 2, dc in next 2, sc in next 1) = 1 point*. Repeat for all 5 points. Join to first dc. (Each point should now be visible; work around the motif to define shape.)
- Outline/Define points: *Sc in each st up to the tip (ch-2 at tip), (sc, ch 2, sc) into ch-2 tip space, sc down other side of point to valley, sl st to next point base*. Repeat around. Join. Fasten off cream.
Star Border (Deep Green)
- Join deep green yarn to any st at the point. Work one round of sc evenly around the entire star, working (sc, ch 2, sc) into every tip (ch-2 tip space), and sc2tog in the valley between points to pull in the shape. Join and fasten off. Weave in ends.
PART 2: 3D POINSETTIA FLOWER
First Layer (Deep Green, 5 petals)
- With deep green yarn, MR. Ch 1, 10 sc into ring. Pull tight, join with sl st to first sc. (10 sc)
- First Petal (make 5): Ch 6, sc in 2nd ch from hook, hdc in next, dc in next 2, hdc in last. Sl st to next sc on ring to anchor. Repeat for a total of 5 petals around. Join to base.
- Fasten off and weave ends.
Second Layer (Light Green, 5 petals, offset)
- Join light green into base between two petals. Repeat petal instructions: Ch 5, sc in 2nd ch from hook, hdc, dc in next 2, sl st to next space between petals. Repeat for five petals, offsetting so each sits between previous petals. Fasten off and weave in ends.
Third Layer (Smaller Deep Green Petals, 5 petals, centered)
- With deep green, join in any space at the base. Ch 4, sc in 2nd ch, hdc, dc. Sl st to next space. Repeat 4 more times. Fasten off, leaving a long tail for sewing.
Cluster Center
Sew golden beads securely to the flower’s center in a tight cluster (7–9 beads as shown). Alternatively, use French knots with gold thread or small crochet balls.
Set aside for assembly.
PART 3: DECORATIVE CHARMS
a) Heart Charm (Deep Green, Make 1)
- MR, ch 1, 6 sc in ring. (6)
- Inc in each st around. (12)
- (Sc, inc) around. (18)
- (Sc in next 2, inc) around. (24)
- Sc in each st for 2 rounds. (24 each)
- First bump: Work in next 12 sts only. (Sc in next 3, hdc in next 3, dc in next 3, hdc in next 2, sc in next 1), fasten off.
- Second bump: Join to unworked 12 sts, repeat as for first bump.
- Sew bumps together at the center to form the heart shape. Stuff lightly with fiberfill before closing completely. Use tail to shape crevice if needed. Set aside.
b) Mini Christmas Trees (Deep Green, Make 2–3)
- With green, MR, ch 1, 6 sc in ring. (6)
- Sc in each st around. (6)
- (Sc, inc) around. (9)
- Sc in each st. (9)
- (Sc in next 2, inc) around. (12)
- Sc in each st. (12)
- (Sc in next 3, inc) around. (15)
- Sc in each st. (15)
- (Sc in next 4, inc) around. (18)
- Sc in each st. (18)
- Continue, increasing as desired for a slightly conical shape. After final round, stuff with fiberfill, fasten off, and flatten slightly at the base. Optionally surface-crochet chains around the tree for a ridged look.
c) Cord Danglers and Assembly
- For each charm, cut a 35–40 cm (14–16”) length of deep green yarn and twist tightly, or crochet a chain of similar length for each dangle.
- Thread on decorative beads and secure one end to each charm securely.
- On two cords (outermost), attach a bell beneath a bead. Use strong thread for extra security.
PART 4: ASSEMBLY AND FINISHING
- Lay star flat, mark a position just below center for the poinsettia flower. Sew securely using long yarn tails.
- Attach heart to a hanging cord. Sew/safety-pin to the center bottom of the star (back side) so that it dangles from the lowest point.
- Attach two mini trees to cords and sew each just below the left and right lower star points, so they hang at a pleasing, even height.
- On the left and right cords, add a bell and a bead above and/or below as decorative spacers.
- Weave in all loose ends with a tapestry needle.
- Prepare the ribbon by tying a large bow and arranging artificial foliage or berry picks behind it.
- Sew or glue the bow-and-foliage cluster to the topmost star point at the back, securely anchoring with strong thread if needed.
- For hanging, add an additional twisted yarn loop or matching ribbon to the center back of the topmost star point.
Block the star lightly if desired by misting with water, pinning flat, and letting dry to set shape and crispness.
CUSTOMIZATION IDEAS
- Use reds, golds, or winter whites for a different seasonal mood or to match your decor.
- Use a variegated yarn for the star body or flower for a more whimsical look.
- Replace any charm with small ornaments, bells, or mini crocheted mittens, stockings, or snowflakes.
- Turn the motif into a cushion front, a wall hanging, or a festive banner by joining several stars.
- Make miniature versions as tree ornaments or gift toppers by reducing rounds and hook size.
- Try a chunky yarn for oversized door decor or a lighter weight for delicate accent pieces.
TROUBLESHOOTING TIPS
- Star curling or ruffling: Adjust your stitch count, or block the piece firmly after finishing. A slightly larger hook may help.
- Uneven star points: Place stitch markers at tip and valley increases to keep symmetry; recount to check placement each round.
- Motif too large or too small: Adjust hook size or number of star rounds.
- Loose color changes: Always finish the last yarn over of a stitch with the new color; weave ends invisibly on wrong side.
- Uneven tension in cords: Use a twisted yarn cord or crochet chain held evenly, and add beads for neatness and weight.
CARE INSTRUCTIONS
Spot-clean with a damp cloth, or hand-wash gently in cold water with mild detergent. Squeeze out excess water, reshape, and lay flat to dry. Avoid wringing or machine-drying to maintain shape and texture.
FINAL NOTES
Take your time to count stitches after each round or motif section, and adjust your tension for an even, professional look. Reference the image to guide placement and styling of charms and ribbon. This project rewards patience with a beautiful, heirloom-quality decoration you’ll treasure for years to come!