Introduction
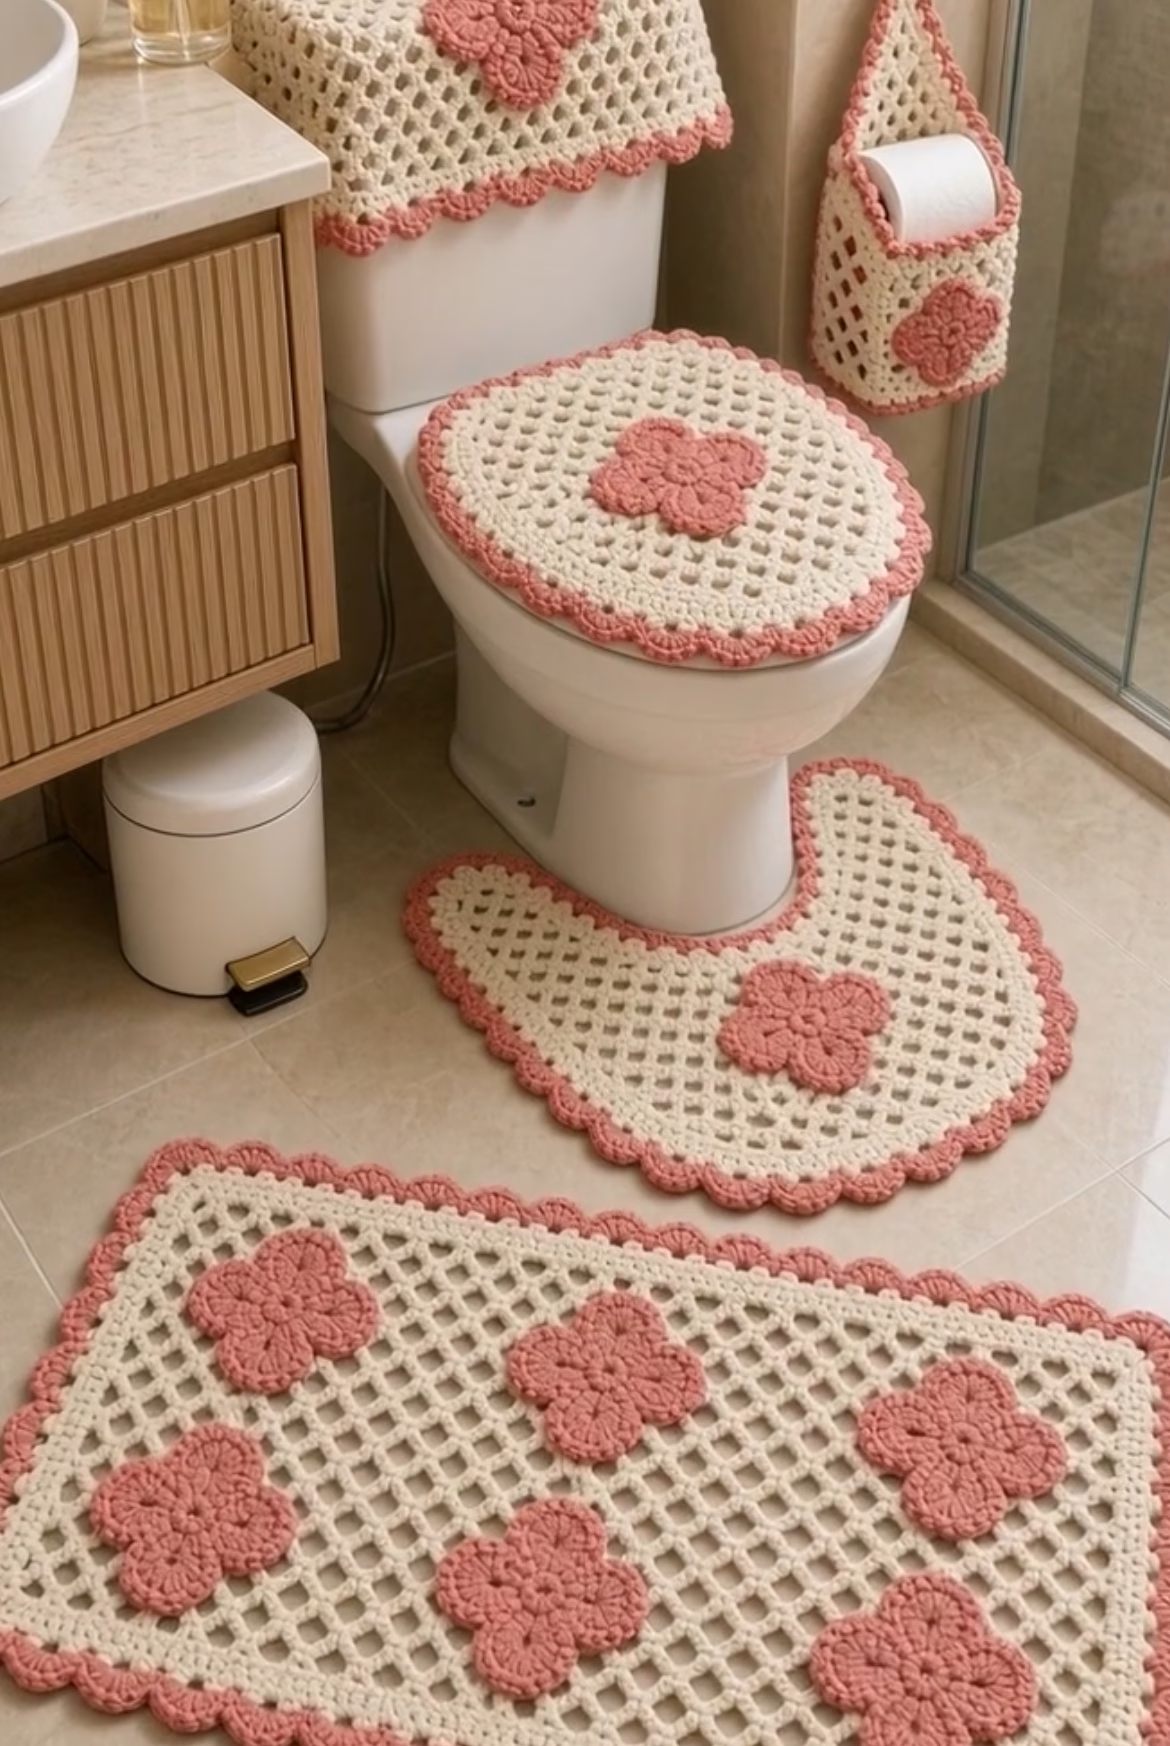
This beautiful vintage-inspired crochet bathroom set brings a touch of classic, handmade artistry to your home. The set consists of several coordinated pieces: a rectangular bath mat, a contour rug for around the toilet base, a matching toilet seat cover, a decorative lid cover for the tank, and a clever toilet paper holder. Each piece is adorned with charming raised floral appliqués in soft blush pink, placed centrally or in a pleasing arrangement over a lacy cream mesh background. The entire set is unified by a delicate scalloped border in the same pink shade as the flowers, wrapping every piece in a cozy, gentle finish.
The interplay of openwork mesh and solid pop-out blossoms creates a design that feels both airy and inviting. The lovely contrast of pink and cream suits many decor styles, while the plush texture provides a comfort underfoot and a pleasing tactile element. This bathroom set is perfect for those who want to add handmade warmth and beauty to everyday spaces. It also makes an impressive gift for housewarmings or bridal showers, and it’s an enjoyable project for anyone wanting to learn new skills or explore textured motifs.
Project Overview
The set is made up of several pieces worked mostly flat, with some shaped to fit their respective surfaces (such as the toilet lid cover and contour rug). Each section is crocheted using a cream base in a mesh (chain and double crochet grid), which is then edged with a solid border. Raised five-petal flowers are crocheted separately and sewn onto the mesh at visually balanced intervals. Most borders are finished with a shell or scallop pattern for a classic look. The toilet paper holder is worked as a small, rectangular mesh pouch and includes a hanging loop for convenience.
If you can work in rows, join in the round, shape pieces, and assemble appliqués, you’ll find this projects rewarding. Appliqué placement is critical for the final coordinated look, and the set is fully customizable in layout, color, and size.
Skill Level
Intermediate. The set involves several mid-level techniques: making and joining mesh, shaping for custom fit, crocheting three-dimensional flowers, working shell borders, and neat assembly. Minimal seaming is required, as most joins use whip stitch or simple sewing. The pattern is well suited for the adventurous crocheter who has worked with basic motifs and wants to expand into textural design.
Materials
- Worsted weight (medium #4) 100% cotton yarn, approx.:
– Cream (main mesh & base): 500g (18 oz)
– Soft blush pink (flowers & border): 250g (9 oz) - US H/8 (5.0mm) crochet hook
- Tapestry needle for weaving in ends and sewing appliqués
- Sharp scissors
- Stitch markers
- Measuring tape
- Optional: Small ring or button for fastening toilet lid cover
Finished Size
- Rectangular bath mat: approx. 55 x 90 cm (22 x 35.5 inches)
- Toilet contour rug: approx. 50 x 60 cm (20 x 24 inches)
- Toilet seat cover: approx. 40 x 45 cm (16 x 18 inches)
- Tank lid cover: approx. 35 x 50 cm (14 x 20 inches)
- Toilet paper holder: approx. 25 x 15 cm (10 x 6 inches) before folding and sewing
Adjust length or width by adding or subtracting starting chains in multiples of 3 + 2 for the mesh. Appliqué flower placement may need adapting if size is changed.
Gauge
In mesh pattern: 10 cm (4 inches) square = 12 dc and 6 rows.
Gauge is not critical, but note that sizing will vary with different tension. Make a swatch to ensure fabric is not too open or dense for intended use.
Stitches and Abbreviations
- ch – chain
- sl st – slip stitch
- sc – single crochet
- hdc – half double crochet
- dc – double crochet
- tr – treble crochet
- sk – skip
- st(s) – stitch(es)
- sp – space
- MR – magic ring
- rep – repeat
- RS/WS – right side/wrong side
Important Pattern Notes
- Turning chains at start of rows count as a stitch unless otherwise noted.
- When joining rounds or changing color, always complete last stitch of old color, then pull new color through to finish stitch.
- Use stitch markers at corners or start of rounds to keep track of shape.
- For appliqué placement, lay out finished base piece and pin flowers before sewing.
- Work mesh flat in rows except where stated (toilet seat and tank lid covers are sometimes worked in joined rounds for shaping).
- Keep RS facing when working borders and attaching appliqués.
Detailed Crochet Pattern
Part 1: 3D Flower Motif (Make 10-12 in pink, depending on set size)
- Round 1: With pink, MR, ch 2 (counts as dc), 11 dc in ring, join with sl st to top of ch-2. (12 dc)
- Round 2: *[Ch 2, 2 dc, ch 2, sl st in same st], sl st in next st; rep from * around, ending with sl st to joining sl st (6 petals formed).
- Round 3: In each ch-2 sp: (sc, hdc, 3 dc, hdc, sc), sl st into space between petals; rep for each petal. Fasten off and weave in ends.
- Flatten and lightly block for an even flower. Each should measure about 8 cm (3 inches) in diameter, depending on tension.
Part 2: Rectangular Main Bath Mat
- Foundation Row: With cream, ch 74 (multiple of 3 + 2 for a rectangle about 55 cm / 22″ wide).
Row 1 (WS): Dc in 5th ch from hook (counts as first dc and ch-1 sp), *ch 1, sk 1 ch, dc in next ch* across, turn. (36 ch-1 sps, 37 dc) - Row 2: Ch 4 (counts as dc + ch-1), dc in next dc, *ch-1, dc in next dc* across, turn.
- Rows 3-36: Repeat Row 2, or until piece measures approx. 90 cm (35.5 inches) long. Fasten off.
- Border (cream): Join cream at a corner, ch 3, work 2 dc in same sp, *(dc, ch 1, dc) in each corner, 1 dc in each dc and ch-1 sp across sides*, all around, join with sl st. Fasten off.
- Scalloped Edge (pink): Join pink in any st, *sk 1 st, 5 dc in next st, sk 1 st, sl st in next st*, repeat from * around, adjusting at corners. Join and fasten off.
- Finishing: Pin and sew five flower motifs evenly spaced (see photo for reference). Weave in all ends.
Part 3: Toilet Contour Rug
- Foundation Row: With cream, ch 61 (adjust for preferred width), turn.
Row 1: Work as for bath mat: dc in 5th ch, *ch 1, sk 1, dc* across, turn. - Rows 2-22: Repeat as for mat. For half-circle shaping (contour):
- Row 23: Ch 4, dc in next dc, ch 1, *dc in next dc*, repeat across until last 12 sts. Leave last 12 unworked, turn.
- Row 24: Decrease 1 mesh at start and end of row for next 3 rows, creating a gentle inward curve.
- Border: Join cream, work 1 row sc evenly around, placing 3 sc in each outside curve and sc2tog at sharp inner corners to shape. Work pink scalloped border as above.
- Sew one flower in the lower center as focal point. Block flat.
Part 4: Toilet Tank Lid Cover
- Foundation: With cream, ch 56, join to form a ring (adjust for your tank lid size). Work mesh pattern in joined rounds:
Round 1: Ch 3, dc in next ch, *ch 1, skip 1, dc*, repeat to end, join at top of ch-3. - Rounds 2-20: Work mesh as for mat, increasing as needed at ends (work 2 dc in corners every 2 rounds) to keep cover flat and shape oval. Work until piece measures approx. 35 x 50 cm (14 x 20 inches).
- Border: 1 round sc in cream, then pink scallops as above. Attach 1 flower centered on short end.
Part 5: Toilet Seat Cover
- Foundation: With cream, ch 52, join to form a round. Work mesh in rounds:
Round 1: Ch 3, dc in next ch, *ch 1, sk 1, dc* around, join. - Rounds 2-17: Continue mesh as for tank cover, increasing by working 2 dc together in center back and sides every 2-3 rounds for shape. Stop when piece covers seat top (approx. 16 x 18 inches). If desired, add 1 round sc with gentle decreases to fit snugly, then scalloped pink border.
- Sew one flower in the center front of the cover.
Part 6: Toilet Paper Holder
- Foundation: Ch 33, turn. Work 18 rows mesh as established (dc, ch 1, sk 1) for a rectangle. Fasten off.
- Fold piece in half (leaving front shorter if desired for easy access), whipstitch one short side to create a pouch. Seam one flower on the center front, attach a loop in pink (ch 18, join with sl st, sc around loop), sew to upper back as a hanger.
Assembly and Finishing
- Weave in all loose ends with tapestry needle.
- Block all pieces gently with a spray bottle and pin to finished measurements if needed for neatness.
- Lay out flowers and pin before sewing with matching thread or yarn for an even finish.
- For toilet seat cover, if a snug fit is preferred, add a row of sc with elastic thread woven at the back or a small button with a loop at the rear edge.
- Use stitch markers or pins during border work to keep corners even, especially on rectangles.
Customization Ideas
- Try other color combos to match your decor: sage and cream, navy and white, lavender and ivory, or bold brights.
- Use wool/acrylic blend for a plusher but less absorbent finish (best for mats and seat covers, not tank lid or toilet paper holder).
- Resize mesh bases to make matching coasters, placemats, or napkin holders.
- Turn the flowered mesh rectangle into a small wall hanging for a softer accent.
- Attach flowers only at center for a more 3D effect, or stagger placement for a modern look.
Troubleshooting Tips
- If the mesh fabric curls, gently steam block or wet block flat to shape before bordering.
- If edges become wavy or ruffled, work fewer increases in border or use a smaller hook for edging rows.
- If the motifs become too loose, check that your yarn is worsted weight and adjust hook size down.
- For loose color changes, always pull new color through on the final loop of a stitch for a smooth join.
- If your piece is too small, add rows to the base meshes or start with a longer chain; if too large, reduce base stitches accordingly.
Care Instructions
- Hand wash or gentle machine wash with mild detergent in cool or lukewarm water. Lay flat to dry and reshape as needed.
- Avoid high heat or tumble drying, as this may distort or shrink cotton motifs.
- Spot clean spills promptly to keep colors bright.
Final Notes
Check your stitch counts at each stage for crisp mesh and neat borders. Adjust your tension if you notice the fabric getting too tight or loose. Use the photographed set as a visual reference for motif placement and color contrast. The playful flowers and open mesh pattern come together for a welcoming, practical handmade set—enjoy personalizing your new favorite bathroom accent!