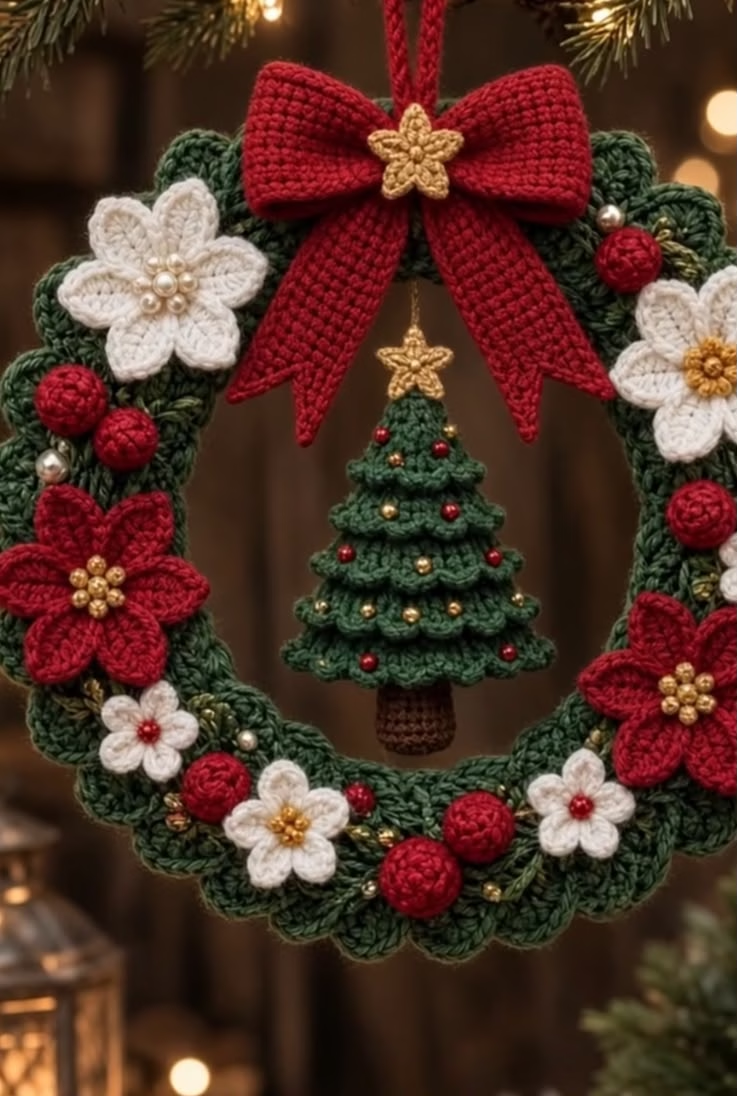
This festive crochet Christmas wreath is a beautiful, handmade decoration perfect for your door or wall. The project features a classic circular green wreath accented with dimensional red and white flowers, small red and gold baubles, and a striking red bow at the top. The centerpiece is a charming, three-dimensional Christmas tree, suspended in the center with a crochet string. The pattern combines soft, cozy textures and vibrant holiday colors, making it inviting and full of seasonal cheer. Whether you’re crafting it as a gift or to enhance your own holiday décor, this project stands out for its intricate detail and playful elements.
The color scheme is classic and timeless: deep forest green for the wreath base, vivid scarlet red and clean white for the flowers and baubles, with touches of gold in the star and bead accents. The lush bow anchors the design, while the tiny crocheted berries and soft floral petals evoke traditional Christmas imagery. Finished with a delicately suspended evergreen tree in the center, the wreath is both festive and whimsical.
This crochet wreath can be used on your front door, as a wall hanging, or even as a centerpiece for your holiday table. It’s interesting to make, offering the satisfaction of producing multiple decorative elements, and the opportunity to customize colors and embellishments to suit your own style or festive theme. This project allows you to explore textured stitches, create dimensional motifs, and practice assembly for a professional finish.
Project Overview
The wreath is constructed in several parts. The main wreath ring is crocheted in rounds and later covered by a scalloped green overlay. Small flowers and baubles are made separately and sewn on. The red bow is crocheted in pieces and stitched together. Finally, the mini 3D Christmas tree is worked in rows and rounds, assembled, and suspended in the center. This pattern involves joining motifs and decorative appliqués, making it engaging and modular.
Skill Level
Intermediate: This pattern is suitable for those comfortable with basic and some intermediate crochet techniques. You’ll need to work in rounds, create 3D objects, shape flowers and a bow, and join separate motifs. Some experience in assembly and color changes will be helpful.
Materials
- Worsted weight yarn (category 4) in these colors:
- Green (wreath & tree): approx. 100g
- Red (flowers, baubles, bow): approx. 70g
- White (flowers): approx. 30g
- Gold/yellow (star, bead embroidery): small amounts, approx. 10g
- Brown (tree trunk): scraps
- 4.0mm (G-6) crochet hook
- Tapestry needle for sewing parts
- Sharp scissors
- Stitch markers (helpful for marking center points and ends)
- Sturdy wire or embroidery hoop (~9″/23cm diameter) for shaping the wreath base (optional but highly recommended for structure)
- Assorted gold and pearl beads for flower centers and tree ornaments (optional but recommended for detail)
- Small amount of fiberfill stuffing for the 3D baubles and tree (optional; you can use yarn ends)
Finished Size
- Approximately 25 cm (10 inches) in diameter (outer edge).
- The central tree hangs freely and is about 10 cm (4 inches) tall.
To adjust the size, use a larger or smaller hoop or adjust your yarn weight and hook size. For a bigger wreath, increase the number of stitches in the base ring and scale up flowers accordingly.
Gauge
About 16 sc x 20 rows = 10 x 10 cm (4 x 4 in) in single crochet. Gauge is not critical for this project, but differences can affect the finished diameter and density of your wreath.
Stitches and Abbreviations
- ch – chain
- sl st – slip stitch
- sc – single crochet
- hdc – half double crochet
- dc – double crochet
- tr – treble crochet
- inc – increase (2 sc in same stitch)
- dec – decrease (single crochet 2 together)
- MR – magic ring
Important Pattern Notes
- Unless stated, rounds are joined with a slip stitch to the first stitch.
- Ch 1 at the beginning of a round does not count as a stitch unless specified.
- Use stitch markers to indicate round beginnings and critical placements.
- Change colors as instructed, always joining the new color in the last yarn-over of the previous stitch for a seamless look.
- The right side faces out on all motifs. Keep tension firm, especially on the wreath overlay.
Detailed Crochet Pattern
Part 1: Main Wreath Base
- Wreath Cover (worked flat and joined):
- With green, ch 100 (or enough to snugly wrap around your hoop/wire, plus 2).
- Row 1: Sc in 2nd ch from hook and across (99 sc). Ch 1, turn.
- Rows 2-7: Sc in each st across. Ch 1, turn. (99 sc)
- Fasten off, leaving a very long tail.
- Wrap the strip tightly around the hoop or wire base, joining short ends with whip stitch. Seam the long edges with mattress stitch or whip stitch along the back. Adjust tension so the cover hugs the base evenly.
- Scalloped Overlay (worked in rounds):
- With green, join yarn at any point on wreath cover (or make a separate strip if you did not use a hoop).
- Round 1: Ch 1, sc evenly around the whole circumference. Join.
- Round 2 (scallops): *Sk 1 st, (hdc, 3 dc, hdc) in next st, sk 1 st, sl st in next st; repeat from * around. If necessary, adjust sk 1 for even spacing at the end. Fasten off, weave in tail.
Part 2: Flowers and Baubles
Large Poinsettia Flowers (Make 3: Red or White)
- With red or white, MR, ch 1.
- Round 1: 5 sc in the ring. Do not join, continue in rounds. (5 sc)
- Round 2: *Ch 4, tr in next st, ch 1, sl st in next st; repeat from * around for 5 petals. Fasten off and weave in tail.
- With gold, sew or glue gold beads (5-7) in a clustered center.
Medium Flowers (Make 4: White or Red)
- MR, ch 1.
- Round 1: 6 sc in ring. (6 sc)
- Round 2: *Ch 2, 3 dc in same st, ch 2, sl st in next st; repeat from * around for 6 petals.
- Sew on a single gold or pearl bead in the center.
Mini Accent Flowers (Make 6: White)
- MR, ch 1.
- Round 1: 5 sc in ring. (5 sc)
- Round 2: In each st, (ch 2, sc in same st), sl st in next st. Repeat for 5 small petals.
- Add a gold or pearl bead in the center.
Baubles/Berries (Make 8–10: Red, Gold)
- With red or gold, MR.
- Round 1: 6 sc in ring, join with sl st to first sc. (6)
- Round 2: 2 sc in each st around. (12)
- Round 3: *Sc2tog, sc in next st* repeat around (8)
- Stuff lightly, then sc2tog around (4), fasten off and close tightly. Weave in ends.
Part 3: Large Bow
- Bow Body
- With red, ch 41.
- Row 1: Sc in 2nd ch from hook and each across. (40)
- Rows 2–14: Sc in each st. (40)
- Fasten off, weave in ends.
- Bow Center Band
- With red, ch 10.
- Row 1: Sc in 2nd ch and across. (9)
- Rows 2–3: Sc in each st. Fasten off, leave tail for sewing.
- Wrap around center of bow and sew on back to pinch and shape.
- Bow Tails (make 2):
- With red, ch 21.
- Row 1: Sc in 2nd ch and across (20 sts). Ch 1, turn.
- Rows 2–5: Sc across, fasten off. Weave in ends. Sew behind bow body, angling both tails slightly outward.
- Bow Center Star Appliqué:
- With gold/yellow, MR, ch 1.
- Round 1: 5 sc in ring. Join with sl st. Fasten off, leave tail.
- Sew this in the center of the bow, optionally sew a small bead in the middle.
Part 4: Hanging Christmas Tree Centerpiece
- Tree Layers (Make 3, Smallest to Largest):
- With green, MR.
- Small (top): 5 sc in MR, join. Ch 1. *Sc, ch 2, sl st in next st* around (picot tips), fasten off. (5 picots)
- Medium (middle): 6 sc in MR, join. Ch 1. *Sc, ch 2, sl st in next st* around (6 picots), fasten off.
- Large (bottom): 8 sc in MR, join. Ch 1. *Sc, ch 2, sl st in next st* around (8 picots), fasten off.
- Sew gold/red beads randomly on each layer for ornaments.
- With green, MR.
- Tree Trunk:
- With brown, ch 6.
- Row 1: Sc in 2nd ch and each across (5), ch 1, turn.
- Rows 2–4: Sc across (5). Fasten off.
- Fold in half and sew ends together to make a trunk. Attach to the base of the largest tree layer.
- Layer Assembly:
- Using green yarn, stack the layers smallest to largest and sew together flat so that the tips are staggered, forming a tiered tree with the right side up.
- Add light fiberfill stuffing if desired for a slight 3D effect.
- Tree Topper Star:
- With gold/yellow, MR, ch 1, work *ch 4, sl st in 2nd ch, hdc in next ch, sc in next ch, sl st in MR* 5 times for 5 points. Tighten and sew to tree tip.
- Hanging Loop:
- With gold yarn, ch 20, fasten off.
- Sew top of tree and the gold loop together at the center back of the wreath so the tree hangs in the middle.
Part 5: Assembly
- Arrange and pin all flowers and baubles along the bottom and sides of the wreath, alternating colors and sizes for balance. Sew them down securely through several layers.
- Stitch the large bow to the very top center, making sure it sits flat.
- Add gold and pearl beads wherever desired for extra sparkle (flowers, berries, tree).
- Fasten the hanging tree by threading its loop through the top center of the wreath and securing firmly at the back.
- For hanging, crochet a sturdy green chain (~30 ch) and attach it to the top of the wreath, forming a loop.
Assembly and Finishing
- Sew all motifs to the wreath using a tapestry needle and yarn tails.
- Weave in all loose ends at the back of the work.
- If using a wire or hoop, ensure ends are covered or taped for safety.
- If desired, block the entire wreath lightly with a steam iron or mist bottle, shaping the wreath and each flower while damp to emphasize the petals and bow.
- Let all beads and glued elements dry securely before hanging.
Customization Ideas
- Try a frosty winter palette with icy blues, silvers, and white poinsettia flowers.
- Substitute the small red berries with crocheted holly leaves for extra greenery.
- Switch out the center tree for a star motif, gingerbread, or snowman applique.
- Use metallic thread for the bow or star for extra shimmer.
- Make multiple wreaths as miniature ornaments for the tree.
- Attach the motif to a pillow front, or use only the flower and bow motifs as present toppers.
Troubleshooting Tips
- Wreath curling: Adjust your tension and block the cover if it curls. A wire base helps maintain shape.
- Uneven edges: Lay the wreath flat and gently shape with your hands after crocheting each round or row.
- Motif sizing: If your motifs become too large or small, switch to a different hook or adjust your tension.
- Loose color changes: Always pull the yarn tight when joining new colors and weave in ends securely at color changes.
- Achieving consistent tension: Take breaks and keep your hands relaxed for uniform stitches.
Care Instructions
- Spot clean with a damp cloth. If needed, gently hand-wash in cool water and mild soap. Avoid wringing or twisting. Lay flat to dry, reshaping as needed.
- If decorated with beads, avoid soaking; spot-clean only.
Final Notes
Carefully check your stitch counts each round, and always adjust tension to keep each motif neat. Use your arrangement of flowers and berries as a personal creative touch and refer to the image as inspiration. Don’t hesitate to mix up colors or add your own embellishments, and enjoy crafting a one-of-a-kind holiday heirloom! Happy crocheting!