Introduction
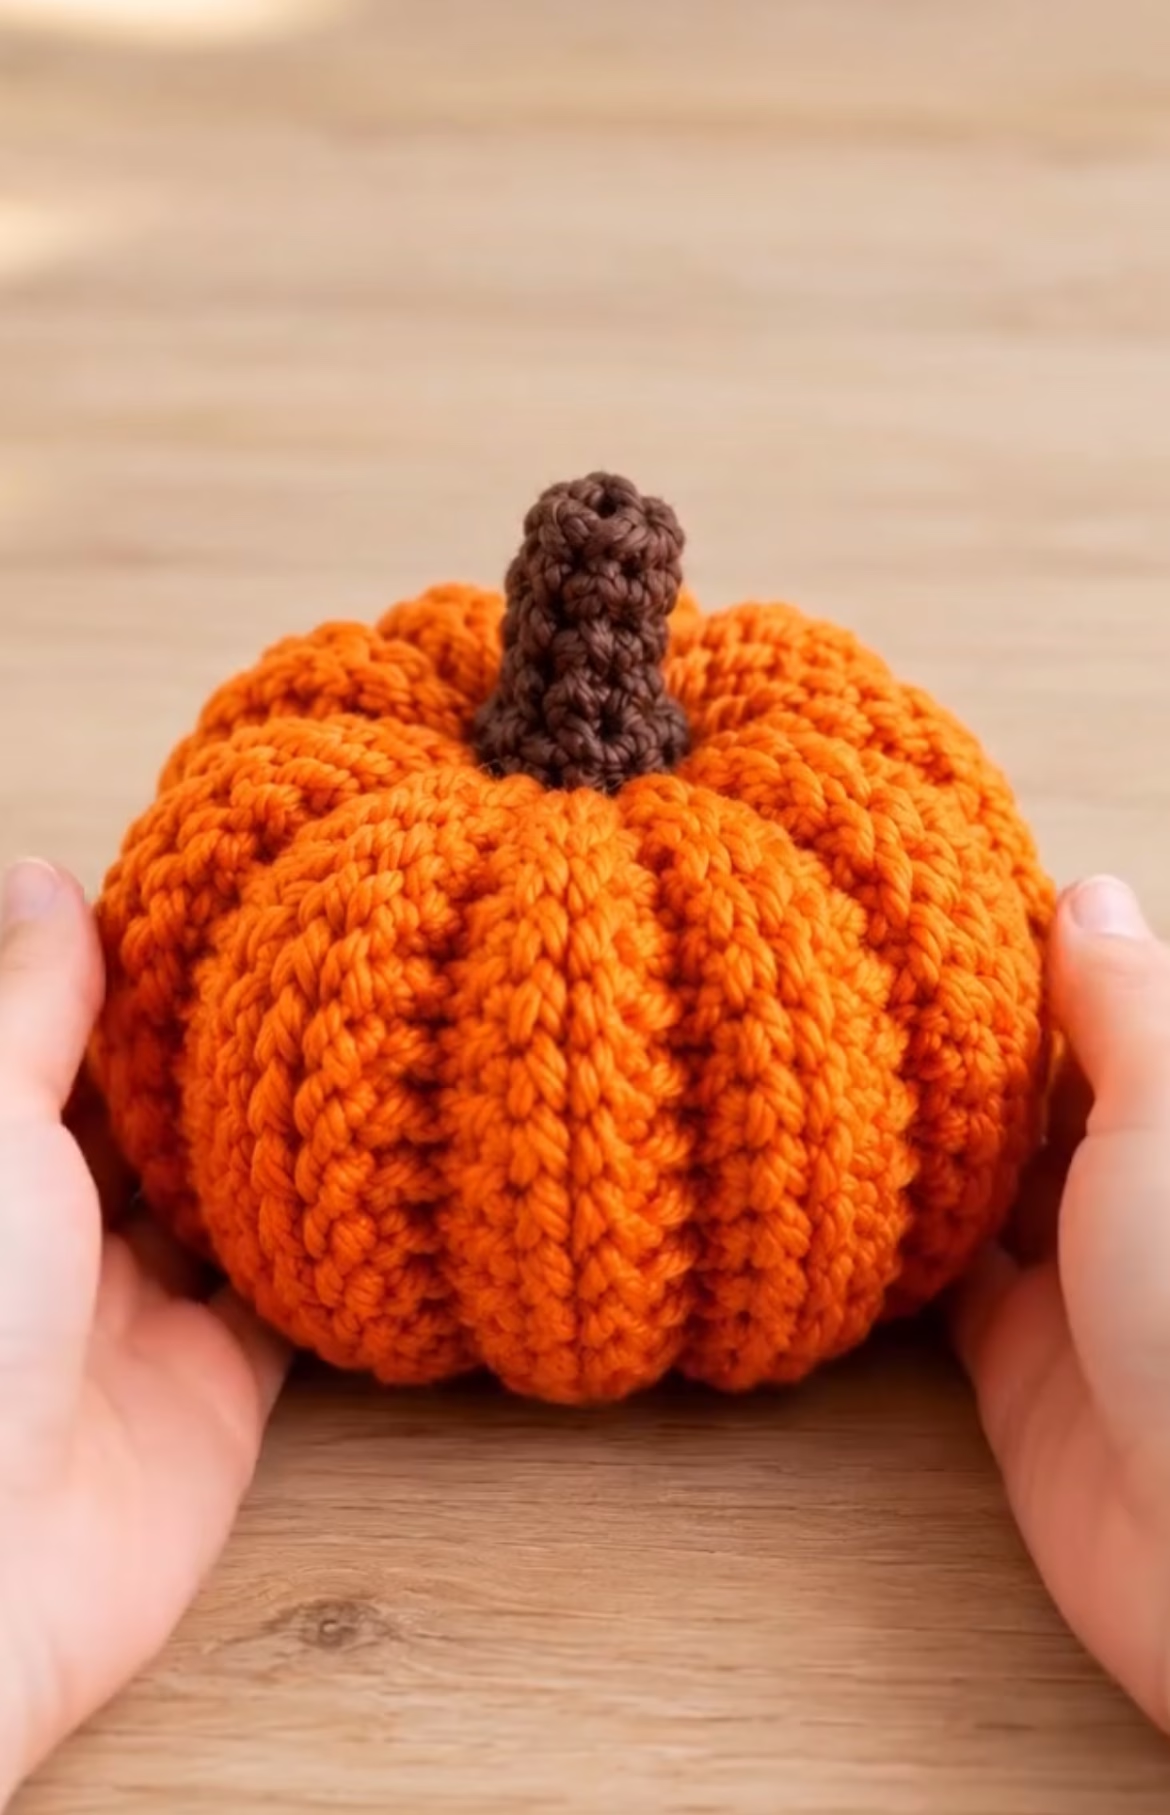
This crochet pumpkin is a true autumn delight, with its bold, plump shape and distinctive, deeply ridged ribs. Created in classic pumpkin orange with a dark brown stem, it captures all the charm of a harvest gourd. The texture is eye-catching and plush, making this pumpkin a statement piece for any fall display. Whether you’re looking to decorate your home, create a festive centerpiece, or make a cozy plush for a child, this project is the perfect choice. The realistic, chunky stem adds a fun touch and makes the overall appearance irresistibly cute and lifelike. Plus, it’s a wonderful stash-buster project that can be finished in an afternoon!
What makes this pumpkin truly interesting is its three-dimensional construction and the bold ridges that separate each segment. The finish is soft and inviting, and you can easily customize the size or colors to suit your style. Whether you want to make a single, oversized pumpkin or a playful patch of miniatures, you’ll love the relaxing rhythm of this construction. This pattern is satisfying for confident beginners and offers plenty to enjoy for seasoned crocheters as well.
Project Overview
The main body of the pumpkin is constructed as a rectangular panel worked in rows, using back-loop-only half double crochet (hdblo) to create pronounced ribs. The rectangle is then seamed to form a tube, cinched at both ends to achieve the pumpkin shape, and stuffed for fullness. The stem is worked separately in the round with basic stitches, then sewn to the center top of the pumpkin. The entire project is seamless except for the stem attachment and end closures, making it easy to assemble with minimal finishing.
Skill Level
Advanced Beginner. The project uses only basic stitches (chains, single crochet, half double crochet), with some shaping and assembly required. The ribbing effect is straightforward with back-loop-only stitching, and the construction is simple to follow. However, seaming and cinching the ends for shaping requires a little confidence with a tapestry needle.
Materials
- Worsted weight yarn (Category 4); 100% acrylic or cotton/acrylic blend for durability and easy care.
- Yarn amounts:
- Main color (pumpkin orange): approx. 90 g (≈ 150 yds/137 m)
- Stem color (dark brown): approx. 10 g (≈ 20 yds/18 m)
- 5.0 mm (H-8) crochet hook
- Tapestry needle
- Sharp scissors
- Polyester fiberfill or alternative stuffing
- Stitch markers (optional, for marking seam or rounds)
- Measuring tape
Finished Size
- Approx. 15 cm (6 in) diameter
- Approx. 10 cm (4 in) tall including stem
To adjust the pumpkin’s finished size, simply change the width or length of the body rectangle (explained below), or use a lighter or heavier weight yarn with an appropriately sized hook. Remember, changes in size will affect yardage and stuffing required.
Gauge
Approx. 13 stitches and 11 rows = 4 in (10 cm) in back-loop-only half double crochet, unstretched. Gauge is not critical for this project, but major changes will affect the final size and proportions. For best results, check your gauge with your chosen yarn and hook, and adjust as needed.
Stitches and Abbreviations
- ch – chain
- sl st – slip stitch
- sc – single crochet
- hdc – half double crochet
- blo – back loop only
- inc – increase (2 stitches in one stitch)
- dec – decrease (2 stitches together)
- st(s) – stitch(es)
- MR – magic ring
Important Pattern Notes
- For the pumpkin ribbing, always work hdc stitches in the back loop only (blo) unless otherwise indicated.
- Turning chains do NOT count as stitches unless specified.
- For the stem, rounds are worked in a continuous spiral. Use a stitch marker to mark the first stitch of each round if needed.
- When sewing the tube edges and cinching the pumpkin ends, use a long, sturdy yarn tail and gather tightly to avoid stuffing leaks.
- Color changes are made by finishing the final yarn-over of the last stitch of the row/round with the new color.
- The right side of the pumpkin body is the ridged, most textured side. Keep this side facing out as you assemble.
Detailed Crochet Pattern
Part 1: Crochet the Ribbed Pumpkin Body Panel
With orange yarn:
- Ch 31 (for approx. 15 cm height; to customize, use any chain number for desired pumpkin height).
- Row 1: Hdc in 2nd ch from hook and each ch across. (30 hdc). Turn.
- Row 2: Ch 1 (does not count as stitch); hdc in back loop only of each st across. Turn. (30 hdc)
- Repeat Row 2 for a total of 35 rows, or until the piece is approximately 35 cm (14 in) long (the length will become your pumpkin circumference). If you want a rounder pumpkin, add more rows; for a taller, thinner pumpkin, work fewer rows.
- At the end, fasten off, leaving a 45 cm (18 in) long tail for sewing.
You should have a ridged, flexible rectangle.
Part 2: Form the Pumpkin Tube
- Fold the panel in half so the short edges meet, with ridges running vertically. The right (ridged) side should be facing out.
- Using the long yarn tail and tapestry needle, sew the short edges together to form a tube. Use a whip stitch, mattress stitch, or preferred method, taking care to match up the ribbing for a neat seam. Fasten off and weave in starting tail only (leave the seaming tail for later).
Part 3: Cinch the Pumpkin Ends, Stuff, and Shape
- Bottom closure:
- Thread a long length of orange yarn onto your tapestry needle. Working along one open tube edge, weave the needle in and out through every row end, about 1 cm (1/2 in) from edge, all the way around.
- Gently pull to gather the opening tightly, cinching it closed. Secure with a knot, and weave yarn through the closed center several times for strength. (For extra durability on a toy, you may cross back and forth a few times to reinforce.)
- Stuff:
- Turn your tube so the seam is inside (if it’s not already), and stuff firmly with polyester fiberfill. Aim for a plump, even shape.
- Top closure:
- Thread a new long strand of orange yarn. Repeat the gathering process on the remaining open end as you did for the bottom. Pull closed, knot securely, and weave yarn in and out several times.
- Create pumpkin segments (optional, for deeply ridged look):
- Thread a long piece of orange yarn through the pumpkin, entering and exiting at the center of each gathered end.
- Bring the yarn up and over the outside, making it lay in one groove between the ridges, then pass through the pumpkin again at the same center points.
- Pull yarn gently to indent the grooves and create visible “pumpkin segments.” Repeat this step 6–8 times (evenly spaced around), depending on desired number of visible segments.
- Adjust the shape as you go. Knot and weave in ends securely.
Part 4: Crochet the Pumpkin Stem
With brown yarn:
- Make a magic ring (MR). Work 6 sc in MR. Do not join; work in a spiral. (6 sc)
- Round 2: [inc in next st] 6 times. (12 sc)
- Round 3: [sc in next st, inc in next st] 6 times. (18 sc)
- Round 4: Sc in each st around. (18 sc)
- Round 5: [sc in next st, dec over next 2 sts] 6 times. (12 sc)
- Rounds 6–11: Sc in each st around. (12 sc per round; work even to create stem height)
- Round 12 (optional): [dec over next 2 sts] 6 times. (6 sc) — This creates a subtle narrowing at the top.
- Stuff base lightly.
- Fasten off, leaving a long tail for sewing. Weave in initial end; use the long tail to stitch stem to pumpkin center.
For a longer stem, add extra plain sc rounds. For a thicker stem, start with more increases or use a larger hook/yarn.
Part 5: Assembly
- Position the stem over the pumpkin’s top center where it was cinched closed. Use the long brown yarn tail and a tapestry needle, and sew the stem all around its base to the pumpkin, stitching securely.
- Knot and weave in all yarn tails securely on the wrong side or inside. Shape the stem upright as desired.
- Gently mold the pumpkin body, pulling at the ribbed segments if needed to accentuate the ridges. Adjust the stuffing for evenness.
Assembly and Finishing
After sewing all pieces together, double-check that the stem is centered and straight. Weave in all remaining ends by running the yarn back and forth through the fiberfill a few times—this helps to secure and hide them. If you want a perfectly round pumpkin, squish and gently roll the finished piece between your hands to smooth out any lumps. For best appearance, lightly shape the indentations between each ribbed segment by tugging the indented yarn or gently pinching the grooves. Blocking is typically not needed for stuffed items, but you can mist the surface lightly and let dry to relax any persistent creases.
Customization Ideas
- Try alternative colorways: rich creams, pale greens, or bold yellows for a decorative gourd effect.
- Use chunky or super bulky yarn for a larger statement pumpkin; mini yarns for tiny table toppers.
- Add a face for a jack-o’-lantern look.
- Attach the motif to a wreath base, basket, or create a dangling garland.
- Stitch several together to form a pumpkin patch centerpiece.
- Use different fibers (velvet yarn, cotton thread) for different textures and uses (e.g. pincushion, toy, decor).
- Embroider vines or add felt leaves for extra details.
Troubleshooting Tips
- If the pumpkin body curls or the edges do not meet, check stitch count and tension. Block panel flat before seaming if necessary.
- Uneven or wavy edges may result from inconsistent turning chains; always use the same method and count correctly.
- If your pumpkin is too long/narrow or too short/wide, adjust the row or chain count on your panel to get the desired shape.
- Loose color changes will show on the stem; pull yarn snug at each change and weave in tails neatly.
- For bulging or lopsided pumpkins, don’t overstuff—add stuffing gradually and shape with your hands as you go.
- If the stem flops, use extra stiff stuffing at the base, or reinforce with a pipe cleaner or floral wire (for decorations only).
Care Instructions
- Spot clean with cool water and mild soap.
- For major cleaning, handwash gently and air dry flat.
- Keep away from direct heat when drying to avoid fiber warping.
- Store in a cool, dry place to maintain shape.
Final Notes
For best results, double-check your stitch counts after a few rows to keep your pumpkin proportions consistent. Adjust your tension if you notice the ribs pulling too tightly or the piece looking loose. Use the provided photo for visual guidance, but don’t be afraid to add your own creative touch with color or embellishments. Take your time with the cinching steps to ensure a plump, well-shaped pumpkin, and enjoy creating this cozy classic for your autumn collection!