Introduction
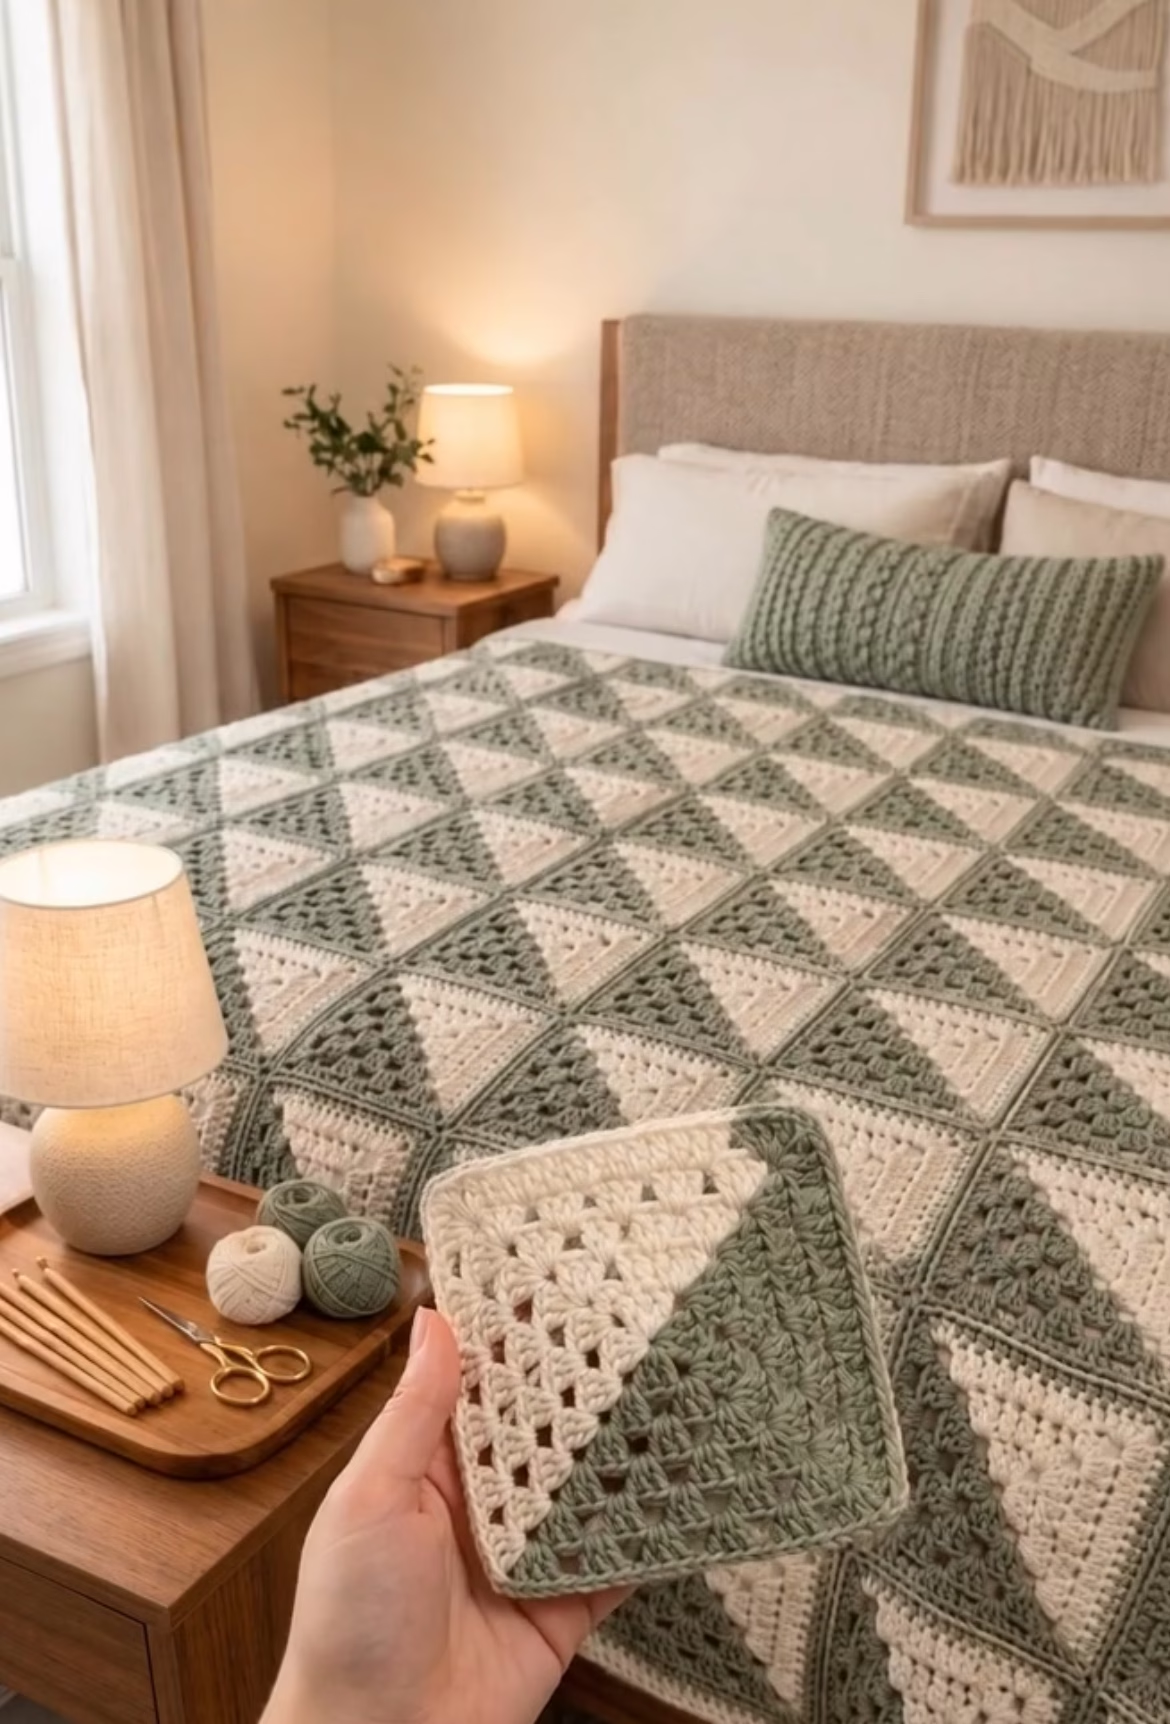
This project features a stunning, contemporary take on the classic granny square blanket. Each motif is worked up in two neat colors divided diagonally, creating a half-and-half effect. The squares are joined in an alternating orientation for a striking geometric pattern that’s both modern and stylish. The color scheme shown blends sage green and creamy off-white, giving a restful, Scandinavian-inspired vibe, but you can personalize the palette to suit your home.
The finished blanket showcases crisp squares with each half formed in a different color, bordered for definition and joined edge-to-edge. Its bold diagonals provide visual interest while the familiar granny stitch texture keeps it cozy and familiar. This blanket makes a perfect bedspread, sofa throw, or an impressive gift for special occasions. Crochet lovers will enjoy the repeatable motif and the flexibility to adjust the final size.
Besides being a delight to crochet, this project is ideal for stash-busting, learning crisp color-changes, and mastering the join-as-you-go method or traditional whipstitch join. The finished piece is both minimalist and timeless—a sure conversation starter anywhere you display it!
Project Overview
This crochet blanket is made from individual granny squares, each square split diagonally into two contrasting colors. The squares are crocheted in rounds, alternating colors at the midpoint, with a final single crochet border. All squares are then joined together in rows and columns, and a border is added around the whole blanket. The visual impact relies on alternating the direction of the color split in each motif when joining, forming a bold diagonal lattice across the blanket.
Skill Level
Advanced Beginner
While the granny square motif is a classic beginner technique, achieving the sharp half-and-half design and handling clean color changes requires a bit of practice. If you’re comfortable with basic stitches and changing yarn colors between rounds, you’ll find this pattern accessible and engaging.
Materials
- Yarn: Worsted weight (category 4) yarn. A smooth acrylic, cotton, or a soft wool blend works well. Example yardages for a large blanket (60 x 80 in/150 x 200 cm):
- Color A (Sage Green): approx. 900–1200 g (about 1800–2400 yards/1650–2200 m)
- Color B (Cream): approx. 900–1200 g (about 1800–2400 yards/1650–2200 m)
- Crochet hook: 5.0 mm (H-8) or size to obtain gauge
- Tapestry needle for weaving in ends
- Sharp scissors
- Stitch markers (optional, for marking rounds or corners)
- Measuring tape
Finished Size
The shown blanket is approximately:
- 150 x 200 cm
- 60 x 80 inches
Each granny square measures approximately 15 x 15 cm (6 x 6 inches) after blocking and joining. Adjust the total number of squares to change your finished size; for a throw, use fewer squares, for a king or queen bedspread, add more.
Gauge
Approximate gauge (after blocking):
- 1 granny square (6 rounds, bordered): 15 x 15 cm (6 x 6 inches)
Exact gauge is not critical, but all your squares should be the same size for smooth joining. A different hook or yarn weight will affect final dimensions. Adjust to get a square size you like!
Stitches and Abbreviations
- ch – chain
- sl st – slip stitch
- sc – single crochet
- dc – double crochet
- sp – space
- st(s) – stitch(es)
- FO – fasten off
- RS – right side
Important Pattern Notes
- Ch 3 at the beginning of a round counts as 1 dc unless otherwise stated.
- To create the half-and-half effect, you’ll work half the square in one color, join the second color at a diagonal midpoint, and finish the round.
- Join rounds with a sl st to the top of the beginning ch-3.
- Always change colors on the last yarn-over of the stitch before the color split for the neatest diagonal line.
- Weave in ends as you go to minimize finishing work.
- Squares are worked with RS facing throughout.
- Use stitch markers to mark corners if needed.
Detailed Crochet Pattern
Part 1: Half-and-Half Granny Squares
Each square is made in rounds. You’ll start at one corner working two sides with Color A, then switch to Color B for the remaining two sides, creating a diagonal split. Every square is bordered with your preferred color (suggested: cream).
Round 1
- With Color A, make a magic ring. Ch 3 (counts as first dc), 2 dc in ring, ch 2, [3 dc in ring, ch 2] twice. Join with sl st to the top of ch 3. (12 dc, 3 ch-2 spaces)
Round 2 (continue in Color A)
- Sl st in next 2 dc and in ch-2 sp. Ch 3 (counts as dc), 2 dc in same sp, ch 2, 3 dc in same sp (corner made), ch 1.
(In next ch-2 sp: 3 dc, ch 2, 3 dc), ch 1. Repeat for one more corner so you have made half of the square (one long side and two corners) with Color A.
Stop. Do not finish the rest of the square with Color A.
Change to Color B
- Join Color B in the next empty ch-2 corner space. Attach with a sl st, ch 3 (counts as dc), 2 dc in same sp, ch 2, 3 dc in same sp. Ch 1.
(Work in remaining side: 3 dc in ch-1 sp, ch 1). Join with sl st to top of Color A’s first ch 3.
At the end of Round 2, you have a square foundation split diagonally between Color A and Color B, with three corners each worked by each color.
Rounds 3–6: Expand the Square
Continue working granny square rounds, expanding each triangle in its color. Each round, begin in the ch-2 corner of the active color, working up one side and across the top, then change to the other color in the diagonal corner (use the last yarn-over of the last dc before the corner to switch). The division between colors always runs corner to corner diagonally.
Sample instructions for one more round:
- With Color A, attach yarn in the same starting corner as before. Ch 3 (counts as dc), 2 dc in same sp, ch 2, 3 dc in same sp, ch 1.
[For each ch-1 sp along this half: 3 dc in ch-1 sp, ch 1]. Stop at the diagonal midpoint (the next corner). - Change to Color B. In diagonal corner, join Color B, ch 3, 2 dc in same sp, ch 2, 3 dc in same sp, ch 1.
[Along that half: 3 dc in each ch-1 sp, ch 1]. Join with sl st to top of previous round’s ch 3. FO Color B.
Repeat as above, increasing the number of (3 dc, ch 1) clusters on each side every round, until your square is the desired size (6 rounds shown in image). Always maintain the sharp corner-to-corner color split. Weave in all ends.
Round 7: Optional Border
- With RS facing, join your preferred border color in any ch-2 corner sp. Ch 1 (does not count as st), (sc, ch 2, sc) in same sp. Sc in each dc and each ch-1 sp across all four sides, working (sc, ch 2, sc) in each corner. Join with sl st to first sc. Fasten off, weave in all ends.
This border evens out the edge and prepares squares for neat joining.
Part 2: Making All Motifs
Repeat Part 1 until you have the total required number of squares. Alternate which color starts each square, so when joining the blanket, you can rotate squares and create a checked/striped diagonal effect as shown.
Example size: 10 squares x 13 squares = 130 total squares for approximately 60 x 80 inches (150 x 200 cm). Adjust number as needed for your desired size.
Part 3: Joining the Squares
Lay out your squares on a large surface, alternating the orientation so that the diagonals create a continuous pattern across the blanket. Rows should alternate the direction of the color split for the optical effect seen in the photo.
Option 1: Whip Stitch Join
- With squares RS together, thread a long piece of border color yarn onto a tapestry needle. Whip stitch through the top loops of both motifs along one edge.
- Continue joining row by row, then column by column. Always match corners accurately for crisp seams.
Option 2: Join-As-You-Go (optional): On the final border round, work sc through both motifs at their touching edges, joining them directly. This is more advanced but gives a seamless look.
Part 4: Blanket Border
After all squares are joined, work a border around the whole blanket:
- Attach border color yarn in any corner ch-2 sp. Ch 1, (sc, ch 2, sc) in corner.
- Sc evenly all the way around, making sure to place (sc, ch 2, sc) in each corner and sc through every join and space for a smooth edge.
- Optional: Add additional rounds of sc, hdc, or dc for a wider border; use contrasting or matching color for accent.
- FO and weave in any remaining yarn tails securely.
Part 5: Finishing Touches
- Lay the finished blanket flat and steam block or wet block to straighten. Pin all edges and corners for a sharp result. Let dry thoroughly.
- Trim stray yarn ends as needed, double-check every seam for security.
Assembly and Finishing
After joining all your squares and adding the border:
- Lay the whole blanket out flat on a large surface to assess its shape. Smooth edges and align corners if needed.
- Use a tapestry needle to neatly weave in any remaining yarn tails on the WS.
- Gently block (steam or wet block) if your yarn allows, pinning the blanket to finished measurements. This even outs the motif size and helps corners lie flat.
- If required, go over joined seams with a tapestry needle and extra thread for reinforcement.
Customization Ideas
- Color schemes: Change up the two main shades for bold, bright, or subtle looks. Try monochrome, gradient, or rainbow for more visual impact.
- Yarn weight: Use DK for a lighter throw, or chunky for a heavier, faster-make blanket. Adjust hook size accordingly.
- Other uses: Make individual squares as coasters, join four or nine for a pillow front, or create sections for wall hangings or tote bags.
- Border options: Add a picot, scallop, or crab stitch border for a more decorative finish.
- Mashup: Alternate squares with traditional all-one-color granny squares for an even more dynamic design.
Troubleshooting Tips
- If your squares curl, try increasing your hook size, blocking the square, or loosening tension.
- Uneven edges? Be sure to count stitches per side before joining and check that you have corner to corner color transitions.
- Inconsistent square size: block each motif before joining, and use the same number of rounds for every square.
- Color changes looser or with gaps? Pull the yarn firmly after the change and weave in ends securely right after switching color.
- If the finished piece is wavy or ruffled, your border might be too tight or too loose—use the right hook size and sc evenly all the way around.
Care Instructions
- Hand wash or gentle cycle in cold water with mild detergent.
- Do not bleach.
- Lay flat to dry for best results; reshape edges and corners while wet.
- If using acrylic yarn, you may tumble dry low, but always check label recommendations.
Final Notes
Take time to count stitches at every round to ensure consistent square sizes. Adjust your hook to maintain even tension throughout. Refer to the image for color placement and diagonal orientation. Enjoy the mindful process of piecing together your beautiful modern project—your finished blanket is sure to be a showstopper!