📖 B. INTRODUCTION
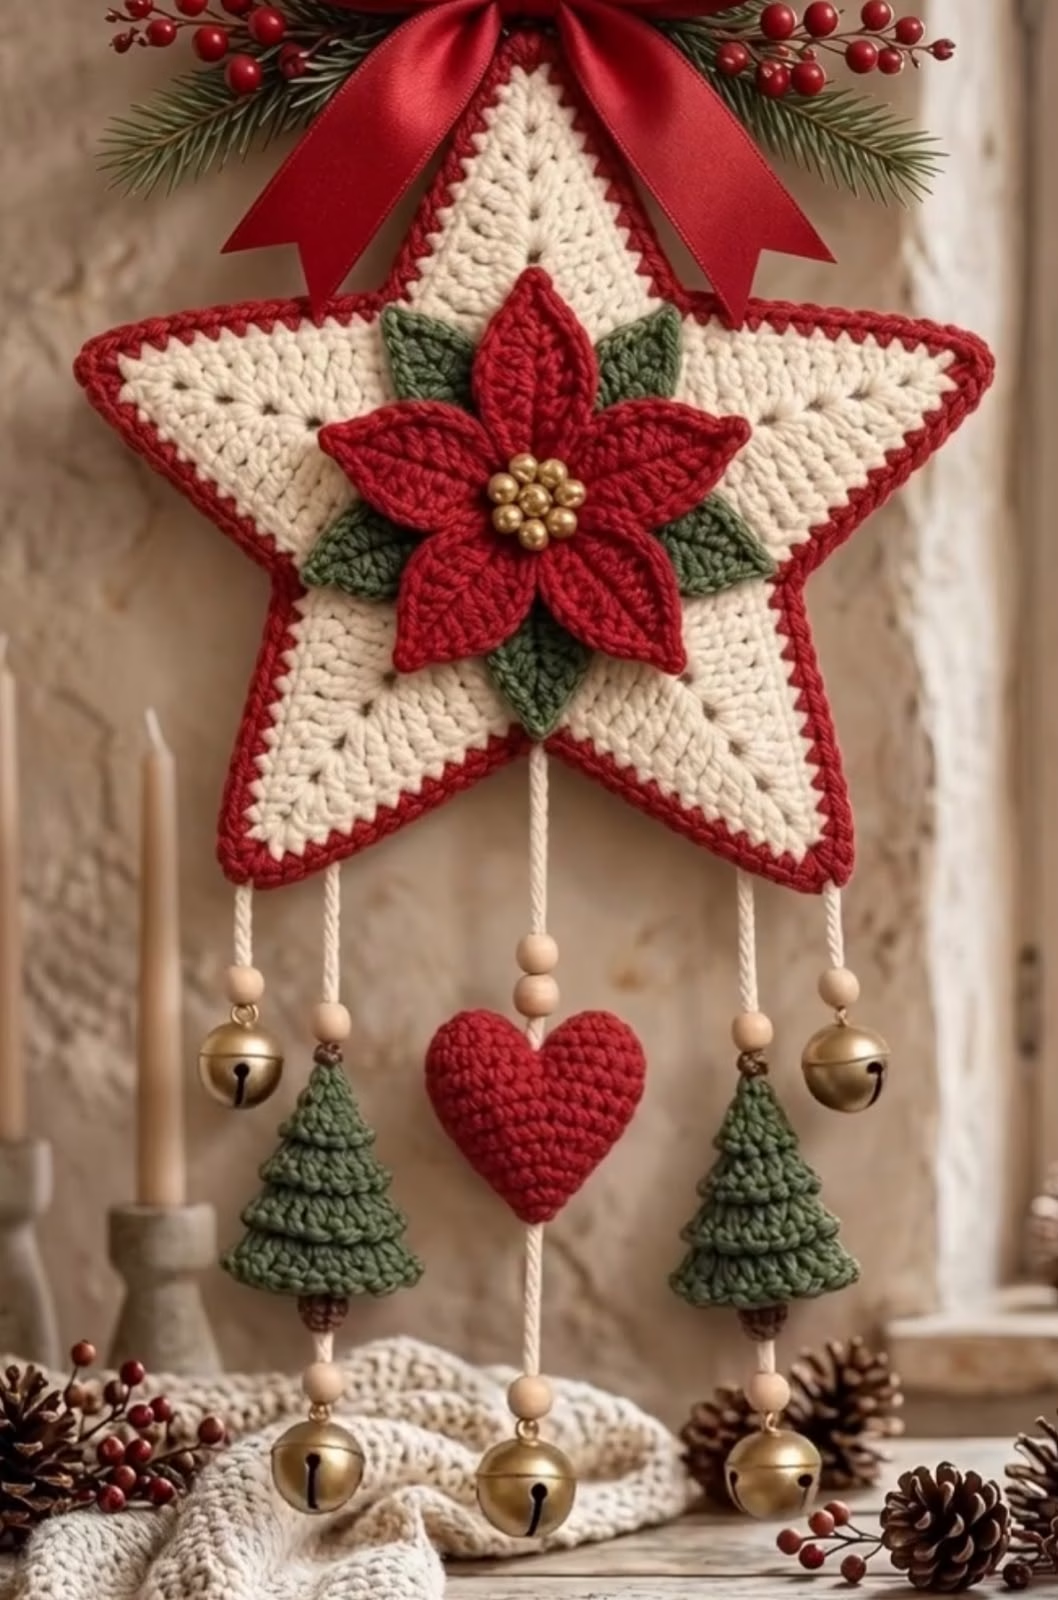
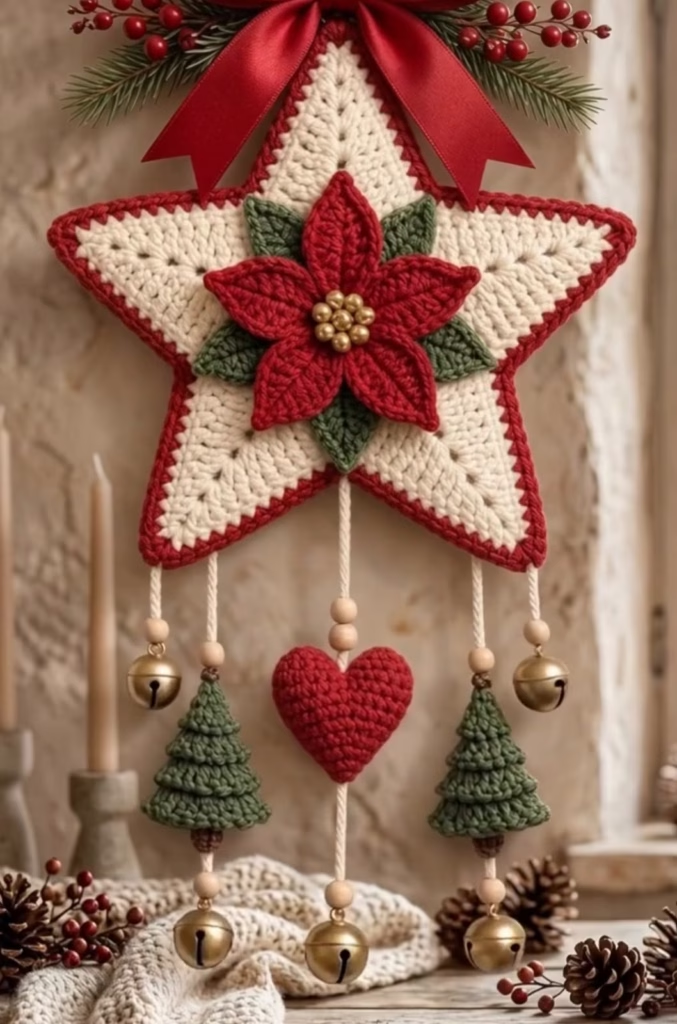
Transform your entryway or festive holiday mantel with this breathtaking Poinsettia Star Door Hanger. Designed as a grand statement piece, this pattern combines a structured 5-pointed cream base star edged in rich crimson with a dimensional 3D poinsettia focal flower, lustrous golden bead pistils, and rich evergreen leaves.
Dangling from the lower star points and valleys are delicate beaded cords carrying a stuffed 3D amigurumi heart, two textured mini pine trees, and rustic gold jingle bells that chime softly whenever the door moves. Crowned with a luxurious red satin ribbon bow and artificial pine sprigs with holly berries, this design embodies the warm, traditional spirit of Christmas craftsmanship.
Whether crafted as a treasured family keepsake, a festive housewarming gift, or an eye-catching craft fair display centerpiece, this project offers an engaging mix of techniques. From flat motif shaping and layered floral construction to small-scale amigurumi and decorative hardware assembly, each component builds into a heirloom-quality holiday decoration.
🔍 C. MAIN PATTERN OVERVIEW
This holiday door hanger is built from several modular crochet components assembled onto a structural cord framework:
- ⭐️ Main Base Star: A large 5-pointed motif worked in natural off-white yarn from a central pentagon base, extended with individual tapered point rows, and finished with a contrast crimson red single crochet border.
- 🌺 Center 3D Poinsettia: A two-tiered red flower with pointed petals, mounted over forest green background leaves and embellished with a cluster of shiny gold beads at its core.
- ❤️ Central Dangling Heart: A 3D amigurumi heart stuffed with fiberfill, suspended along the center vertical axis.
- 🌲 Miniature Textured Christmas Trees (Make 2): Layered, ridge-textured mini trees flanking the central heart.
- 🔔 Hanging Cords & Hardware: Five twisted yarn or jute cords strung with natural wooden beads and brass/gold jingle bells.
- 🌿 Top Topper: Finished with a classic red satin bow and decorative pine/holly berry sprigs at the hanging loop apex.
                     [ Hanging Loop & Pine Sprig ]
                             🎀 [Red Satin Bow]
                                  /  \
                                 / ⭐ \  <-- 5-Pointed Cream Star
                                /  🌺  \ <-- 3D Poinsettia & Leaves
                               /________\    with Gold Bead Center
                              / |  |  |  \
                             /  |  |  |   \
                     [Cord 1]   |  |  |   [Cord 5]
                        |       |  |  |      |
                       🪵       🪵  🪵 🪵      🪵
                        🔔      |  ❤️  |      🔔
                               🌲  |  🌲
                                |  🪵  |
                               🪵  🔔  🪵
                                🔔      🔔
🎯 D. SKILL LEVEL
Level: Intermediate 🎯
This project is ideal for crocheters comfortable with shaping geometric motifs, working small amigurumi parts, and assembling multi-piece decorative projects.
- 🧶 Techniques Used:
- 🔹 Working in continuous and joined rounds
- 🔹 Flat row short-shaping (tapered star points)
- 🔹 Single Crochet (sc), Half Double Crochet (hdc), Double Crochet (dc), Treble Crochet (tr)
- 🔹 Front Loop Only (FLO) and Back Loop Only (BLO) stitches
- 🔹 Amigurumi decreases (sc2tog / invisible dec)
- 🔹 Layering floral petals and mounting embellishments
- 🔹 Cord stringing, bead mounting, and bell knotting
📏 E. FINISHED SIZE
- 📐 Star Width (Arm to Arm): Approx. 28 cm (11.0 inches) wide.
- 📐 Star Height (Top to Bottom Point): Approx. 29 cm (11.5 inches).
- 📐 Total Hanging Length: Approx. 52 cm (20.5 inches) from top bow to lowest central jingle bell.
- 📐 Central Poinsettia Diameter: Approx. 12 cm (4.75 inches).
- 📐 Mini Trees Height: Approx. 6.5 cm (2.5 inches) each.
- 📐 Stuffed Heart Height: Approx. 5 cm (2.0 inches).
🧮 F. GAUGE
- 🧶 Star Gauge: 18 sc x 20 rows = 10 cm x 10 cm (4 in x 4 in) using a 3.5 mm (US E/4) hook.
- 💡 Tension Guidance: The base star requires a firm, tight gauge so the arms hold their flat shape without curling or sagging under the weight of the dangling cords and flower center.
🧶 G. REQUIRED YARN AMOUNTS
- 🧶 Yarn Specification: Worsted Weight (Category 4) or Light Aran Mercerized Cotton / Cotton Blend Yarn for crisp stitch definition and low stretch.
- 🎨 Color Breakdown:
- 🤍 Natural Cream / Off-White (Base Star): Approx. 85 grams (175 yards / 160 meters)
- 🔴 Crimson Red (Star Border, Poinsettia, Heart): Approx. 65 grams (135 yards / 123 meters)
- 🌲 Forest Green (Poinsettia Leaves, Mini Trees): Approx. 35 grams (72 yards / 66 meters)
- 🧵 Total Project Yarn: Approx. 185 grams (382 yards / 349 meters).
🧰 H. MATERIALS
- 🪡 Crochet Hooks: 3.5 mm (US E/4) for star and accessories; 3.0 mm (US C/2) for amigurumi heart/trees.
- 🧶 Yarn: Worsted/Aran Cotton in Cream, Crimson Red, and Forest Green.
- 🪵 Wooden Beads: 7 natural round wooden beads (12 mm – 14 mm diameter with 3 mm center holes).
- 🔔 Jingle Bells: 4 gold/brass vintage metal jingle bells (approx. 20 mm – 25 mm diameter).
- 🟡 Gold Center Beads: 7 small gold metallic or pearl round beads (5 mm – 6 mm) for poinsettia pistils.
- 🎀 Red Ribbon: 1 meter (1.1 yards) of 3.8 cm (1.5 inch) wide red satin ribbon for top bow.
- 🌿 Greenery Accent: Faux pine needle sprig with small red holly berries.
- ☁️ Stuffing: Premium polyester fiberfill (small handful for heart).
- ✂️ Tools: Sharp scissors, tapestry needle, stitch markers, hot glue gun or strong clear fabric glue.
⚠️ Safety Note: Ensure jingle bells and wooden beads are knotted tightly to cords. Keep out of reach of unattended small children.
🔤 I. ABBREVIATIONS – US TERMS
- ch: chain
- ch-sp: chain space
- dc: double crochet
- dec: decrease (sc2tog)
- FLO: front loop only
- BLO: back loop only
- hdc: half double crochet
- inc: increase (2 sc in same st)
- MR: magic ring
- picot: ch 3, sl st in 1st ch
- RS: right side
- sc: single crochet
- sc2tog: single crochet 2 stitches together
- sl st: slip stitch
- st(s): stitch(es)
- tr: treble crochet
- YO: yarn over
- WS: wrong side
- [ ]: work instructions within brackets into specified stitch/space
- ( ): total stitch count at end of round/row
📝 J. NOTES BEFORE YOU BEGIN
- 📌 Star Structure: The central star is constructed by crocheting a flat 5-sided pentagon in rounds. Each of the 5 triangular star points is then worked back and forth in short rows directly off one edge of the pentagon.
- 📌 Blocking is Crucial: Steam block the plain cream star before attaching the poinsettia or dangling cords to establish crisp geometric symmetry.
- 📌 Amigurumi Stuffing: Stuff the red heart firmly so it maintains its rounded 3D shape, but do not overstuff to the point where stitches stretch open.
- 📌 Cord Security: Double-knot all dangling cords at the back of the star and secure knots with a drop of fabric glue for lasting durability.
🪡 K. COMPLETE PATTERN
⭐️ Component 1: Main 5-Pointed Base Star
Part A: Central Pentagon (Cream Yarn)
Worked in joined rounds.
- Round 1 (RS): Into a MR, ch 3 (counts as 1 dc), 1 dc, ch 2, *[2 dc, ch 2]; repeat from * 3 more times. Join with sl st to top of starting ch-3.
(Count: 10 dc, 5 ch-2 sps — 2 dc per side) - Round 2: Sl st into first ch-2 sp. Ch 3 (counts as dc), [1 dc, ch 2, 2 dc] in same sp. *Dc in next 2 sts, [2 dc, ch 2, 2 dc] in next ch-2 sp; repeat from * 3 more times, dc in last 2 sts. Join with sl st to top of ch-3.
(Count: 30 dc, 5 ch-2 sps — 6 dc per side) - Round 3: Sl st into ch-2 sp. Ch 3 (counts as dc), [1 dc, ch 2, 2 dc] in same sp. *Dc in next 6 sts, [2 dc, ch 2, 2 dc] in next ch-2 sp; repeat from * 3 more times, dc in remaining 6 sts. Join with sl st to top of ch-3.
(Count: 50 dc, 5 ch-2 sps — 10 dc per side) - Round 4: Sl st into ch-2 sp. Ch 3 (counts as dc), [1 dc, ch 2, 2 dc] in same sp. *Dc in next 10 sts, [2 dc, ch 2, 2 dc] in next ch-2 sp; repeat from * 3 more times, dc in remaining 10 sts. Join with sl st to top of ch-3.
(Count: 70 dc, 5 ch-2 sps — 14 dc per side) - Round 5: Sl st into ch-2 sp. Ch 3 (counts as dc), [1 dc, ch 2, 2 dc] in same sp. *Dc in next 14 sts, [2 dc, ch 2, 2 dc] in next ch-2 sp; repeat from * 3 more times, dc in remaining 14 sts. Join with sl st to top of ch-3.
(Count: 90 dc, 5 ch-2 sps — 18 dc per side)
🧵 Fasten off Cream yarn.
Part B: Star Points (Make 5 — Worked onto Pentagon Sides)
Reattach Cream Yarn with a sl st to the first dc of any 18-dc side.
- Row 1 (RS): Ch 1, sc in same st and in each of the next 17 dc across side. Turn. (18)
- Row 2 (WS): Ch 1, sc2tog over first 2 sts, sc in next 14 sts, sc2tog over last 2 sts. Turn. (16)
- Row 3: Ch 1, sc in all 16 sts across. Turn. (16)
- Row 4: Ch 1, sc2tog, sc in next 12 sts, sc2tog. Turn. (14)
- Row 5: Ch 1, sc in all 14 sts across. Turn. (14)
- Row 6: Ch 1, sc2tog, sc in next 10 sts, sc2tog. Turn. (12)
- Row 7: Ch 1, sc in all 12 sts across. Turn. (12)
- Row 8: Ch 1, sc2tog, sc in next 8 sts, sc2tog. Turn. (10)
- Row 9: Ch 1, sc in all 10 sts across. Turn. (10)
- Row 10: Ch 1, sc2tog, sc in next 6 sts, sc2tog. Turn. (8)
- Row 11: Ch 1, sc in all 8 sts across. Turn. (8)
- Row 12: Ch 1, sc2tog, sc in next 4 sts, sc2tog. Turn. (6)
- Row 13: Ch 1, sc in all 6 sts across. Turn. (6)
- Row 14: Ch 1, sc2tog, sc in next 2 sts, sc2tog. Turn. (4)
- Row 15: Ch 1, sc in all 4 sts across. Turn. (4)
- Row 16: Ch 1, [sc2tog] x2. Turn. (2)
- Row 17: Ch 1, sc2tog. (1)
🧵 Fasten off. Repeat Rows 1–17 on the remaining 4 sides of the pentagon to form 5 complete points.
Part C: Crimson Contrast Outer Border
Join Crimson Red Yarn with a sl st in any inner valley (where two star points meet).
- Border Round:
- Work 1 sc in each row end up the sloped edge of the star point (17 sc).
- At the tip of the point, work [1 sc, ch 1, 1 sc] into the tip stitch.
- Work 1 sc in each row end down the opposite sloped edge (17 sc).
- At the inner valley corner, work a sl st into the center join.
- Repeat around all 5 star points. Join with sl st to first sc.
🧵 Fasten off and weave in all loose ends.
🌺 Component 2: Central 3D Poinsettia Flower & Leaves
Part A: Green Background Leaves (Make 4)
Using Forest Green Yarn.
- Foundation: Ch 11.
- Round 1: Working down chain: sl st in 2nd ch from hook, sc in next ch, hdc in next ch, dc in next 4 chs, hdc in next ch, sc in next ch, [3 sc] in last ch (leaf tip).
Rotate to work along opposite side of chain: sc in next ch, hdc in next ch, dc in next 4 chs, hdc in next ch, sc in next ch, sl st in starting ch.
(Leaf length: 10 sts per side + 3 tip sts)
🧵 Fasten off, leaving a 20 cm tail for sewing.
Part B: Large Outer Red Petals (Make 6)
Using Crimson Red Yarn.
- Foundation: Ch 10.
- Round 1: Sl st in 2nd ch from hook, sc in next ch, hdc in next ch, dc in next 3 chs, hdc in next ch, sc in next ch, [1 sc, picot, 1 sc] in last ch.
Rotate to work along opposite side of chain: sc in next ch, hdc in next ch, dc in next 3 chs, hdc in next ch, sc in next ch, sl st in first st.
🧵 Fasten off, leaving a sewing tail.
Part C: Small Inner Red Petals (Make 6)
Using Crimson Red Yarn.
- Foundation: Ch 8.
- Round 1: Sl st in 2nd ch from hook, sc in next ch, hdc in next 2 chs, sc in next 2 chs, [1 sc, picot, 1 sc] in last ch.
Rotate along opposite side: sc in next 2 chs, hdc in next 2 chs, sc in next ch, sl st in first st.
🧵 Fasten off, leaving a sewing tail.
Part D: Poinsettia Assembly & Bead Center
- Arrange the 4 Green Leaves in an “X” layout and stitch them together at their base ends.
- Layer the 6 Large Red Petals over the leaves in a circular star burst pattern.
- Layer the 6 Small Red Petals on top, staggering them between the large petals.
- Stitch through all layers at the central core to secure.
- Sew 7 small Gold Beads in a tight cluster in the center of the top petal layer.
❤️ Component 3: 3D Amigurumi Red Heart Charm
Using Crimson Red Yarn and 3.0 mm hook.
Lobe 1:
- Round 1: MR 6 sc. (6)
- Round 2: [inc] x6. (12)
- Round 3: [1 sc, inc] x6. (18)
- Rounds 4–5: Sc in all 18 sts around. (18)
🧵 Fasten off Lobe 1.
Lobe 2 & Heart Joining:
- Repeat Rounds 1–5 for Lobe 2. Do NOT fasten off.
- Round 6 (Joining Round): Sc in next 18 sts of Lobe 1, sc in all 18 sts of Lobe 2. (36)
- Round 7: Sc in all 36 sts around. (36)
- Round 8: [4 sc, dec] x6. (30)
- Round 9: Sc in all 30 sts around. (30)
- Round 10: [3 sc, dec] x6. (24)
- Round 11: Sc in all 24 sts around. (24)
- Round 12: [2 sc, dec] x6. (18)
☁️ Stuff heart firmly with fiberfill. - Round 13: [1 sc, dec] x6. (12)
- Round 14: [dec] x6. (6)
🧵 Fasten off, weave tail through FLO of remaining 6 sts, pull tight to close bottom point.
🌲 Component 4: Miniature Textured Christmas Trees (Make 2)
Using Forest Green Yarn and 3.0 mm hook. Worked top-down in back-loop ridge rounds to create branch layers.
- Round 1: MR 6 sc. (6)
- Round 2: [1 sc, inc] x3. (9)
- Round 3 (BLO): Sc in all 9 sts. (9)
- Round 4: [2 sc, inc] x3. (12)
- Round 5 (BLO): Sc in all 12 sts. (12)
- Round 6: [3 sc, inc] x3. (15)
- Round 7 (BLO): Sc in all 15 sts. (15)
- Round 8: [4 sc, inc] x3. (18)
- Round 9 (BLO): Sc in all 18 sts. (18)
- Branch Ruffle Round: Attach green yarn to front loop of Round 3. Work [1 sc, ch 2, 1 sc] into each FLO st around across Rounds 3, 5, 7, and 9 to create 4 tiered needle ruffles.
- Bottom Base Disk: MR 6 sc, Round 2: [inc] x6 (12), Round 3: [1 sc, inc] x6 (18). Stuff tree lightly, sew disk to bottom edge of Round 9.
🎨 L. STYLING / ASSEMBLY / STABILITY / FINAL SHAPING
  [ STAR BLOCKING ]        [ FLORAL MOUNT ]       [ CORDS & HARDWARE ]
 Steam star flat & sharp  Center 3D Poinsettia     Attach 5 beaded cords
   crimson borders        glued/sewn to star       with heart, trees, bells
         |                         |                          |
         v                         v                          v
  +--------------+        +-----------------+      +-------------------+
  | Rigid Base   | -----> | Vibrant Focal   | ---> | Harmonious Holiday|
  | Pentagon Star|        | Flower Center   |      | Wall/Door Hanger  |
  +--------------+        +-----------------+      +-------------------+
📌 Recommended Assembly Sequence:
- Mount Central Poinsettia: Center the assembled 3D Poinsettia (with green leaves and gold beads) on the cream star and sew/glue firmly to the pentagon core.
- Attach Top Topper & Loop:
- Attach a 25 cm cream cord loop to the top point of the star for hanging.
- Glue or stitch the faux pine branch and red holly berries behind the top point.
- Tie a full bow from 3.8 cm red satin ribbon and attach at the base of the top star point.
- Construct & Attach the 5 Dangling Cords:
- 🧵 Cord 1 (Far Left): Attach cream cord to left horizontal star tip. Thread 1 wooden bead, attach 1 gold jingle bell.
- 🧵 Cord 2 (Inner Left Valley): Attach cream cord to inner left valley. Thread 1 wooden bead, pass cord through center of 1 Mini Green Tree, thread 1 wooden bead, attach 1 gold jingle bell at the bottom.
- 🧵 Cord 3 (Center Valley): Attach cream cord to bottom center valley. Thread 2 wooden beads, pass cord through 3D Red Heart top-to-bottom, thread 1 wooden bead, attach 1 gold jingle bell at the bottom.
- 🧵 Cord 4 (Inner Right Valley): Attach cream cord to inner right valley. Thread 1 wooden bead, pass cord through center of 1 Mini Green Tree, thread 1 wooden bead, attach 1 gold jingle bell at the bottom.
- 🧵 Cord 5 (Far Right): Attach cream cord to right horizontal star tip. Thread 1 wooden bead, attach 1 gold jingle bell.
🎨 Final Finishing Checklist
- ✅ Star points are blocked flat, crisp, and symmetrical.
- ✅ Poinsettia sits dead-center with golden beads securely fastened.
- ✅ All 5 dangling cords hang straight without twisting or catching on star border.
- ✅ Red stuffed heart and mini green trees hang balanced vertically.
- ✅ Jingle bells are tied with double knots and secured with fabric glue.
- ✅ Red satin bow loops are fluffed and ribbon tails cut cleanly in inverted ‘V’ notches.
💡 M. HELPFUL CROCHET TIPS
- 💡 Tip 1 (Blocking Star Arms): Pin down every star tip and inner valley on a blocking mat and steam thoroughly. This prevents the arms from curling forward under the weight of the dangling elements.
- 💡 Tip 2 (Invisible Decreases): Use invisible decreases (sc2tog through FLO only) on the red heart to prevent small stuffing gaps.
- 💡 Tip 3 (Bead Hole Expansion): If your wooden bead holes are narrow, use a small round metal file or a yarn needle threader to pass cord strands easily through without fraying yarn.
- 💡 Tip 4 (Ribbon Tail Sealing): Lightly pass a flame from a lighter along the raw edges of your satin ribbon tails to seal them instantly against fraying.
- 💡 Tip 5 (Cord Equalization): Lay the star flat on a table when tying dangling cords so you can adjust lengths visually before securing final knots.
- 💡 Tip 6 (Stiffening Spray): For doors that open and close frequently, spray the back of the cream star with fabric stiffener spray to keep it perfectly rigid.
🧼 N. CARE INSTRUCTIONS
- 🧼 Cleaning: Spot clean gently with a damp cloth and cold water. Do not submerge the ornament in water to protect the wooden beads, metallic jingle bells, satin bow, and glue bonds.
- 🧼 Dusting: Dust periodically using a soft dry makeup brush or low-powered hand vacuum.
- 🧼 Seasonal Storage: Wrap flat between sheets of tissue paper and store in a sturdy box. Avoid crushing the 3D poinsettia petals or satin bow.
❓ R. FAQ
❓ Q1: Can I make this door hanger larger?
Yes! To increase the star size, simply add 1 or 2 extra rounds to the central pentagon (following the [2 dc, ch 2, 2 dc] corner increase logic) before starting the triangular star points.
❓ Q2: What type of yarn works best for door hangings?
100% Mercerized Cotton yarn (Worsted Weight) is best. It resists stretching, holds crisp geometric edges, and withstands door vibrations much better than soft acrylics.
❓ Q3: How do I attach the mini green trees to the cords?
Thread your tapestry needle with the hanging cord yarn, pass it directly through the center hole of the tree base disk up through the top tip of the tree, framing the tree with a wooden bead above and below.
❓ Q4: Can I glue the poinsettia instead of sewing it?
Yes! Hot glue or clear fabric craft glue works well to secure the poinsettia layer and top greenery sprigs. However, sewing provides long-term durability if hung outdoors or on heavily used doors.
❓ Q5: How do I keep the jingle bells from falling off?
Pass the cord strand through the bell loop twice to create a friction lock, tie a tight double knot, and apply a tiny drop of clear craft glue inside the knot.
❓ Q6: How long does this project take to complete?
Because it involves multiple small components, assembly usually takes between 3 to 5 hours total. It makes a satisfying weekend crochet project!