📖 B. INTRODUCTION
Bring a touch of warm, rustic elegance to your holiday decor with these handmade Boho Lace Christmas Tree Ornaments. Combining delicate openwork crochet stitches, natural wooden accent beads, textured fringed bases, and festive bow details, these handcrafted trees capture a vintage boho aesthetic that elevates any Christmas tree, mantle garland, or holiday gift package.
Whether you choose a classic monochrome cream palette or create striking two-tone color-blocked designs using deep forest green or crimson red, these ornaments are light, fast to stitch, and endlessly customizable. They make thoughtful handmade stocking stuffers, secret Santa presents, host gifts, and charming additions to winter craft market tables.
The openwork triangular body expands from top to bottom with scalloped branch edging, creating structural lattice windows along the center spine where natural wooden beads nestle seamlessly. Topped with a rustic wooden star, a neat wrapped yarn collar, a tiny red tie bow, and a golden ribbon bow, this project combines soft yarn craft with natural wooden elements for a truly timeless holiday keepsake.
🔍 C. MAIN PATTERN OVERVIEW
This project features a flat, openwork triangular crochet tree worked from the top apex downward using a combination of double crochet shells, chain spaces, and side picot branch details. The lower base is finished with brushed macrame-style yarn fringe, while the center vertical spine accommodates threaded natural wooden beads.
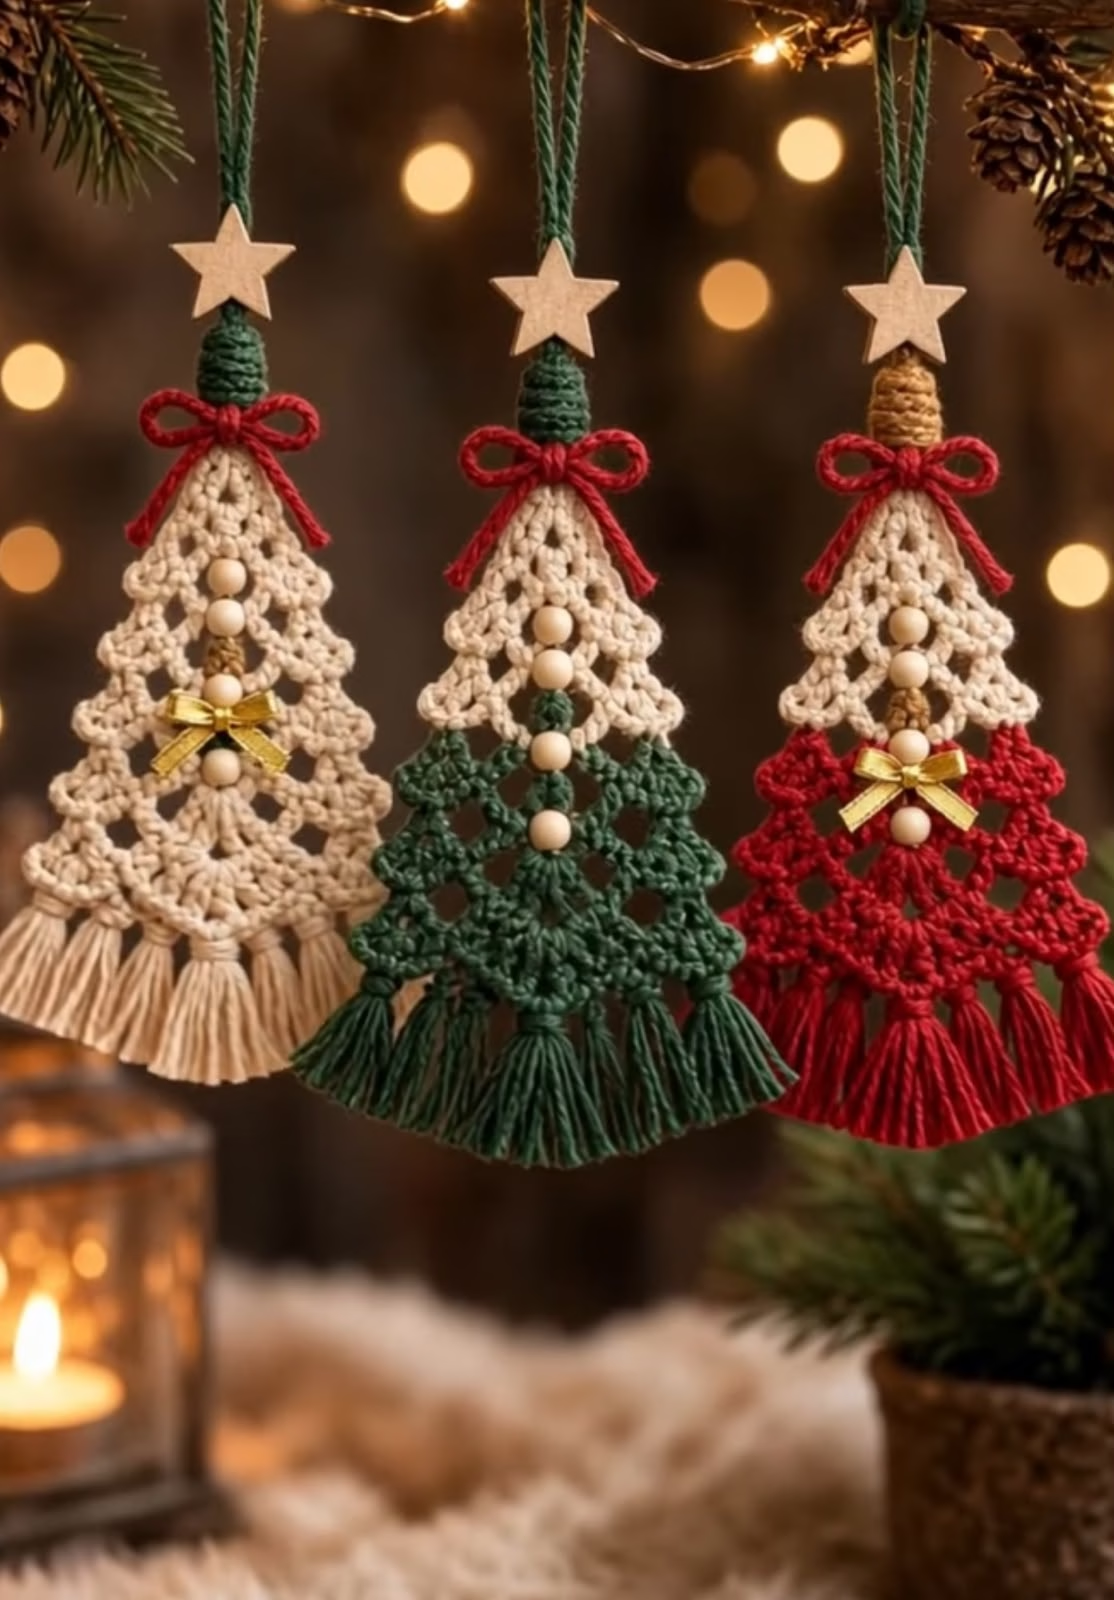
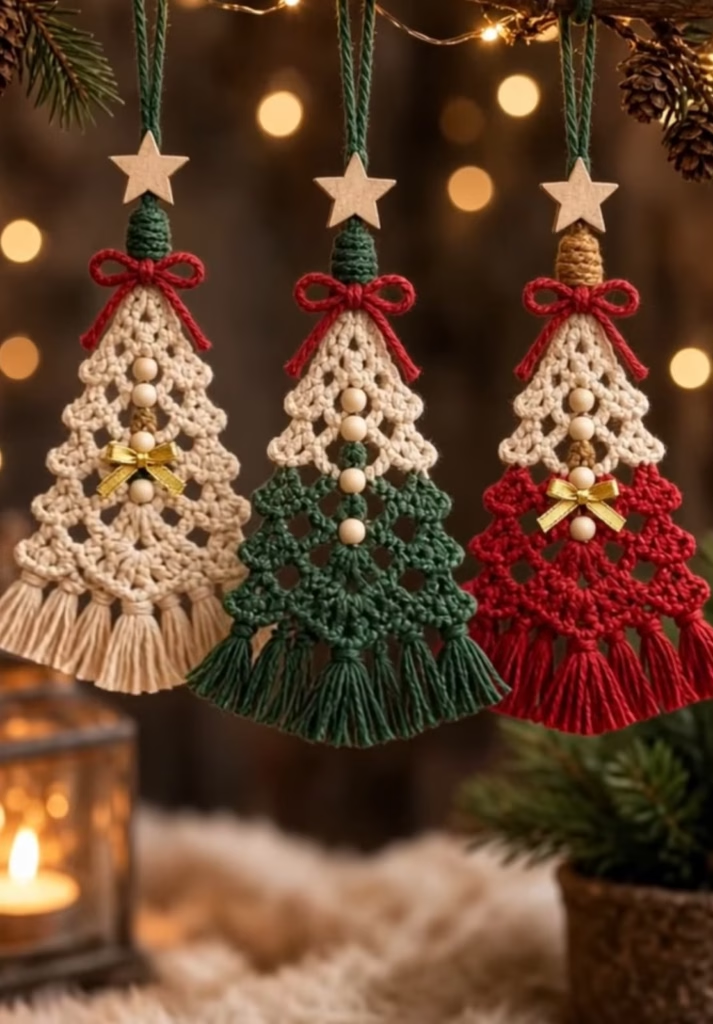
The design is presented in three color variations as shown in the reference image:
- 🤍 Classic Cream Solid: Crafted entirely in natural off-white cotton yarn with a red accent top bow, wooden beads, and a central gold metallic bow.
- 🌲 Woodland Two-Tone: Features a cream top section paired with a rich forest green lower half, red top bow, and center wooden beads.
- 🔴 Holiday Crimson Two-Tone: Features a cream top section paired with a deep crimson red lower half, red top bow, center wooden beads, and a gold ribbon accent bow.
                 [ Hanging Loop ]
                        |
                  ⭐ [Wooden Star]
                  🧶 [Wrapped Collar]
                  🎀 [Red Top Bow]
                       / \
                      /   \  <-- Scalloped Edge Branches
                     / 📿  \ <-- Wooden Bead Center Spine
                    /   📿  \
                   /  🎀 📿  \ <-- Gold Ribbon Bow
                  /_________ \
                  |||||||||||| <-- Macrame Fringe Base
🎯 D. SKILL LEVEL
Level: Easy to Intermediate 🎯
This pattern is well-suited for adventurous beginners and intermediate crocheters familiar with basic stitch construction and flat row shaping.
- 🧶 Techniques Used:
- 🔹 Magic Ring / Starting chain loops
- 🔹 Basic stitches: Single Crochet (sc), Double Crochet (dc), Slip Stitch (sl st)
- 🔹 Openwork chain-space lattice and shell stitches
- 🔹 Picot stitch edge shaping (ch 3, sl st into 1st ch)
- 🔹 Seamless color changing at row ends (for two-tone variants)
- 🔹 Stringing/attaching wooden beads onto crochet work
- 🔹 Attaching Lark’s Head Knot yarn fringe and precision combing/trimming
📏 E. FINISHED SIZE
- 📐 Height: Approx. 18 cm (7.0 inches) from top collar to bottom of fringe (excluding hanging loop).
- 📐 Width: Approx. 12 cm (4.75 inches) at the widest bottom fringe base.
- 📐 Thickness: Approx. 1 cm (0.4 inches) flat profile.
⚠️ Note: Variations in yarn weight, hook size, yarn tension, and fringe trimming length will alter final measurements.
🧮 F. GAUGE
- 🧶 Sample Gauge: 5 rows x 10 dc stitches = 5 cm x 5 cm (2 inches x 2 inches) using a 3.25 mm (US D/3) crochet hook.
- 💡 Tension Guidance: Gauge is not strictly critical for this ornament, but maintaining firm, consistent tension keeps the openwork lattice crisp and prevents the branch edges from drooping once hung.
🧶 G. REQUIRED YARN AMOUNTS
- 🧶 Yarn Specification: Fine / Sport Weight (Category 2) or Light DK (Category 3) 100% Mercerized Cotton Yarn for clean stitch definition and non-fuzzy structure.
- 🎨 Per Ornament Estimates:
- 🤍 Natural Cream / Ecru: Approx. 18 grams (38 yards / 35 meters)
- 🌲 Forest Green / Crimson Red (Optional Accent): Approx. 15 grams (32 yards / 29 meters)
- 🧵 Top Collar & Loop Strand (Forest Green or Jute): Approx. 3 meters (3.3 yards)
- 🎀 Red Bow Thread: Approx. 1 meter (1.1 yards) thin red embroidery floss or yarn
- 📦 Total Yarn per Ornament: Approx. 33–35 grams (70–75 yards / 64–68 meters) total.
🧰 H. MATERIALS
- 🪡 Crochet Hook: Size 3.25 mm (US D/3) or 3.50 mm (US E/4).
- 🧶 Yarn: Sport / DK Cotton Yarn in Cream, Forest Green, and Deep Crimson Red.
- 🪵 Wooden Beads: 5 natural round unfinished wooden beads (8 mm – 10 mm diameter with a 2 mm – 3 mm hole) per ornament.
- ⭐ Wooden Star: 1 flat wooden star embellishment (approx. 20 mm – 25 mm wide) per ornament.
- 🎀 Gold Ribbon: 15 cm (6 inches) of 6 mm wide metallic or satin gold ribbon per ornament.
- 🧵 Embroidery Thread: Bright red embroidery floss or thin yarn for top bow.
- ✂️ Craft Tools: Sharp fabric/yarn scissors, fine-tooth comb (for brushing fringe).
- 🪡 Tapestry Needle: Blunt yarn needle small enough to pass through wooden bead holes (or a thin wire loop tool).
- 🧴 Craft Adhesive: Small dab of clear craft glue or fabric glue for bow knots and star placement.
- 📍 Blocking Gear: Blocking mat and stainless steel pins (optional but recommended for steam blocking).
⚠️ Safety Warning: Contains small wooden beads and decorative components. Keep away from infants and pets to prevent choking hazards.
🔤 I. ABBREVIATIONS – US TERMS
- ch: chain
- ch-sp: chain space
- dc: double crochet
- inc: increase
- MR: magic ring
- picot: ch 3, sl st in 1st ch made
- RS: right side
- sc: single crochet
- sl st: slip stitch
- st(s): stitch(es)
- YO: yarn over
- WS: wrong side
- [ ]: work instructions within brackets into the specified stitch or space
- ( ): total stitch count at the end of the row
📝 J. NOTES BEFORE YOU BEGIN
- 📌 Construction Method: The tree body is worked flat in rows from the top peak down to the widest lower edge.
- 📌 Turning Chains: Ch 3 at the start of a row counts as 1 double crochet throughout.
- 📌 Two-Tone Color Transition: When making two-tone trees, execute the color change on the final Yarn Over (YO) of the last double crochet in Row 5.
- 📌 Bead Attachment Strategy: Beads are threaded down the central ch-2 spine using a tapestry needle after completing the crochet tree body to ensure perfect tension and alignment.
- 📌 Symmetry Verification: Always check that increases on the left and right sloped sides mirror each other exactly around the center ch-2 spine.
🪡 K. COMPLETE PATTERN
🎄 Component 1: Main Openwork Tree Body
Worked flat in turning rows from top apex to bottom base.
- Row 1 (RS): Using Cream Yarn, ch 4 (counts as 1 dc + ch 1 sp). Into the 4th ch from hook, work: [2 dc, ch 2, 2 dc, ch 1, 1 dc]. Turn.
(Count: 6 dc, 2 ch-1 sps, 1 center ch-2 sp) - Row 2 (WS): Ch 3 (counts as dc), work 2 dc into first ch-1 sp, ch 1, work [2 dc, ch 2, 2 dc] into center ch-2 sp, ch 1, work 3 dc into last ch-1 sp. Turn.
(Count: 10 dc, 2 ch-1 sps, 1 center ch-2 sp) - Row 3 (RS): Ch 3 (counts as dc), 2 dc in same first st, ch 1, [2 dc, ch 1] in next ch-1 sp, work [2 dc, ch 2, 2 dc] into center ch-2 sp, ch 1, [2 dc, ch 1] in next ch-1 sp, 3 dc in top of turning ch-3. Turn.
(Count: 14 dc, 4 ch-1 sps, 1 center ch-2 sp) - Row 4 (WS): Ch 3 (counts as dc), 2 dc in same first st, ch 1, [2 dc, ch 1] in next ch-1 sp, [2 dc, ch 1] in next ch-1 sp, work [2 dc, ch 2, 2 dc] into center ch-2 sp, ch 1, [2 dc, ch 1] in next ch-1 sp, [2 dc, ch 1] in next ch-1 sp, 3 dc in top of turning ch-3. Turn.
(Count: 18 dc, 6 ch-1 sps, 1 center ch-2 sp) - Row 5 (RS): Ch 3 (counts as dc), 2 dc in same first st, ch 1, *[2 dc, ch 1] in next ch-1 sp; repeat from * across to center ch-2 sp, work [2 dc, ch 2, 2 dc] into center ch-2 sp, ch 1, *[2 dc, ch 1] in next ch-1 sp; repeat from * across to last st, 3 dc in top of turning ch-3. Turn.
(Count: 22 dc, 8 ch-1 sps, 1 center ch-2 sp)
🧶 For Two-Tone Variants (Green/Red): Change to Accent Color on final YO of the last dc. - Row 6 (WS): [In Accent Color or Cream] Ch 3 (counts as dc), 2 dc in same first st, ch 1, *[2 dc, ch 1] in next ch-1 sp; repeat from * across to center ch-2 sp, work [2 dc, ch 2, 2 dc] into center ch-2 sp, ch 1, *[2 dc, ch 1] in next ch-1 sp; repeat from * across to last st, 3 dc in top of turning ch-3. Turn.
(Count: 26 dc, 10 ch-1 sps, 1 center ch-2 sp) - Row 7 (RS): Ch 3 (counts as dc), 2 dc in same first st, ch 1, *[2 dc, ch 1] in next ch-1 sp; repeat from * across to center ch-2 sp, work [2 dc, ch 2, 2 dc] into center ch-2 sp, ch 1, *[2 dc, ch 1] in next ch-1 sp; repeat from * across to last st, 3 dc in top of turning ch-3. Turn.
(Count: 30 dc, 12 ch-1 sps, 1 center ch-2 sp) - Row 8 (WS): Ch 3 (counts as dc), 2 dc in same first st, ch 1, *[2 dc, ch 1] in next ch-1 sp; repeat from * across to center ch-2 sp, work [2 dc, ch 2, 2 dc] into center ch-2 sp, ch 1, *[2 dc, ch 1] in next ch-1 sp; repeat from * across to last st, 3 dc in top of turning ch-3. Turn.
(Count: 34 dc, 14 ch-1 sps, 1 center ch-2 sp) - Row 9 (RS) – Picot Branch Base Row:
Ch 1, sc in first st, *[1 sc, picot, 1 sc] in next ch-1 sp, sc in next 2 sts; repeat from * across to center ch-2 sp, work [2 sc, picot, 2 sc] into center ch-2 sp, sc in next 2 sts, *[1 sc, picot, 1 sc] in next ch-1 sp, sc in next 2 sts; repeat from * across to last st, 1 sc in last st.
(Count: 16 picots along bottom edging)
🧵 Fasten off and weave in loose yarn ends securely on the wrong side.
📿 Component 2: Wooden Bead Spine Threading
- 🧵 Quantity: 5 natural wooden beads (8 mm – 10 mm).
- 🪡 Instructions:
- Thread a 40 cm strand of matching yarn (or thin durable thread) onto a tapestry needle.
- Anchor thread securely at the back of the Row 1 apex.
- Pass needle from back to front through the center space of Row 2, slide 1 wooden bead onto thread, then push needle back to front through Row 3.
- Continue down the center spine, threading 1 bead across every 1–2 rows until all 5 beads are aligned down the center axis.
- Fasten off firmly at the back of Row 8/9 and weave in thread ends.
🧶 Component 3: Macrame-Style Bottom Fringe
- ✂️ Strand Preparation: Cut 32 strands of yarn in the base color (Cream, Green, or Red), each 15 cm (6 inches) long.
- 🪡 Attachment Method:
- Group strands into pairs of 2.
- Fold each pair in half to form a center loop.
- Insert crochet hook from back to front through each bottom picot/chain space along Row 9.
- Catch the yarn loop with the hook and pull through slightly.
- Pull the free strand ends through the loop to form a Lark’s Head Knot.
- Pull tails firmly to tighten knot against the crochet edge.
- Repeat across all 16 spaces along the bottom tree base.
- Trimming: Lay tree flat on a hard surface. Gently comb strands straight using a fine comb. Using sharp scissors, trim fringe straight across in a subtle downward arc.
🎀 Component 4: Accent Bow Details
- 🔴 Top Red Bow: Using thin red embroidery floss or thin red yarn, tie a neat ribbon bow measuring approx. 2.5 cm wide with 2 cm tails.
- 🪙 Center Gold Ribbon Bow: Using 6 mm gold ribbon, tie a small bow measuring approx. 2 cm wide with angled ribbon tails.
⭐ Component 5: Topper, Neck Collar Wrap & Hanging Loop
- ➰ Hanging Loop: Thread a 30 cm piece of dark green yarn or jute cord through the top loop of Row 1. Tie tails together with an overhand knot to create a 10–12 cm loop.
- 🧶 Neck Wrap Collar: Take a 60 cm length of forest green or jute yarn. Wrap tightly around the top tip (Rows 1–2 area) 8 to 10 times to form a neat, solid wrapped collar. Secure end tightly at the back with a tapestry needle.
- ⭐ Star Attachment: Position small wooden star over the front center of the wrapped collar. Secure with a tiny dot of craft glue or stitch firmly through pre-drilled star holes if present.
🎨 L. STYLING / ASSEMBLY / STABILITY / FINAL SHAPING
  [ STEP 1: BLOCKING ]    [ STEP 2: HARDWARE ]      [ STEP 3: EMBELLISH ]
  Pin out side picots     Thread 5 center beads    Attach top star, red bow
  & steam tree flat       down central ch-2 spine   & gold middle bow
          |                          |                        |
          v                          v                        v
  +---------------+        +------------------+     +-------------------+
  | Crisp Shells  | -----> | Aligned Vertical | --> | Complete Boho     |
  | & Flat Lattice|        | Bead Center Line |     | Christmas Tree    |
  +---------------+        +------------------+     +-------------------+
📌 Recommended Step-by-Step Assembly Sequence:
- Steam Blocking: Pin the raw crochet tree body onto a blocking mat, pulling out each side picot point gently. Lightly steam with an iron (do not touch iron directly to acrylic/cotton) and let dry completely.
- Collar & Loop Attachment: Wrap top neck collar tightly with green yarn and insert hanging loop.
- Bead Spine Threading: Thread 5 wooden beads vertically down the center spine from top to bottom.
- Bottom Fringe Installation: Knot 16 pairs of yarn fringe along Row 9 using Lark’s Head Knots. Comb smooth and precision trim edge.
- Star & Bow Placement:
- Glue/stitch wooden star onto front center of wrapped neck collar.
- Sew red thread bow directly beneath wooden star.
- Sew or glue gold ribbon bow onto center spine between beads #3 and #4.
🎨 Final Finishing Checklist
- ✅ All 5 center beads align straight vertically without twisting.
- ✅ Wrapped neck collar is dense, tight, and conceals top yarn ends.
- ✅ Wooden star rests flat and straight facing forward.
- ✅ Red top bow and gold center bow are symmetrical with crisp cut tails.
- ✅ Fringe is combed straight, trimmed clean, and free of stray loose strands.
💡 M. HELPFUL CROCHET TIPS
- 💡 Tip 1 (Steam First): Always steam block the plain crochet tree before adding beads, star, or fringe. This ensures flat geometry without warping embellishments.
- 💡 Tip 2 (Bead Threading Trick): If wooden bead holes are small, fold a 10 cm piece of thin wire in half to create a DIY needle threader to pull yarn through smoothly.
- 💡 Tip 3 (Fringe Trimming Secret): Place a strip of masking tape straight across the combed fringe as a cutting guide to get an ultra-crisp, even edge.
- 💡 Tip 4 (Glue Security): Apply a tiny dab of clear fabric glue on the back side of bow knot ties so they never untie over time.
- 💡 Tip 5 (Tension Consistency): Keep chain stitches in the openwork lattice uniform so the center bead channel remains straight.
- 💡 Tip 6 (Stiffening Option): For extra crispness, spray the back of the finished crochet tree with fabric stiffener spray or diluted PVA glue before hanging.
🧼 N. CARE INSTRUCTIONS
- 🧼 Cleaning: Gently spot clean with a damp cloth and mild cool soapy water. Do not submerge wooden beads or star in water to prevent wood warping or finish discoloration.
- 🧼 Drying: Lay flat on a clean dry towel. Avoid wringing or twisting.
- 🧼 Fringe Maintenance: If fringe strands tangle after storage, comb gently with a clean fine-tooth comb.
- 🧼 Storage: Store flat between sheets of clean cardstock or tissue paper in a dry container to protect picot branch points and fringe.
❓ R. FAQ
❓ Q1: Can I use acrylic yarn instead of cotton yarn?
Yes, Category 2 or 3 acrylic yarn works well! However, 100% mercerized cotton gives superior stitch definition, crisper picot branch points, and a stiffer hang without curling.
❓ Q2: What if my wooden beads have holes too small for my tapestry needle?
Use a thin wire threader loop or coat the end of your yarn strand in clear nail polish/craft glue and roll it into a stiff point to string beads effortlessly.
❓ Q3: How do I stop the bottom fringe from fraying too much?
Mercerized cotton yarn naturally resists fraying. If using soft acrylic or unmercerized cotton, comb fringe gently and lightly mist with hairspray or fabric stiffener to set strands in place.
❓ Q4: Can I scale this pattern up to make a larger wall hanging?
Yes! Simply continue adding increase rows following the Row 4–8 logic (adding 4 dc per row) until reaching your desired width before working the final picot border and fringe.
❓ Q5: How long does it take to complete one ornament?
An experienced crocheter can finish one complete tree ornament (including bead threading, fringe trimming, and bow assembly) in approximately 45 to 60 minutes!
❓ Q6: What hook size should I use if I am a loose crocheter?
If you crochet loosely, drop down to a 2.75 mm or 3.0 mm hook to maintain tight, crisp openwork lattice windows that support the wooden beads properly.