📖 B. INTRODUCTION
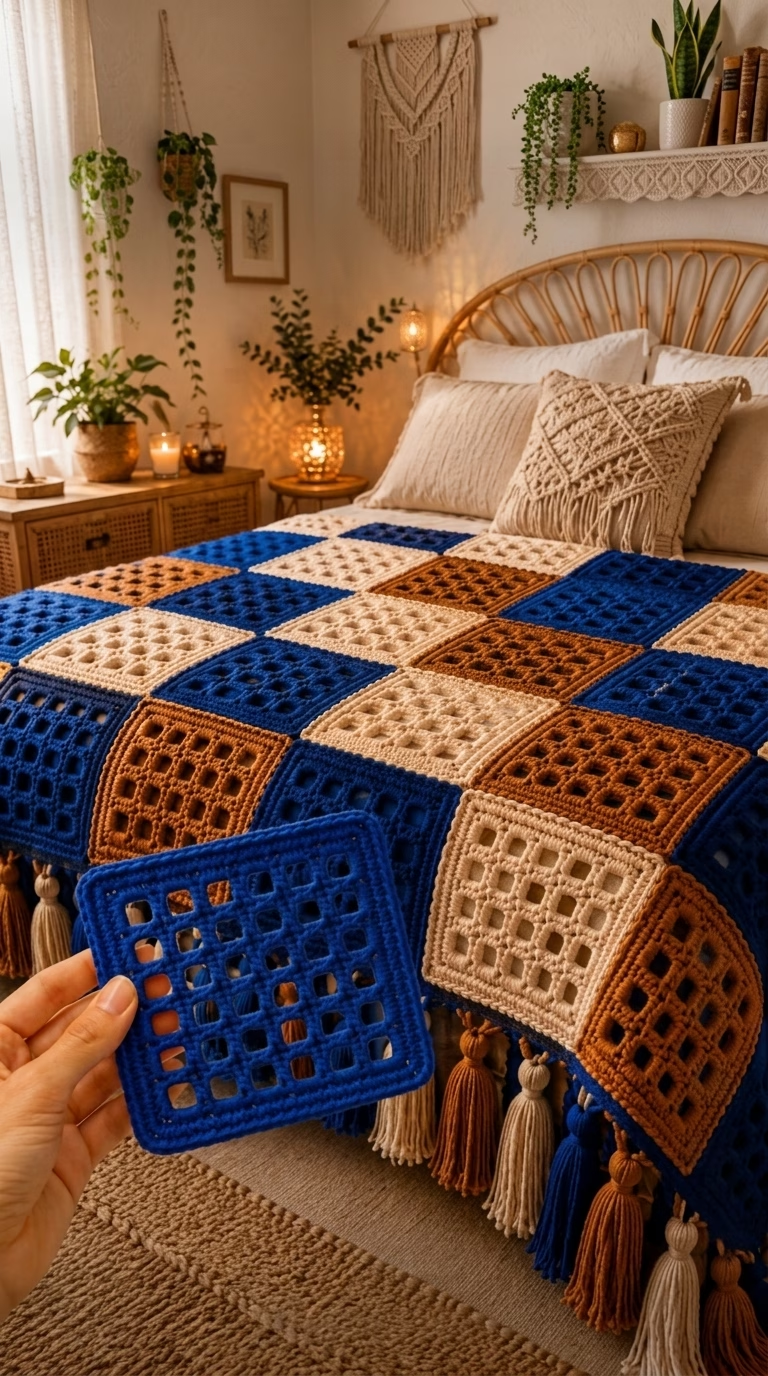
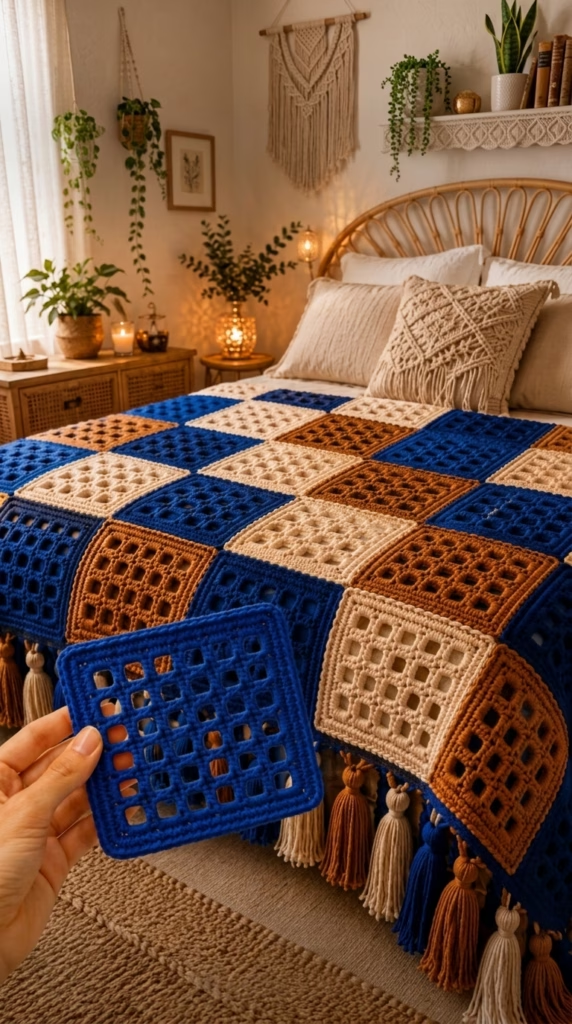
Bring modern architectural texture and rich color blocking into your home with the Geometric Waffle Grid Throw Blanket. This stunning afghan features a striking 5×5 open-lattice motif that creates a tactile, dimensional waffle tile. By assembling these individual structured squares in a balanced tri-color palette—deep cobalt blue, warm terracotta cinnamon, and soft oatmeal cream—you build an eye-catching heirloom throw that elevates any bed, sofa, or cozy reading nook.
Designed with modern bohemian living in mind, this project balances geometric precision with plush, relaxed comfort. Each square tile is framed by a crisp, corded border that gives the finished blanket structural integrity and clean seam lines. Decadent, oversized tri-color tassel fringe accents the ends, adding movement, weight, and a luxurious artisan finish.
Modular crochet blanket patterns are ideal for both on-the-go crafting and relaxing evening stitching. Instead of managing a heavy, full-sized blanket on your lap, you can craft one compact 8-inch tile at a time. This makes the project portable, manageable, and exceptionally satisfying as you watch your stack of colorful waffle tiles grow.
Whether you are crafting a showstopping housewarming gift, updating your bedroom sanctuary, or looking for a modern geometric crochet project to showcase high-contrast yarn tones, this comprehensive pattern provides every stitch count, seaming technique, and finishing detail you need to complete your own boutique-quality afghan.
🔍 C. MAIN PATTERN OVERVIEW
The Geometric Waffle Grid Throw Blanket is constructed by stitching 30 identical 5×5 waffle grid tiles, joining them into a 5-column by 6-row grid layout, and accenting the short ends with thick hand-crafted tassels.
+---+---+---+---+---+
| B | T | C | B | T |  Row 1 (Top)
+---+---+---+---+---+
| C | B | T | C | B |  Row 2
+---+---+---+---+---+
| T | C | B | T | C |  Row 3
+---+---+---+---+---+
| B | T | C | B | T |  Row 4
+---+---+---+---+---+
| C | B | T | C | B |  Row 5
+---+---+---+---+---+
| T | C | B | T | C |  Row 6 (Bottom)
+---+---+---+---+---+
 🪢   🪢   🪢   🪢   🪢   <- Oversized Tassel Fringe
 (B = Royal Blue | T = Terracotta | C = Cream)
- 🔲 5×5 Waffle Grid Tiles: Each tile is worked flat in a textured post-stitch lattice that creates 25 sunken open windows framed by raised structural ribs. A 2-round border surrounds each square, creating a smooth, corded framing edge.
- 🧩 Flat Slip-Stitch Joining: The tiles are seamed together along the back loops, resulting in invisible, flat seam lines that preserve the square geometry.
- 🖼️ Perimeter Edge: A simple, solid single-crochet border binds the entire afghan together for structural stability.
- 🪢 Chunky Tri-Color Tassels: Dense 6-inch tassels attached along the bottom and top edges add visual weight and draped elegance.
🎯 D. SKILL LEVEL
Skill Level: Intermediate
This pattern is best suited for crocheters who have mastered basic stitches and want to expand into front post techniques, gauge consistency, and modular assembly.
- 🧶 Techniques Involved:
- 🔹 Front Post Double Crochet (
FPdc) for lattice ribbing - 🔹 Working into chain spaces to create open grid windows
- 🔹 Working in back loops only (
BLO) for corded borders - 🔹 Modular block seaming (Flat Slip-Stitch Join)
- 🔹 Blocking acrylic/wool blend squares to precise dimensions
- 🔹 Making and trimming heavy yarn tassels
📏 E. FINISHED SIZE
- 📏 Individual Tile Size: 8 inches x 8 inches (20.5 cm x 20.5 cm) after light steam blocking.
- 📏 Throw Dimensions (Without Tassels): 40 inches wide x 48 inches long (102 cm x 122 cm).
- 📏 Total Dimensions (With Tassels): 40 inches wide x 60 inches long (102 cm x 152 cm).
⚠️ Note on Sizing: You can easily customize the overall blanket size by adjusting the number of tiles. Adding one additional column and row (36 tiles total) creates a twin-bed throw measuring 48 inches x 56 inches (122 cm x 142 cm).
🧮 F. GAUGE
- 🧮 Tile Gauge: 1 unblocked Waffle Grid Tile (through Row 11) = 7.5 inches x 7.5 inches (19 cm x 19 cm) using a 5.0 mm hook.
- 🧮 Stitch Gauge: 16 sts x 9 rows = 4 inches (10 cm) in standard double crochet.
💡 Gauge Note: Consistency between individual tiles is more important than matching exact gauge. Try to maintain uniform tension across all 30 squares so that joining proceeds smoothly without puckering.
🧶 G. REQUIRED YARN AMOUNTS
The pattern uses standard Worsted / Medium (Category 4) yarn. For crisp grid definition and soft drape, a high-quality acrylic, wool blend, or mercerized cotton blend is recommended.
- 🟦 Color A (Royal Blue / Cobalt): 4 skeins / approx. 880 yards (805 meters).
- 🟧 Color B (Warm Terracotta / Cinnamon): 4 skeins / approx. 880 yards (805 meters).
- ⬜ Color C (Oatmeal / Cream): 4 skeins / approx. 880 yards (805 meters).
- 🧵 Total Blanket Yardage: Approx. 2,640 yards (2,415 meters) total.
🧰 H. MATERIALS
- 🪡 Crochet Hook: 5.0 mm (US H-8) or size needed to obtain gauge.
- ✂️ Tapestry Needle: Large-eye blunt yarn needle for weaving ends and joining.
- 📏 Blocking Board & Pins: Foam blocking mats and stainless steel T-pins (essential for squaring up tiles).
- 📦 Tassel Template: A 6-inch (15 cm) wide piece of stiff cardboard or acrylic template for wrapping fringe tassels.
- ✂️ Scissors & Measuring Tape: For trimming tassels and measuring tile dimensions.
🔤 I. ABBREVIATIONS – US TERMS
ch= chain stitchsc= single crochethdc= half double crochetdc= double crochetFPdc= Front Post double crochet (yarn over, insert hook around post from front to back to front, complete dc)sl st= slip stitchBLO= Back Loop Onlyst(s)= stitch(es)sp(s)= space(s)ea= eachrep= repeatRS= Right SideWS= Wrong SideFO= fasten off
📝 J. NOTES BEFORE YOU BEGIN
- 📐 Grid Architecture: Each tile consists of a 5×5 lattice grid. The vertical grid lines are formed by
FPdcstitches worked on RS rows, while horizontal lattice bars are created by chain spaces and standard dc rows. - 🔄 Reversible Appearance: The RS displays crisp, 3D raised square frames. The WS displays a clean, woven mesh texture. Ensure all tiles face RS up during assembly.
- 🧵 Weaving Ends As You Go: Do NOT leave all ends to the very end! Weave in the starting and ending tails of each square as soon as you finish its border.
- 🔲 Blocking Importance: Steam blocking or wet blocking each tile to exact 8″ x 8″ dimensions before joining guarantees straight seams and perfect corner alignment.
🪡 K. COMPLETE PATTERN
🔲 Waffle Grid Tile Motif
- Purpose: Modular square tiles forming the main blanket body.
- Colors: Make 10 in Royal Blue, 10 in Terracotta, and 10 in Cream (30 total).
- Hook Size: 5.0 mm (US H-8).
[Row 1: 21 dc] ➔ [Rows 2-11: 5x5 Lattice Windows] ➔ [Border R1: sc frame] ➔ [Border R2: BLO corded sl st]
Grid Core (Worked Flat)
- Foundation Chain: Ch 23 loosely.
- Row 1 (RS – Solid Base): Dc in 4th ch from hook (skipped 3 chs count as 1st dc) and in ea ch across. Turn.
- (Stitch Count: 21 dc)
- Row 2 (WS – Grid Window Row 1): Ch 2 (counts as hdc here and throughout),
*FPdc around next st, ch 2, skip 2 sts*. Repeat from*to*5 times total. FPdc around next st, 1 hdc in top of turning ch. Turn. - (Stitch Count: 2 hdc, 6 FPdc, 5 ch-2 spaces = 5 open window spaces)
- Row 3 (RS – Grid Frame Row 1): Ch 2,
*FPdc around next FPdc, 2 dc in ch-2 sp*. Repeat from*to*5 times total. FPdc around last FPdc, 1 hdc in top of turning ch. Turn. - (Stitch Count: 21 total stitches across)
- Rows 4–11: Repeat Rows 2 and 3 sequentially four more times.
- (You will have 5 complete tiers of open grid windows stacked vertically).
- Row 12 (RS – Solid Top Edge): Ch 2, dc in ea st across. Do not turn or fasten off; proceed directly to Tile Border.
- (Stitch Count: 21 dc)
Tile Framing Border (Worked in the Round)
- Round 1 (RS – Base Frame):
- Top Edge: Ch 1, work 1 sc in ea st across to corner (21 sc). Work
(1 sc, ch 2, 1 sc)in top-right corner. - Side Edge 1: Work 19 sc evenly down the row ends to bottom corner. Work
(1 sc, ch 2, 1 sc)in corner. - Bottom Edge: Work 19 sc across foundation chain. Work
(1 sc, ch 2, 1 sc)in corner. - Side Edge 2: Work 19 sc evenly up row ends. Work
(1 sc, ch 2, 1 sc)in final corner. Join with sl st to first sc. - (Stitch Count: 21 sc per side + 4 corner ch-2 spaces)
- Round 2 (RS – Raised Corded Edge):
- Ch 1. Working in Back Loop Only (BLO) for the entire round, sl st loosely in ea sc around all 4 sides, working
(1 sl st, ch 1, 1 sl st)into ea corner ch-2 space. - Join with an invisible join to first sl st.
- 🧵 Fasten Off: Cut yarn leaving a 6-inch tail and weave in invisibly on the WS.
🧩 Tile Assembly & Layout Grid
- Purpose: Joining the 30 individual waffle tiles into a cohesive afghan.
- Method: Flat Slip-Stitch Join using matching or contrasting yarn.
Layout Diagram (5 columns x 6 rows):

Row 1: [ Blue ] [Terra] [Cream] [ Blue ] [Terra]
Row 2: [Cream] [ Blue ] [Terra] [Cream] [ Blue ]
Row 3: [Terra] [Cream] [ Blue ] [Terra] [Cream]
Row 4: [ Blue ] [Terra] [Cream] [ Blue ] [Terra]
Row 5: [Cream] [ Blue ] [Terra] [Cream] [ Blue ]
Row 6: [Terra] [Cream] [ Blue ] [Terra] [Cream]
- Arrange Tiles: Lay out all 30 blocked tiles RS up on a clean flat surface following the checkerboard grid above.
- Horizontal Joining:
- Place Row 1 and Row 2 tiles with Right Sides facing up.
- Using Cream yarn (or matching tile color), insert hook into the inner loops only of the bottom edge of Row 1 and top edge of Row 2.
- Work a loose Flat Slip Stitch across the entire row from left to right.
- Repeat for all horizontal seams across Rows 2–6.
- Vertical Joining:
- Working from top to bottom, flat slip-stitch down all vertical columns, crossing over the horizontal joins cleanly.
🖼️️ Outer Perimeter Border
- Purpose: Binds all outer raw tile edges into a clean, finished blanket rim.
- Yarn/Color: Royal Blue (or Cream).
- Hook Size: 5.0 mm.
- Round 1 (RS): Join yarn in any corner ch-2 sp. Ch 1,
(2 sc, ch 2, 2 sc)in corner sp. Work 1 sc in ea st around entire perimeter, placing 1 sc in ea seam junction. Work(2 sc, ch 2, 2 sc)in all 4 corners. Join with sl st to first sc. - Round 2 (RS – Finishing Rim): Ch 1, working in BLO, sl st loosely in ea sc around. Work
(1 sl st, ch 1, 1 sl st)in corners. Join with invisible finish.
🪢 Hand-Crafted Chunky Tassels
- Purpose: Decorative heavy fringe along short top and bottom ends.
- Quantity: Make 12 oversized tassels total (4 Blue, 4 Terracotta, 4 Cream).
[Wrap yarn 30 times around 6" template] ➔ [Tie top wrap ring] ➔ [Bind neck 1" down] ➔ [Trim bottom loops]
- Wrapping: Wrap chosen yarn color 30 times around a stiff 6-inch (15 cm) cardboard template.
- Top Secure Tie: Thread a 12-inch piece of yarn under the top loop wrap and tie a tight double knot. Leave long tails for attaching.
- Cutting Base: Cut the bottom strands across the cardboard edge.
- Neck Binding: Wrap a separate 10-inch yarn strand tightly around the tassel neck (1 inch down from top fold) 5 times. Knot securely and pull ends inside the tassel core using your tapestry needle.
- Trimming: Trim tassel ends evenly to a crisp 5.5-inch length.
- Attachment: Secure 1 tassel to each lower and upper corner, plus evenly space 4 tassels across the bottom and top border seams.
🎨 L. STYLING / ASSEMBLY / STABILITY / FINAL SHAPING
📐 Tile Symmetry & Blocking Guidelines
Because post stitches create tension pull, unblocked squares may bow slightly inward. Steam blocking is crucial for clean geometric tile alignment:
- Pin each tile to a foam blocking board, placing T-pins in each corner ch-2 sp to stretch the square to exactly 8″ x 8″.
- Hold a garment steamer 2 inches above the acrylic/cotton fabric, allowing steam to penetrate the fibers.
- Gently smooth the raised grid ribs with your fingertips so windows settle into crisp 5×5 squares.
- Allow to cool and dry completely before unpinning.
🔢 Recommended Assembly Sequence
1. Crochet 30 Tiles ➔ 2. Steam Block Squares ➔ 3. Flat Seam Horizontal Rows ➔ 4. Flat Seam Vertical Columns ➔ 5. Work Perimeter Rim ➔ 6. Attach Tassels
- Step 1: Stitch 10 Blue, 10 Terracotta, and 10 Cream Waffle Grid Tiles.
- Step 2: Steam block all 30 tiles to uniform 8″ x 8″ dimensions.
- Step 3: Join horizontal seams 1 through 5 using flat slip stitching.
- Step 4: Join vertical seams 1 through 4.
- Step 5: Work Rounds 1 & 2 of the Outer Perimeter Border around the afghan.
- Step 6: Attach the 12 chunky tassels along top and bottom border joins.
✅ Final Finishing Checklist
- ✅ Grid Alignment: Do all vertical post-stitch grid lines align seamlessly across square joins?
- ✅ Flat Seams: Are slip-stitch seam joins flexible and flat without puckering?
- ✅ Tassel Security: Are all 12 tassels double-knotted through border stitches so they survive washing?
- ✅ Color Balance: Does the checkerboard layout alternate colors without two identical squares touching?
- ✅ Woven Ends: Are all yarn tails secured invisibly inside the post stitch ribs on the WS?
💡 M. HELPFUL CROCHET TIPS
- 💡 Tip 1 (Mastering Post Stitches): Insert your hook completely under the post of the target stitch rather than into the top loops to create dramatic, 3D raised grid lines.
- 💡 Tip 2 (Preventing Seam Tightness): Use a 0.5 mm larger hook (5.5 mm) when working the Flat Slip Stitch join to prevent horizontal seams from pulling too tightly.
- 💡 Tip 3 (Chain Space Control): Keep your
ch-2grid window chains relaxed so the open mesh boxes remain square rather than distorted triangles. - 💡 Tip 4 (Batch Processing): Work in color batches! Crochet all 10 tiles of one color first to maintain uniform tension before moving to the next color.
- 💡 Tip 5 (Corner Precision): Always mark the
ch-2corner spaces of Round 1 border with stitch markers so you never miss a corner stitch during seaming. - 💡 Tip 6 (Tassel Density): Use a stiff acrylic or cardboard template when winding yarn for tassels so every tassel has identical strand length and thickness.
- 💡 Tip 7 (Tension Uniformity): Measure your first completed square. If it is smaller than 7.5 inches unblocked, switch to a 5.5 mm hook; if larger than 8.5 inches, drop to a 4.5 mm hook.
- 💡 Tip 8 (Seamless Weaving): Weave yarn tails through the thick vertical FPdc ribs on the WS of tiles—this hides ends completely within the 3D texture!
🧼 N. CARE INSTRUCTIONS
- 🧼 Washing: Hand wash or machine wash on delicate cycle inside a large mesh laundry bag using cold water and mild detergent.
- 🌀 Drying: Lay flat on dry towels to air dry. Reshape waffle tiles gently with your hands while damp. Do not tumble dry, as high heat can alter acrylic/wool fibers and frizzy tassel fringe.
- 🪢 Tassel Care: Comb tassel strands gently with a wide-tooth comb after washing to keep fringe neat and tangle-free.
❓ R. FAQ
❓ How long does it take to complete this blanket?
Each 8-inch waffle grid tile takes approximately 35 to 45 minutes to crochet. Total project construction, including blocking, seaming, and tassel making, takes roughly 25 to 30 crafting hours.
❓ Can I make a solid single-color version of this throw?
Yes! A monochrome version in solid cream or muted sage highlights the 3D geometric post-stitch texture beautifully, giving it a modern Scandinavian aesthetic.
❓ Is this pattern suitable for beginners?
If you know basic stitches (sc, dc, ch) and are ready to learn Front Post stitches (FPdc), this is a fantastic project to build intermediate skills! Working one small square at a time keeps learning manageable.
❓ What is the best yarn substitute for this pattern?
Any Category 4 Worsted/Aran weight yarn with good stitch definition works well. Excellent options include Lion Brand Wool-Ease, Caron Simply Soft, or Paintbox Yarns Simply Aran.
❓ Do I have to block the squares before seaming?
While not strictly mandatory, steam blocking is highly recommended. Blocking evens out stitch tension and square edges, making seaming much faster and visually seamless.
❓ How do I stop my tassels from unraveling in the wash?
Tie the top wrap and neck binding strands with tight double square knots, then use a tapestry needle to pull the knot ends directly down into the center core of the tassel before trimming.